
Red Hat blog
Memory lane
Remember your first senior sysadmin job? Your server fleet was tiny compared to today. You manually installed the OS on each server and named them after your favorite sci-fi characters. It was rare to get more than one or two new servers per year. When there was a request for a new service, you immediately knew which servers had the spare cycles to handle it because they were **your** servers. You'd start each day rotating backup tapes, cruising around the server room looking for red lights, and skimming logs looking for potential issues. Automation? Sure, that’s why you had crontabs and junior sysadmins. Hardware, operating system, storage, network, database, backups: you took care of it all. Those were the days. Well, except for all the lonely on-site evening and weekend work.
But then fleets started growing at unprecedented rates, much faster than staffing numbers at least. Hardware was getting denser. Virtualization became commonplace. Each sysadmin was responsible for more and more systems. Automated installation, monitoring and configuration management systems reduced the workload somewhat, but the servers were still managed and functioning essentially the same way. Some clever admins tried scripting their way out of this conundrum. But really all that accomplished was moving the problem from supported products to home-grown products. Eventually, it became apparent that traditional system administration methods did not scale.
Companies started compartmentalizing administration functions in reaction to massive growth. The importance of a sysadmin didn’t diminish rather the job became more specialized. Hardware, virtualization, backups, monitoring, operating system, storage, network and database admins were split into different groups. These groups were introducing disparate – and sometimes proprietary – administration products. Automation across silos? Probably not. Creative server names gave way to alphanumeric codes that designated location, business unit and function. The servers no longer felt like they were **yours** rather they were just company assets whirring away in a data center that you no longer had access to.
Night and weekend work persisted, but due to the functional silos, five people were involved instead of just one. So guess what? The siloed approach didn’t scale either.
Back to the future
We’re in an exciting time for enterprise computing. Open source is a household phrase. Tech that was solely for the big dot-coms a few years ago is now making its way into the corporate data center. Cloud computing and everything-as-a-service have completely transformed modern infrastructure and application design. Software-defined storage and networking have moved critical workloads away from high-priced, proprietary hardware onto x86 boxes.
Is there still a need for sysadmins? Of course, there is and I’d argue they’re in a much better position now than a few years ago. If your enterprise is planning a cloud initiative, there is probably a lot of work on your plate. On-premise cloud computing still requires system administration. Cultural shifts such as self-service, DevOps and agile development are being adopted to bring down the walls between groups. Taking full advantage of modern technologies and methodologies will require some big changes to system administration though. Even if your enterprise isn’t planning any major changes at this time, these are still valuable concepts that will help you contend with future growth.
So what is the first step? You need to practice some scalable skills. You can start today by modernizing how you interact with the machines you already have. Primarily you need to separate troubleshooting from administration. Aside from troubleshooting, everything that is done to a server can be automated. You need to start thinking about system administration not as a group of manual jobs, but as code. If you can repeat it, you can code it. If you can effectively document it, you can automate it. You just need to define what those things are, break them into the smallest blocks possible, then have a method of putting those blocks back together in multiple configurations.
Once you can conceptualize this, you can start using Ansible by Red Hat to manage your fleet.
For years, sysadmins have automated tasks using the tools they know: shell scripts, interpreted languages and agent-based configuration management. So what makes Ansible better than these tried and true methods?
For one, it’s an integrated approach; no longer do you need glue scripts to integrate multiple products. It’s agentless, the only software you need to install is on your control nodes. It uses ssh as its transport, so if you can ssh to a server or device, you can automate it. Plus, Ansible solves many scripting headaches:
-
Automatic fact gathering on managed nodes. No need to grep and awk through command line utilities, config files, or rely on a static inventory.
-
It’s idempotent. No more “>” vs “>>” errors. No matter how many times you re-run a playbook, the end state of the system will be the same.
-
Playbooks are written in YAML. Addressing problems with environment variables or incompatibilities between different implementations of your chosen shell.
-
YAML is very simple and straightforward. Reduced code complexity makes modularity and re-use much easier.
-
Step-by-step error checking and status reporting are built in. No need to constantly check return codes or string commands together with AND/OR operators.
-
Built in templating. No need to rely on an external configuration management system.
-
Parallel execution by default. Greatly reduces job run time without the need to write any batching functions.
Configuring an environment
If you are using Fedora, Ansible is available in the main repository. If you’re using Red Hat Enterprise Linux, you can install it from EPEL. Installation instructions for a wide array of operating systems are available at the main Ansible site.
Since it is agentless, there is nothing to install on the managed nodes, although there are a few requirements:
-
A recent version of Python 2 (at least 2.6). Python 3 support is in tech preview as of this writing.
-
Key-based ssh authentication, while not required in the strictest sense of the word, is highly recommended.
-
Passwordless privilege escalation of some form. The supported methods are listed here. Like key-based authentication, it is highly recommended.
And that is it. You’re ready to go.
Example
So now let’s get down to business. This example will configure web servers and deploy a web page. A fairly trivial task, but one that is easily expanded in later installments.
I have created three files:
-
hosts, an inventory list
-
index.html, a web page to deploy
-
web.yml, the Ansible Playbook
The inventory for this exercise is quite short. I used IP addresses because the managed nodes are just VMs running on my laptop. In production, either FQDNs or IP ranges would be more common. The hosts file contains:
[webservers]
192.168.124.124
192.168.124.178
The web page simply contains:
Deployed with Ansible!
I won’t go into great detail about the modules used in this Playbook as the main Ansible site offers very comprehensive documentation. But here are few pointers to keep in mind when writing Playbooks:
-
Always start with a line that contains three dashes. While this is not explicitly required, it makes modularization and code re-use easier in the future.
-
“become:” directives are used to escalate privileges on the managed nodes.
-
Always be descriptive when using “- name:” as these tags are what will appear in the output.
-
If you are working with the firewall on the managed host, always explicitly enable ssh. Remember ssh is used as the transport, accidentally closing it off would disable management on that node.
-
And most importantly, **indentation matters in YAML.** Allow me to repeat that, **indentation matters in YAML.** To automatically keep track of indentation, I configure vim to replace tabs with two spaces, automatically indent and alternate colors in the first few columns of YAML files. This is the config line from my .vimrc:
autocmd Filetype yaml setlocal tabstop=2 ai colorcolumn=1,3,5,7,9,80
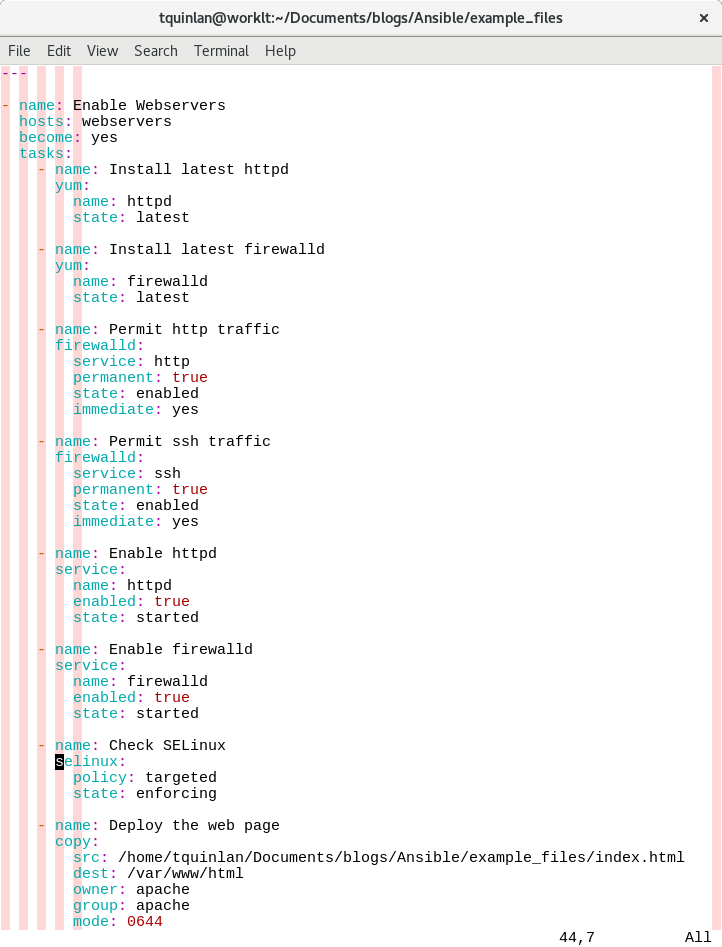
Sorry for the screenshot here, but I wanted to emphasize the formatting and column highlighting when editing the Playbook. I’ll make all the example files available for download. Even without studying the module documentation, it is pretty easy to follow along. The Playbook contains:
Finally, run the Playbook, specifying the inventory file with the -i switch:
$ ansible-playbook -i hosts web.yml
PLAY [Enable Webservers] ***************************************************

TASK [Gathering Facts] *****************************************************
ok: [192.168.124.178]
ok: [192.168.124.124]

TASK [Install latest httpd] ************************************************
changed: [192.168.124.124]
changed: [192.168.124.178]

TASK [Install latest firewalld] ********************************************
ok: [192.168.124.124]
ok: [192.168.124.178]

TASK [Permit http traffic] *************************************************
changed: [192.168.124.124]
changed: [192.168.124.178]

TASK [Permit ssh traffic] **************************************************
ok: [192.168.124.124]
ok: [192.168.124.178]

TASK [Enable httpd] ********************************************************
changed: [192.168.124.178]
changed: [192.168.124.124]

TASK [Enable firewalld] ****************************************************
ok: [192.168.124.178]
ok: [192.168.124.124]

TASK [Check SELinux] *******************************************************
ok: [192.168.124.178]
ok: [192.168.124.124]

TASK [Deploy the web page] *************************************************
changed: [192.168.124.178]
changed: [192.168.124.124]

PLAY RECAP *****************************************************************
192.168.124.124            : ok=9    changed=4    unreachable=0    failed=0
192.168.124.178            : ok=9    changed=4    unreachable=0    failed=0
Note that all the tasks were successful, however, some are marked as “ok” while others are marked as “changed.” In the output for TASK, “ok” denotes that the managed node was already configured while “changed” denotes that the managed node was changed to meet the requirements of that task. In this example, firewalld was already installed, while httpd was not. If I re-ran this Playbook, all the tasks should return as “ok.” In the PLAY RECAP for each managed node it states “ok=9 changed=4”. This indicates that all nine tasks are now considered “ok”, but it had to change four to get there.
Now I have two new web servers with firewalld and SELinux running:
$ curl 192.168.124.124
Deployed with Ansible!
$ curl 192.168.124.178
Deployed with Ansible!
Conclusion
The Playbook above is quite simple, but as this series progresses I will delve into more complex topics and examples. Hopefully, this post, combined with the official documentation, is enough to get you started with Ansible. If you would like formal training and certification, Red Hat offers DO407 Automation with Ansible and the associated exam. I have taken the course and I highly recommend it. This post is the first in a series. In future posts I plan to cover:
-
Templating
-
Modules and Roles
-
Setting up a DevOps environment
-
Ansible Galaxy
-
Ansible Tower

A Red Hat Technical Account Manager is a specialized product expert who works collaboratively with IT organizations to strategically plan for successful deployments and help realize optimal performance and growth. The TAM is part of Red Hat’s world-class Customer Experience and Engagement organization and provides proactive advice and guidance to help you identify and address potential problems before they occur. Should a problem arise, your TAM will own the issue and engage the best resources to resolve it as quickly as possible with minimal disruption to your business.