
Blog de Red Hat
Container-native applications are becoming more and more complex, consisting of various services and features, each component with its own security constraints and complex network policy rules. This makes it more difficult to perform day two operations once the cloud-native applications are deployed.
While upgrades, patches, and provisioning can be done using Ansible playbooks or Helm Charts, application lifecycle, storage lifecycle, and other deeper analysis cannot be done and requires application support team intervention.
Operator Framework initiative introduced Operator-SDK framework several years ago to standardize Kubernetes Operators development and make it easier for the Kubernetes community to create Operators and control container-native applications lifecycle.
Operator-SDK can create a boilerplate for Ansible and Helm Operators, build Operator container images, and much more. More about Ansible Operator.
When Kubernetes Operators were introduced, the only way to write an Operator was by writing one in Golang. At the time, the majority of application developers and platform engineers were new to the Golang programming language, and instead of creating a Golang Operator, they chose Ansible playbooks or Helm Charts to deploy and update container-native applications.
One of the benefits of Ansible Operator is that all Kubernetes objects (deployments, stateful sets, secrets, etc.) can be added to the Operator by using Ansible roles and playbooks with k8s Ansible module. More about k8s Ansible module.
Not all Operator types give the same level of capabilities. As per the below image, Helm Operator has some limitations at the time of writing. Ansible Operator is capable of providing the same level of customization and features as the Golang Operator:
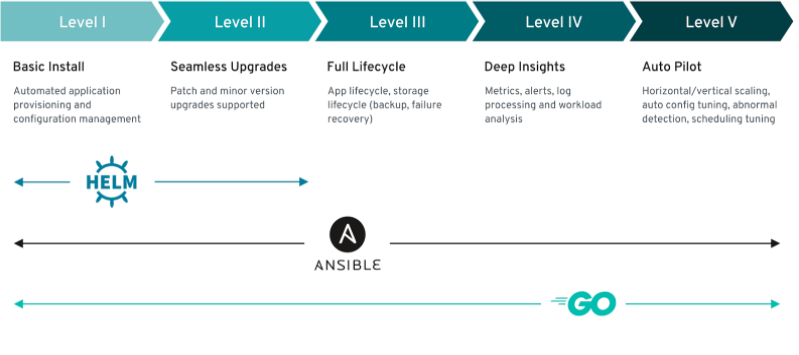 Source - Operator Framework documentation
Ansible Operator base image is written in Golang, however, it reads instructions written in YAML and uses the internal processes like Ansible runner and Proxy for reconciliation and communication with Kubernetes API. More about Ansible Operator information flows.
The majority of container-native application developers use YAML format for Kubernetes manifests. Ansible Operator makes it easy to transform and reuse those manifests to create an Operator. This blog post will go through the steps on how to create an Operator for Node.js application.
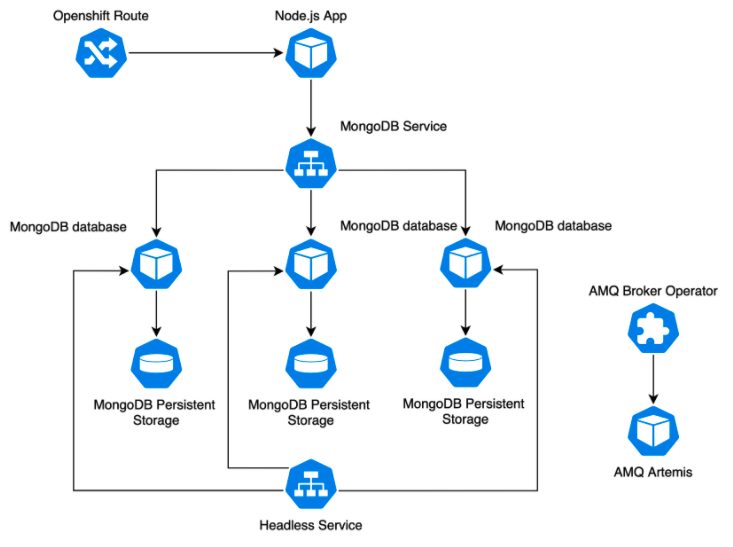
We will use a simple Node.js application that communicates with a stateful MongoDB database, which consists of three replicas and is synchronizing the data between its persistent volumes. We will also include AMQ Broker Operator with its custom resource. Even though the application won’t be talking with AMQ, we use it to show how other Operator Lifecycle Manager controlled Operators can be integrated into the new Operator.
Node.js application diagram is shown below:
Prerequisites:
- Operator-SDK v0.16.0+
- git
- oc 4.3+ client tool
- Container registry access
- docker v17.03+
Operator will be running on OpenShift Container Platform 4.3. Other Kubernetes platforms can be used; however, you might need to remove the AMQ Broker sections from the Ansible roles (in case the platform does not have Operator Lifecycle Manager, Operator Marketplace or Red Hat Catalog Source deployed) or replace it with any other available.
The first step is to download Operator-SDK binaries. For MacOS users Operator-SDK is available via Homebrew:
$ brew install operator-sdk
For other Operating Systems, follow the guide:
Kubernetes Operator is watching Custom Resources for changes (or creation/deletion). Once the Custom Resource is created, the Operator will start provisioning Kubernetes objects according to its known rules and will ensure every component is configured correctly.
If the current resources state is different from the desired state, Operator will reconcile the resources and bring them to the desired state. If Custom Resource gets deleted, the Operator will remove all related objects and will wait for new instructions.
Each Custom Resource is described and defined in a cluster-wide Custom Resource Definition object.
In this example, we will use two Custom Resource Definitions, one will be for Node.js application and another for MongoDB database.
We will call Custom Resources for Node.js - App and Custom Resources for MongoDB database - AppDB.
Both Custom Resources will be part of myapp.cloud-ninja.name API group with the version - v1alpha1.
The name of the application operator will be myapp-operator.
We are not going to create a third Custom Resource Definition and Custom Resource for AMQ Broker since it will have it’s own Custom Resources and Custom Resource Definitions. We will let the AMQ Broker Operator own and control its resources and will only care about deployment or removal of this Operator.
Generate a boilerplate for Ansible Operator. When creating a boilerplate with Operator-SDK, only one Custom Resource kind can be provided (we will create the second one manually):
$ operator-sdk new myapp-operator --api-version=myapp.cloud-ninja.name/v1alpha1 --kind=App --type=ansible |
Operator-SDK creates well familiar Ansible-like file and directory structure:
$ tree myapp-operator/ myapp-operator/ ├── build │ └── Dockerfile ├── deploy │ ├── crds │ │ ├── myapp.cloud-ninja.name_apps_crd.yaml │ │ └── myapp.cloud-ninja.name_v1alpha1_app_cr.yaml │ ├── operator.yaml │ ├── role.yaml │ ├── role_binding.yaml │ └── service_account.yaml ├── molecule ├── requirements.yml ├── roles │ └── app │ ├── README.md │ ├── defaults │ │ └── main.yml │ ├── files │ ├── handlers │ │ └── main.yml │ ├── meta │ │ └── main.yml │ ├── tasks │ │ └── main.yml │ ├── templates │ └── vars │ └── main.yml └── watches.yaml $ |
Operator-SDK creates a build directory with the Dockerfile, deploy directory where our custom resource definitions, custom resource manifests, deployment manifests, role, and service account manifests are located.
We also have a molecule directory with predefined YAML files for molecule tests.
The roles directory is where our Ansible roles are located. Each custom resource will have it’s own Ansible role. We will use Ansible Playbooks later as well.
The watches.yaml file contains the information for Ansible Operator - which roles to run or playbooks to play if a specific Custom Resource is created, modified, or removed.
Next, we will create a second Custom Resource and Custom Resource Definition for our MongoDB database. We will do that by copying the existing generated Custom Resource Definition and Custom Resource files for Node.js and modifying them:
$ cp deploy/crds/myapp.cloud-ninja.name_apps_crd.yaml deploy/crds/myapp.cloud-ninja.name_appdbs_crd.yaml $ cp deploy/crds/myapp.cloud-ninja.name_v1alpha1_app_cr.yaml deploy/crds/myapp.cloud-ninja.name_v1alpha1_appdb_cr.yaml |
Let's examine the Custom Resource Definition file.
Complete files are available.
apiVersion: apiextensions.k8s.io/v1beta1 kind: CustomResourceDefinition metadata: name: apps.myapp.cloud-ninja.name spec: group: myapp.cloud-ninja.name names: kind: App listKind: AppList plural: apps singular: app scope: Namespaced subresources: status: {} validation: openAPIV3Schema: type: object x-kubernetes-preserve-unknown-fields: true versions: - name: v1alpha1 served: true storage: true |
Custom Resource Definition describes the Custom Resource - App.
metadata.name has to be in plural form since the same Custom Resource Definition can have multiple Custom Resources.
In this example, we will have one Custom Resource per Custom Resource Definition.
spec.group defines the API group our Custom Resource belongs.
spec.versions defines the api version we will use for our Custom Resource.
Now, let’s check App Custom Resource file:
apiVersion: myapp.cloud-ninja.name/v1alpha1 kind: App metadata: name: myapp spec: # Add fields here size: 3 |
The API version is pre-populated for us, and the kind is the name we provided to Operator-SDK - App.
We will place our Ansible role and playbook variables under spec property. The concept is similar to the Ansible inventory file. We will have default variables added to the role and use Custom Resource to overwrite them if needed.
Since we copied Custom Resource Definition and Custom Resource files for MongoDB, we need to make modifications to them. We will change the name prefix, kind, listKind, plural, and singular parameters in the Custom Resource Definition file:
apiVersion: apiextensions.k8s.io/v1beta1 kind: CustomResourceDefinition metadata: name: appdbs.myapp.cloud-ninja.name spec: group: myapp.cloud-ninja.name names: kind: AppDB listKind: AppDBList plural: appdbs singular: appdb <...> |
In Custom Resource file, we need to change the kind and name parameters:
apiVersion: myapp.cloud-ninja.name/v1alpha1 kind: AppDB metadata: name: myappdb spec: size: 3 storage_class_name: 'managed-premium' image: image-registry.openshift-image-registry.svc:5000/openshift/mongodb:3.6 |
Since we have two Custom Resources - App and AppDB, we will need one more Ansible role. We will name it appdb:
$ cp -R roles/app roles/appdb |
Now we are ready to fill in Ansible roles with our application components.
Our Node.js app consists of secrets with MongoDB credentials, Node.js service, Node.js ingress (this example is running on OpenShift, so we will use OpenShift route), Node.js deployment and we will deploy AMQ Broker Operator as part of our application rollout.
In order to deploy Operator from OperatorHub, we need to allow Operator deployments on our namespace. This is done by creating an OperatorGroup object and setting a targetNamespaces parameter to our namespace. Once the namespace is allowed to host Operators, we will subscribe to AMQ Broker Operator by creating a Subscription object with AMQ Broker Operator parameters.
Ansible operator is using community.kubernetes.k8s Ansible module and that makes the whole procedure much easier.
Lets open roles/app/tasks/main.yml and add all Node.js application and AMQ Broker Operator components. Complete file is available.
--- - name: Create app Secret with mongo credentials community.kubernetes.k8s: definition: kind: Secret apiVersion: v1 metadata: name: '{{meta.name}}' namespace: '{{meta.namespace}}' stringData: database-password: '{{dbpassword}}' database-admin-password : '{{dbadminpasswd}}' - name: Create Node Service community.kubernetes.k8s: definition: kind: Service apiVersion: v1 metadata: name: '{{meta.name}}' namespace: '{{meta.namespace}}' annotations: description: 'Exposes and load balances the application pods' service.alpha.openshift.io/dependencies: | name: 'mongodb' kind: 'Service' spec: ports: - name: web port: 8080 targetPort: 8080 selector: app: '{{meta.name}}' <...> |
Similarly, AppDB tasks are added as well. For MongoDB, we will need a secret with MongoDB database credentials (even though we have created the same secret when creating Node.js, it is better to keep them separate). We also created two MongoDB services - one for communication between Node.js and a database, and another - headless service for MongoDB pod synchronization. Finally we will create a MongoDB statefulset. Complete file is available.
--- <...> - name: Create headless Mongo Service community.kubernetes.k8s: definition: kind: Service apiVersion: v1 metadata: name: 'mongodb-internal' namespace: '{{meta.namespace}}' labels: app: 'mongodb' annotations: service.alpha.kubernetes.io/tolerate-unready-endpoints: 'true' spec: clusterIP: None ports: - name: mongodb port: 27017 selector: app: 'mongodb' - name: Create Mongo StatefulSet community.kubernetes.k8s: definition: kind: StatefulSet apiVersion: apps/v1 metadata: name: '{{meta.name}}' namespace: '{{meta.namespace}}' annotations: description: 'Defines how to deploy the database' template.alpha.openshift.io/wait-for-ready: 'true' spec: replicas: '{{size}}' serviceName: 'mongodb-internal' selector: matchLabels: app: 'mongodb' template: <...> |
As you can see, when using community.kubernetes.k8s module, we provide the full definition of our application component, e.g. deployment.
We can add all variables to the Custom Resource file, but usually, some of the values are not changing that often, or are required by an application to run but might be changed later. We will add default values in roles/{app|appdb}/defaults/main.yml files for both Ansible roles.
Complete Ansible roles are available.
--- # defaults file for app dbpassword: 'password' dbadminpasswd: 'admin-password' artemisName: 'amq-artemis' dbname: 'sampledb' dbuser: 'mongo-user' |
Operator needs to know which Custom Resources it has to watch and what actions it will have to take in case the state of those Custom Resources changes. We are providing the full path to our Ansible roles in the container (/opt/ansible is the default home directory for Ansible in the container).
Since we are subscribing to the AMQ Broker Operator, we need to make sure that once we destroy our App Custom Resource, AMQ Broker Operator and its resources are removed in the correct order.
For that, we will create a finalizer with the playbook to remove AMQ Custom Resource before removing the Operator and everything else defined in Ansible role.
We deploy Operator from OperatorHub by subscribing to it. Once the Subscription object is created, another resource - ClusterServiceVersion is created as well. When we want to remove the Operator Lifecycle Manager controlled Operator, we need to unsubscribe and remove the ClusterServiceVersion object as well.
To remove the ClusterServiceVersion object, we will create a finalizer playbook to perform the removal for us.
First, let's add our App and AppDB Custom Resources with their API groups to the watches.yaml file. We do not want to recreate an ActiveMQArtemis Custom Resource if it is modified, so we will exclude it from watching by using blacklist setting:
--- - version: v1alpha1 group: myapp.cloud-ninja.name kind: App role: /opt/ansible/roles/app maxRunnerArtifacts: 30 reconcilePeriod: 5s blacklist: - group: broker.amq.io version: v2alpha2 kind: ActiveMQArtemis finalizer: name: finalizer.myapp.cloud-ninja.name playbook: /opt/ansible/playbooks/destroy.yml - version: v1alpha1 group: myapp.cloud-ninja.name kind: AppDB role: /opt/ansible/roles/appdb maxRunnerArtifacts: 30 reconcilePeriod: 5s |
Finalizer is also part of the same API group as our application. Finalizer name must be finalizer.<api group>. Let’s create a directory for our playbooks with the playbook named destroy.yml.
$ mkdir playbooks $ touch destroy.yml |
Finalizer will remove ActiveMQArtemis Custom Resources first, then AMQ Broker Operator subscription and finally - ClusterServiceVersion and AMQ Broker Operator service object (since it is created by AMQ Broker Operator but not owned by it):
--- - hosts: all tasks: - name: Find all existing AMQ artemis resources community.kubernetes.k8s_info: kind: ActiveMQArtemis api_version: broker.amq.io/v2alpha2 namespace: '{{ meta.namespace }}' register: amq_list - name: Remove an existing AMQ resource community.kubernetes.k8s: state: absent api_version: broker.amq.io/v2alpha2 kind: ActiveMQArtemis namespace: '{{ meta.namespace }}' name: '{{ item }}' loop: 'amq_list: {{ amq_list | json_query("resources[*].metadata.name") }}' # we are ignoring errors in case no artemis resources are found ignore_errors: true - name: Remove an existing AMQ operator subscription community.kubernetes.k8s: state: absent api_version: operators.coreos.com/v1alpha1 kind: Subscription namespace: '{{ meta.namespace }}' name: amq-broker - name: Remove an existing AMQ Operator service version community.kubernetes.k8s: state: absent api_version: operators.coreos.com/v1alpha1 namespace: '{{ meta.namespace }}' kind: ClusterServiceVersion name: amq-broker-operator.v0.13.0 - name: Remove AMQ Operator service community.kubernetes.k8s: state: absent kind: Service api_version: v1 name: amq-broker-operator namespace: '{{ meta.namespace }}' |
We need to add playbooks directory to our build/Dockerfile file, so the directory content is copied during container image build:
$ vim build/Dockerfile FROM quay.io/operator-framework/ansible-operator:v0.16.0 COPY requirements.yml ${HOME}/requirements.yml RUN ansible-galaxy collection install -r ${HOME}/requirements.yml \ && chmod -R ug+rwx ${HOME}/.ansible COPY watches.yaml ${HOME}/watches.yaml COPY roles/ ${HOME}/roles/ COPY playbooks/ ${HOME}/playbooks/ |
We need to add additional role permissions for our Operator service account, so it can subscribe to other operators, create Custom Resource Definitions, service accounts, roles, role bindings, and create routes.
Complete Operator manifests are available.
<...> - apiGroups: - myapp.cloud-ninja.name - broker.amq.io - route.openshift.io - operators.coreos.com - apiextensions.k8s.io resources: - '*' verbs: - create - delete - get - list - patch - update - watch - apiGroups: - "" resources: - roles - rolebindings - serviceaccounts verbs: - create - delete - get - list - patch - update - watch |
Now we can build our Operator container image and push it to our container registry. We will use Operator-SDK build feature to build Operator container image and push it to our container registry with docker tool:
Already built Operator container image is available.
$ operator-sdk build quay.io/<REPLACE>/myapp-operator:v0.0.1 $ docker push quay.io/<REPLACE>/myapp-operator:v0.0.1 |
Add correct image version and url in Operator deployment manifest file. It is located in deploy/operator.yaml.
sed -i 's|REPLACE_IMAGE|quay.io/<REPLACE>/myapp-operator:v0.0.1|g' deploy/operator.yaml |
If you are performing these steps on MacOS, use the following sed command instead:
sed -i "" 's|REPLACE_IMAGE|quay.io/<REPLACE>/myapp-operator:v0.0.1|g' deploy/operator.yaml |
Let’s deploy our Operator. For that, let’s deploy Custom Resource Definitions for App and AppDB instances, the service account our Operator is going to use, role, and role binding.
oc create -f deploy/crds/myapp.cloud-ninja.name_appdbs_crd.yaml oc create -f deploy/crds/myapp.cloud-ninja.name_apps_crd.yaml oc create -f deploy/service_account.yaml oc create -f deploy/role.yaml oc create -f deploy/role_binding.yaml oc create -f deploy/operator.yaml |
Once our operator is running and is listening for changes, let's create our App and AppDB Custom Resources:
$ oc create -f deploy/crds/myapp.cloud-ninja.name_v1alpha1_app_cr.yaml $ oc create -f deploy/crds/myapp.cloud-ninja.name_v1alpha1_appdb_cr.yaml |
Check if all Pods are started and running:

We can test the application by opening the route URL.
To test if Operator is working, lets delete Node.js route and check if Operator will recreate it:
$ oc get routes NAME HOST/PORT PATH SERVICES PORT TERMINATION WILDCARD nodejs-myapp app.apps.quay-poc.cloud-ninja.name nodejs-myapp <all> None $ oc delete route nodejs-myapp route.route.openshift.io "nodejs-myapp" deleted $ |
Route will be recreated by the Operator once the reconciliation is finished. Similarly, delete MongoDB StatefulSet and wait until it is recreated as well.
Lets delete our Custom Resources and check if all application components will be removed:
$ oc delete -f deploy/crds/myapp.cloud-ninja.name_v1alpha1_app_cr.yaml $ oc delete -f deploy/crds/myapp.cloud-ninja.name_v1alpha1_appdb_cr.yaml |
All Operator controlled objects will be removed, and only the Operator pod will be left running and waiting for another trigger.
TIP: If, by accident, you removed the CRDs or Project/Namespace manually before all of the related CRs are removed, each CR will have to be edited, and the finalizer section needs to be removed. Otherwise CRDs, Namespaces, and CRs will stay in Terminating state.
Summary
Ansible Operator enables container-native application developers to automate the whole application lifecycle, manage upgrades and ensure the availability of the application without additional operational resources, multiple monitoring, and alerting tools required for operation teams, different accounts, change requests and minimize the human-error probability.
Operator-SDK pre-builds all required configuration, build, and deployment files making application manifest integration into Operator quicker and easier. By using YAML format and well known Ansible roles and playbooks structure, Ansible Operator allows developers, without additional programming language knowledge, to quickly add container-native application manifests into Operator.
Connect with Red Hat Services
Learn more about Red Hat Consulting
Learn more about Red Hat Training
Join the Red Hat Learning Community
Learn more about Red Hat Certification
Subscribe to the Training Newsletter
Follow Red Hat Services on Twitter
Follow Red Hat Open Innovation Labs on Twitter
Like Red Hat Services on Facebook
Watch Red Hat Training videos on YouTube
Understand the value of Red Hat Certified Professionals
Sobre el autor

Juozas is a cloud infrastructure consultant specializing in Red Hat OpenShift with public and private clouds.