Blog de Red Hat
The last few years have seen Ceph continue to mature in stability, scalability and performance to become a leading open source storage platform. However, getting started with Ceph has typically required the administrator learning automation products like Ansible first. While learning Ansible brings its own rewards, wouldn’t it be great if you could simply skip this step and just get on with learning and using Ceph?
Red Hat Ceph Storage 4 introduces a GUI installation tool built on top of the Cockpit web console. Under the covers, we still rely on the latest iteration of the same trusted ceph-ansible installation flows that have been with us since 2016.
The new install UI guides users with no prior Ceph knowledge to build clusters ready for use by providing sensible defaults and making the right choices without asking the operator for much more than a set of servers to turn into a working cluster.
Let’s dig into the details of the new installer as delivered in RHCS 4.
Cockpit Ceph Installer
The Cockpit Ceph installer is a plug-in for the Cockpit web-based server management interface found in several Linux distributions, including CentOS, Fedora Server, and Red Hat Enterprise Linux. The plug-in creates a simple way to deploy a Ceph cluster by consuming infrastructure provided by the ansible-runner and ansible-runner-service projects.
The Cockpit Ceph Installer uses the cockpit UI to validate that the intended hosts are indeed suitable for building a Ceph cluster, and then drives the complete Ansible installation using ceph-ansible.
The Red Hat Storage team integrated this new UI Installer in the RHCS Ceph distribution, but there is nothing stopping others from adopting our UX philosophy and choosing the same install approach, as the code has been released under the LGPL 2.1 following our standard practice.
Design Overview
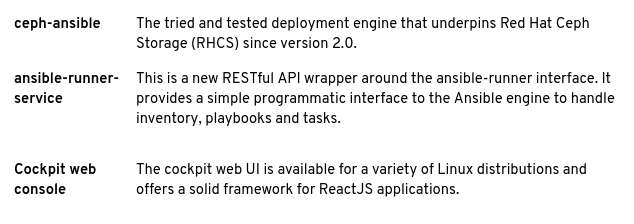
Developing a GUI could have gone in many different directions, but the guiding principle has been to not reinvent the wheel. With that in mind the architecture of the installer consists of the following components;
As Easy as 1-2-3
With your systems subscribed to the Red Hat content distribution network, the installation flow is simplicity itself:
-
Install the installation tool RPM (
cockpit-ceph-installer). -
Start the
ansible-runner-service(RESTful API service). -
Log in to the cockpit web console, and start the installation!
The installer gathers your configuration requirements, and handles Ansible configuration interactions for you. The installation workflow also performs a sanity check of the servers you’ve chosen against your desired Ceph roles, before deployment begins with all detected configuration errors reported in the UI.
The New Interface
The animation here provides an overview of the UI steps, during the installation of Red Hat Ceph Storage 4 to a small cluster of 3 host machines.
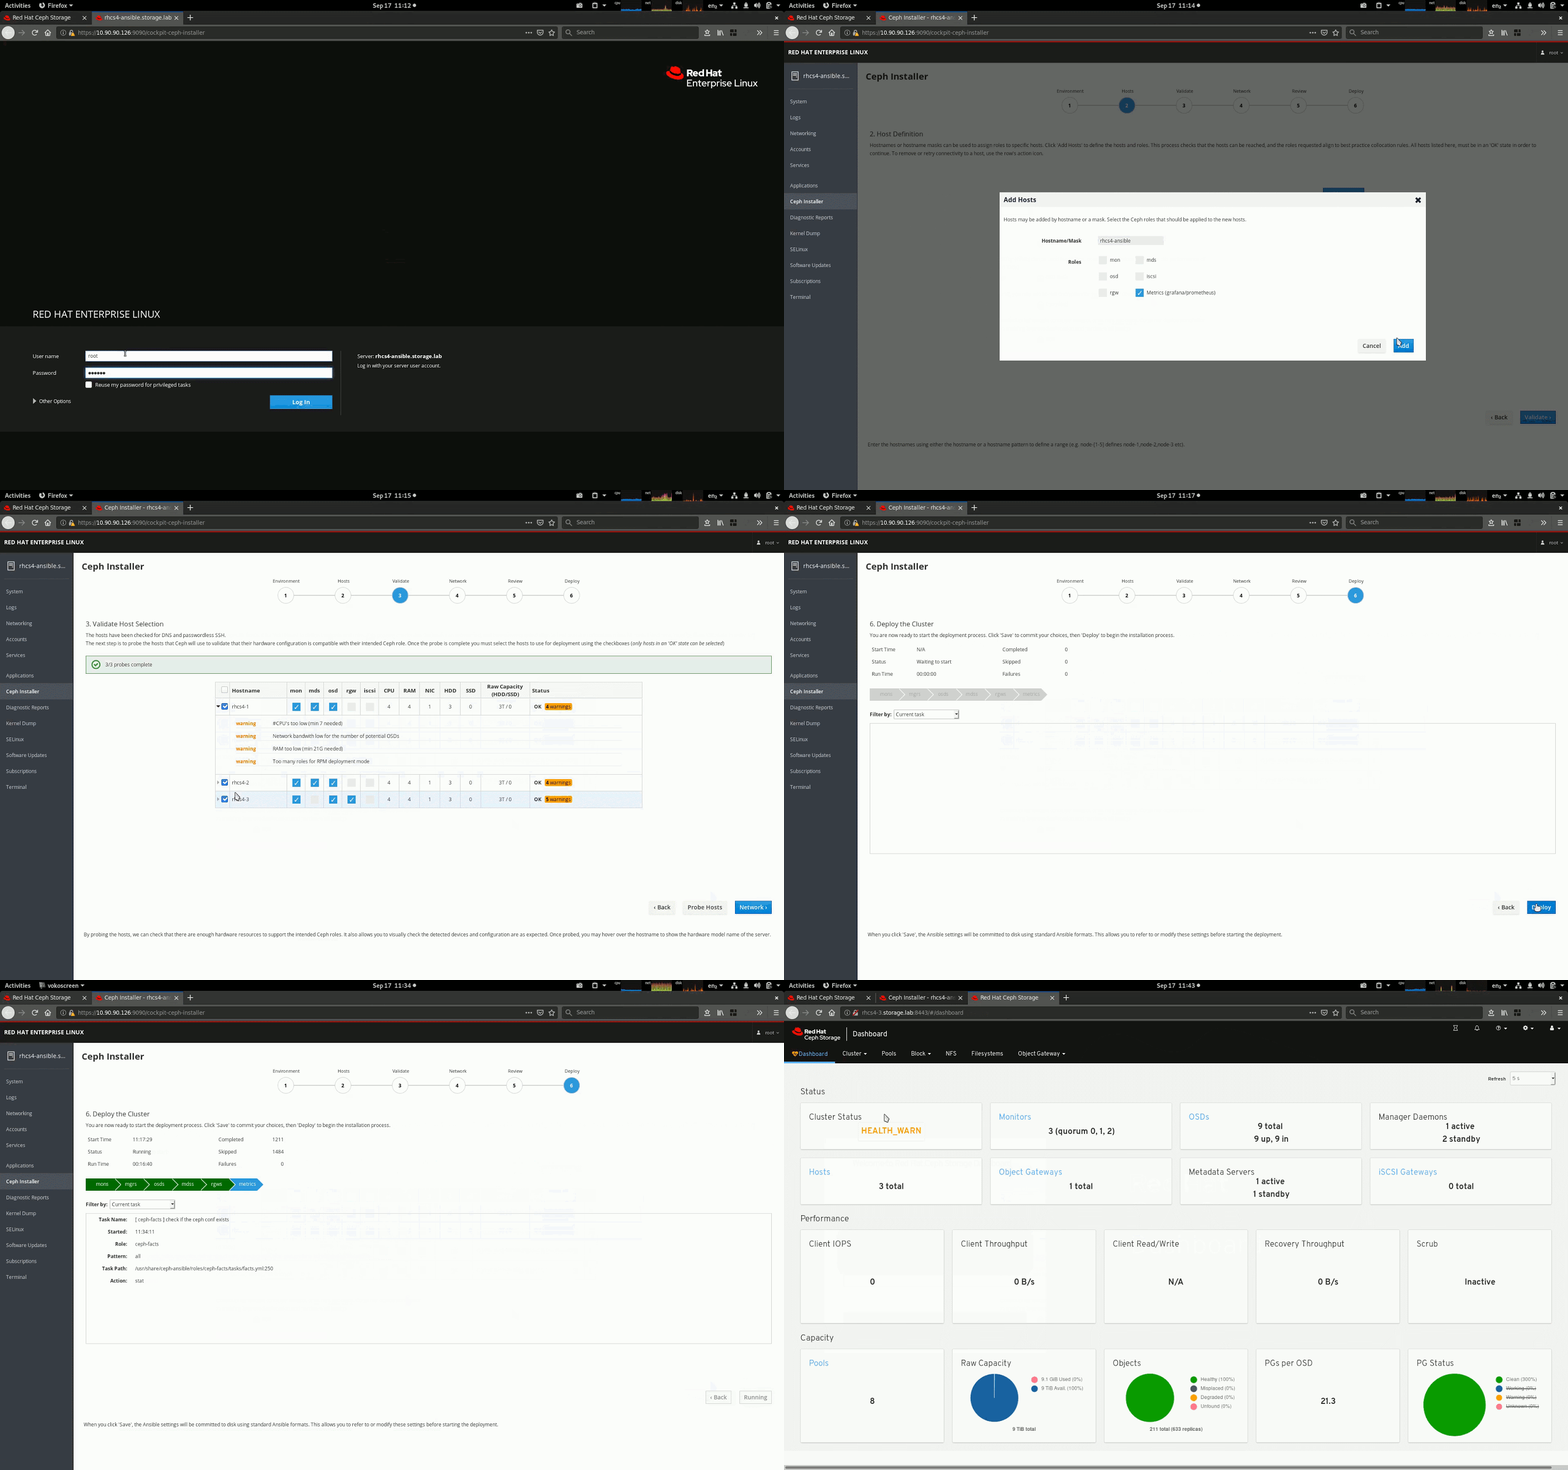
The UI supports the most commonly used ceph-ansible features, and utilizes the same configuration files that a manual deployment with ceph-ansible would use. This approach enables advanced users to tweak an installation by manually editing the configuration data, before the deployment is started.
For entry level users, UI-driven installation is a game changer, as it always provides a valid selection and simply does not allow an operator entirely new to Ceph to build an invalid cluster configuration — the install process always offers a valid option, or when not provided with enough hardware, will identify what additional resources are required to proceed.
Exploring in Detail
However, there are a few features of the installation process that are worth exploring in more detail.
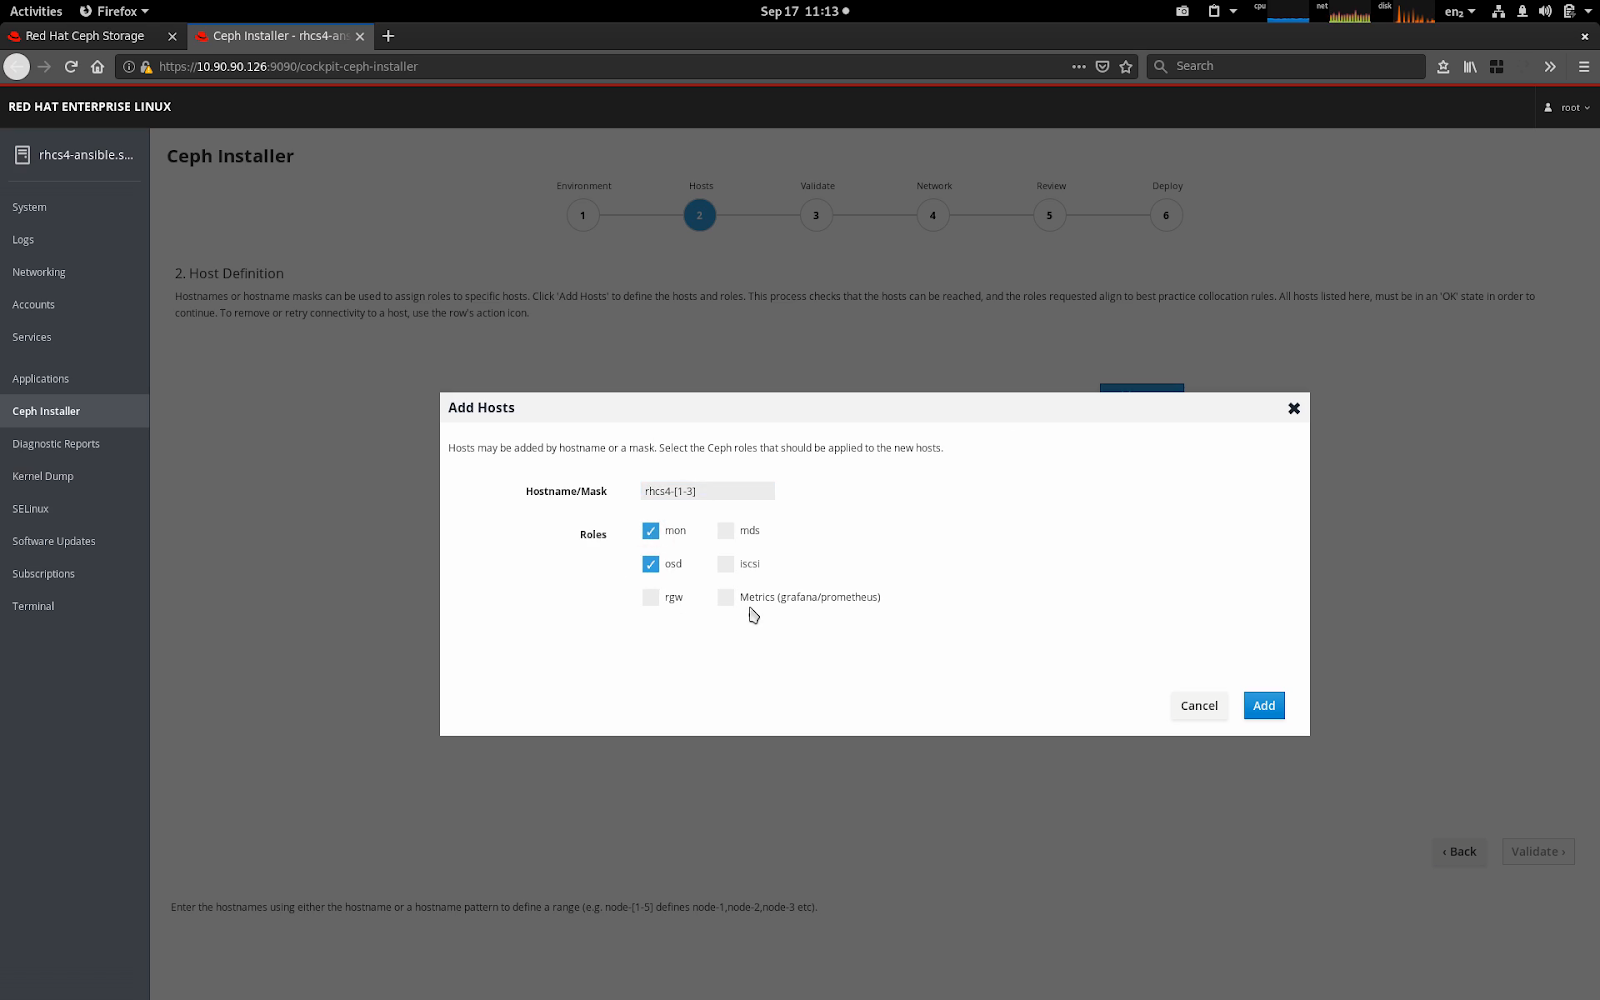
When adding hosts, the UI supports masking. This allows multiple hosts to be added within the same Add Hosts operation. The installer automatically enables the Ceph Storage 4 Dashboard feature, which also requires a host to be identified for Metrics (Prometheus and Grafana). You may choose a separate host for metrics, or simply use the same machine you’re running Ansible from as your metrics host.
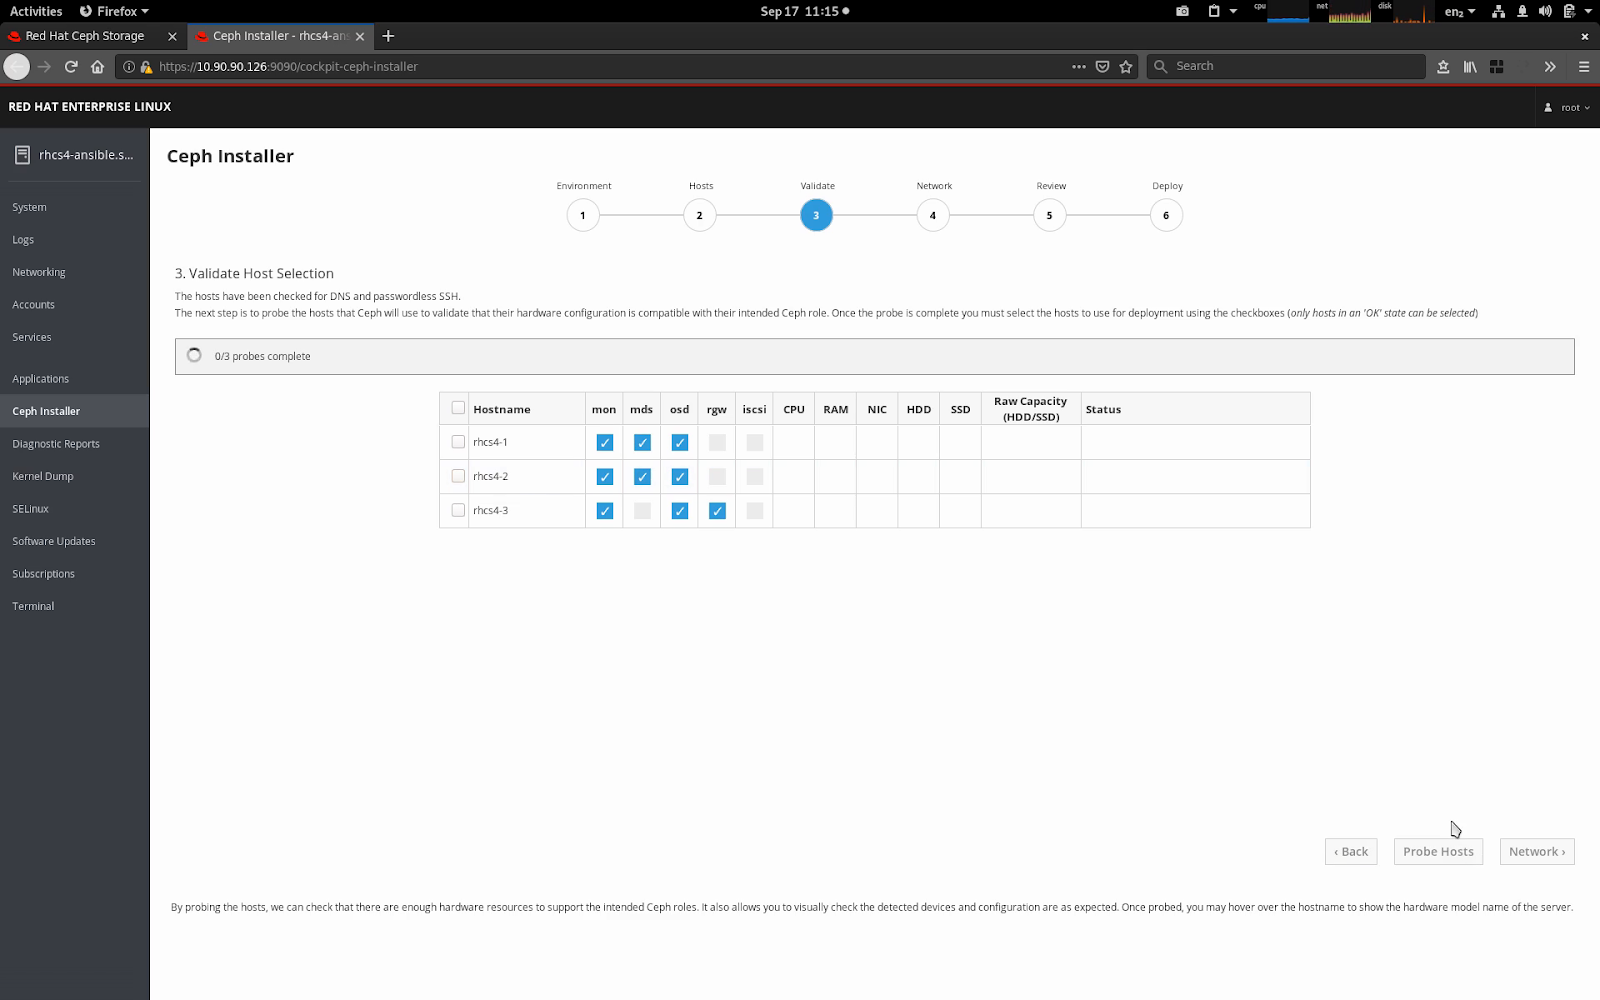
Once the hosts are selected, the Validate Hosts page provides a Probe button. The probe phase executes a background playbook that performs a sanity check; comparing each host’s configuration against the requirements of the Ceph roles that have been selected. Any errors, or warnings detected are shown.
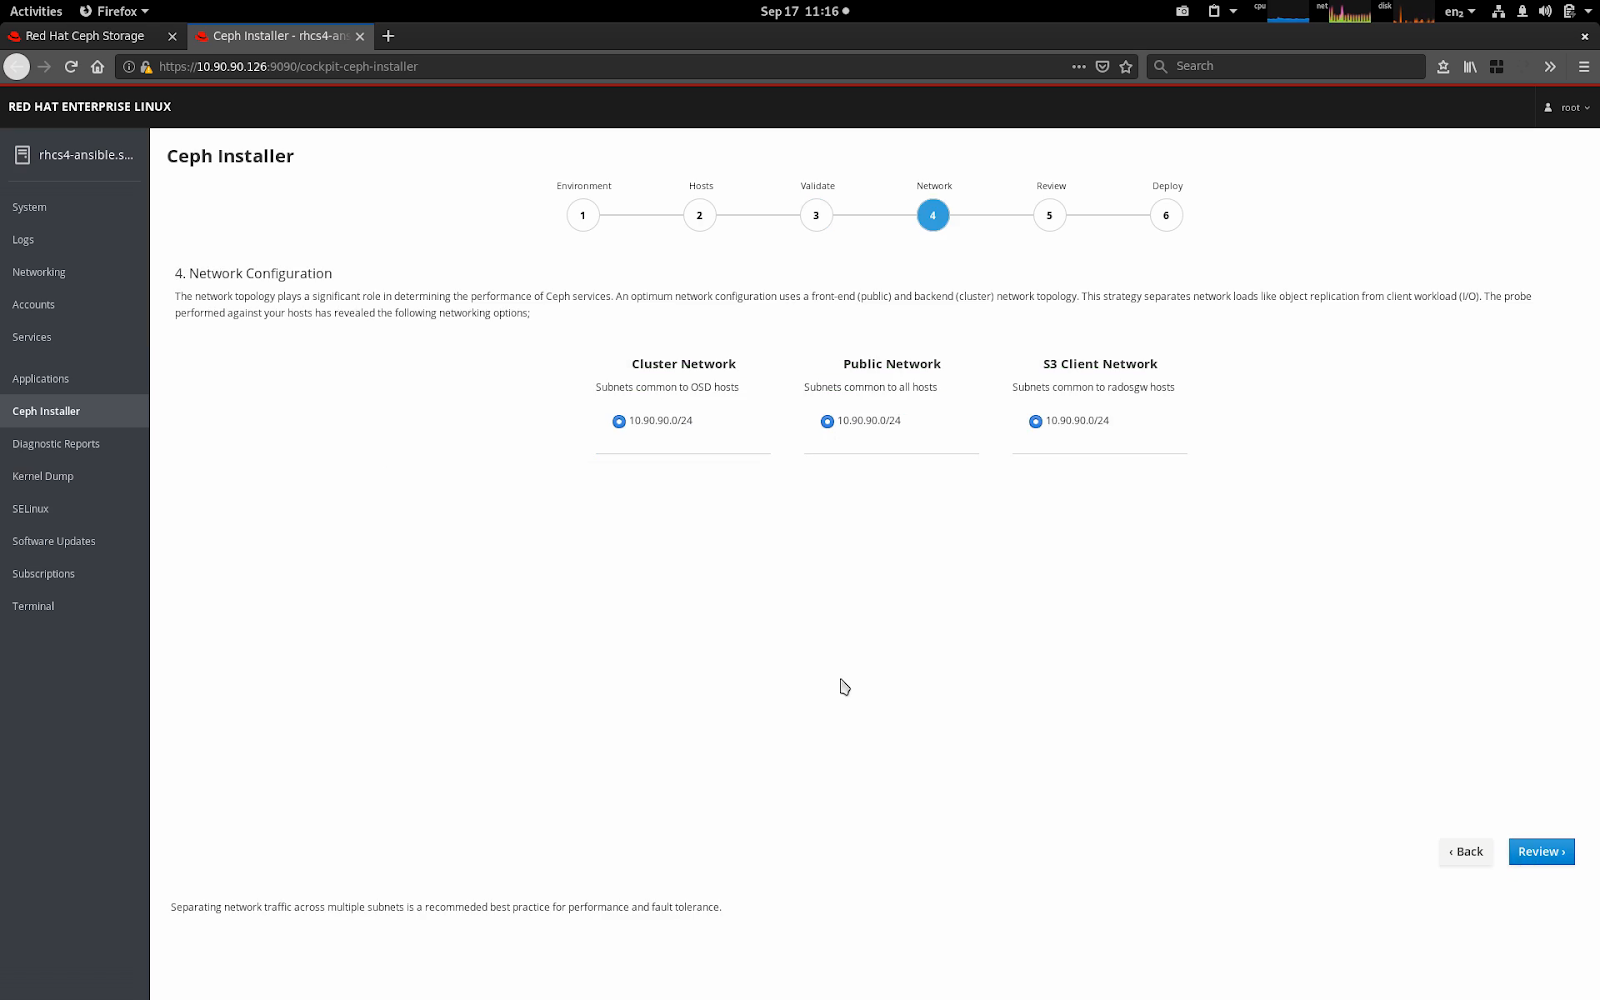
During the probe process, the network topology of the hosts is gathered and compared, enabling common subnets across hosts to be categorized. Available network subnets are then shown against the varying network roles within a Ceph cluster, allowing you to separate front-end (public), back-end (cluster), S3 and iSCSI networks.
Do Try This at Home
Red Hat Ceph Storage 4 is available from Red Hat’s website. Try the new install process today!
Sobre los autores
Paul Cuzner is a Principal Software Engineer working within Red Hat's Cloud Storage and Data Services team. He's has more than 25 years of experience within the IT industry, encompassing most major hardware platforms from IBM mainframe to commodity x86 servers. Since joining Red Hat in 2013, Cuzner's focus has been on applying his customer and solutions-oriented approach to improving the usability and customer experience of Red Hat's storage portfolio.
Cuzner lives with his wife and son in New Zealand, where he can be found hacking on Ceph during the week and avoiding DIY jobs around the family home on weekends.
Federico Lucifredi is the Product Management Director for Ceph Storage at Red Hat and a co-author of O'Reilly's "Peccary Book" on AWS System Administration.

