
One advantage of deploying applications on Red Hat OpenShift is that you can deploy new releases automatically, right from the Git repository your development team uses to build the application. In this article, I'll show you how to configure OpenShift and Git so that when you update your Git repository, your OpenShift application automatically pulls down the new content and spins up a new container with that new content.
You can set this up using the OpenShift web user interface (UI) or the command line. To help you visualize and understand the process, I'll first go through the steps using the web interface, then demonstrate the command-line interface and show how you can accomplish the same result with just a few steps.
[ Learning path: Getting started with Red Hat OpenShift Service on AWS (ROSA) ]
Prerequisites
Before getting started:
- You must have access to a Git server. Create a new repository and configure it so that your OpenShift instance can access it. If you don't have access to a Git server, there are Git hosting services such as GitLab and GitHub. In this article, I use GitHub, but you can use any Git server or hosted service you prefer.
For this example, create and commit an
index.htmlfile containing:<html> <title>Example</title> <body> <p>Hello world</p> </body> </html>- You must have access to an OpenShift instance. If you do not, you can get a free one at try.openshift.com using your redhat.com login. If you don't have a redhat.com login, create a free one at access.redhat.com.
Use OpenShift's web UI
Do the first few steps from the developer's perspective within the OpenShift web UI. Click the drop-down menu in the top-left corner, and then click Developer.
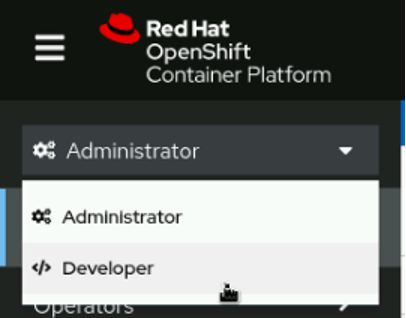
Developer mode allows you to create a project and add a container image.
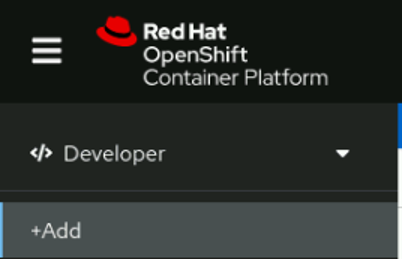
Click +Add in the left column.
If you need to switch to your project, click the All Projects drop-down menu and choose your project from the list.
If you're trying OpenShift on try.openshift.com, you're already in an active project (called username-dev).
If you don't have a project, click the create a Project link to create a new one.
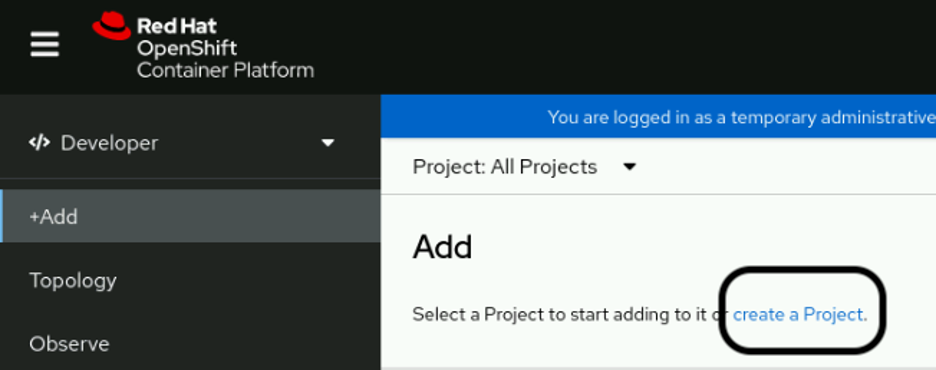
Give your project a name, and then click Create.
After selecting your project, click All services in the Developer Catalog column.

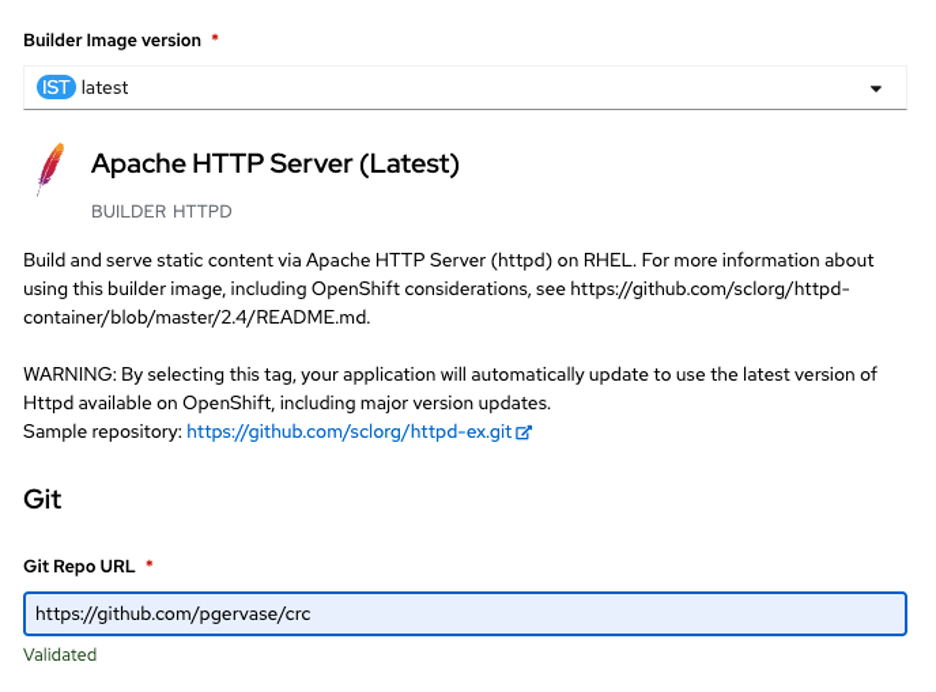
Type Apache in the search box and select the Builder Image option. Do not use the Template option.
When you select the Builder Image option, a panel opens with a description of the image. Click the blue Create Application button in the top-left corner of the Apache HTTP Server panel.
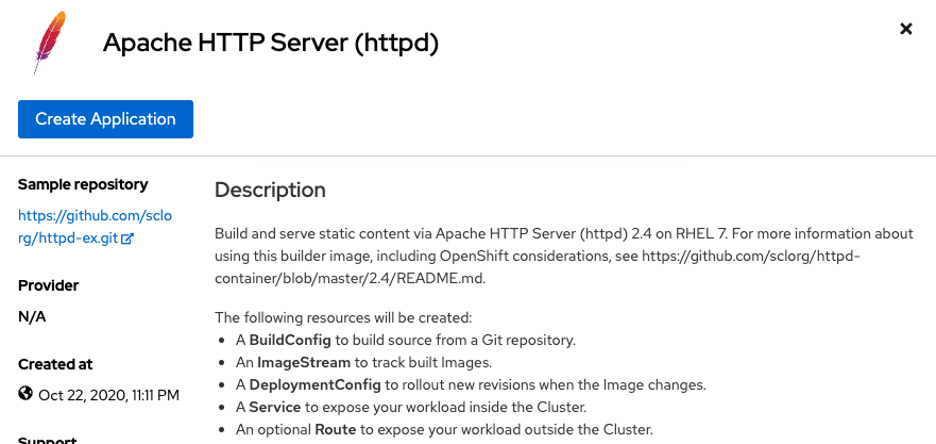
There are many ways to build a container image. The Source-to-Image (S2I) toolkit builds containers from source code. S2I helps you build images from your application source code, and OpenShift uses it by default for the Builder Image you select.
[ Get this complimentary eBook from Red Hat: Managing your Kubernetes clusters for dummies. ]
Under the Builder Image version field, click the version displayed and choose latest from the drop-down menu that appears.

In the Git Repo URL field, enter the URL of your Git repository containing the index.html file you created for this exercise. I'm using a repository called crc within my GitHub profile for this example.
Name your application whatever you want. It doesn't need to correlate to the GitHub URL or your OpenShift project.
In the Resources section, select Deployment.
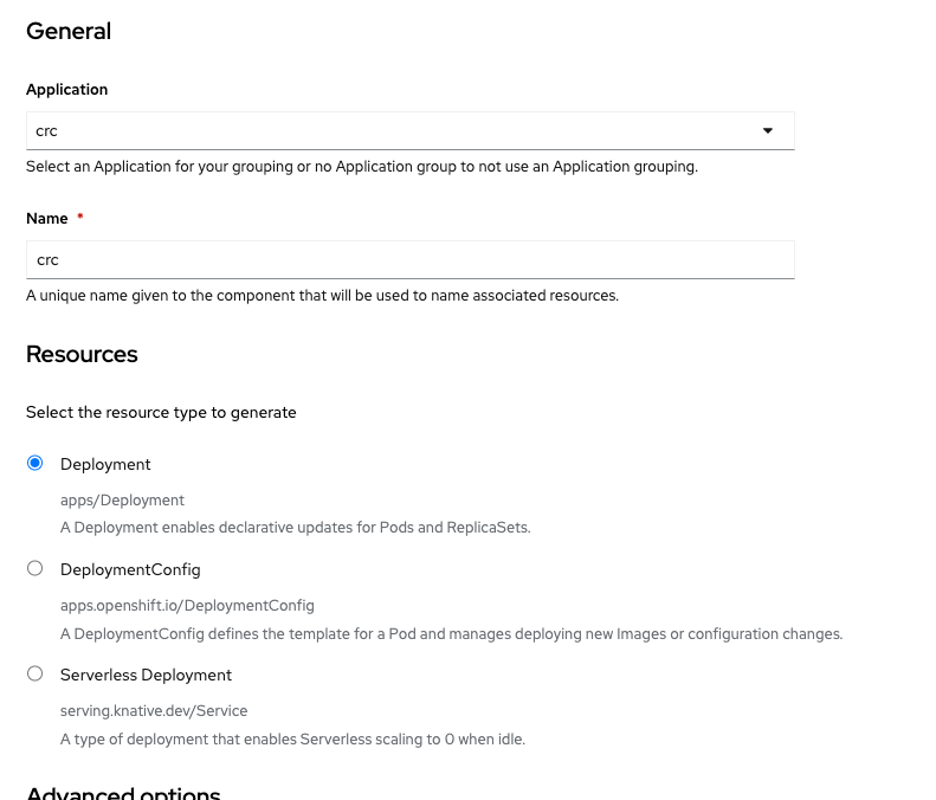
Leave the target port set to 8080 and ensure that the option to create a route for your application is selected.
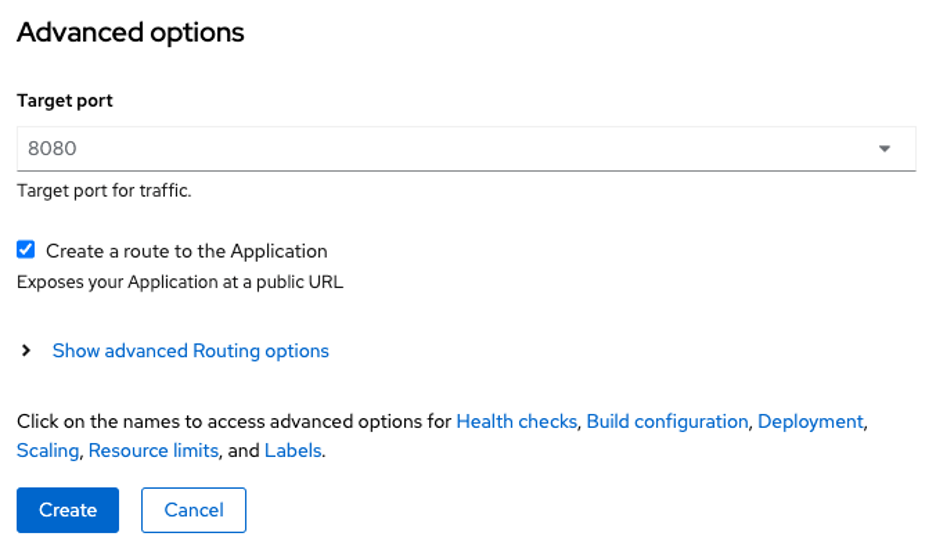
You might want to create the route afterward if you need to set something custom, but the default route is fine for this simple demonstration.
[ Want to test your sysadmin skills? Take a skills assessment today. ]
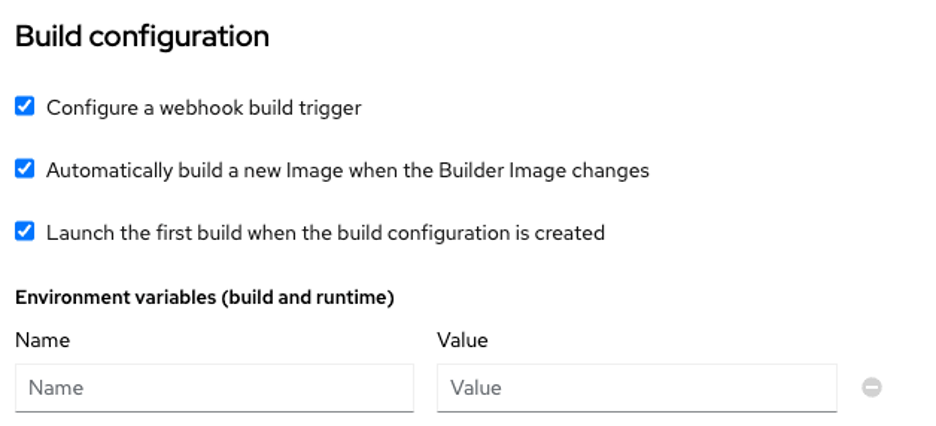
Build configuration
Click Build configuration at the bottom of the page. Select these three checkboxes:
- Configure a webhook build trigger
- Automatically build a new Image when the Builder Image changes
- Launch the first build when the build configuration is created
- Click the blue Create button. You've just created an Apache web server to use content from your Git repository!
To verify that it's working, click Topology in the left column, and then click on your application. After that, ensure that Resources is selected in the right column, and then scroll down to Routes. Click the URL in the Location field. A new tab shows the content in your Git repo.
It's now time to configure your OpenShift instance so that a new container is automatically created when you make a change in that source Git repository.
Switch to the Administrator perspective using the drop-down menu in the top left.
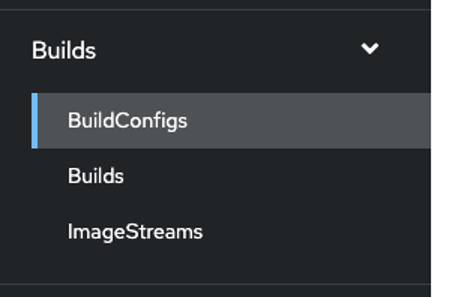
In the left column, click BuildConfigs in the Builds group.
Click the name of your build in the main body of the page.
At the bottom of the page are two webhook options: Generic and GitHub. Click the Copy URL with Secret link for Generic. Do not use the GitHub option even if you're using GitHub for this exercise.

Configure a Git repository
Now you must create a webhook so that your Git repository sends pushed commits to your OpenShift instance. The method you use for this depends on your Git server or service. Because I'm using GitHub, I'll demonstrate that, but the process is similar for other hosting services. If you're running your own Git server, you don't use a webhook; you just create a Git hook.
[ Keep your favorite Git commands, aliases, and tips close at hand. Download the Git cheat sheet. ]
For GitHub, log in to your account and navigate to your repository. At the top of the repo's page, click Settings.

Click Webhooks in the menu bar on the left.

Click Add webhook in the top right of the main body of the page.
- For the Payload URL, paste the URL with the Secret link that you copied from the OpenShift interface.
- Change the Content type to application/json.
- Leave Secret blank.
- Enable Just the push event.
- Enable Active.
- Click Add webhook.
You have now set GitHub to push data to your OpenShift instance.
Back in the OpenShift Container Platform (OCP) web UI, to monitor your new image's activity, click Builds in the Builds item in the left column of OpenShift.

To verify that you can see your content, click Networking and then Routes in the left column of OpenShift.

Click the URL for your route in the Location column.
Assuming that works, you can make a change to see it update. The easiest way is by manually editing the index.html file in your Git repository.
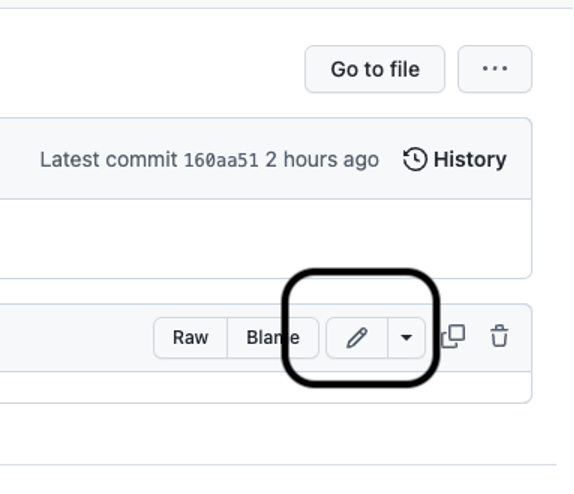
If you're using GitHub, you can make changes directly in the web interface. Navigate to your repo in your browser, and then click on the index.html file.
On the next page, click the Pencil icon to make an edit.
Change the text to something clearly different (for example, change "Hello world" to "Hello OpenShift"). Then click the green Commit changes button, and ensure you're committing to the main branch. This is only for demonstration purposes, but in a "real" environment, you'd use branches and pull requests.
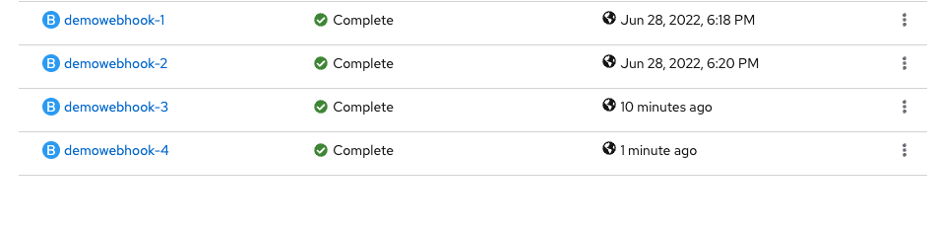
Back in OpenShift, return to the Builds under Builds in the left column, and you will see that a new build for your deployment is in progress.
To verify that your changes in Git were used, refresh the browser tab from the Networking Routes location, or reopen it by going to Networking and then Routes to click on the URL in the Location column for your route.
[ Learn about upcoming webinars, in-person events, and more opportunities to increase your knowledge at Red Hat events. ]
Use the command-line interface
Now that you know the step-by-step process using the web interface, you can use the command-line interface. First, make sure you're in the correct project for this demonstration:
$ oc project
Using project "default" on server "https://api.ocp4.example.com:6443"
Because I'm using the default project, I'll create a new project called pgcli:
$ oc new-project pgcli
Now using project "pgcli" on server "[https://api.ocp4.example.com:6443](https://api.ocp4.example.com:6443/)"
Next, create a new application. Using my repository as an example, the command is:
$ oc new-app openshift/httpd:latest~https://github.com/pgervase/crc \
--name viaoc --context-dir=/
My repo in GitHub is crc, so my command is:
$ oc new-app \
openshift/httpd:latest~https://github.com/pgervase/crc \
--name viaoc --context-dir=/
To expose a route to your application:
$ oc expose service/viaocYou must use the web UI to get an authentication secret for your OpenShift instance. This uses the same process as above, so navigate to Builds and Build configs to select your build config. Copy the Generic secret URL.
Next, configure a webhook in GitHub (or GitLab, or whatever service you use) as before, or configure a Git hook in a plain Git repository.
Finally, clone your repository and make a change to your index.html file:
$ git clone https://github.com/<your user>/<your repo>Then change your directory into that repo:
$ cd crc

$ sed -i 's/Hello world/Hello OpenShift/g' index.html

$ git add index.html

$ git commit -m "new content"

$ git push
To follow the build logs as your image is being updated, you can run a command like:
$ oc logs bc/viaoc -f In the web browser, you can go to Workloads and then Pods to monitor your project's build pod running.
Click the URL from Networking and then Routes for your project's route to see the new content in your browser.
Automatic builds
Automatic updates to your OpenShift containers integrate the development and deployment processes. This is useful in a testing environment when you're making changes and need to see the effects immediately, and it can change how you release software to your users.
About the author
I am a Senior Principal Security Architect at Verizon. Before that, I worked at Red Hat in various roles such as consulting and in the Solutions Architect where I specialized in Smart Management, Ansible, and OpenShift. In my free time, I enjoy spending time with my family, exercising, and woodworking.
More like this
Avoid operational drift with Red Hat Lightspeed content templates for RHEL extended environments
How insurance organizations balance strict compliance with data agility
Container Roundup | Compiler
Press Start | Command Line Heroes
Browse by channel

Automation
The latest on IT automation for tech, teams, and environments

Artificial intelligence
Updates on the platforms that free customers to run AI workloads anywhere

Open hybrid cloud
Explore how we build a more flexible future with hybrid cloud

Security
The latest on how we reduce risks across environments and technologies

Edge computing
Updates on the platforms that simplify operations at the edge

Infrastructure
The latest on the world’s leading enterprise Linux platform

Applications
Inside our solutions to the toughest application challenges
Virtualization
The future of enterprise virtualization for your workloads on-premise or across clouds