
They say that buying a used house or car is just buying someone else’s problems. What duct tape repairs are hiding inside the walls or under the hood? Without knowing the maintenance history, you need to investigate to avoid the unexpected.
Whether there is a rogue server, admins departing the company, or acquisitions and mergers, at some point in your sysadmin journey you will inherit a server that you didn’t build but are suddenly responsible for. This article will focus on a few areas to start securing and getting familiar with the new system. Taking a triage approach is only a starting point: Security is part of the ongoing life cycle of managing a system.
Be mindful that this system is hosting an application or service that needs to remain available. Use any required change management processes your company has in place. Also, be familiar with your company’s security policies and where you can reference them for appropriate settings.
Backups
Always have a good backup plan… and recoverable backups!
Start the review by checking that the system is backed up regularly and the backups are recoverable. Don’t wait until you need the restore to find out it is bad. Backup checks should include confirming that any remote file systems are also backed up somewhere.
Some applications and databases require a special process or agent to get good backups, so this is a good time to review that those additional backups are being performed properly. Conducting periodic recovery tests that include testing the application for post-recovery functionality identifies any gaps and issues with the backups.
You may also want to take a quick one-off backup before continuing. A complete system restore may not be necessary, but if adjustments go terribly wrong this backup provides a working state to fall back on. Use change control and document your work as another method to aid possible recovery.
Accounts
Your next steps include a review of who has access to the system and how they authenticate. Any elevated privileges, such as through sudo, also need to be checked. Know the company’s security policies such as password expiration and complexity rules to verify those are being enforced. This knowledgebase article walks through details on how to configure password policies.
Note: Be sure to check if the system is using identity sources like IDM, AD, or LDAP. Conversely, even if the system is using an external, local accounts should still be reviewed.
Let’s look at specific examples of issues you need to consider and how to handle them.
The previous admin’s account
Since this system was inherited, consider whether the previous admin still needs an account. If not, avoid deleting their account. Lock it, instead. Doing so preserves account information and helps prevent inadvertent reuse of the UID. The usermod command can be used to lock the account:
$ sudo user mod -L <username>
Privileged access accounts
Review sudoers to include both the sudoers file (/etc/sudoers) and the include directory (/etc/sudoers.d). Check for any assignments in particular that include ALL. This assignment typically includes the group wheel. To remove users from groups, use the groupmems command like this:
$ sudo groupmems -g wheel -d <username>
You can also list any sudo-allowed commands for any user like this:
$ sudo -l -U <username>
Other accounts
If there are accounts that multiple users share, consider forcing a password change as part of this handover. A better approach to shared accounts would be leveraging groups and ACLs for file permissions.
Service accounts should not have login access as a best practice. These accounts are typically locked or have no password, and have a shell like /usr/sbin/nologin. If a service account needs an interactive shell, consider granting the admin sudo su <accountname> instead of direct login.
Other commands that may help when reviewing accounts are chage and last. The chage command provides options to view and adjust account expiry settings. The last command shows information about recent logins.
To view expiry info for an account:
$ sudo chage -l <username>
To view the last five logins for an account:
$ last <username> -5
Ports and services
Reviewing running services and ports helps you identify those that are unnecessary and can be disabled. Stopping these extra services also removes them as attack vectors.
One quick way to show what is listening is with the ss command. This example uses options to show sockets listening to TCP and UDP, and also includes process details:
$ sudo ss -tulnp
Running this command on a sample web server gives what you see here:
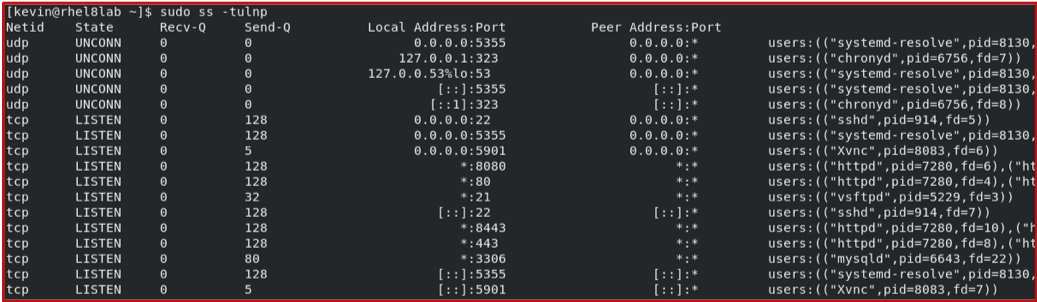
This output shows that there are httpd processes listening to ports 80, 443, 8080, and 8443. Other listening processes include mariadb (mysqld) on port 3306, xvnc on port 5901, and vsftpd on port21. These last three processes might raise some concerns.
Anything not needed for the app or system to function should be disabled. If you need to trace a PID back to the systemd service, run systemctl status:
$ systemctl status <PID>
Research configurations for the remaining services. Some applications may support ACLs to add another layer of protection. On multihomed systems, check if a service is only needed on one network segment. The Local Address:Port column shows if the service is listening on a specific IP, or on all networks (*, 0.0.0.0, or :: ).
Let’s look at additional things you can do to secure your ports and services.
Ports
Scanning ports with a tool like nmap shows what ports are reachable from another system. This tool can also be used to validate that firewalls are working as expected. You have several options with nmap, but for a quick and simple scan, you just need to provide the hostname or IP address:
$ nmap <host-to-scan>
Services
Access your services to see what is running and necessary, as not all services have an active network listener. You can get a list of running services using the --state option with systemctl, like this:
$ systemctl --state=running -t s
Stopping and disabling services is straightforward with systemctl:
$ sudo systemctl stop <service name>
$ sudo systemctl disable <service name>
Also, check for any services that have failed and need maintenance:
$ systemctl --state=failed
Or, if a service is not needed at all, disable it with systemctl disable.
SELinux
SELinux should be enabled and set to enforce. This state can be checked using sestatus:
$ sestatus -v
If necessary, you can change SELinux to enforcing with the command:
$ sudo setenforce Enforcing
Keep the change persistent by going to /etc/selinux/config by looking for either SELINUX=disable or SELINUX=permissive, then change the line to:
SELINUX=enforcing
Troubleshooting SELinux goes beyond this guide, but a good starting reference is this knowledgebase article.
Patching
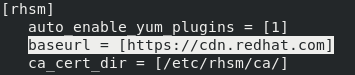
Maintaining and securing a system includes updates. For the inherited server, start by checking that the system is subscribed and configured to receive updates. On Red Hat Enterprise Linux (RHEL), use this command to show information about the subscription management service:
$ sudo subscription-manager config --list
The baseurl listed in the [rhsm] section provides information on what this system is subscribed to. If cdn.redhat.com is listed, the system is subscribed directly to the Red Hat Content Delivery Network.
This example shows a systems subscribed directly to Red Hat. If the baseurl is a satellite server, check the synced repositories there to ensure the synchronized content is fresh.
Confirm what repos are enabled for the system with this command:
$ yum repolist --all
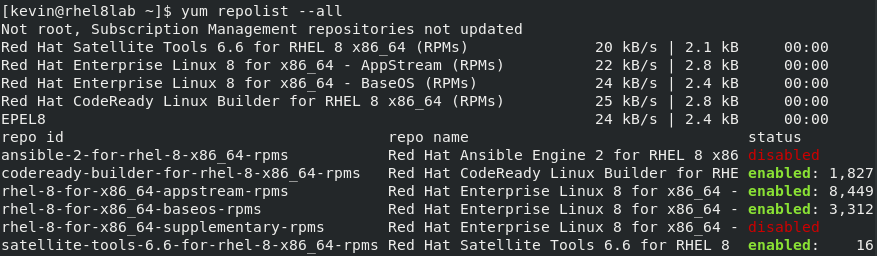
This output shows the repositories configured and their status. If a repository is disabled, it will not be checked for patches when the system is updated.
Note: Starting with RHEL 8, CentOS 8, and Fedora 22, yum was replaced with dnf. The yum options are all nearly the same as those for dnf, and yum itself is just a symbolic link to dnf.
Running yum check-update will list the packages and versions that are available for update. Best practice applies all available patches but there may be some cases where only security related fixes are desired. It is possible to do this using the --security option.
This option can be combined with the check-update to return a list of patches which provide relief from a security vulnerability, but will skip anything else. It can also be included with the update command.
$ yum check-update
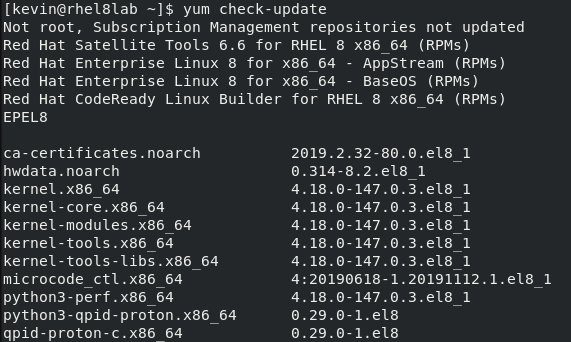
Add the --security option to limit this output to security-related updates.

For Red Hat Enterprise Linux systems, you can review the criticality of each update from either Red Hat Satellite or the customer portal. Each security errata has a rating (Critical, Important, Moderate, or Low) based on potential risk. The rating helps you determine how soon you need to schedule any updates to the system.
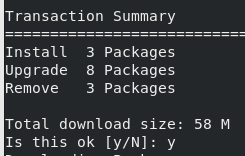
When you’re ready to patch, run the yum update command:
$ sudo yum update

Review the output and press Y when prompted.
Note: Kernel updates require a reboot, and this article lists what other packages require a reboot for RHEL systems. The yum-utils package also includes a needs-restarting utility that checks if a reboot is necessary.
Next steps
Vulnerability scans and compliance checks should be scheduled and performed as time allows. Two tools to explore this topic are OpenVAS and OpenSCAP. These tools provide a deeper analysis of the system, reporting on any existing vulnerabilities and gaps in compliance. If you have not used these tools before, they may take some time to set up and get comfortable with, but they should become your go-to tools for securing all of the systems you manage.
Closing it up
Being assigned to manage a system someone else built can certainly be intimidating. Throughout this review of your inherited system, you should be more familiar with it, and you will have improved its security. Continue with periodic security reviews for all of your systems as part of the system life cycle.
Be sure to check back for future articles as we dive deeper into vulnerability scanning and STIG processes.
[Want to try out Red Hat Enterprise Linux? Download it now for free.]
About the author
Kevin is a Technical Account Manager at Red Hat with over 20 years working in various IT roles. In addition to being in the trenches as a sysadmin designing, supporting, and securing Linux and Unix based systems, Kevin has managed and led numerous sysadmin teams and enterprise projects.
When he isn't digging into a problem or learning a new technology you may find him camping or hiking in the woods of Pennsylvania.
More like this
Beyond automation: Why the surge in AI-driven security vulnerabilities demands human technical advocacy
Fragnesia and friends: When page cache vulnerabilities keep coming back
Operating System Management | Compiler
Collaboration In Product Security | Compiler
Browse by channel

Automation
The latest on IT automation for tech, teams, and environments

Artificial intelligence
Updates on the platforms that free customers to run AI workloads anywhere

Open hybrid cloud
Explore how we build a more flexible future with hybrid cloud

Security
The latest on how we reduce risks across environments and technologies

Edge computing
Updates on the platforms that simplify operations at the edge

Infrastructure
The latest on the world’s leading enterprise Linux platform

Applications
Inside our solutions to the toughest application challenges
Virtualization
The future of enterprise virtualization for your workloads on-premise or across clouds