table { border: #ddd solid 1px; } td, th { padding: 8px; border: #ddd solid 1px; } td p { font-size: 15px !important; }
In the previous post, Using RHEL System Roles to automate and manage Network Bound Disk Encryption, I covered utilizing the NBDE System Roles with a simple scenario where a single Tang server was used. In this post, we’ll look at a more complex scenario where we use the NBDE System Roles to implement multiple Tang servers to provide high availability and increased security, and we’ll also cover how to utilize the System Roles to both rotate Tang keys, and back up Tang keys.
Background on NBDE System Roles
Red Hat Enterprise Linux (RHEL) has offered the ability to encrypt disks for many years. However, there previously wasn’t a good method for allowing these systems to automatically unlock their encrypted volumes. This would normally require an administrator to manually type the LUKS passphrase each time the systems were booted.
This is why Red Hat introduced the network bound disk encryption (NBDE) functionality, which implements policy-based decryption that can automatically unlock volumes by utilizing one or more network servers (referred to as Tang servers).
If you are implementing NBDE across your environment, you are probably interested in automating the installation, configuration, and ongoing maintenance tasks related to NBDE. This is why Red Hat has introduced the NBDE server and NBDE client System Roles, which can help automate these tasks. RHEL System Roles are a collection of Ansible roles and modules that are included in RHEL to help provide consistent workflows and streamline the execution of manual tasks.
Multiple Tang servers can provide high availability in the environment, so that your Clevis clients can still automatically unlock their encrypted volumes in the event that a Tang server is offline. You can also optionally require Clevis clients to connect to more than one Tang server, which can help increase the security of the environment.
Unlock the power of encryption with RHEL System Roles
If you aren’t already familiar with NBDE, please refer to the RHEL documentation on configuring automated unlocking of encrypted volumes using policy-based decryption and also refer to the Using RHEL System Roles to automate and manage Network Bound Disk Encryption post, where I cover the basics of these System Roles.
In the demo environment, I have several existing RHEL 8 and RHEL 7 clients that already have a LUKS encrypted root volume. By the end of the post, I’ll have implemented NBDE in the environment with multiple Tang servers using RHEL System Roles as well as implemented the ability to rotate the Tang keys and backup the Tang keys.
Environment overview
In my example environment, I have a control node system named controlnode running RHEL 8 and seven managed nodes:
-
Two RHEL 8 systems (rhel8-server1 and rhel8-server2).
-
Two RHEL 7 systems (rhel7-server1 and rhel7-server2).
-
Three RHEL 8 systems that I would like to be Tang servers (tang1, tang2, and tang3).

All seven of these managed nodes have encrypted root volumes. Whenever I reboot these systems, they pause at boot, and I must manually type in the encryption passphrase for them to continue booting:
I would like to use the NBDE client and server system roles to install and configure Tang on the tang1, tang2, and tang3 servers. The system roles should also implement the Clevis client on all seven managed nodes in the environment, so that they utilize NBDE to unlock the root volume at boot without manual user intervention.
When utilizing multiple Tang servers, you can optionally use Shamir’s Secret Sharing (SSS), which is an algorithm that essentially divides a key into several parts. You can configure how many of these different parts are necessary to access the complete key.
For example, if you have three Tang servers (such as in this demo) you can utilize SSS to specify that Clevis clients must be able to reach two, or even three, of the Tang servers before they have the ability to unlock their root volume. If SSS wasn’t used, the Clevis clients could unlock their root volumes as long as they could connect to at least one of the Tang servers.
This is configured on Clevis clients with a setting that is referred to as the threshold. In our example with three Tang servers, we could configure the Clevis threshold with one of the following values:
|
Clevis client threshold |
Result |
|
1 |
SSS not utilized, Clevis client can unlock volume as long as it can connect to any one of the Tang servers. |
|
2 |
SSS utilized, Clevis client must connect to at least two of the three Tang servers before it can unlock volume. |
|
3 |
SSS utilized, Clevis client must connect to all three of the Tang servers before it can unlock volume. |
Another consideration with the threshold setting is allowing for maintenance on the Tang servers. If we had three Tang servers and we set the Clevis threshold setting to 3, any time we took down any one of the Tang servers for maintenance (planned or unplanned), none of the client servers would be able to utilize NBDE to automatically unlock their encrypted volumes.
With all these considerations, I would like the NBDE client system role to set the threshold to 2 on all seven of the managed nodes in this demo environment.
As previously mentioned, the Tang servers will be Clevis clients of each other. This means if one of the Tang servers reboots, it must be able to connect to the remaining two Tang servers to automatically unlock its encrypted root volume.
Below is a summary of my desired configuration for the environment:
|
Host |
Threshold |
Bind to Tang servers |
|
rhel8-server1 |
2 |
tang1, tang2, tang3 |
|
rhel8-server2 |
2 |
tang1, tang2, tang3 |
|
rhel7-server1 |
2 |
tang1, tang2, tang3 |
|
rhel7-server2 |
2 |
tang1, tang2, tang3 |
|
tang1 |
2 |
tang2, tang3 |
|
tang2 |
2 |
tang1, tang3 |
|
tang3 |
2 |
tang1, tang2 |

As another example, the tang1 host will be bound to tang2 and tang3 and must be able to connect to both of them to have its root volume automatically unlocked:

I will also use the NBDE server system role to both back up the Tang keys on to the controlnode host and periodically rotate the Tang keys.
Each of these systems is configured to use DHCP. The NBDE client System Role does not currently support systems with Static IP addresses (see BZ 1985022 for more information).
I’ve already set up an Ansible service account on all of the hosts, named ansible, and have SSH key authentication set up so that the ansible account on controlnode can log in to each of the systems. In addition, the ansible service account has been configured with access to the root account via sudo on each host. I’ve also installed the rhel-system-roles and ansible packages on controlnode. For more information on these tasks, refer to the Introduction to RHEL System Roles post.
In this environment, I’m using a RHEL 8 control node, but you can also use Ansible Tower as your RHEL system role control node. Ansible Tower provides many advanced automation features and capabilities that are not available when using a RHEL control node. For more information on Ansible Tower and its functionality, refer to this overview page.
Defining the inventory file and role variables
I need to define an Ansible inventory to list and group the hosts that I want the NBDE system roles to configure.
From the controlnode system, the first step is to create a new directory structure:
[ansible@controlnode ~]$ mkdir -p nbde/group_vars
These directories will be used as follows:
The nbde directory will contain the playbook and the inventory file.
-
The
nbde/group_varsfile will define Ansible group variables that will apply to the groups of hosts that were defined in the inventory file.
I’ll create the main inventory file at nbde/inventory.yml with the following content:
all:
  children:
    nbde-servers:
      hosts:
        tang1:
        tang2:
        tang3:
    nbde-clients:
      hosts:
        rhel8-server1:
        rhel8-server2:
        rhel7-server1:
        rhel7-server2:
        tang1:
        tang2:
        tang3:
This inventory lists the seven hosts, and groups them into two groups:
-
nbde-servers group contains the tang1, tang2, and tang3 hosts.
-
nbde-clients group contains the rhel8-server1, rhel8-server2, rhel7-server1, rhel7-server, tang1, tang2, and tang3 hosts.
I can generate an encrypted string for this variable with the following command:
$ ansible-vault encrypt_string 'your_luks_password' --name "encryption_password"
Replace the your_luks_password with the password you currently have defined on your encrypted LUKS volumes. The “encryption_password” at the end of the line defines the Ansible variable name and should not be changed.
When this ansible-vault command is run, it will prompt you for a new vault password. This is the password you’ll need to use each time you run the playbook so that the variable can be decrypted. After you type a vault password, and type it again to confirm, the encrypted variable will be shown in the output, for example:
    encryption_password: !vault |
          $ANSIBLE_VAULT;1.1;AES256
333335663732386137346635613066636162373334636338346234613565373462336130666337326439363966303265373038666233326536636133376338380a383965646637393539393033383838386636356237333465663462306431373065323833643431333436393365383030343236393963353130356365396334360a38313232623730356362623833306263373530616535333430643035376162623539643033643266663236333332636633333262336332386538386139356335
Next, I’ll create a file that will define variables for the system listed in the nbde-clients inventory group by creating a file at nbde/group_vars/nbde-clients.yml with the following content:
nbde_client_bindings:
  - device: /dev/vda2
    encryption_password: !vault |
$ANSIBLE_VAULT;1.1;AES256
333335663732386137346635613066636162373334636338346234613565373462336130666337326439363966303265373038666233326536636133376338380a38396564663739353939303338383886636356237333465663462306431373065323833643431333436393365383030343236393963353130356365396334360a38313232623730356362623833306263373530616535333430643035376162623539643033643266663236333332636633333262336332386538386139356335
    threshold: 2
    servers: "{{ groups['nbde-servers'] | difference([inventory_hostname]) }}"
The nbde_client_bindings dictionary variable will be defined, containing several keys:
-
The device key will define the existing encrypted device on each host (/dev/vda2) that the role will bind with Clevis.
-
The encryption_password key, as previously discussed, will contain our current LUKS password, encrypted via Ansible Vault.
-
The threshold key defines the number of Tang servers the Clevis clients must be able to connect to, and is set to 2.
-
The servers key will define a list of Tang servers that the Clevis client should bind to. For this key’s value, I reference the list of hosts in the nbde-servers inventory group (tang1, tang2, and tang3), and utilize the difference filter to remove the current hostname from that list. As a result of this, each of the Tang servers, which are Clevis clients of each other, will only be configured to bind to the remaining two Tang servers. Each of the other hosts will be configured to bind with all Three Tang servers, as shown in the table below:
|
Host |
Bind to Tang servers |
|
rhel8-server1 |
tang1, tang2, tang3 |
|
rhel8-server2 |
tang1, tang2, tang3 |
|
rhel7-server1 |
tang1, tang2, tang3 |
|
rhel7-server2 |
tang1, tang2, tang3 |
|
tang1 |
tang2, tang3 |
|
tang2 |
tang1, tang3 |
|
tang3 |
tang1, tang2 |
I’ll also create a file that will define variables for the systems listed in the nbde-servers inventory group by creating a file at nbde/group_vars/nbde-servers.yml with the following content:
nbde_server_fetch_keys: yes
nbde_server_keys_dir: /home/ansible/nbde/keys
The nbde_server_fetch_keys variable set to yes will cause the NBDE server role to fetch the keys from the Tang servers, and back them up on the controlnode host in the location defined by the nbde_server_keys_dir variable, which in this example is /home/ansbile/nbde/keys. This will allow me to have a centralized backup of all of the Tang keys in the environment.
Creating the playbook
The next step is creating the playbook file at nbde/nbde.yml with the following content. This is the same playbook that was utilized in the previous blog post.
- name: Open firewall for Tang
  hosts: nbde-servers
  tasks:

    - firewalld:
        port: 80/tcp
        permanent: yes
        immediate: yes
        state: enabled

- name: Deploy NBDE Tang servers
  hosts: nbde-servers
  roles:
    - rhel-system-roles.nbde_server

- name: Create /etc/dracut.conf.d/nbde_client.conf
  hosts: nbde-clients
  tasks:
    - copy:
        content: 'kernel_cmdline="rd.neednet=1"'
        dest: /etc/dracut.conf.d/nbde_client.conf
        owner: root
        mode: u=rw

- name: Deploy NBDE Clevis clients
  hosts: nbde-clients
  roles:
    - rhel-system-roles.nbde_client
The first task, Open Firewall for Tang, runs on the nbde-servers group (which contains the three Tang servers) and will open TCP port 80 in the firewall, which is necessary for the Clevis clients to connect to the Tang servers.
The second task, Deploy NBDE Tang servers, also runs on the nbde-servers group (containing the three Tang servers). This task calls the nbde_server system role, which will install and configure Tang on the servers.
The third task, Create /etc/dracut.conf.d/nbde_client.conf, runs on hosts in the nbde-clients group (which contains all seven of the managed nodes). This task is needed due to recent RHEL 8 changes related to Clevis and its dracut modules. For more information, see this issue in the upstream Linux System Roles project.
And the final task, Deploy NBDE Clevis clients, which also runs on hosts in the nbde-clients group (containing all seven of the managed nodes), calls the nbde_client system role, which will install and configure the Clevis client, utilizing the role variables we previously defined in the nbde/group_vars/nbde-clients.yml file.
If you are using Ansible Tower as your control node, you can import this Ansible playbook into Red Hat Ansible Automation Platform by creating a Project, following the documentation provided here. It is common to use Git repos to store Ansible playbooks. Ansible Automation Platform stores automation in units called Jobs, which contain the playbook, credentials and inventory. Create a Job Template following the documentation here.
Running the playbook
At this point, everything is in place, and I’m ready to run the playbook. If you are using Ansible Tower as your control node, you can launch the job from the Tower Web interface. For this demonstration I’m using a RHEL control node and will run the playbook from the command line. I’ll use the cd command to move into the nbde directory, and then use the ansible-playbook command to run the playbook.
[ansible@controlnode ~]$ cd nbde

[ansible@controlnode nbde]$ ansible-playbook nbde.yml -b -i inventory.yml --ask-vault-pass
I specify that the nbde.yml playbook should be run, that it should escalate to root (the -b flag), and that the inventory.yml file should be used as my Ansible inventory (the -i flag). I also specified the --ask-vault-pass argument which will cause ansible-playbook to prompt me for the Ansible Vault password that can be used to decrypt the encryption_password variable that was previously encrypted.
After the playbook completes, I verified that there were no failed tasks:

Validating the configuration
To validate that the Tang service is active on the Tang servers, I’ll run systemctl status tangd.socket on each of them:

The tangd.socket is active on all of the Tang servers, so I’ll check the status of Clevis on the RHEL 8 hosts (the clevis luks list command is not available on RHEL 7):

This output indicates that the /dev/vda2 device is bound to tang1, tang2, and tang3 for the rhel8-server1 and rhel8-server2 hosts. Each of the three Tang servers is bound to the other two Tang servers. Note that the “t” setting, which is the SSS threshold, is set to 2 for all hosts, meaning that each of these Clevis host bindings must be able to connect to at least two of the listed Tang servers in order to automatically unlock their encrypted volumes.
As a final test, I’ll reboot rhel8-server1, rhel7-server1, and tang1 at the same time, and validate that they all boot up successfully without requiring the LUKS passphrase to be manually typed in.
The hosts boot up and each briefly pauses at the LUKS passphrase prompt:
However, at this point each of the systems is working on initiating a connection to the Tang servers in the background, and after around five or ten seconds, the systems continue to boot with no manual intervention.
In the event that at least two of the Tang servers were not reachable, I could still manually type the original LUKS passphrase to unlock the device and boot up the system.
Centralized backup of Tang Keys
Previously, I set the nbde_server_fetch_keys variable to yes, and set the nbde_server_keys_dir variable to /home/ansible/nbde/keys within the nbde/group_vars/nbde-servers.yml file. This caused a backup of the Tang keys from each of the three Tang hosts to be placed in the /home/ansible/nbde/keys directory on the controlnode host:

Rotating Tang keys with NBDE server system role
It is recommended to periodically rotate the Tang server keys. The NBDE server system role has a nbde_server_rotate_keys variable that can be set to yes which will cause the role to rotate the keys.
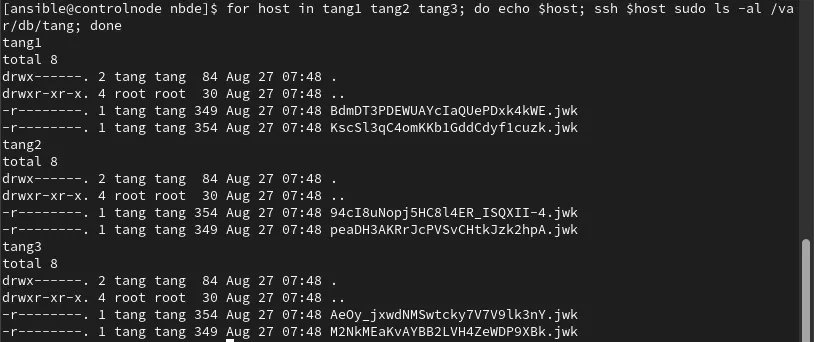
Before we rotate the keys, let’s first check the status of the keys on each host:
I will then re-run the original nbde.yml playbook. However this time I will enable the nbde_server_rotate_keys variable on the ansible-playbook command line with the -e flag:
$ ansible-playbook nbde.yml -b -i inventory.yml --ask-vault-pass -e nbde_server_rotate_keys=yes
The playbook runs and completes successfully:

I’ll again check the status of the Tang keys on each of the Tang servers:
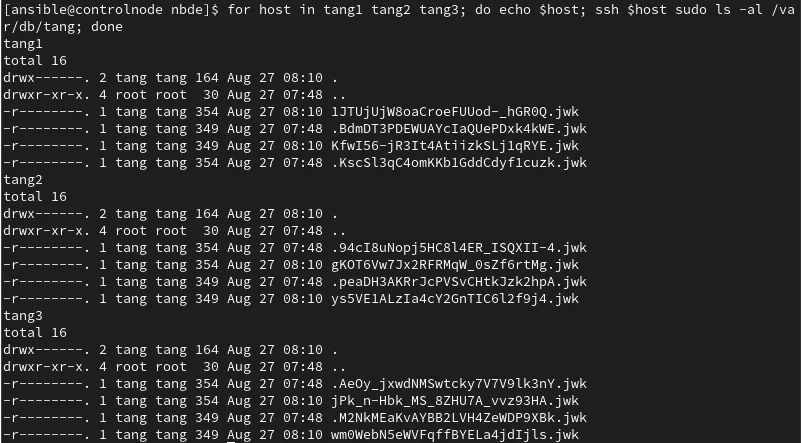
Based on the output, I can see that new Tang keys were generated for each of the Tang servers, and the original keys were renamed as hidden files, starting with a period. The old/original keys won't be advertised by the Tang server, but they are still available if any clients were not updated with the new keys.
The NBDE clent system role also updated all seven of the Clevis clients to utilize the new Tang keys, so at this point, I could delete these old Tang key files (that start with a period) from each of the Tang servers if I was confident that no other Clevis clients in the environment were using them.
Conclusion
The NBDE Client and NBDE Server System Roles can make it quicker and easier to implement Network Bound Disk Encryption across your RHEL environment, even with complex implementations that utilize multiple Tang servers.
We covered how to centralize backing up your Tang keys onto the control node host, as well as how to periodically rotate the Tang keys utilizing the system roles.
We offer many RHEL system roles that can help automate other important aspects of your RHEL environment. To explore additional roles, review the list of available RHEL System Roles and start managing your RHEL servers in a more efficient, consistent and automated manner today.
Want to learn more about Red Hat Ansible Automation Platform? Check out our e-book, "The automated enterprise: Unify people and processes."
.boxed { border: 1px solid black ; }
关于作者

Brian Smith is a product manager at Red Hat focused on RHEL automation and management. He has been at Red Hat since 2018, previously working with public sector customers as a technical account manager (TAM).


