Today for my 30 day challenge, I decided to learn JBoss Forge.
JBoss Forge is a rapid application development tool used to build Maven based Java applications. It helps Java developers quickly get started with web application development.
This blog shows how to develop a simple todo application using JBoss Forge. This application exposes JaxRS based RESTful web services consumed by an Angularjs based front end. All of this done using JBoss Forge without writing a single line of code.
Let's get started.

Prerequisite
- Sign up for an OpenShift Account. It is free and instant. Red Hat gives every user three free Gears on which to run your applications. At the time of this writing, the combined resources allocated for each user is 1.5 GB of memory and 3 GB of disk space.
- Basic Java knowledge is required.
- Basic Git knowledge is required. Git is a distributed revision control system and source code management system. In case you are not aware of git , you can refer to this tutorial.
- Install the latest Java Development Kit (JDK) on your operating system. You can either install OpenJDK 7 or Oracle JDK 7. OpenShift supports OpenJDK 6 and 7.
- Download the latest Eclipse package for your operating system from the official Eclipse website. At the time of writing this blog, the latest Eclipse package is called Kepler.

It is very easy to install eclipse , just extract the downloaded package and you are done. On linux or mac machines , open a new command line terminal and type the command shown below.
$ tar -xzvf eclipse-jee-kepler-R-*.tar.gz
On windows, you can extract the zip file using winzip or 7-zip or any other software.
After you have extracted the Eclipse, there is a folder named eclipse in the directory where you extracted Eclipse. You can optionally create a shortcut of the executable file.
Step 1 : Install OpenShift and JBoss Forge Eclipse Plugin
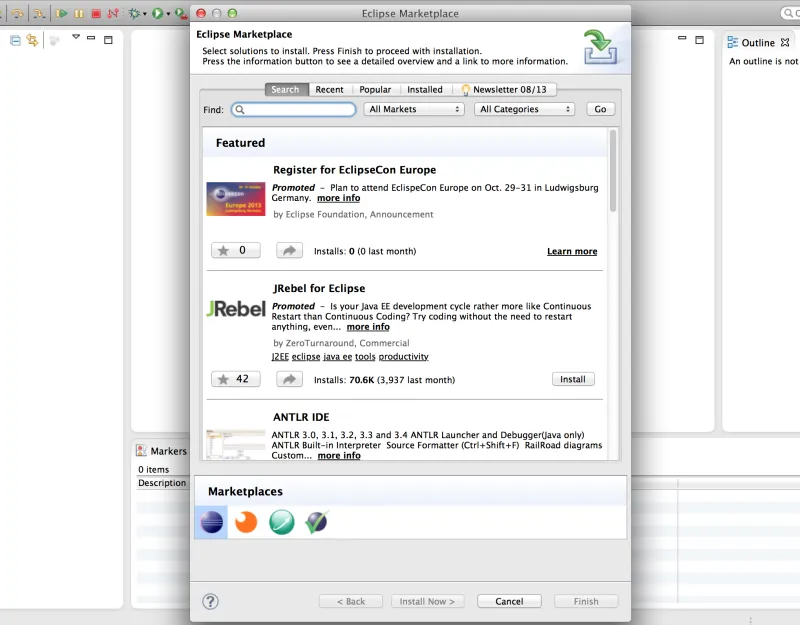
Once you have downloaded and extracted the Eclipse Kepler IDE for Java EE, open Eclipse and navigate to your project workspace. Go to Help > Eclipse Marketplace and you will see a screen as shown below.

In the search box, type "jboss tools" and press the Go button.

After pressing the Go button, you will see "JBoss Tools(Kepler)" as the first result as shown below.

Now press the install button, you will get a list of plugins which you can install. Since the purpose of this blog is to demonstrate OpenShift, we will only choose "JBoss OpenShift Tools" as shown below. After selecting "JBoss OpenShift Tools" press the "Confirm" button.

Next you're asked to accept the license. Click "I accept the terms of the license agreement" radio button and then press the Finish button as shown below.

Eclipse will next show a security warning as the plugin is unsigned. Press the OK button and you're be asked to restart the Eclipse so that changes can be applied. Press Yes to restart Eclipse.

Step 2 : Change JBoss Forge installation to 1.4.1
The JBoss Forge plugin uses old JBoss forge version 1.3.1 but in this blog, we will use JBoss forge 1.4.1 version. The reason is that JBoss Forge Angularjs plugin does not work with version 1.3.1. So download the JBoss Forge installation from http://forge.jboss.org/. Once downloaded, extract the zip to a convenient location and go to the Eclipse preferences as shown below.

On a Windows machine, go to Windows > Preferences.
Under preferences , go to Forge > Installed Forge Runtimes as shown below and add a new runtime.

Now click on the 'Add' button to add new a Forge runtime as shown below. Press OK after adding the details.

After you have added the installation, choose it as your default installation as shown below and press the OK button.

Step 4 : Start JBoss Forge
After you have updated the JBoss Forge version, you should start the forge. To do that, open the forge console by navigating to Window > Show View > Other > Forge > Forge Console as shown below.

Double click on "Forge Console" and one more tab view is available in Eclipse, where you can start/stop Forge.

Start the forge by clicking the green button and you will see as shown below.

Step 5: Create Maven Project
Now that we have successfully started Forge 1.4.1 , lets create our first Forge Maven project.
To create a new project, type the command shown below in the forge console.
[no project] forge $ new-project --named todoapp --topLevelPackage com.todoapp --finalName todoapp
The command tells forge to create a project with the name todoapp and to use top level package as com.todoapp. Also , the final name of the artifact is todoapp. Once the project is created, it's imported as a Maven project in Eclipse.
After you type the command mentioned above, forge also asks you whether you want to use the following directory as a project directory. If you press enter, it chooses the default option.
You can tell Forge to automatically use default options for every command by setting ACCEPT_DEFAULTS to true. In the Forge shell, run the following command.
set ACCEPT_DEFAULTS true;
Step 6 : Add Persistence
Forge also makes it very easy to add JPA based persistence in the application. To add JPA, run the command shown below in the Forge shell.
[todoapp] todoapp $ persistence setup --provider HIBERNATE --container JBOSS_AS7
This creates persistence.xml and binds to java:jboss/datasources/ExampleDS.
Step 7 : Create Todo Entity
Now we create a Todo JPA entity and add four fields to it.
[todoapp] todoapp $ entity --named Todo


[todoapp] Todo.java $ field string --named task


[todoapp] Todo.java $ field string --named description


[todoapp] Todo.java $ field temporal --type DATE --named createdOn


[todoapp] Todo.java $ field boolean --named completed
To view the content of any Java class you can use the ls command as shown below. This lists all the fields and methods in the class.
[todoapp] Todo.java $ ls


[fields]

private::Date::createdOn;        private::Long::id;               private::String::description;    private::String::task;           private::boolean::completed;     private::int::version;


[methods]

public::equals(Object that)::boolean                      public::getCompleted()::boolean                           public::getCreatedOn()::Date                              public::getDescription()::String                          public::getId()::Long                                     public::getTask()::String                                 public::getVersion()::int                                 public::hashCode()::int                                   public::setCompleted(final boolean completed)::void       public::setCreatedOn(final Date createdOn)::void          public::setDescription(final String description)::void    public::setId(final Long id)::void                        public::setTask(final String task)::void                  public::setVersion(final int version)::void               public::toString()::String
Step 8 : Expose RESTful Web services
Now we will use JBoss Forge to generate a REST endpoint for the Todo entity. Therefore, we need to setup the JBoss Forge REST plugin. Type the rest setup command as shown below.
[todoapp] Todo.java $ rest setup --activatorType APP_CLASS

***SUCCESS*** Installed [forge.maven.WebResourceFacet] successfully.

***SUCCESS*** Installed [forge.spec.servlet] successfully.

***SUCCESS*** Installed [forge.spec.jaxrs.applicationclass] successfully.

***SUCCESS*** Installed [forge.spec.jaxrs] successfully.

***SUCCESS*** Rest Web Services (JAX-RS) is installed.

Wrote /Users/shekhargulati/dev/workspaces/forge/todoapp/src/main/webapp

Wrote /Users/shekhargulati/dev/workspaces/forge/todoapp/pom.xml

Wrote /Users/shekhargulati/dev/workspaces/forge/todoapp/src/main/java/com/todoapp/rest/RestApplication.java

[todoapp] Todo.java $
In the command shown above, we used the Application class approach to activate JAX-RS instead of defining in web.xml. The above command creates a class named RestApplication which extends javax.ws.rs.ApplicationPath.
Now we can use Forge to generate our RESTful endpoints.
[todoapp] todoapp $ rest endpoint-from-entity --contentType application/json com.todoapp.model.Todo.java
The command shown above created a standard RESTful webservice for our Todo JPA entity with all the required annotations and Java code.
Step 9 : Scaffold AngularJS front end
The default scaffold mechanism supported by Forge is JSF. But you are free to choose other scaffold technologies like Angularjs as well. To use Angularjs , we have to install the Angularjs scaffold plugin.
In the Forge console, type the command shown below. This will install Forge Angularjs plugin.
[todoapp] todoapp $ forge install-plugin angularjs
Once installed you can set up Angularjs scaffolding by executing the command shown below.
[todoapp] todoapp $ scaffold-x setup --scaffoldType angularjs
This will setup Angularjs in our todoapp. Now we can generate the view for Todo entity.
[todoapp] model $ scaffold-x from Todo.java
Now we have successfully created our first Forge application.
Step 10 : Deploy to OpenShift
The last step is deployment to OpenShift. OpenShift JBoss tools plugin makes it easy to deploy Java web application from Eclipse. In this blog, we will deploy an existing Eclipse application to OpenShift. You can also refer to my earlier blog on OpenShift Eclipse integration.
Go to your eclipse and click File > New > Other > OpenShift Application as shown below and click next

Provide your OpenShift account credentials after pressing the 'Next' button. If you have not signed up for an OpenShift account, you can click the 'sign up here' link on the wizard to create your OpenShift account. Enter your OpenShift account username and password. Check the 'Save password' checkbox to avoid entering your password with every command and click 'Next'.

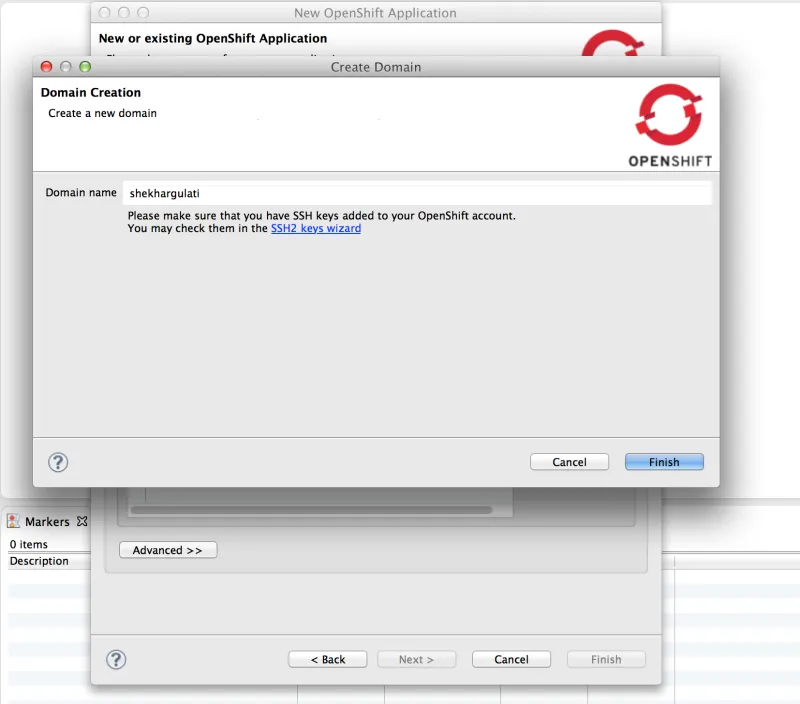
Next, you're asked to create an OpenShift domain name. Every account needs to have one domain name which should be unique among all OpenShift users. One account can have only one domain name. Domain names form part of the url that OpenShift assigns to an application. For example, if your application name is 'awesomeapp' and your namespace is 'onopenshiftcloud', then the url of application is http://awesomeapp-onopenshiftcloud.rhcloud.com. Enter your unique domain name and press finish.

After the domain is created, you're directed to an application creation wizard. Enter the details required to create an application like the name of the application, type of the application, gear profile(whether you want small instance or medium instance. For FreeShift users,you can only create small instances), scaled application or non scaled application, and whether you want to embed any or multiple cartridges like mysql, postgresql, mongodb etc. We will create an application named todoapp which uses a jbosseap-6 cartridge.

Next you are asked to set up a todoapp and configure server adapter settings. Choose the default and click next.

The next screen will ask you to specify the location where you want to clone the git repository and the name of the git remote. Choose the default options.
Finally, press the 'finish' button and you are done. This will create an application container for us, called a gear, and setup all of the required SELinux policies and cgroup configurations. OpenShift will also setup a private git repository for you and clone the repository to your local system. Next, OpenShift will propagate the DNS to the outside world. Finally, the project is imported to your eclipse workspace.
OpenShift Eclipse tooling will merge the changes and will ask you whether you want to push the application code to OpenShift.

You can view the application running online by going to the following url http://todoapp-{domain-name}.rhcloud.com. Please replace {domain-name} with your OpenShift account domain name.

Conclusion
In this blog we covered how you can use JBoss Forge and OpenShift Eclipse integration to build Java EE applications. OpenShift Eclipse plugin makes it very easy to work with OpenShift. So, if you are a Java (EE) developer looking for a deployment platform then give OpenShift a try.
Next Steps
- Sign up for OpenShift Online and try this out yourself
- Promote and show off your awesome app in the OpenShift Application Gallery today.
