This is part 1 of a tutorial that demonstrates how to add OpenShift Virtualization 2.5 to an existing OpenShift 4.6 cluster and start a Fedora Linux VM inside that cluster.
Please refer to “Your First VM with OpenShift Virtualization Using the Web Console” for the introduction of this tutorial and for links to all of its parts.
Because this tutorial performs all actions using the OpenShift Web Console, you could follow it from any machine you use as a personal workstation, such as a Windows laptop. You do not require a shell prompt to type oc or kubectl commands.
Before showing how to install OpenShift Virtualization, this tutorial verifies that your cluster nodes are able to run virtual machines using KVM. Yes, OpenShift Virtualization is based on the same tried and tested hypervisor technology that is embedded into the Linux Kernel and used by Red Hat Virtualization and Red Hat OpenStack Platform.
Verifying That Your Cluster Supports KVM
You can use the Web Console to verify that your cluster nodes have hardware virtualization enabled and are able to load the KVM kernel modules before you attempt to install OpenShift Virtualization. That saves you a lot of frustration and troubleshooting time if your cluster is just not enabled for virtualization.
My test cluster is a compact cluster with three-node minimal nodes. It is the minimum required to install OpenShift 4 without an infrastructure provider. Your cluster may include dedicated compute nodes, but you do not require them to run virtual machines. You can run VMs in a schedulable control plane node as well as any other workload.
Please rely on the written instructions more than on the screen captures. They are here mostly to provide you visual aid and assurance that you are on the correct page for each step.
Log in to your cluster’s web console as a cluster administrator and click Compute → Nodes to view the list of control plane nodes (masters) and compute nodes (workers) of your cluster:
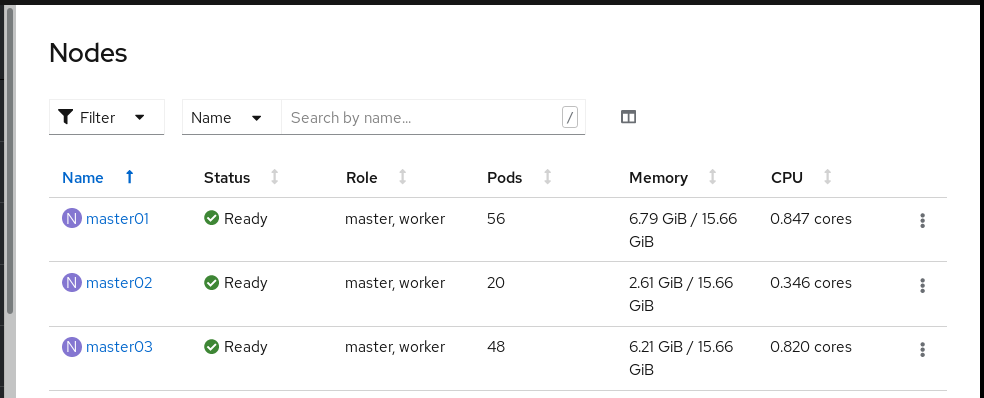
Pick one of them to start a terminal session. My nodes are all of the same type, so if it works for one, it should work for all of them. Click master01 to enter its Node Details page, and click the Terminal tab. Check its /proc/cpuinfo file for hardware capabilities on your cores, and check if the kvm kernel module loads:
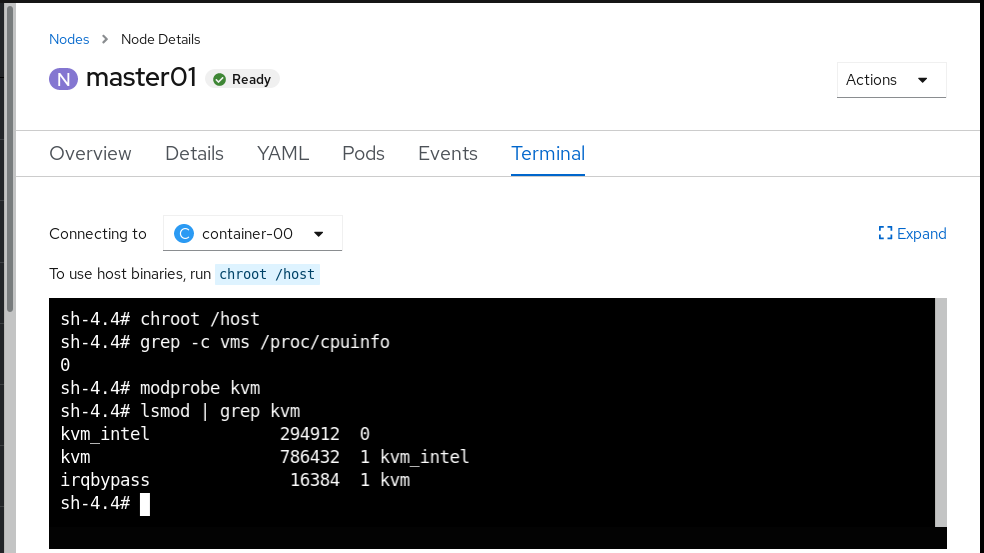 Note that it is not sufficient that the kvm module loads. If it does not load a CPU-specific kvm module, such as kvm_intel in the example above, you will not be able to start VMs with OpenShift Virtualization.
If you are using an AMD CPU, replace “vmx” with “svm” in the grep command from the previous screen shot.
Next Steps
Now that you know that your cluster nodes are enabled to run virtual machines, you can proceed to part 2 of this tutorial: “Adding OpenShift Virtualization to your OpenShift Cluster Using the Web Console.”
关于作者

Fernando lives in Rio de Janeiro, Brazil, and works on Red Hat's certification training for OpenShift, containers, and DevOps.


