At times, it may not be possible to use a pre-existing image to deploy virtual machines (VM) in your OpenShift Virtualization environment. There may be several reasons for this: an image containing the desired operating system may not be available or maybe the available images do not have the application or configuration that all systems in your environment need.
In these situations, an image must be created. This blog post runs through the process of creating a Microsoft Windows 10 image that can be used in an OpenShift Virtualization environment. Although Microsoft Windows 10 was used in this blog post, the basic process should work for most operating systems that can be installed from installation media in an ISO format.
If an existing Microsoft Windows 10 image is available, see this blog post on the Creation of Windows Virtual Machines from existing VM images for information on how to install the needed drivers and how to get the image into an OpenShift Virtualization environment.
Please note that Microsoft is a registered trademark of the Microsoft Corporation.
The Environment
The environment used in this blog post consists of five nodes running as an OpenShift Container Platform (OCP 4.6) cluster. The cluster consists of three master nodes running as virtual machines on a Red Hat Enterprise Linux 8 (RHEL8) server. The two compute nodes in the cluster are running on two physical servers.
The Microsoft Windows 10 installation ISO is provided by an HTTP server and specified using a URL. This can be done by either using a link directly from the Microsoft download page or by hosting the image on a local HTTP server.
The procedures discussed in this blog post require OpenShift 4.6 or greater and that the OpenShift Virtualization operator be installed. Once the operator is installed, OpenShift Virtualization must be deployed and storage must be configured. See the OpenShift Virtualization documentation on how to install and configure these.
This cluster is using the hostpath-provisioner for storage. The provisioner is included with OpenShift Virtualization 2.5, but must be configured separately. The hostpath-provisioner is configured to provision the storage when a VM is started, to ensure the VM is started on the same nodes as the storage it uses. Everything in this blog works also with other storage providers.
Documentation on how to use OpenShift Virtualization is available on the website or by selecting the question mark (?) at the top of the GUI interface.
Providing the Installation ISO
The ISO used to install the operating system must be specified using a URL. This means the images must be provided by a web server. The image can be hosted on a local or existing webserver or, in the case of Windows 10, can be used directly from the Microsoft download page.
Using an ISO from the Microsoft Download Page
To use an image directly from the Microsoft download page you must get its download link.
For example, to install Windows 10 from the Microsoft download page, navigate to the Windows 10 download page using a browser.
You will be prompted for the edition of Windows 10 to download then prompted for the language of the edition to download.
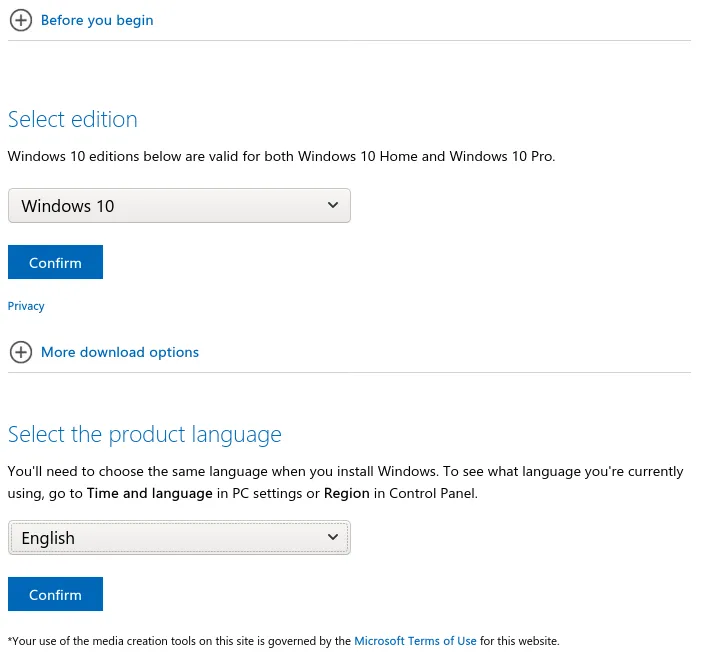
After selecting the product language, a page providing a link to the editions is presented.
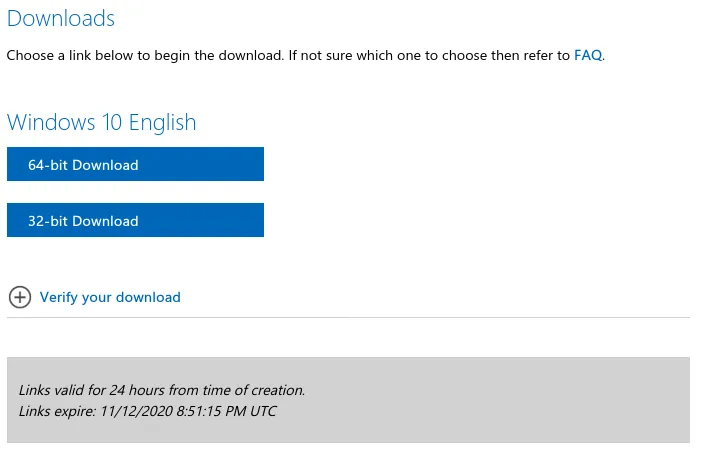
Right clicking on the link will allow you to copy the URL for the ISO image. Make note of this link, it is unique for this download request and is only available for the amount of time specified.
When creating the VM, this link can be used for the URL. If you will not be able to create the VM within the time the link is valid, then you must either request another link or download the image and host it locally.
Hosting an Image on a Local HTTP Server
The ISO image to be used to install the VM can be hosted on a local HTTP server. Setting up a Red Hat Enterprise Linux 8 (RHEL8) server to host the ISO image can be done in a few short steps.
On a RHEL8 server, install the httpd package.
# dnf -y install httpdThe httpd service must be started and should be enabled to start upon boot of the server.
# systemctl start httpd
# systemctl enable httpd
By default, the firewall on the server will prevent access to port 80 on the server. Since this port is used for http traffic, it must be opened on the firewall. This is done in two steps, the first is to open it immediately and the second makes the configuration permanent across server reboots.
# firewall-cmd --add-port 80/tcp
# firewall-cmd --add-port 80/tcp --permanent
Place the installation ISO into the /var/www/html directory. The SeLinux security contexts must be set to allow the httpd service to access the file. The following command will make sure the SeLinux security contexts are set correctly.
# restorecon -rv /var/www/htmlPreparing a VM
To create an image using installation media a VM must be created. This section shows how to create a temporary virtual machine to use to install the OS from installation media.
Log into the OpenShift Web Console as a regular user. Create a new VM by selecting Workloads -> Virtualization.
Select a project that the VM and disk images will be created in, I used a project called sandbox in this blog post. Next select Create Virtual Machine -> New with Wizard. This wizard will step through configuring the virtual machine. The following sections discuss what configurations are needed to create this image.

General Configuration
The first configuration window in the wizard is for the General configuration of the VM. There are several fields to be configured on this screen. Please see the documentation for OpenShift Virtualization for more information about the fields in the wizard. For more information, see the documentation on Creating virtual machines.
Make sure the Boot Source is set to URL. Once this is set, a URL field appears. Enter the URL of the Windows installation ISO, this is either the URL provided by the Microsoft download page or the URL to the copy on the local HTTP server..
Select the appropriate Operating System to reflect the version of Windows being installed. Selecting this will display a checkbox called Mount Windows guest tools. Make sure this is box checked.
Complete the remaining fields as appropriate for the version of Windows being installed.

Networking Configuration
A single network interface (NIC) should be defined for the VM. The NIC is set to use the virtio virtual adapter by default. Using this virtual adapter prevents the VM from having network and internet access during installation because Windows does not contain a driver for this virtual adapter. If network connectivity is required during the installation of the operating system, change the virtual adapter to e1000e.
Note: The virtio drivers are optimized for running in virtual machines and should provide better performance. Normally, you would want to use the virtio devices and drivers in your VMs. Since this post is only using the VM to create a disk image, it should not matter which driver is used unless you need network connectivity during the installation process.

Storage Configuration
This screen shows two disks listed, a CD-ROM device and a Disk device. The CD-ROM device uses a container that contains the Windows guest tools and drivers and does not need any modification.
The Disk device, named rootdisk, uses the Windows installation ISO and should be a CD-ROM device and not a Disk device. Edit the Disk device called rootdisk. This is done by selecting the kebab menu (three vertical dots) on the right side of the device.

Change the Name of the disk to something different than rootdisk. Make sure the Size parameter is large enough to hold the ISO image. Set the Interface to SATA and the Type to CD-ROM. Setting the Storage-Class is required if there is not a default Storage-Class defined.

A disk is needed to install the operating system on. Create a new disk by selecting the Add Disk button, set the Source to Blank so the installation can install to an empty device. Set the Name to rootdisk. Set the Size appropriately. Make sure to set the Interface to virtio and the Type to Disk. Set the Storage-Class if needed. The name and size for the disks should be set appropriately for the version of Windows being installed.
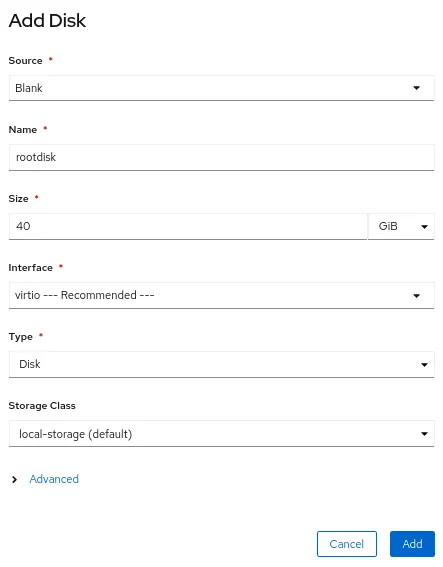
After the storage is configured, there should be three storage devices defined.

Advanced Configuration
The Advanced tab does not need to be configured for this VM. A screenshot is included for completeness, but this tab can be skipped.

Review of the Configuration
This lets you review the configuration of the VM being created. You can go back to previous steps if the configuration is not correct. Once the configuration is reviewed and determined to be correct, select the Create Virtual Machine button.
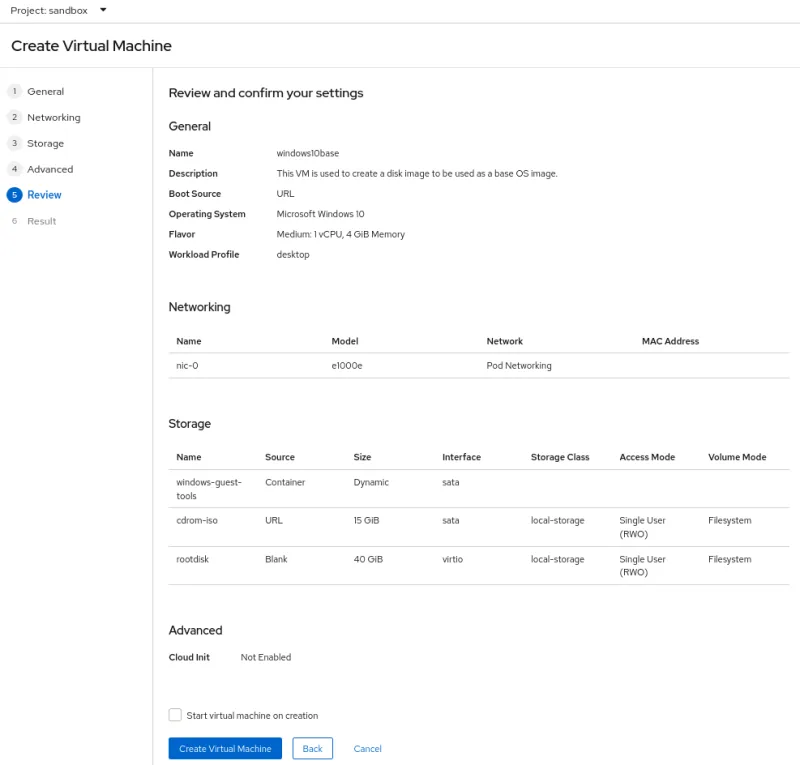
Result of the VM Creation
The VM should be successfully created. Select the See virtual machine details button.
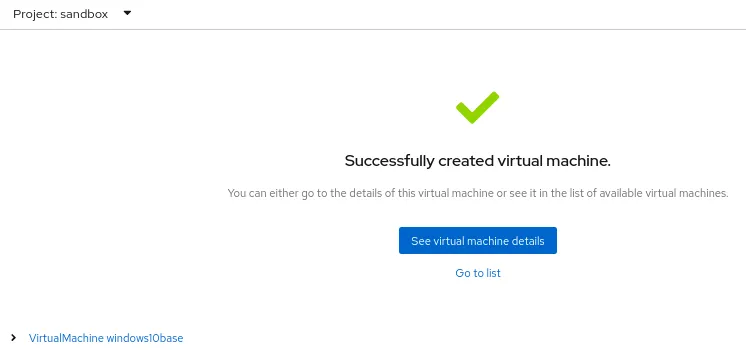
Virtual Machine Details
The Status of the VM will show Importing (CDI). This means the installation ISO specified by the URL is being copied to a persistent volume claim (PVC). After the copy is complete, the Status of the VM will change to Off. Once the Status is Off, the VM can be started and the installation of the OS can begin.

Installing the Windows Operating System
This post will not walk through the entire Windows installation, but will highlight any deviations from the normal installation.
Start the VM and open its console. You should see the Windows installation screen. Complete each screen of the installation program appropriately. If prompted to choose between multiple installation types, choose a type that will allow the installation of custom drivers. When installing Windows 10, there is a Custom option that allows this.
The installation wizard will not be able to detect the added disk that uses the virtio storage device. This is the disk that is intended to be the installed operating system disk. The installation wizard will prompt to load a driver.

Select Load driver. Do not select Browse on the following screen, instead select Ok and the wizard will scan the attached media for device drivers.
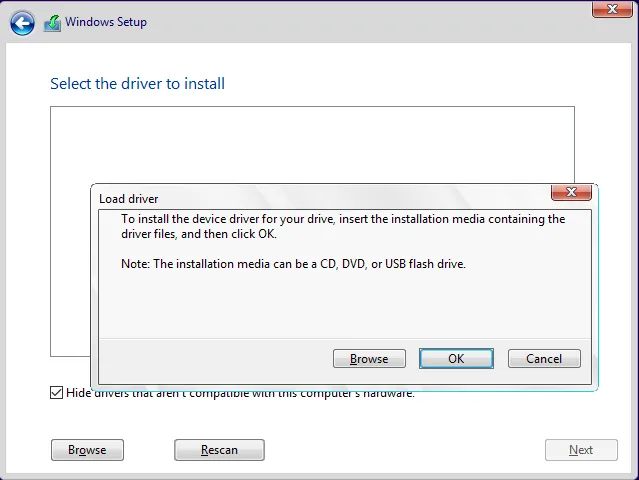
The wizard will list the drivers that were found. Select the Red Hat VirtIO SCSI controller driver that is appropriate for the operating system being installed. For Windows 10, it is the driver located in the w10 directory.

After the wizard installs the driver, the disk should be seen. Select the disk and continue with the installation.
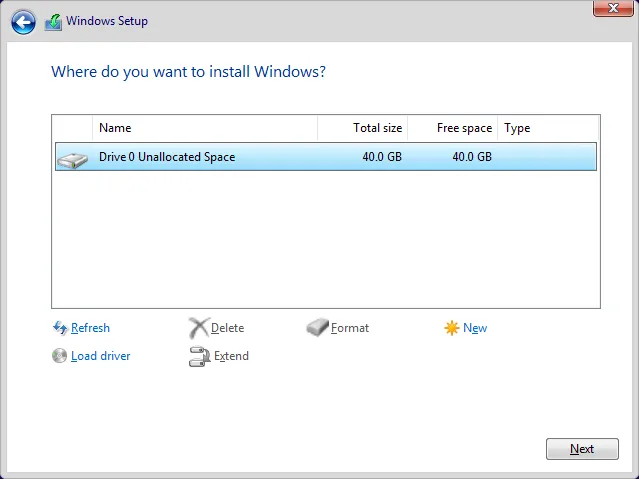
Installing the Guest Agent and Virtio Drivers
Once the installation completes, the remaining virtio drivers and the guest agent must be installed. Browse to the cdrom drive containing the virtio-win image.
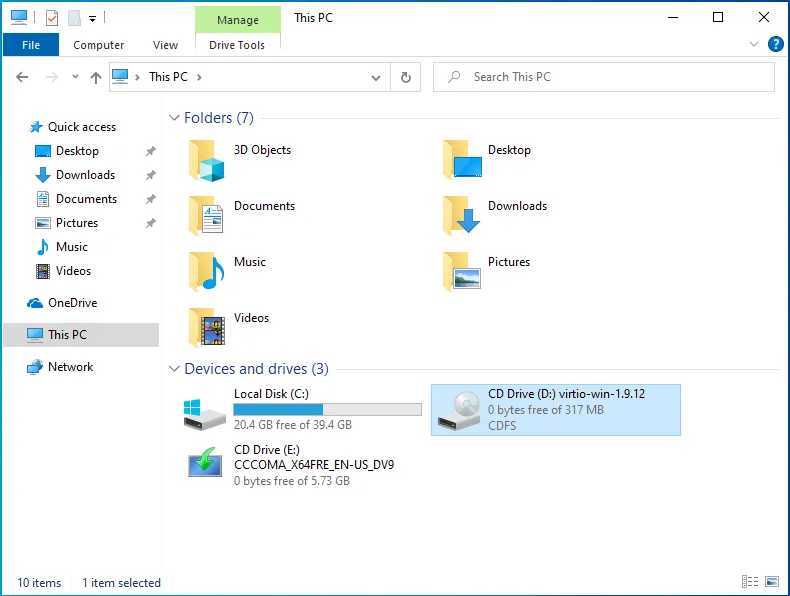
Execute the virtio-win-guest-tools.exe application. This will install the virtio drivers and guest agent.

After reading and agreeing to the license terms and conditions, select Install.
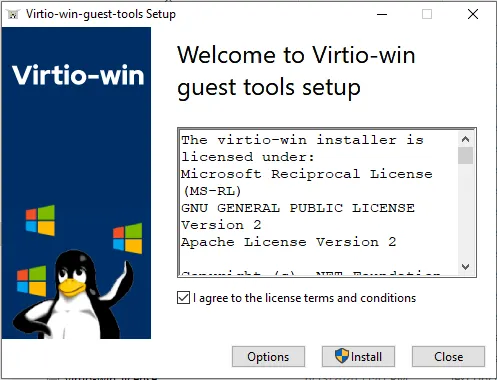
If prompted to allow the software to make changes to the device, select Yes.

After the guest tools are installed, the virtio driver installation wizard starts. This wizard will install the remaining virtio drivers for the OS. A Custom Setup screen will appear after the Welcome and License screens.
By default all drivers are selected to be installed. Continue to install the drivers.

Updating the OS
The virtual machine should now have network connectivity. Install any updates to the OS, this prevents each VM created from the image from needing to install them.
After the updates are installed, Stop the VM using the OpenShift Web Console. The VM should start its shutdown process if the guest agent was installed correctly.
Please note that shutting the VM down should be done using the OpenShift Web Console. Using the power off button inside the OS will cause OpenShift Virtualization to restart the VM.
Preparing the Windows OS
The OS should be generalized to become a base OS image. This process removes any configuration and settings that are specific to this VM. A Windows provided utility called sysprep.exe utility performs these steps.
First, start the VM to finish applying any updates that were installed. After the OS finishes booting, open a command prompt. This can be done by pressing the Windows + R keys simultaneously and then entering cmd.exe. After the command prompt is opened, execute the sysprep.exe command as seen below. Make sure to include the options at the end of the command.
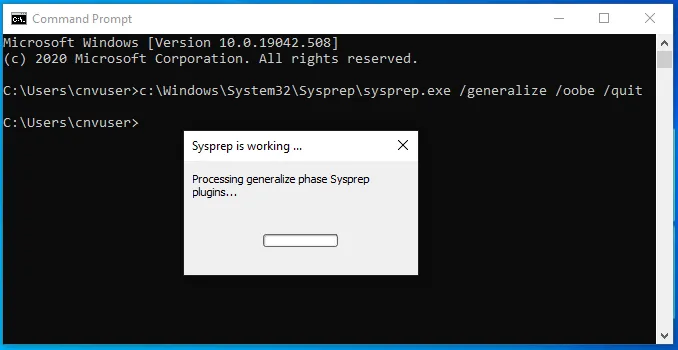
The command will prepare the OS to be used as a base OS image. Once the command completes, stop the VM using the OpenShift Web Console. After the VM stops, do not start it again. If the VM is started, the system preparation step will need to be performed again.
Creating the Base OS Image
A base OS image is a disk image of an installed operating system stored in the openshift-virtualization-os-images project namespace. This image is cloned to become the disk image of a VM when the VM is created.
To make the image created in this blog post a base OS image, it must be cloned to the openshift-virtualization-os-images namespace. This procedure is covered in the Creating Base OS Images to Auto-Clone in OpenShift Virtualization blog post.
Sobre el autor
Más como éste
Ford's keyless strategy for managing 200+ Red Hat OpenShift clusters
F5 BIG-IP Virtual Edition is now validated for Red Hat OpenShift Virtualization
Edge computing covered and diced | Technically Speaking
Kubernetes and the quest for a control plane | Technically Speaking
Navegar por canal
Automatización
Las últimas novedades en la automatización de la TI para los equipos, la tecnología y los entornos
Inteligencia artificial
Descubra las actualizaciones en las plataformas que permiten a los clientes ejecutar cargas de trabajo de inteligecia artificial en cualquier lugar
Nube híbrida abierta
Vea como construimos un futuro flexible con la nube híbrida
Seguridad
Vea las últimas novedades sobre cómo reducimos los riesgos en entornos y tecnologías
Edge computing
Conozca las actualizaciones en las plataformas que simplifican las operaciones en el edge
Infraestructura
Vea las últimas novedades sobre la plataforma Linux empresarial líder en el mundo
Aplicaciones
Conozca nuestras soluciones para abordar los desafíos más complejos de las aplicaciones
Virtualización
El futuro de la virtualización empresarial para tus cargas de trabajo locales o en la nube
