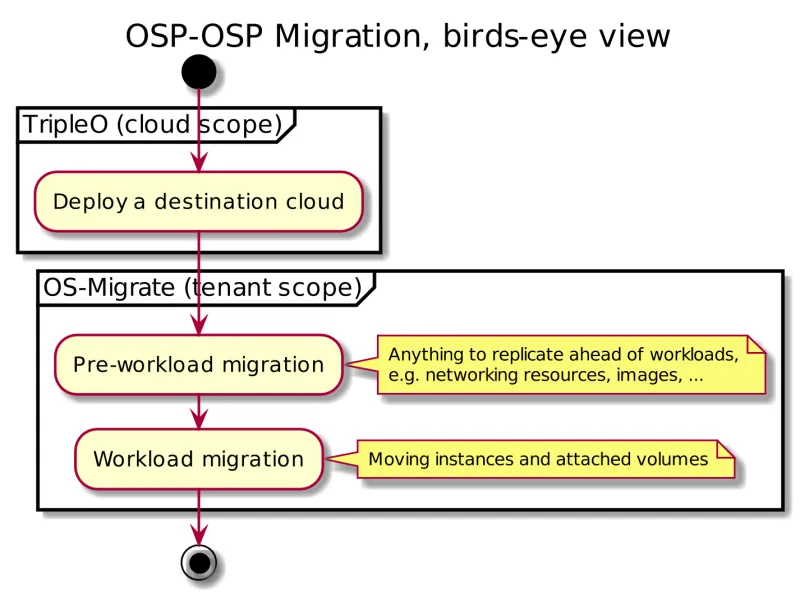
In this post we will cover a parallel cloud migration from a Red Hat OpenStack Platform 13 cluster to a Red Hat OpenStack Platform 16 cluster using some tools put together by Red Hat engineering. The goal is to demonstrate control plane and workload migration between clusters.
This is a technology preview, so we're not recommending this for customers to use in production at this time. However, we like to show our work early and would be happy to get feedback from the OpenStack Platform users who might like to test this out in a non-production environment.
Parallel cloud migration is a way to modernize an OpenStack Platform deployment. Instead of upgrading an OpenStack Platform cluster in place, a second OpenStack Platform cluster is deployed alongside, and tenant content is migrated from the original cluster to the new one. Parallel cloud migration is best suited for environments which are due for a hardware refresh cycle. It may also be performed without a hardware refresh, but extra hardware resources are needed to bootstrap the new cluster. As hardware resources free up in the original cluster, they can be gradually added to the new cluster.

OS-Migrate is an open source project that provides a framework for exporting and importing resources between two clouds. It’s a collection of Ansible playbooks that provide the basic functionality, but may not fit each use case out of the box. You can craft custom playbooks using the OS-Migrate collection pieces (roles and modules) as building blocks.
OS-Migrate strictly uses the official OpenStack API and does not utilize direct database access or other methods to export or import data. The Ansible playbooks contained in OS-Migrate are idempotent. If a command fails, you can retry with the same command.
Pre-workload Migration
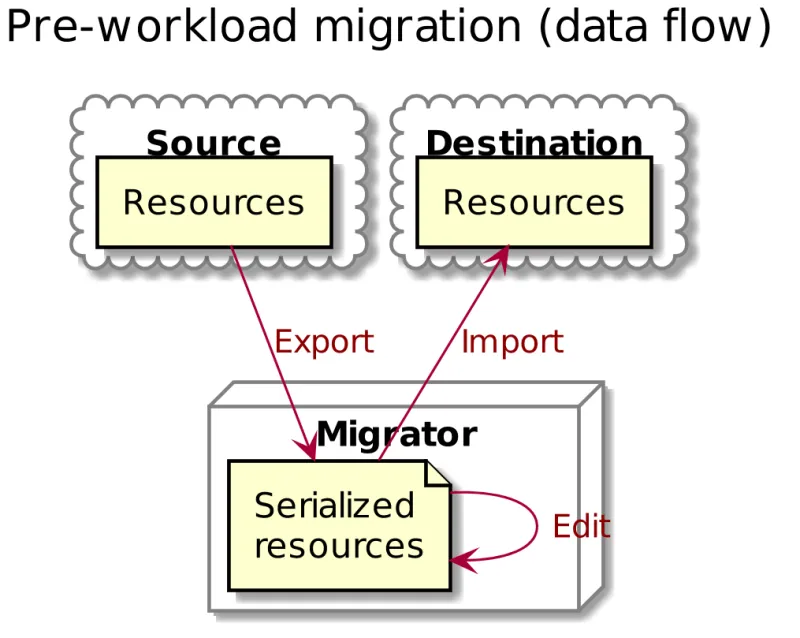
Workloads require the support of several resources in a given cloud to operate properly. Some of these resources include networks, subnets, routers, router interfaces, security groups, and security group rules. The pre-workload migration process includes exporting these resources from a source cloud to a destination cloud.
Exporting or importing resources is enabled by running the corresponding playbook from os-migrate. For example, to export the networks run the “export_networks” playbook and the following YAML file is created.
os_migrate_version: 0.0.2
resources:
- _info:
availability_zones:
- nova
created_at: '2020-04-07T14:08:30Z'
id: a1eb31f6-2cdc-4896-b582-8950dafa34aa
project_id: 2f444c71265048f7a9d21f81db6f21a4
qos_policy_id: null
revision_number: 3
status: ACTIVE
subnet_ids:
- a5052e10-5e00-432b-a826-29695677aca0
- d450ffd0-972e-4398-ab49-6ba9e29e2499
updated_at: '2020-04-07T14:08:34Z'
  params:
availability_zone_hints: []
description: ''
dns_domain: null
is_admin_state_up: true
is_default: null
is_port_security_enabled: true
is_router_external: false
is_shared: false
is_vlan_transparent: null
mtu: 1450
name: osm_net
provider_network_type: null
provider_physical_network: null
provider_segmentation_id: null
qos_policy_name: null
segments: null
  type: openstack.network.Network
You may edit the file as needed and then run the “import_networks” playbook to import the networks from this file into the destination cloud.


Workload Migration
Workload information is exported in a similar method to networks, security groups, etc. as in the previous sections. Run the "export_workloads" playbook, and edit the resulting workloads.yml as desired:
os_migrate_version: 0.0.1
resources:
- _info:
    addresses:
      external_network:
      - OS-EXT-IPS-MAC:mac_addr: fa:16:3e:98:19:a0
        OS-EXT-IPS:type: fixed
        addr: 10.19.2.41
        version: 4
    flavor_id: a96b2815-3525-4eea-9ab4-14ba58e17835
    id: 0025f062-f684-4e02-9da2-3219e011ec74
    status: SHUTOFF
  params:
    flavor_name: m1.small
    name: migration-vm
    security_group_names:
    - testing123
    - default
  type: openstack.compute.Server
Note that this playbook only extracts metadata about instances in the specified tenant - it does not download OpenStack volumes directly to the migration data directory! Data transfer is handled by the import_workloads playbook, and it is a fairly involved process to create an environment where this playbook will run successfully. The next few sections detail the process and some of the rationale for various design choices.
Process Summary
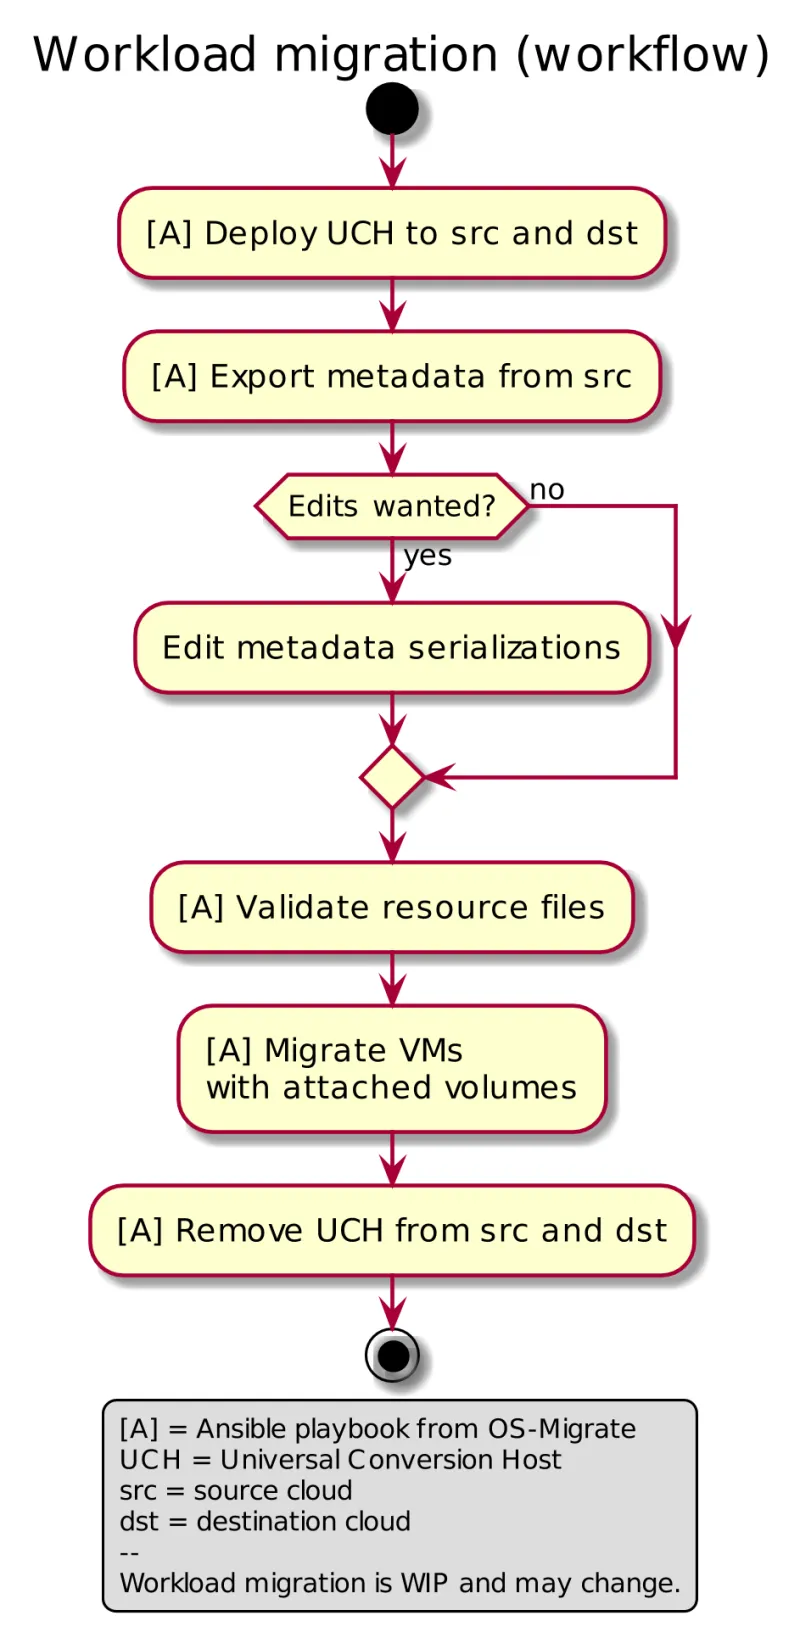
This flowchart illustrates the high-level migration workflow, from a user’s point of view:

The process involves the deployment of a “Universal Conversion Host” on source and destination clouds. A UCH is an OpenStack instance booted from the “Universal Conversion Image” provided by ManageIQ here. This image contains the tools needed for exporting and converting virtual machines from various virtualization platforms. The official release for this appliance has not been finalized, but the final process will work the same way.
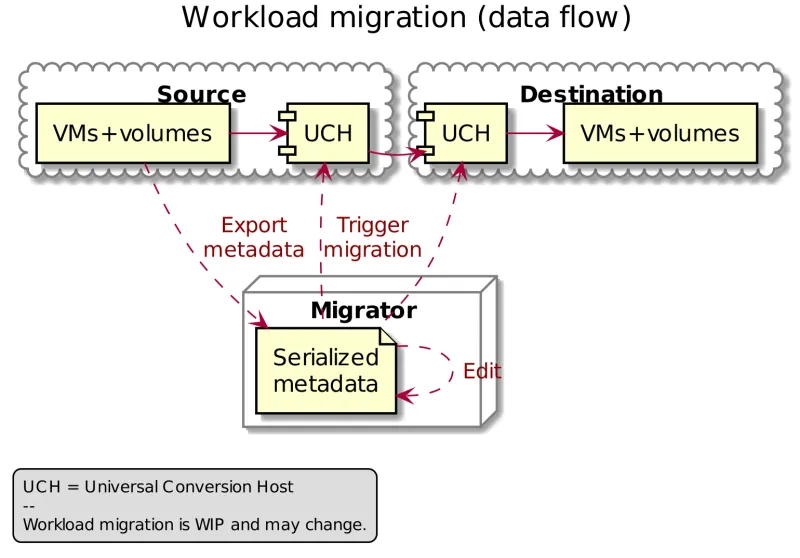
The following diagram helps explain the need for a conversion host VM:

This shows that volumes on the source and destination clouds are removed from their original VMs and attached to their respective UCH, and then transferred over the network from the source UCH to the destination. The tooling inside the UCH migrates one instance by automating these actions on the source and destination clouds:
Source Cloud:
-
Detach volumes from the target instance to migrate
-
Attach the volumes to the source conversion host
-
Export the volumes as block devices and wait for destination conversion host to connect
Destination Cloud:
-
Create new volumes on the destination conversion host, one for each source volume
-
Attach the new volumes to the destination conversion host
-
Connect to the block devices exported by source conversion host, and copy the data to the new attached volumes
-
Detach the volumes from the destination conversion host
-
Create a new instance using the new volumes
This method keeps broad compatibility with the various flavors and configurations of OpenStack using as much of an API-only approach as possible, while allowing the use of libguestfs-based tooling to minimize total data transfer.
Preparation
Before beginning, there are a number of things to gather or validate to help guide a successful migration:
-
Verify the configuration of basic OpenStack services. The migration tooling makes use of glance, cinder, nova, keystone, and neutron. Most other services (e.g. Swift) are not currently required.
-
Verify credentials for the tenant containing the workloads to migrate in the source OpenStack cloud and the tenant to receive the workloads in the destination OpenStack cloud. Migration does not require administrative credentials in either of these tenants.
-
Make sure networking and security groups are configured to allow external SSH access to instances in the source and destination tenants - the destination conversion host will run SSH commands on the source conversion host.
-
Shut down the instances that are going to be migrated. Currently this OpenStack to OpenStack migration solution only supports cold migration.
-
Verify quotas on both source and destination clouds:
-
The source cloud will need at least one instance slot available for the conversion host, and one available volume and one available snapshot to migrate volume-based instances. This is because in order to migrate boot volumes that cannot be detached, a volume snapshot of a VM's boot disk will be taken and a new volume will be created from that volume snapshot. This new volume will be attached to the source conversion host for export, and should be removed along with the snapshot after the process completes.
-
For instances started directly from an image, the source tenant will need to be able to create one server image and one volume from that image. In this case, a new server image snapshot is created from the instance, and a new volume is created from that image.
-
The destination cloud will need one instance slot reserved for the conversion host, and one volume for every volume attached to the instances coming in from the source cloud. Image-based instances on the source cloud will be converted to volume-based instances on the destination, so allocate one extra volume for every such instance.
-
-
Configure SSH keys. It is recommended to create a new SSH key for migration purposes. This key will need to be authorized on the source and destination conversion hosts, and it will need to be provided to the ansible playbook orchestrating the migration. This step is required because the ansible playbook needs password-less SSH access to the destination conversion host, and the destination conversion host needs password-less SSH access to the source conversion host. The examples assume that a new SSH key has been generated and placed in the os_migrate ansible data directory on the migrator workstation.
-
Install conversion host instances on the source and destination clouds:
-
Obtain a Universal Conversion Image and upload it to the source and destination tenants, alongside the VMs that are going to be migrated. Launch this image as a new instance in the source and destination tenants using the SSH key from the previous step, and verify external network access.
-
Obtain the VMware vSphere Virtual Disk Development Kit. This is not actually used for an OpenStack-to-OpenStack migration, but the underlying virt-v2v-wrapper tool may check for its existence depending on the version of the conversion host appliance. This kit is not redistributable and therefore must be installed manually to /opt on the source and destination conversion host instances, for example:
-
# scp -i migration.key VMware-vix-disklib-6.5.2-6195444.x86_64.tar.gz cloud-user@192.168.55.30:/home/cloud-user
VMware-vix-disklib-6.5.2-6195444.x86_64.tar.gz                                    100%   19MB  41.2MB/s   00:00
# ssh -i migration.key cloud-user@192.168.55.30 sudo tar -xf /home/cloud-user/VMware-vix-disklib-6.5.2-6195444.x86_64.tar.gz -C /opt
Migration
To actually perform the migration, configure the os_migrate ansible variables to include information about source and target clouds, and about the conversion hosts on each one. For example:
# cat os-migrate-vars.yml
os_migrate_data_dir: /home/migrator/os-migrate-data
os_migrate_conversion_host_key: /home/migrator/os-migrate-data/migrate.key
os_migrate_src_filters: {}

os_migrate_src_auth:
        auth_url: https://192.168.55.53:13000/v3
        username: migration-source-user
        password: migrate
        project_domain_id: default
        project_name: migration-source-project
        user_domain_id: default
os_migrate_src_validate_certs: False
os_migrate_src_conversion_host: source-conversion-host

os_migrate_dst_auth:
        auth_url: https://192.168.55.54:13000/v3
        username: migration-destination-user
        password: migrate
        project_domain_id: default
        Project_name: migration-destination-project
        user_domain_id: default
os_migrate_dst_validate_certs: False
os_migrate_dst_conversion_host: destination-conversion-host
If not already exported, export workload information with the export_workloads playbook. Each instance listed in the resulting workloads.yml will be migrated, except for the one matching the name given to the source conversion host instance. Note: before migrating workloads, the destination cloud must have imported all other resources (networks, security groups, etc.) or the migration will fail! Matching named resources (including flavor names) must exist on the destination before the instances are created.
# export OS_MIGRATE=/home/migrator/.ansible/collections/ansible_collections/os_migrate/os_migrate
# ansible-playbook -i $OS_MIGRATE/localhost_inventory.yml -e @os-migrate-vars.yml $OS_MIGRATE/playbooks/export_workloads.yml
Finally, run the import_workloads playbook:
# ansible-playbook -i $OS_MIGRATE/localhost_inventory.yml -e @os-migrate-vars.yml $OS_MIGRATE/playbooks/import_workloads.yml
After a few minutes, results should start showing up looking something like this:
PLAY [migrator] ********************************************************************************************************************

TASK [Gathering Facts] ********************************************************************************************************************
[DEPRECATION WARNING]: Distribution fedora 31 on host localhost should use /usr/bin/python3, but is using /usr/bin/python for backward compatibility with prior Ansible releases. A future Ansible release will default to using the
discovered platform python for this host. See https://docs.ansible.com/ansible/2.9/reference_appendices/interpreter_discovery.html for more information. This feature will be removed in version 2.12. Deprecation warnings can be disabled by setting deprecation_warnings=False in ansible.cfg.
ok: [localhost]

TASK [import_workloads : validate loaded resources] ********************************************************************************************************************
ok: [localhost]

TASK [import_workloads : stop when errors found] ********************************************************************************************************************
skipping: [localhost]

TASK [import_workloads : read workloads resource file] ********************************************************************************************************************
ok: [localhost]

TASK [import_workloads : get source conversion host address] ********************************************************************************************************************
ok: [localhost]

TASK [import_workloads : check source conversion host status] ********************************************************************************************************************
skipping: [localhost]

TASK [import_workloads : get destination conversion host address] ********************************************************************************************************************
ok: [localhost]

TASK [import_workloads : check destination conversion host status] ********************************************************************************************************************
skipping: [localhost]

TASK [import_workloads : import workloads] ********************************************************************************************************************
changed: [localhost] => (item={'_info': {'addresses': {'external_network': [{'OS-EXT-IPS-MAC:mac_addr': 'fa:16:3e:98:19:a0', 'OS-EXT-IPS:type': 'fixed', 'addr': '10.19.2.41', 'version': 4}]}, 'flavor_id': 'a96b2815-3525-4eea-9ab4-14ba58e17835', 'id': '0025f062-f684-4e02-9da2-3219e011ec74', 'status': 'SHUTOFF'}, 'params': {'flavor_name': 'm1.small', 'name': 'migration-vm', 'security_group_names': ['testing123', 'default']}, 'type': 'openstack.compute.Server'})
changed: [localhost] => (item={'_info': {'addresses': {'external_network': [{'OS-EXT-IPS-MAC:mac_addr': 'fa:16:3e:d7:ae:16', 'OS-EXT-IPS:type': 'fixed', 'addr': '10.19.2.50', 'version': 4}]}, 'flavor_id': 'a96b2815-3525-4eea-9ab4-14ba58e17835', 'id': '0ca7b7d6-6679-4d46-99e5-866672d3e869', 'status': 'SHUTOFF'}, 'params': {'flavor_name': 'm1.small', 'name': 'second-migration-vm', 'security_group_names': ['default']}, 'type': 'openstack.compute.Server'})
skipping: [localhost] => (item={'_info': {'addresses': {'external_network': [{'OS-EXT-IPS-MAC:mac_addr': 'fa:16:3e:14:12:46', 'OS-EXT-IPS:type': 'fixed', 'addr': '10.19.2.39', 'version': 4}]}, 'flavor_id': 'd0c1507e-92ce-48c5-9287-59c7b4e57467', 'id': '240d0194-ee2a-4708-b2c1-bde082887c59', 'status': 'ACTIVE'}, 'params': {'flavor_name': 'ims.conversion-host', 'name': 'source-conversion-host-2', 'security_group_names': ['default']}, 'type': 'openstack.compute.Server'})
changed: [localhost] => (item={'_info': {'addresses': {'external_network': [{'OS-EXT-IPS-MAC:mac_addr': 'fa:16:3e:06:3e:c2', 'OS-EXT-IPS:type': 'fixed', 'addr': '10.19.2.44', 'version': 4}]}, 'flavor_id': 'a96b2815-3525-4eea-9ab4-14ba58e17835', 'id': '980e76f6-9143-475d-89f8-e708342b90e2', 'status': 'SHUTOFF'}, 'params': {'flavor_name': 'm1.small', 'name': 'fourth-migration-vm', 'security_group_names': ['default']}, 'type': 'openstack.compute.Server'})
skipping: [localhost] => (item={'_info': {'addresses': {'external_network': [{'OS-EXT-IPS-MAC:mac_addr': 'fa:16:3e:3a:9b:72', 'OS-EXT-IPS:type': 'fixed', 'addr': '10.19.2.40', 'version': 4}]}, 'flavor_id': 'd0c1507e-92ce-48c5-9287-59c7b4e57467', 'id': 'ce4dda96-5d8e-4b67-aee2-9845cdc943fe', 'status': 'ACTIVE'}, 'params': {'flavor_name': 'ims.conversion-host', 'name': 'latestuci', 'security_group_names': ['default']}, 'type': 'openstack.compute.Server'})
skipping: [localhost] => (item={'_info': {'addresses': {'external_network': [{'OS-EXT-IPS-MAC:mac_addr': 'fa:16:3e:3d:d1:25', 'OS-EXT-IPS:type': 'fixed', 'addr': '10.19.2.37', 'version': 4}]}, 'flavor_id': 'd0c1507e-92ce-48c5-9287-59c7b4e57467', 'id': 'a4e688e4-8d22-4469-9535-a8c867797c61', 'status': 'ACTIVE'}, 'params': {'flavor_name': 'ims.conversion-host', 'name': 'source-conversion-host-', 'security_group_names': ['default']}, 'type': 'openstack.compute.Server'})

PLAY RECAP ********************************************************************************************************************
localhost                  : ok=6    changed=1    unreachable=0    failed=0    skipped=3    rescued=0    ignored=0
Any instance marked “changed” should be successfully migrated to the destination cloud. Instances are “skipped” if they are still running, or if they match the name or ID of the specified conversion host. If there is already an instance on the destination matching the name of the current instance, it will be marked “ok” and no extra work will be performed:
TASK [import_workloads : import workloads] ******************************************************************************************************************
ok: [localhost] => (item={'_info': {'addresses': {'external_network': [{'OS-EXT-IPS-MAC:mac_addr': 'fa:16:3e:98:19:a0', 'OS-EXT-IPS:type': 'fixed', 'addr': '10.19.2.41', 'version': 4}]}, 'flavor_id': 'a96b2815-3525-4eea-9ab4-14ba58e17835', 'id': '0025f062-f684-4e02-9da2-3219e011ec74', 'status': 'SHUTOFF'}, 'params': {'flavor_name': 'm1.small', 'name': 'migration-vm', 'security_group_names': ['testing123', 'default']}, 'type': 'openstack.compute.Server'})
Current in-flight work includes better transfer progress tracking and removal of the VDDK requirement.
Status and final thoughts
As we mentioned, this is a technology preview and not ready for production use. But we hope to make this available in the future for customers looking to ease the upgrade path between LTS releases of Red Hat OpenStack Platform. Keep watching the Red Hat Blog for updates and more about our work on OpenStack Platform.
Sobre los autores
Más como éste
Looking ahead to 2026: Red Hat’s view across the hybrid cloud
Key considerations for 2026 planning: Insights from IDC
Crack the Cloud_Open | Command Line Heroes
Edge computing covered and diced | Technically Speaking
Navegar por canal
Automatización
Las últimas novedades en la automatización de la TI para los equipos, la tecnología y los entornos
Inteligencia artificial
Descubra las actualizaciones en las plataformas que permiten a los clientes ejecutar cargas de trabajo de inteligecia artificial en cualquier lugar
Nube híbrida abierta
Vea como construimos un futuro flexible con la nube híbrida
Seguridad
Vea las últimas novedades sobre cómo reducimos los riesgos en entornos y tecnologías
Edge computing
Conozca las actualizaciones en las plataformas que simplifican las operaciones en el edge
Infraestructura
Vea las últimas novedades sobre la plataforma Linux empresarial líder en el mundo
Aplicaciones
Conozca nuestras soluciones para abordar los desafíos más complejos de las aplicaciones
Virtualización
El futuro de la virtualización empresarial para tus cargas de trabajo locales o en la nube
