
What’s that you say? You got your hands on a shiny new OpenShift Online Next Gen Developer Preview account and need to know how to add a database to your project. Never fear my friends, I have you covered in this blog post.
In this post I will cover how to add a database (mysql) to your project using the web console. I will be using the following application as an example to confirm that database is probably configured and working:
<a href="https://github.com/gshipley/phpdatabase.git"><span>https://github.com/gshipley/phpdatabase.git</span></a>
Step 1: Create a new application
Creating a new application is a fairly easy process using either the command line tool (oc) or the web console. When using the web console, click on add to project as shown in the following image:

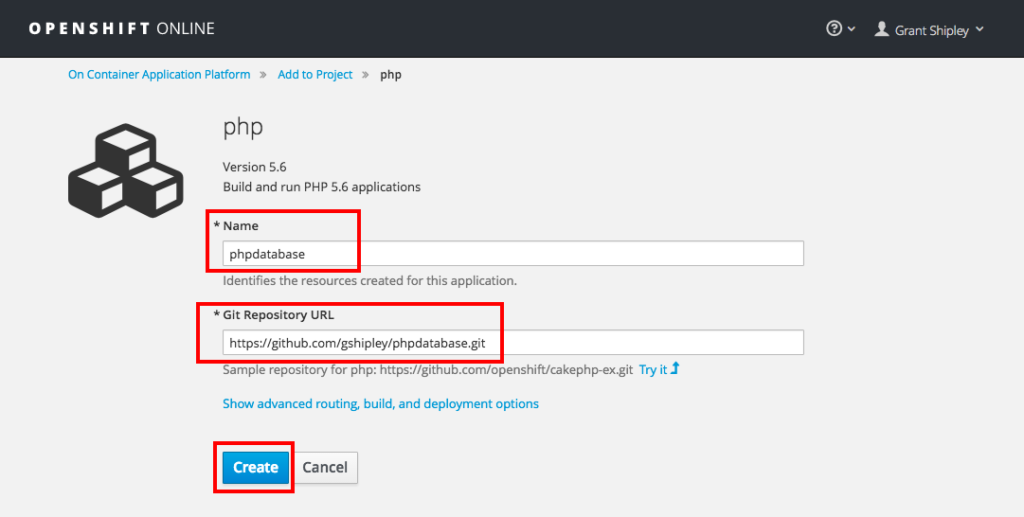
On the next screen, select to use the php:latest builder image and then provide the name of your application, the git repository and finally click the create button:
Once your application has been created, verify that it is working by visiting the URL in your web browser, you should be greeted with the following message:
Welcome to OpenShift Online Developer PreviewTo test the database, hit the dbtest.php URL
Step 2: Add a Database
Now that we have a small application that is running, we can add a database. At the current time, we provide default docker images for MongoDB, MySQL, and PostgreSQL but you are free to use any database that you enjoy. For this example, I will using the mysql database. Go to your project overview page and click on Add to Project button just as we did during step 1 of the post.
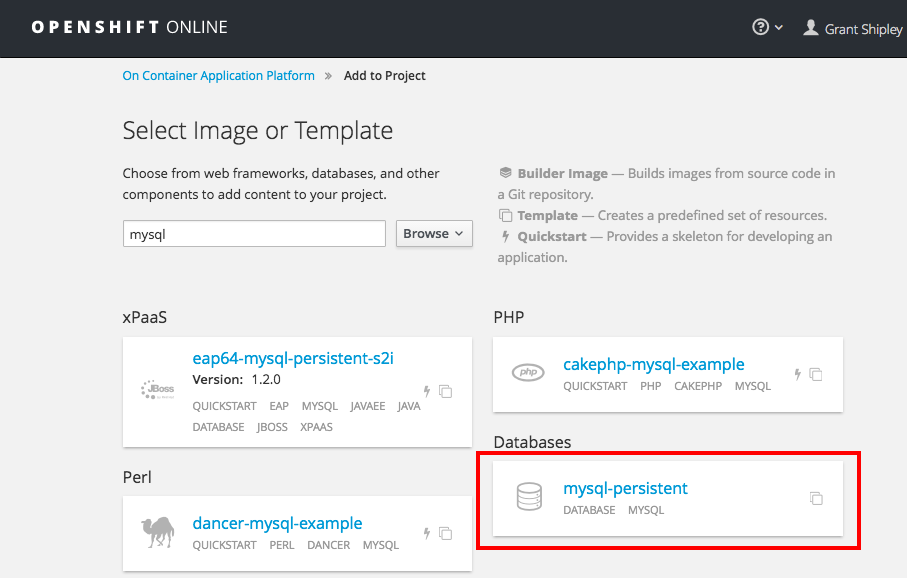
On the following page, filter for mysql and select the mysql-persistent image as shown in the following image:
On the following screen, you will be able to specify some configuration items that determines things such as the amount of memory your database can consume, authentication information, and the volume capacity for the disk. Leave everything the default except for the following fields:
| MySQL User | myuser |
| MySQL Password | mypassword |
| MySQL Database Name | mydatabase |
Note: If you don’t specify authorization credentials, some will be generated for you. This is considered the best practice versus hard coding them. However, for simplification to demonstrate how to add a database, I have created static ones.

Once you have added your username, password and database name, click on the Create button.
Step 3: Linking the database to the application
When we added the database, the platform stored all of the information needed to connect to the database as system environment variables initially only accessible to the database pods. The following variables were created in this example:
MYSQL_PREFIX=/opt/rh/rh-mysql56/root/usrMYSQL_VERSION=5.6
MYSQL_DATABASE=mydatabase
MYSQL_PASSWORD=mypassword
MYSQL_PORT_3306_TCP_PORT=3306
MYSQL_PORT_3306_TCP=tcp://172.30.43.191:3306
MYSQL_SERVICE_PORT_MYSQL=3306
MYSQL_PORT_3306_TCP_PROTO=tcp
MYSQL_PORT_3306_TCP_ADDR=172.30.43.191
MYSQL_SERVICE_PORT=3306
MYSQL_USER=myuser
MYSQL_PORT=tcp://172.30.43.191:3306
MYSQL_SERVICE_HOST=172.30.43.191
In order to be able to communicate to the database using these environment variables, we need to add them to the DeploymentConfig of our application. Adding the environment variables to the DeploymentConfig instead of directly in the running pod ensures that any new pod will be started with the variables it needs to connect. You could certainly just hard code these values in your application code but that is not a best practice! This can be done using the following command:
<span>oc env dc phpdatabase -e MYSQL_USER=myuser -e MYSQL_PASSWORD=mypassword -e MYSQL_DATABASE=mydatabase </span>
Once you enter in the above command, you will notice that your application starts a redeployment. This is because the current running state of the application does not match we have specified in the DeploymentConfig. Due to this mismatch, OpenShift updates the running application to match what we have defined as the “truth” in the DeploymentConfig.
Now that you have added your authentication information as environment variables, you can verify the connection was successful by visiting the /dbtest.php URL of your application. You will see the following message:
<span>Connected to the database</span>
Congratulations! You have just linked a database to an application using OpenShift Online Next Gen.
What's next
OpenShift Online Next Gen is now in developer preview! For more information on how to use the platform or how to sign up, check out the following:
저자 소개
유사한 검색 결과
에이전틱 패러독스와 하이브리드 AI의 필요성
과거의 운영 방식에서 벗어나 IT의 미래 구축
Crack the Cloud_Open | Command Line Heroes
Edge computing covered and diced | Technically Speaking
채널별 검색

오토메이션
기술, 팀, 인프라를 위한 IT 자동화 최신 동향

인공지능
고객이 어디서나 AI 워크로드를 실행할 수 있도록 지원하는 플랫폼 업데이트

오픈 하이브리드 클라우드
하이브리드 클라우드로 더욱 유연한 미래를 구축하는 방법을 알아보세요

보안
환경과 기술 전반에 걸쳐 리스크를 감소하는 방법에 대한 최신 정보

엣지 컴퓨팅
엣지에서의 운영을 단순화하는 플랫폼 업데이트

인프라
세계적으로 인정받은 기업용 Linux 플랫폼에 대한 최신 정보

애플리케이션
복잡한 애플리케이션에 대한 솔루션 더 보기
가상화
온프레미스와 클라우드 환경에서 워크로드를 유연하게 운영하기 위한 엔터프라이즈 가상화의 미래