
In part one, I discussed the function and use of cgroups for system administration and performance tuning. In part two, I noted the complexity of cgroups and CPUShares values. Here in part three, I focus on manual administrative tasks for cgroups.
Don't forget to read on in part four about how cgroups work with systemd.
Doing cgroups the hard way
Let's take a look at how to create cgroups without any of the tooling around them. At their heart, cgroups are simply a directory structure with cgroups mounted into them. They can be located anywhere on the filesystem, but you will find the system-created cgroups in /sys/fs/cgroup by default. So how do you create cgroups? Begin by creating the following top-level directory:
# mkdir -p /my_cgroups
After this is created, decide which controllers you wish to use. Remember that the structure for cgroups version 1 looks something like this:
/my_cgroups
├── <controller type>
│   ├── <group 1>
│   ├── <group 2>
│   ├── <group 3>
[ Readers also liked: An introduction to crun, a fast and low-memory footprint container runtime ]
All groups you wish to create are nested separately under each controller type. Therefore, group1 under the controller memory is completely independent of group1 in blkio. With that in mind, let's create a basic CPUShares example.
For simplicity, I will generate a load on the system by running:
# cat /dev/urandom
This puts some artificial load on the system for easy measuring. This is not a real-world load example, but it highlights the main points of CPUShares. I have also set up a virtual machine running CentOS 8 with a single vCPU to make the math really simple. With that in mind, the first step is to create some directories for our cgroup controllers:
# mkdir -p /my_cgroups/{memory,cpusets,cpu}
Next, mount the cgroups into these folders:
# mount -t cgroup -o memory none /my_cgroups/memory
# mount -t cgroup -o cpu,cpuacct none /my_cgroups/cpu
# mount -t cgroup -o cpuset none /my_cgroups/cpusets
To create your own cgroups, simply create a new directory under the controller you want to utilize. In this case, I am dealing with the file cpu.shares, which is found in the cpu directory. So let's create a couple of cgroups under the cpu controller:
# mkdir -p /my_cgroups/cpu/{user1,user2,user3}
Notice that the directories are automatically populated by the controller:
# ls -l /my_cgroup/cpu/user1/
-rw-r--r--. 1 root root 0 Sep  5 10:26 cgroup.clone_children
-rw-r--r--. 1 root root 0 Sep  5 10:26 cgroup.procs
-r--r--r--. 1 root root 0 Sep  5 10:26 cpuacct.stat
-rw-r--r--. 1 root root 0 Sep  5 10:26 cpuacct.usage
-r--r--r--. 1 root root 0 Sep  5 10:26 cpuacct.usage_all
-r--r--r--. 1 root root 0 Sep  5 10:26 cpuacct.usage_percpu
-r--r--r--. 1 root root 0 Sep  5 10:26 cpuacct.usage_percpu_sys
-r--r--r--. 1 root root 0 Sep  5 10:26 cpuacct.usage_percpu_user
-r--r--r--. 1 root root 0 Sep  5 10:26 cpuacct.usage_sys
-r--r--r--. 1 root root 0 Sep  5 10:26 cpuacct.usage_user
-rw-r--r--. 1 root root 0 Sep  5 10:26 cpu.cfs_period_us
-rw-r--r--. 1 root root 0 Sep  5 10:26 cpu.cfs_quota_us
-rw-r--r--. 1 root root 0 Sep  5 10:26 cpu.rt_period_us
-rw-r--r--. 1 root root 0 Sep  5 10:26 cpu.rt_runtime_us
-rw-r--r--. 1 root root 0 Sep  5 10:20 cpu.shares
-r--r--r--. 1 root root 0 Sep  5 10:26 cpu.stat
-rw-r--r--. 1 root root 0 Sep  5 10:26 notify_on_release
-rw-r--r--. 1 root root 0 Sep  5 10:23 tasks
Now that I have some cgroups set up, it's time to generate some load. For this, I simply open up three SSH sessions and run the following command in the foreground:
# cat /dev/urandom
You can see the results in top:
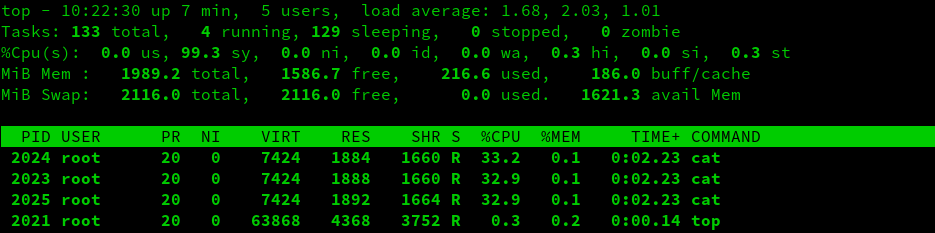
IMPORTANT NOTE: Remember that the CPUShares are based on the top-level cgroup, which is unconstrained by default. This means that should a process higher up in the tree demand CPUShares, the system will give that process priority. This can confuse people. It's vital to have a visual representation of the cgroup layout on a system to avoid confusion.
In the screenshot above, you can see that all of the cat processes receive more or less the same amount of CPU time. This is because, by default, cgroups are given a value 1024 in cpu.shares. These shares are constrained by the parent's relationship to other cgroups, as discussed earlier. In our example, I have not adjusted the weight of any of the parents. Therefore, if all parent cgroups demand resources simultaneously, the default weight of 1024 CPUShares applies.
Getting back to our example, I have created a cgroup with some default values. That means that each group has the default weight of 1024. To change this, simply change the values in the cpu.shares file:
# echo 2048 > user1/cpu.shares
# echo 768 > user2/cpu.shares
# echo 512 > user3/cpu.shares
Excellent, I now have a more complicated weighting calculation, but I have not actually added any processes to the cgroup. Therefore, the cgroup is inactive. To add a process to a cgroup, simply add the desired PID to the tasks file:
# echo 2023 > user1/tasks
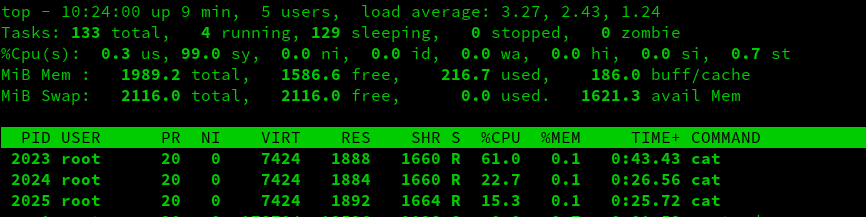
Here is the result of adding a process into a cgroup as seen in top:

As you see in the screenshot above, the process in the new cgroup receives roughly half of the CPU time. This is because of the equation from earlier:

Let's go ahead and add the other two processes into their respective cgroups and observe the results:
# echo 2024 > user2/tasks
# echo 2025 > user3/tasks
We now see that the weighting has taken effect, with the cgroup user1 taking up about 61% of the CPU time:
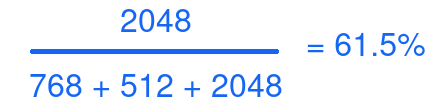
The remaining time is split between user2 and user3.
There are, of course, several problems with our test setup.
- These are all created by hand. What happens if the process you are putting into a cgroup changes its PID?
- The custom files and folders created will not survive a reboot.
- This is a lot of manual work. Where is the tooling?
Have no fear, my friends, systemd has you covered.
[ Free online course: Red Hat Enterprise Linux technical overview. ]
Wrap up
Now that we better understand the manual administration of cgroups, we can better appreciate the value of cgroups and systemd working together. I examine that idea in part four of this series. Incidentally, part four is the conclusion.
저자 소개
Steve is a dedicated IT professional and Linux advocate. Prior to joining Red Hat, he spent several years in financial, automotive, and movie industries. Steve currently works for Red Hat as an OpenShift consultant and has certifications ranging from the RHCA (in DevOps), to Ansible, to Containerized Applications and more. He spends a lot of time discussing technology and writing tutorials on various technical subjects with friends, family, and anyone who is interested in listening.
유사한 검색 결과
빠르게 진화하는 AI 위협, 더 빠른 대응
자동화 그 이상의 가치: AI 기반 보안 취약점 급증에 따라 기술 전문가의 지원이 필요한 이유
Infrastructure At The Edge | Compiler
Operating System Management | Compiler
채널별 검색

오토메이션
기술, 팀, 인프라를 위한 IT 자동화 최신 동향

인공지능
고객이 어디서나 AI 워크로드를 실행할 수 있도록 지원하는 플랫폼 업데이트

오픈 하이브리드 클라우드
하이브리드 클라우드로 더욱 유연한 미래를 구축하는 방법을 알아보세요

보안
환경과 기술 전반에 걸쳐 리스크를 감소하는 방법에 대한 최신 정보

엣지 컴퓨팅
엣지에서의 운영을 단순화하는 플랫폼 업데이트

인프라
세계적으로 인정받은 기업용 Linux 플랫폼에 대한 최신 정보

애플리케이션
복잡한 애플리케이션에 대한 솔루션 더 보기
가상화
온프레미스와 클라우드 환경에서 워크로드를 유연하게 운영하기 위한 엔터프라이즈 가상화의 미래