
In 1989, the University of Washington released a *nix email client named Pine. This client contained an integrated editor called Pico, which stood for Pine’s message composer, and was written in C. Pico was a simple editor which concentrated on working with a single document at a time.
In 1999, when issues with Pico’s licensing developed, Chris Allegretta created TIP in order to create a free software replacement. TIP, which stood for TIP isn’t Pico, was renamed to Nano in 2000 to avoid a conflict with a Unix tool called tip. Nano became part of the GNU project in 2001, and as a result, Nano is sometimes referred to as GNU Nano.
This article will show you how to install Nano and provide you with basic commands to get you started.
Installation
Installing Nano on a Red Hat Enterprise Linux-based system is as easy as sudo yum install nano, and unlike some editors, there is no additional configuration needed unless you wish to configure Nano to be your default editor. To make Nano the default for your whole system:
sudo cat <<EOF >> /etc/profile.d/nano.sh
export VISUAL="nano"
export EDITOR="nano"
EOF
To make Nano a user’s default editor:
cat <<EOF >> ~/.bash_profile
export VISUAL="nano"
export EDITOR="nano"
EOF
Then, to activate, simply type ./.bash_profile, or log out and then back in to reset your session.
Basic commands
Let’s explore the basic commands you’ll need to start using Nano.
Starting/editing a file
To open an existing file, or to create a new file, type nano <filename>. If the file is or will be in a different directory, type nano </path/to/filename>. No matter how you open the file, you begin on the edit screen:

Getting help
There are several ways to get help with Nano. If you are on the command line, look at the man pages by typing man nano, which will return the command-line options.
The other types of help are available within the program once you are editing. The first type is what I tend to call the "on-screen help," as it is visible on the bottom of your screen at all times (though this feature does vary if you are in the process of using one of Nano’s program functions via a shortcut). For instance, if you type the shortcut for justify, the shortcut for unjustify replaces one of the original options. Another example is when you search. The on-screen help changes to shortcuts you can use while searching.
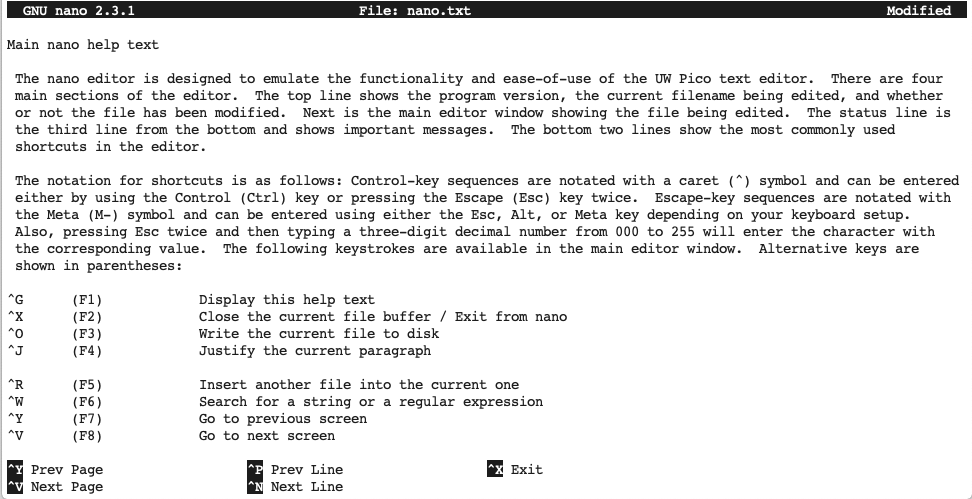
To access Nano's main help, type Ctrl+G or Ctrl+g, as Nano is not case sensitive as far as shortcuts and searches.
If you access the help from the main editing screen, you are taken to the main help for Nano, which includes all of the different program functions and their shortcuts, as well as a brief explanation of each:
However, if you were to access the help from one of the program functions, you would find more specialized help similar to how the on-screen shortcuts change.
Searching (and replacing)
You can access the search function via the shortcut Ctrl+W, and it is not case sensitive as mentioned before. Another feature of this shortcut is that it will wrap the file, so if you started lower down in the text and there’s a match above, the search will wrap around to that spot:

If, while searching, you wish to replace the text or character that you are searching for, you can do so with the Ctrl+R shortcut. Note: if you have already searched to at least the first match, Ctrl+R will be for "Read File" so you will need to Ctrl+W and then Ctrl+R to do a search and replace. If a match is found, you are prompted to replace that instance with a Y (yes) or N (no), or to replace all instances, or to cancel the search and replace altogether.
Moving around
You can move around in Nano while using the search function, or while editing. When in the search function, use the various shortcuts to move to the beginning or end of the line, paragraph, or the document itself (noted by first or last line). You can also go to a specific location within the document.
When moving while editing, you have the option to go to the previous page or the next page.
Cutting and pasting
As with most editors, you have the ability to cut (Ctrl+K) and paste (Ctrl+U) within Nano, though paste is referred to as Uncut. To cut a specific section of a line or lines, first mark your selection by using Ctrl+Shift+6 (Ctrl+^), and then move your cursor to the end of the selection, and use the Ctrl+^ shortcut again to cut the text out of the document.
Finding your location
Need to find out where your cursor is in the document? The Ctrl+C shortcut provides the line, column, character, and percent of the way through the document.
Justifying
Justifying a paragraph re-spaces it so that all lines touch both the left and right edges by adding white spaces as needed. To justify your current paragraph, use the Ctrl+J shortcut; but similar to uncutting, you use the Ctrl+U shortcut to unjustify.
Inserting files
As mentioned when discussing Nano’s history, you can only work with one file at a time. However, you can insert another file into the document you are currently working on. To insert the other file in your current location within the document, use the Ctrl+R shortcut. You can then supply the file’s path by typing it, or use Ctrl+T to search through the filesystem.
Saving or writing out
There are times when you wish to save your document while editing, and without having to log out of the document. This situation can be referred to as saving or writing out. To do this, use the shortcut Ctrl+O, and you will be prompted for the filename to use (giving you the opportunity to save to a different file if you choose).
Exiting
Exiting Nano is simple. You type Ctrl+X. You are given the opportunity to save the file, give it a new name, or not save at all. Or, you can choose not to exit the document after all.
Pros and cons
As you can see, Nano is pretty simple and straightforward to use. It is also extremely lightweight and at one point was the default editor, as well as the editor installed when in recovery mode. However, Nano does have its limitations, such as a smaller feature set than you would find in a more robust editor like Vim or Emacs, including the ability to work on more than one document at a time.
저자 소개
Amy Marrich is a Principal Technical Marketing Manager at Red Hat. She previously worked at a small open source e-assessment company in Luxembourg, where she was the Open Source Community and Global Training Manager. Previously, she was the OpenStack Instructor at Linux Academy and a Linux System Engineer on the Platform Engineering Cloud Operations team at Rackspace. She currently serves on the OpenStack Board, is an active member of the Openstack Ansible project, and was previously the chair of the OpenStack User Committee. Amy spends her free time competing in performance events (agility, FASt Cat, and dock diving) with her Dalmatians and competing in dressage with her Connemara pony.
유사한 검색 결과
빠르게 진화하는 AI 위협, 더 빠른 대응
AI 전환점 디지털 주권 확보가 더 이상 선택이 아닌 이유
Container Roundup | Compiler
Untangling Networks | Compiler
채널별 검색

오토메이션
기술, 팀, 인프라를 위한 IT 자동화 최신 동향

인공지능
고객이 어디서나 AI 워크로드를 실행할 수 있도록 지원하는 플랫폼 업데이트

오픈 하이브리드 클라우드
하이브리드 클라우드로 더욱 유연한 미래를 구축하는 방법을 알아보세요

보안
환경과 기술 전반에 걸쳐 리스크를 감소하는 방법에 대한 최신 정보

엣지 컴퓨팅
엣지에서의 운영을 단순화하는 플랫폼 업데이트

인프라
세계적으로 인정받은 기업용 Linux 플랫폼에 대한 최신 정보

애플리케이션
복잡한 애플리케이션에 대한 솔루션 더 보기
가상화
온프레미스와 클라우드 환경에서 워크로드를 유연하게 운영하기 위한 엔터프라이즈 가상화의 미래