This article is the final entry in a 5 part series. The series consists of:
- Introduction to OpenShift Pipelines
- Using Source 2 Image Build in Tekton
- Manage a Runtime Image
- Application Deployment and Pipeline Orchestration
- Using the Examples in this Series
Introduction
OpenShift Pipelines is a Continuous Integration / Continuous Delivery (CI/CD) solution based on the open source Tekton project. The previous articles in the series showed how to use Tekton to:
- use the OpenShift source 2 image to build an application,
- create and store a runtime image,
- Create an overall orchestration process of Tekton pipelines to bring together the tasks explained so far in the series into a single seamless process that executes all required steps.
In this article the use of the source code and pipeline assets will be explained in detail such that the reader can create the process for themselves. Hopefully it can act as a template for a more creative build / test / deploy process to be created for your requirements.
The steps outlined in this article will do the following:
- Build an application from source code using Maven and the OpenShift Source to Image process
- Create a runtime container image
- Push the image to the Quay image repository
- Deploy the image into a project on OpenShift (after first clearing out the old version)
Access to the source content
All assets required to create your own instance of the resources described in this article can be found in the GitHub repository here. In an attempt to save space and make the article more readable only the important aspects of Tekton resources are included within the text. Readers who want to see the context of a section of YAML should clone or download the Git repository and refer to the full version of the appropriate file.
Using the example build process
If you want to experiment with the build process described in this article then you can easily do so. The prerequisite is that you have an OpenShift cluster with the OpenShift Pipelines operator installed.
Access to the source code and pipeline configuration
Although you will have a copy of the source code for the application and the yaml for the build process locally, remember that when the build runs it will clone the repository again and will use that code for the application build. The source code that you clone here is irrelevant, but it helps to keep together the source code and pipeline assets. Follow the steps below to create the content in your cluster:
- Clone or fork the Git repository and cd to the root of your local copy
- git clone https://github.com/marrober/pipelineBuildExample.git
- cd pipelineBuildExample
Create the OpenShift project and assets
- Create an OpenShift project
- If you want to change the project name feel free to change the references to the namespace in the yaml files.
- oc new-project liberty-rest
- Create the resources by executing the command :
- oc project liberty-rest
- cd build
- ./create-tasks.sh
Create a quay.io authentication secret
Generate and store in OpenShift the quay.io authentication secret with the following steps..
- Create an account on quay.io if you do not already have one.
- Login to quay.io in the web user interface and click on the username in the top right corner.
- Select account settings.
- Click the blue hyperlink ‘Generate Encrypted Password’.
- Re-enter your password when prompted.
- Select the second option in the pop up window for ‘Kubernetes secret’ .
- Download the file.
- Create a repository in the quay.io account to match the OpenShift project name. In this example the project name is ‘liberty-rest’
- Edit the secret file to change the name of the secret to be : quay-auth-secret.
- Create the secret using the command:
- oc create -f <filename>
Update parameters in the pipeline run
Update the pipeline run to match the quay.io account that you created.
Modify the file build/pipelineRun/pipelineRun.yaml to ensure the account name matches the quay.io account.
   - name: quay-io-account
     value: "xxxxxxxxxxxxx"
Test the pipeline
Execute the pipeline process using the command:
oc create -f pipelineRun/pipelineRun.yaml
Watch the build progress in the OpenShift web user interface under the pipelines section of the developer perspective, as shown in figure 1.

Figure 1 - Pipeline view in OpenShift web user interface
Click on the name of the pipeline to see the tasks within the pipeline shown as a flow diagram and then click on the Pipeline Runs tab to see the status of completed or running pipeline runs as shown in figure 2.
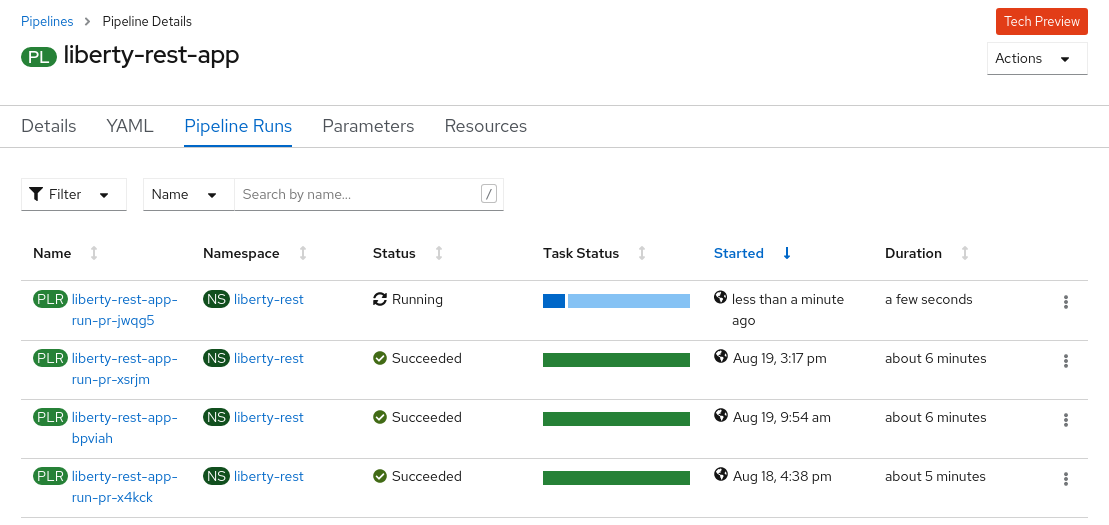
Figure 2 - Pipeline runs with one in progress
Select the name link for the running pipeline to see details of how far it has progressed as shown in figure 3.
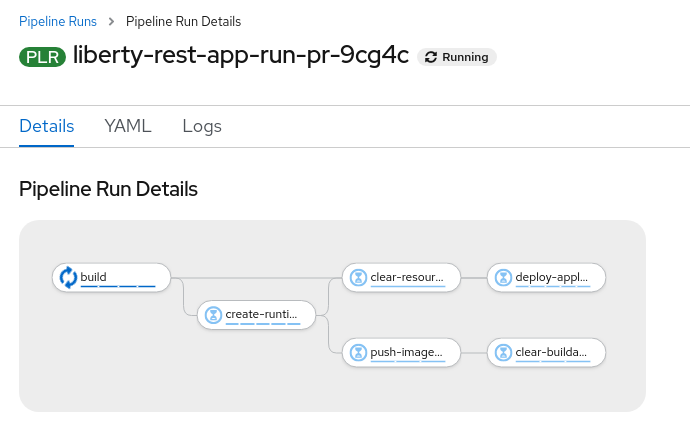
Figure 3 - details of running pipeline
Each task on the running pipeline can be clicked to see the details of the steps within it.
Test the application
When the pipeline process has completed, perform the following steps to test the application. Use the curl command below to send a rest call to the application.
curl $(oc get route liberty-rest-route -o \

jsonpath='{"http://"}{.spec.host}')/System/propertiesJavaHome
The response should be similar to :
Java Home ~~~~~> /opt/java/openjdk/jre
Summary
This article showed how to use the example assets to create a pipeline execution process.
What’s next
Watch this space. More articles are planned covering the use of Tekton triggers to automate the pipeline execution based on actions taking place in GitHub.
저자 소개

유사한 검색 결과
과거의 운영 방식에서 벗어나 IT의 미래 구축
AI의 다음 변곡점: 에이전트를 엔터프라이즈 슈퍼유저로 전환
Crack the Cloud_Open | Command Line Heroes
Edge computing covered and diced | Technically Speaking
채널별 검색

오토메이션
기술, 팀, 인프라를 위한 IT 자동화 최신 동향

인공지능
고객이 어디서나 AI 워크로드를 실행할 수 있도록 지원하는 플랫폼 업데이트

오픈 하이브리드 클라우드
하이브리드 클라우드로 더욱 유연한 미래를 구축하는 방법을 알아보세요

보안
환경과 기술 전반에 걸쳐 리스크를 감소하는 방법에 대한 최신 정보

엣지 컴퓨팅
엣지에서의 운영을 단순화하는 플랫폼 업데이트

인프라
세계적으로 인정받은 기업용 Linux 플랫폼에 대한 최신 정보

애플리케이션
복잡한 애플리케이션에 대한 솔루션 더 보기
가상화
온프레미스와 클라우드 환경에서 워크로드를 유연하게 운영하기 위한 엔터프라이즈 가상화의 미래