
Welcome to this guide on installing Red Hat Enterprise Linux (RHEL) on the NVIDIA BlueField-2 Data Processing Unit (DPU). The BlueField-2 combines the capabilities of a Network Interface Card (NIC) with a general-purpose CPU, making it a versatile platform for running various applications. This article will guide you through setting up RHEL on the BlueField-2 using the rshim interface and a PXE server on the host machine. Note that it requires you to run specific steps at the right time.
Setup overview
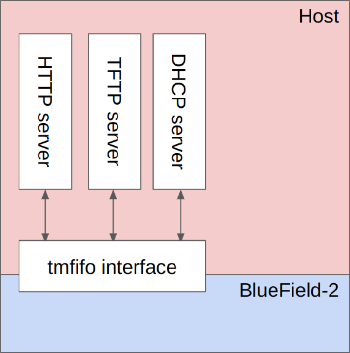
When installing RHEL on the BlueField-2, you can set up a PXE server on the network or the host machine. The advantage of choosing the latter option is that you won't need to configure your network in any specific way. This self-contained approach simplifies the setup process, making it more accessible and user-friendly. The diagram below shows the setup.
Ingredients of the setup:
- RHEL installation on x86 host with the rshim package
- RHEL ISO (download this through your Red Hat subscription)
- Custom GRUB configuration
- Custom Kickstart configuration
- TFTP server
- DHCP server
- HTTP server
Step-by-step walk-through
The remainder of this article focuses on setting up these components and booting the BlueField-2 into RHEL. Start by confirming that the x86 host detected the BlueField-2 by issuing the following command:
lspci | grep -i blue
Next, download the RHEL ISO using your RH subscription. Note that you need the AARCH version of the RHEL ISO since the BlueField-2 uses the ARM architecture. Mount the ISO with this command:
mount -t iso9660 -o loop ISO_NAME ISO_PATH
Create a TFTP boot directory and copy the necessary files into it:
mkdir /var/lib/tftpboot/
mkdir /var/lib/tftpboot/pxelinux
cp $ISO_PATH/images/pxeboot/vmlinuz /var/lib/tftpboot/pxelinux
cp $ISO_PATH/images/pxeboot/initrd.img /var/lib/tftpboot/pxelinux
Create a custom GRUB configuration at /var/lib/tftpboot/grub.cfg where 172.131.100.1 is the IP that will be set up later on the tmfifo interface:
set timeout=5

menuentry 'Install' --class red --class gnu-linux --class gnu --class os {{
    linux pxelinux/vmlinuz showopts inst.repo=http://172.131.100.1/mnt inst.ks=http://172.131.100.1/kickstart.ks \
        console=tty0 console=tty1 console=ttyS0,115200 console=ttyS1,115200 \
        ip=dhcp console=ttyAMA1 console=hvc0 console=ttyAMA0 earlycon=pl011,0x01000000
    initrd pxelinux/initrd.img
}}

menuentry 'Reboot' --class red --class gnu-linux --class gnu --class os {{
    reboot
}}
Create a custom DHCP server configuration at /etc/dhcp/dhcpd.conf. Do not forget to insert your DNS servers and domain:
option space pxelinux;
option pxelinux.magic code 208 = string;
option pxelinux.configfile code 209 = text;
option pxelinux.pathprefix code 210 = text;
option pxelinux.reboottime code 211 = unsigned integer 32;
option architecture-type code 93 = unsigned integer 16;
allow booting;
allow bootp;

next-server 172.131.100.1;
always-broadcast on;

filename "/BOOTAA64.EFI";

subnet 172.131.100.0 netmask 255.255.255.0 {{
    range 172.31.100.10 172.31.100.20;
    option broadcast-address 172.31.100.255;
    option routers 172.131.100.1;
    option domain-name-servers <INSERT COMMA SEPARATED LIST OF DNS SERVERS HERE>;
    option domain-search "<INSERT DOMAIN HERE>"
    option dhcp-client-identifier = option dhcp-client-identifier;
}}
Prepare the files for HTTP:
cp $ISO_PATH/images/pxeboot/rootfs.img /www
Create a Kickstart file at /www/kickstart.ks:
# System language
lang en_US.UTF-8

# Use text mode install
text

# Keyboard layouts
keyboard us

# Use network installation
url --url="REPO_URL"

# Accept the license
eula --agreed

# System timezone
timezone --utc Asia/Jerusalem

# Root password
rootpw bluefield

# Disable firewall
firewall --disabled

# System authorization information
auth --enableshadow --passalgo=sha512

# Do not configure the X Window System
skipx

# Disable the Setup Agent on first boot
firstboot --disabled

# Network information
network --bootproto=dhcp --hostname=bluefield-soc.mlx --device=eth0 --activate

# Bootloader/partition configuration
ignoredisk --only-use=mmcblk0
clearpart --all --initlabel --drives=mmcblk0
autopart --type=plain
bootloader --append="crashkernel=auto console=ttyAMA1 console=hvc0 console=ttyAMA0 earlycon=pl011,0x01000000 earlycon=pl011,0x01800000" --location=mbr --boot-drive=mmcblk0

# Reboot after installation
reboot

%packages --ignoremissing
@base
@core
@Development Tools
python3-devel
atk
cairo
tcl
tk
nfs-utils
chrony
vim
ethtool
git
grubby
xterm

NetworkManager-config-server
%end

%post --interpreter /bin/bash
systemctl set-default multi-user.target
systemctl disable initial-setup-graphical.service

# Necessary for accessing virtual console via rshim
systemctl enable serial-getty@hvc0
systemctl start serial-getty@hvc0

systemctl enable serial-getty@ttyAMA0.service
systemctl start serial-getty@ttyAMA0.service

systemctl enable serial-getty@ttyAMA1.service
systemctl start serial-getty@ttyAMA1.service

systemctl disable firewalld

dnf update

systemctl stop chronyd.service
chronyd -q 'server clock.redhat.com iburst'
hwclock --systohc --localtime

%end
Next, reboot the BF, wait five seconds, add an IP on the tmfifo interface, and connect to the console through minicom to interrupt the boot process:
echo SW_RESET 1 > /dev/rshim0/misc
sleep 5
ip a a 172.131.100.1/24 dev tmfifo_net0
minicom --color on --baudrate 115200 --device /dev/rshim0/console
Once interrupted, start the TFTP server and the HTTP server:
/usr/sbin/in.tftpd -s -L /var/lib/tftpboot
cd /www; python -m http.server
On the console, select the option to boot from the interface with a MAC address that starts with 001ACAFFFF. RHEL should boot, and the installation should proceed automatically.
Wrap up
If all goes well, the BlueField-2 will reboot to the fresh RHEL environment after the installation completes. Since multiple steps must be executed at specific times, the automated version is available as a pxeboot script. That script is packaged into a publicly available container.
저자 소개
Balazs Nemeth is a Senior Principal Software Engineer at Red Hat. He's the tech lead and team lead of the Hardware Enablement Team specializing in end-to-end enablement of DPUs in Openshift.
유사한 검색 결과
에이전틱 패러독스와 하이브리드 AI의 필요성
과거의 운영 방식에서 벗어나 IT의 미래 구축
Crack the Cloud_Open | Command Line Heroes
Edge computing covered and diced | Technically Speaking
채널별 검색

오토메이션
기술, 팀, 인프라를 위한 IT 자동화 최신 동향

인공지능
고객이 어디서나 AI 워크로드를 실행할 수 있도록 지원하는 플랫폼 업데이트

오픈 하이브리드 클라우드
하이브리드 클라우드로 더욱 유연한 미래를 구축하는 방법을 알아보세요

보안
환경과 기술 전반에 걸쳐 리스크를 감소하는 방법에 대한 최신 정보

엣지 컴퓨팅
엣지에서의 운영을 단순화하는 플랫폼 업데이트

인프라
세계적으로 인정받은 기업용 Linux 플랫폼에 대한 최신 정보

애플리케이션
복잡한 애플리케이션에 대한 솔루션 더 보기
가상화
온프레미스와 클라우드 환경에서 워크로드를 유연하게 운영하기 위한 엔터프라이즈 가상화의 미래