
Network Observability for secondary interfaces with Multus and SR-IOV plugins in Kubernetes can be a complex task, but it's crucial for monitoring and troubleshooting network issues in a Kubernetes cluster.
Overview of achieving network observability for a secondary interface
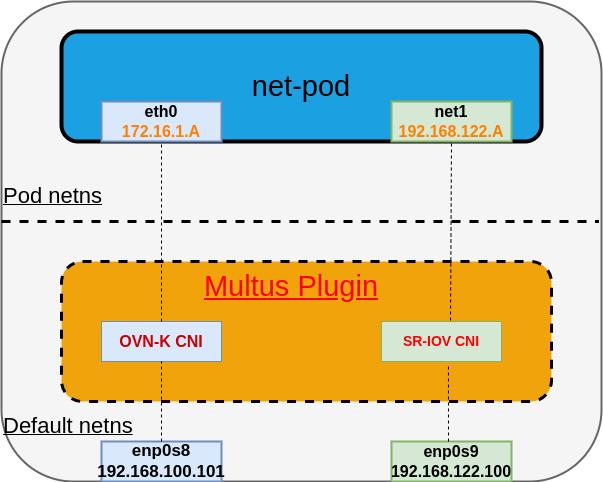
- Multus CNI plugin: Multus is a Container Network Interface (CNI) plugin for Kubernetes that allows you to attach multiple network interfaces to pods. In OpenShift, Multus is used to attach SR-IOV vfs to your pods. For reference and more details about Multus CNI, please refer to the Multus OCP documentation.
- SR-IOV plugin: SR-IOV (Single Root I/O Virtualization) is a technology that enables the partitioning of a single PCIe network adapter into multiple virtual functions (VFs). Pods can use these VFs as secondary network interfaces, achieving higher performance and isolation. For reference and more details about SR-IOV, refer to the SR-IOV OCP documentation.
Network Observability eBPF agent enhancements to support the secondary interface
To provide network observability for secondary interfaces in this setup and make the eBPF agent network namespace aware, eBPF agents need to implement the following steps:
- Using fsNotify package: Utilize the fsNotify package to be notified when new network namespaces are created. This allows the eBPF agent to keep track of network namespace creation events.
- Using netlink package: Employ the netlink package to register when the network interfaces are created or deleted within each network namespace. This will enable the eBPF agent to monitor the interface changes on a per-namespace basis.
- Attaching/detaching eBPF TC hooks: Add support to the eBPF agent to attach and detach the eBPF Traffic Control (TC) hook for network interfaces in non-default network namespaces. This step is crucial for monitoring and controlling network traffic within these network namespaces.
Configuring SR-IOV objects
- Install the SR-IOV operator in the environment.
- Identify the SR-IOV-capable device on the node.
- Label the node that has the SR-IOV interface with the feature.node.kubernetes.io/network-sriov.capable=true label.
- Create the SriovNetworkNodePolicy object.
apiVersion: sriovnetwork.openshift.io/v1
kind: SriovNetworkNodePolicy
metadata:
  name: mypolicy
  namespace: openshift-sriov-network-operator
spec:
  resourceName: netdeviceresource
  nodeSelector:
    feature.node.kubernetes.io/network-sriov.capable: "true"
  priority: 99
  numVfs: 50
  nicSelector:
    pfNames: ["ens7f0np0#25-49"]
  deviceType: netdevice
5. Create the SriovNetwork object. This will create net-attach-def in the openshift-sriov-network-operator namespace.
apiVersion: sriovnetwork.openshift.io/v1
kind: SriovNetwork
metadata:
  name: sriov-test
  namespace: openshift-sriov-network-operator
spec:
  resourceName: netdeviceresource
  networkNamespace: test
  ipam: '{ "type": "static", "addresses": [{"address": "192.168.122.71/24"}]}'
6. Create a test pod using the SRIOVNetwork object created above and denoted by the k8s.v1.cni.cncf.io/networks: "sriov-test" annotation.
apiVersion: v1
kind: Pod
metadata:
  name: httpd-2
  namespace: openshift-sriov-network-operator
  labels:
    app: sriov
  annotations:
    k8s.v1.cni.cncf.io/networks: "sriov-test"
spec:
  containers:
  - name: httpd
    command: ["sleep", "30d"]
    image: registry.redhat.io/rhel8/support-tools
    ports:
    - containerPort: 8080
    securityContext:
      allowPrivilegeEscalation: false
      seccompProfile:
        type: RuntimeDefault
      capabilities:
        drop:
        - ALL
Configuring the Network Observability operator to work with SR-IOV
- Deploy the Network Observability operator.
- Create the FollowCollector object with privileged set to true.
apiVersion: flows.netobserv.io/v1beta1
kind: FlowCollector
metadata:
  name: cluster
spec:
  agent:
    type: EBPF
    ebpf:
      privileged: true
The Network Observability operator will deploy its components (eBPF agent, flowlogs pipeline, and console plugin). The eBPF agent will start discovering all the interfaces, attach the eBPF hooks, and then flows start being collected.
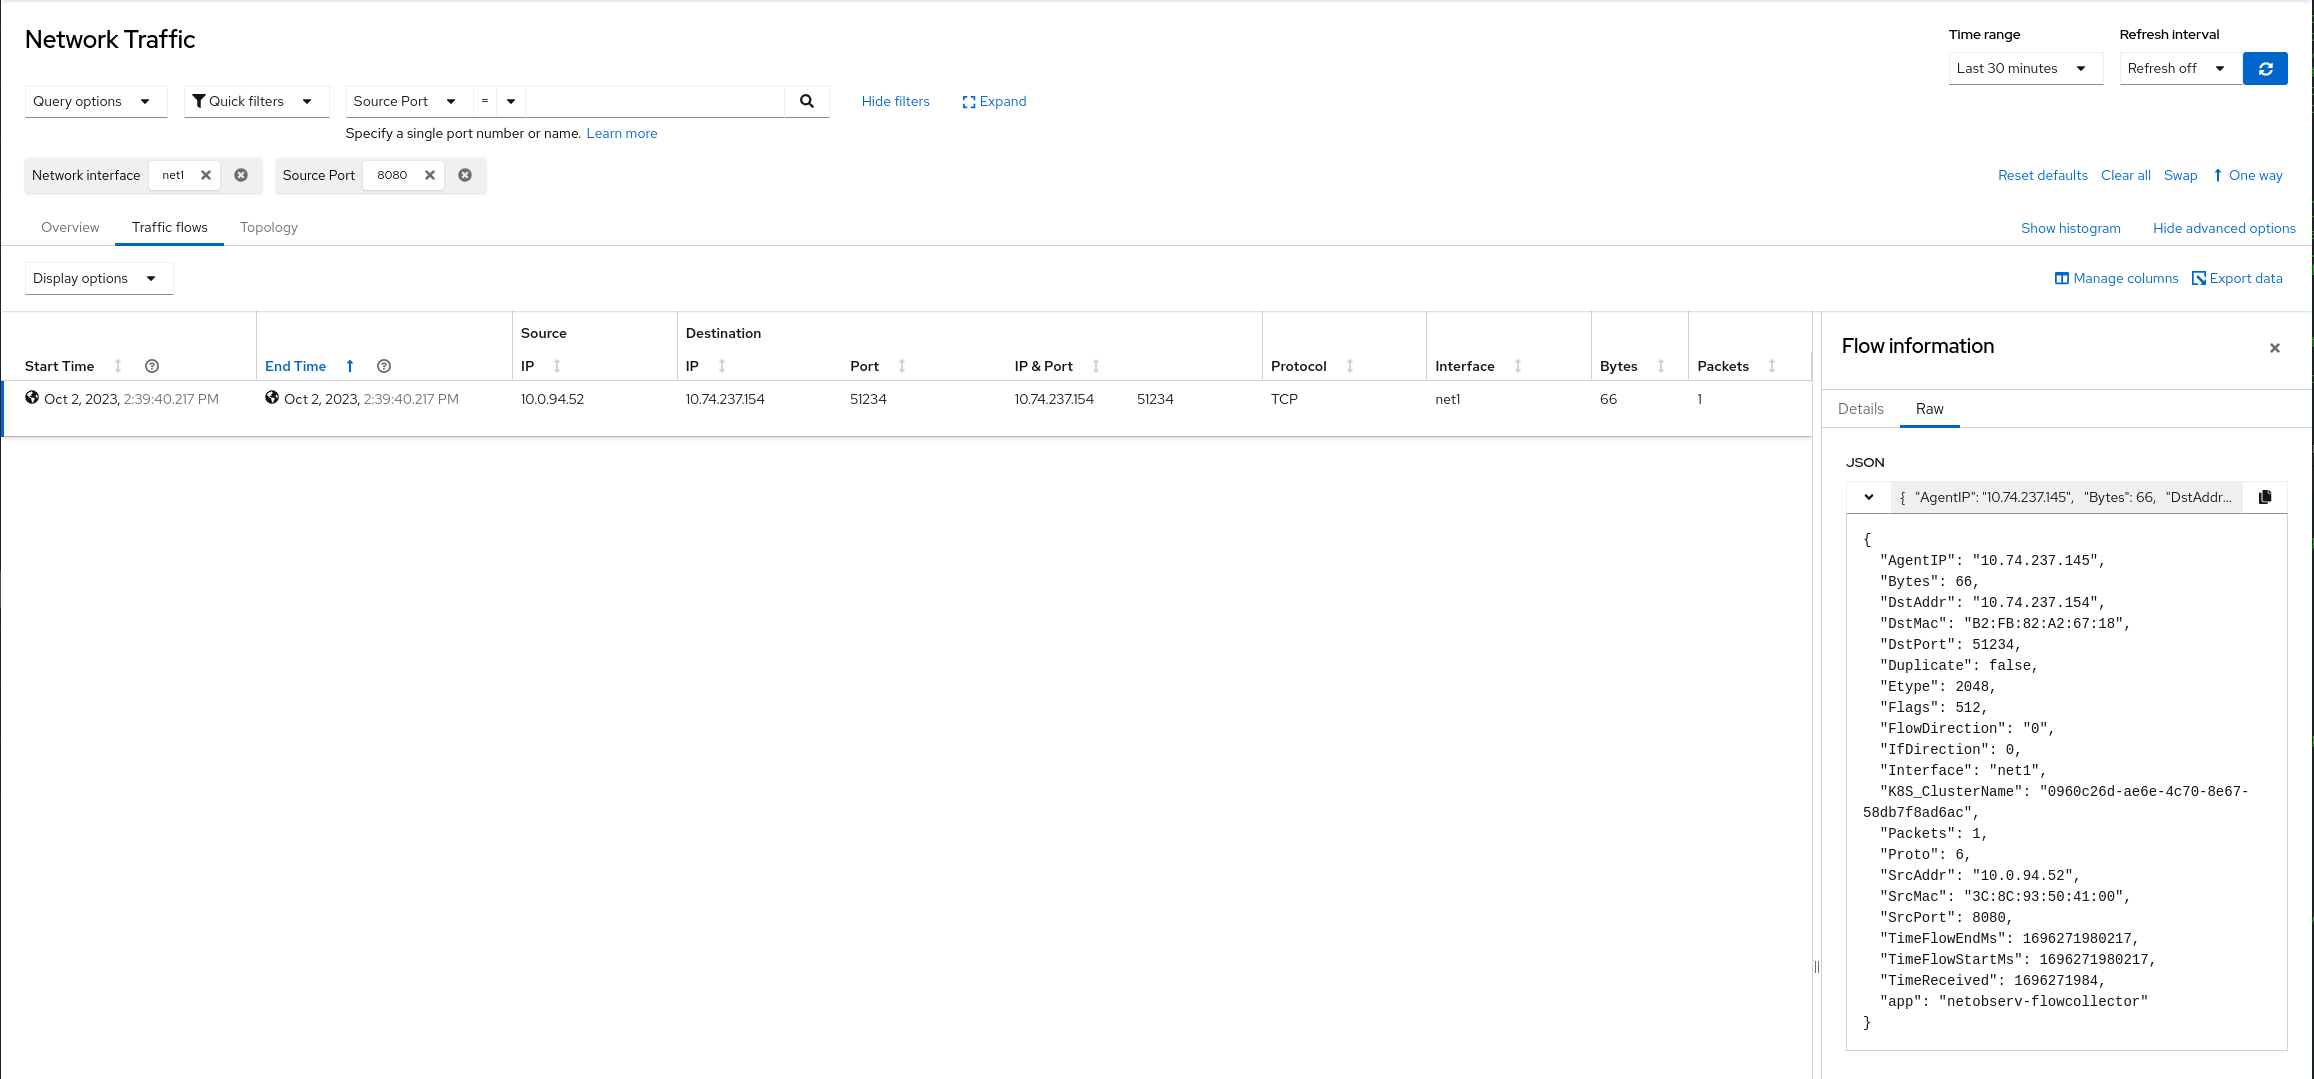
Sample Network Observability raw flow output by filtering on Pod VF interface net1
View Network Observability output by opening the console plugin, looking in the Traffic Flows table, and filtering by Network interface name == net1. For example, if you filter by TCP flow packets, you'll see results like the following:
Feedback
Netobserv is an open source project available on GitHub. Feel free to share your ideas, use cases, or ask the community for help.
저자 소개
유사한 검색 결과
에이전틱 패러독스와 하이브리드 AI의 필요성
과거의 운영 방식에서 벗어나 IT의 미래 구축
Crack the Cloud_Open | Command Line Heroes
Edge computing covered and diced | Technically Speaking
채널별 검색

오토메이션
기술, 팀, 인프라를 위한 IT 자동화 최신 동향

인공지능
고객이 어디서나 AI 워크로드를 실행할 수 있도록 지원하는 플랫폼 업데이트

오픈 하이브리드 클라우드
하이브리드 클라우드로 더욱 유연한 미래를 구축하는 방법을 알아보세요

보안
환경과 기술 전반에 걸쳐 리스크를 감소하는 방법에 대한 최신 정보

엣지 컴퓨팅
엣지에서의 운영을 단순화하는 플랫폼 업데이트

인프라
세계적으로 인정받은 기업용 Linux 플랫폼에 대한 최신 정보

애플리케이션
복잡한 애플리케이션에 대한 솔루션 더 보기
가상화
온프레미스와 클라우드 환경에서 워크로드를 유연하게 운영하기 위한 엔터프라이즈 가상화의 미래