
With recent changes the to the .NET ecosystem, developers of popular languages such as C# now have the ability to develop and deploy .NET applications across multiple platforms including OS X and Linux.
This is made possible thanks to the .NET Core, a modular implementation of the .NET framework capable of supporting both web and console applications.
Aside from opening up opportunities to a new pool of potential developers, .NET Core also enabled these applications to take advantage of certain technologies they were previously restricted from.
One of these technologies in particular is Linux Containers. Containerized .NET applications can now benefit from a wide range of features built into containerization technologies such as Docker. This includes a rapid application deployment cycle and portability across machines whether they are located on physical, virtual or hosted in a cloud environment.
In addition, since these applications are running in containers, they are also eligible to be run in OpenShift. OpenShift provides the flexibility to manage and run containerized applications while also providing the tools necessary for developers to be productive.
It is this ecosystem that gives developers the flexibility and freedom to easily build and deploy applications, without needing to be concerned about the underlying infrastructure.
Quickstart
Getting up and running developing .NET web applications with OpenShift Online is as simple as it gets. You can either use the Web Console or the CLI tools, but we'll focus on the Web Console. If you want further information about the CLI tools check our Beyond the basics guide on the OpenShift Docs.
It's recommended to have a beginner understanding of OpenShift Online (Next Gen) in order to follow the instructions on this blog post, if you find yourself in need of more information check the Getting Started on the OpenShift Docs.
Web Console
Here are the steps using the web console:
- Login to your Openshift Online account and select or create a project
- Click Add to Project then search and select
dotnet:latest - For the Git Repository URL use the sample which is provided (https://github.com/openshift-s2i/s2i-aspnet-example) or, alternatively, fork the example repository and use your own URL.
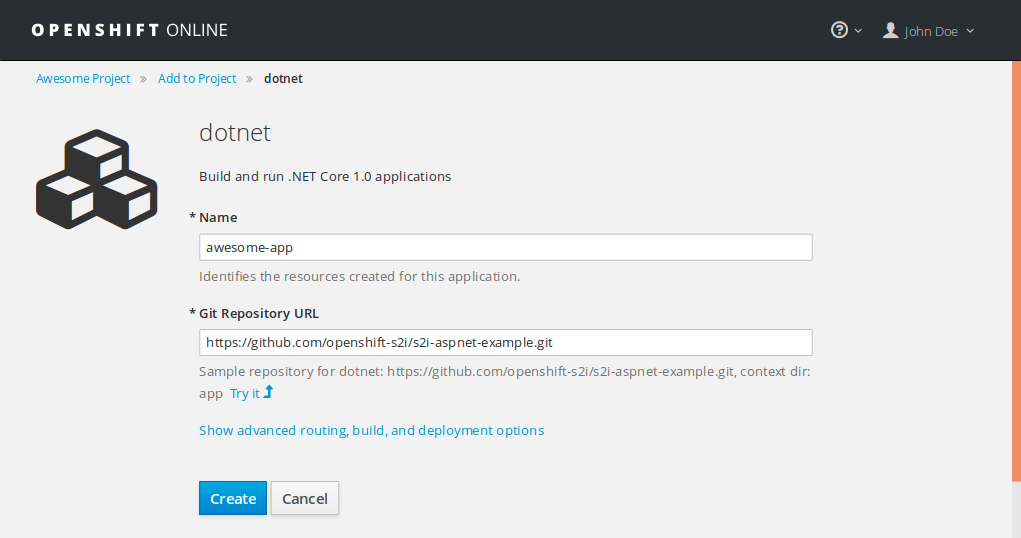
- Hit Create button! Your app is created and the build process should start soon. Head over to the project overview page to see additional details about your app

- After the app has been built, you can preview it by clicking the URL on the top
That's it! Your app is deployed and available to the world! In the next sections we'll go over making changes to your application and how to automatically deploy them to OpenShift.
Making Changes to the App
Now that your app is all set up and ready to roll, it's time to make your own changes. Firstly, we should enable auto deployments by using the provided WebHooks. Here's how:
- If you haven't done so already, fork the example repository into your account.
- Then, on the Web Console Go to Browse > Builds > awesome-app > Configuration > Actions > Edit and change the Source Repository URL to your own repository
- To enable the webhooks, go back to Browse > Builds > awesome-app > Configuration and grab the GitHub webhook URL
- Go back to your GitHub repository and add the webhook to Settings > Webhooks & services

Now that the basic configurations are done, it's time for editing the app locally:
- Use a terminal or git client of your choice and clone the repository:
$ git clone git@github.com:your-username/s2i-aspnet-example.git
- Make changes to the app, for instance, edit the
app/Views/Home/index.cshtmlfile. - Then add, commit and push your changes with git:
$ git add app/Views/Home/index.cshtml

$ git commit -m "Update index to test auto deployments"

$ git push origin master
Now that your changes are pushed to your GitHub repository you should see a new build in progress at the overview page of the Web Console. That's it! You've successfully deployed your own .NET app with OpenShift Online!
Extra info
- To work with .NET core in an IDE you need Microsoft Visual Studio update 3 or higher. In fact, the first patch to update 3 is what you actually need.
- If you have an existing .NET application and you want to know if it will work on .NET core, you can use .NET Portability Analyzer plug-in in Visual Studio.
저자 소개
유사한 검색 결과
과거의 운영 방식에서 벗어나 IT의 미래 구축
AI의 다음 변곡점: 에이전트를 엔터프라이즈 슈퍼유저로 전환
Crack the Cloud_Open | Command Line Heroes
Edge computing covered and diced | Technically Speaking
채널별 검색

오토메이션
기술, 팀, 인프라를 위한 IT 자동화 최신 동향

인공지능
고객이 어디서나 AI 워크로드를 실행할 수 있도록 지원하는 플랫폼 업데이트

오픈 하이브리드 클라우드
하이브리드 클라우드로 더욱 유연한 미래를 구축하는 방법을 알아보세요

보안
환경과 기술 전반에 걸쳐 리스크를 감소하는 방법에 대한 최신 정보

엣지 컴퓨팅
엣지에서의 운영을 단순화하는 플랫폼 업데이트

인프라
세계적으로 인정받은 기업용 Linux 플랫폼에 대한 최신 정보

애플리케이션
복잡한 애플리케이션에 대한 솔루션 더 보기
가상화
온프레미스와 클라우드 환경에서 워크로드를 유연하게 운영하기 위한 엔터프라이즈 가상화의 미래