All the discussion around using private Git repositories so far in this series of blog posts has used GitHub as the hosting service. In this post we will look at using private Git repositories hosted on GitLab.
From the perspective of how things are done in OpenShift, there is no real difference when using GitLab vs GitHub. The differences are how you set up the repository SSH key or personal access token in GitLab, so we will be focusing on that in this blog post.
Ensure you have read the prior posts for background on how to create repository SSH keys, register any credentials with OpenShift, and create an application from the private Git repository. These can be found at:
- Private Git Repositories: Part 1 - Best Practices
- Private Git Repositories: Part 2A - Repository SSH Keys
- Private Git Repositories: Part 2B - Repository SSH Keys
- Private Git Repositories: Part 3 - Personal Access Tokens
Using a Repository SSH Key
The first step to using a private Git repository on GitLab using a repository SSH key is to generate the SSH key pair to be used with that repository. Remember that it is recommended to use a distinct SSH key pair. Do not use your primary identity SSH key as you will need to upload the private key file of the SSH key pair to OpenShift.
$ ssh-keygen -C "openshift-source-builder/repo@gitlab" -f repo-at-gitlab -N ''
To register the repository SSH key with your private repository on GitLab, go to the Settings for the repository and find the Repository settings page.

On GitLab the repository SSH key is referred to by the term Deploy Key. Search down the Repository settings page and find the Deploy Keys section and expand it. In this section, give the key a name and paste in the contents of the public key file from the SSH key pair. This is the file with the .pub extension, which in our case is called repo-at-gitlab.pub.
Ensure that the Write access allowed checkbox is not enabled. That is, you do not want to grant any user of this repository SSH key write access to the repository, read-only access is sufficient.
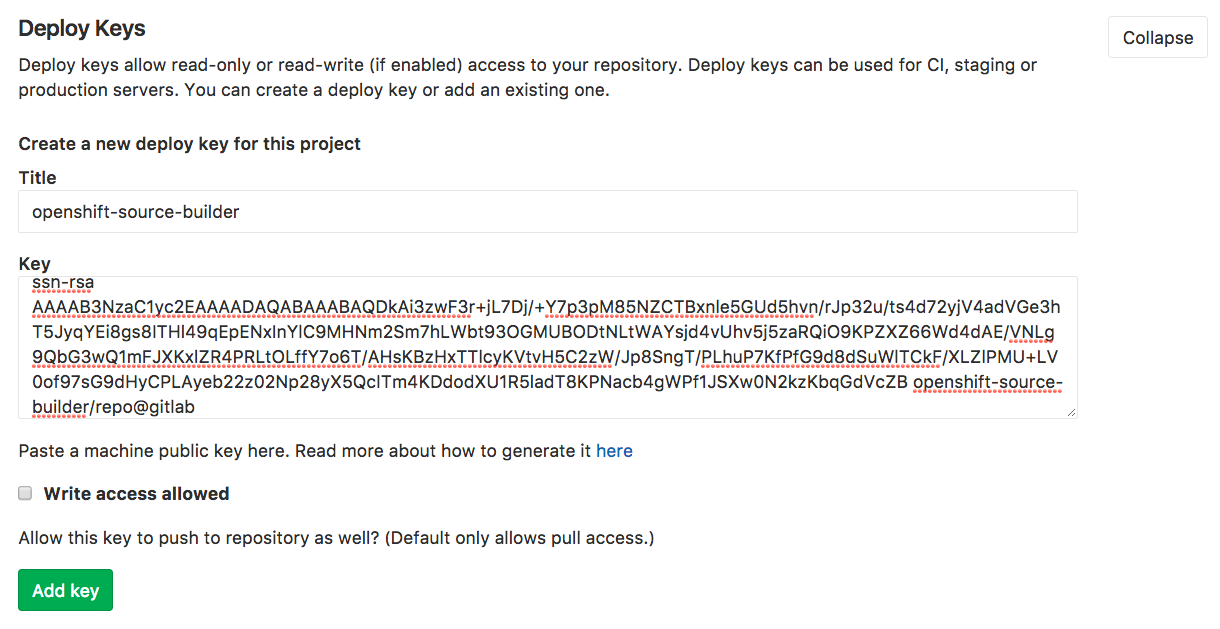
Upon clicking on Add key, the key will be registered for the repository.

The next step is to create a secret in OpenShift to hold the private key of the SSH key pair. We showed how to do this using both the web console and command line in prior posts. When using the command line, this was done by creating the secret:
$ oc secrets new-sshauth repo-at-gitlab --ssh-privatekey=repo-at-gitlab
and enabling access to the secret from the builder service account:
$ oc secrets link builder repo-at-gitlab
To ensure that OpenShift knows the secret is for our private Git repository, we annotate the secret with the complete SSH form of the URI for the repository, including ssh://, dropping any user credentials in the URI in the process.
$ oc annotate secret/repo-at-gitlab \

    'build.openshift.io/source-secret-match-uri-1=ssh://gitlab.com/osevg/private-repo.git'
We can then deploy our application from the private Git repository.
$ oc new-app httpd~git@gitlab.com:osevg/private-repo.git --name mysite
Using a Personal Access Token
If the OpenShift cluster you are using is located behind a corporate firewall and SSH connections are blocked, you need to use a personal access token and HTTPS connection instead.
From the web interface of GitLab, browse to your User Settings and then select Access Tokens.

Enter in a name for the token and enable the api checkbox.
At this point in time, GitLab doesn't provide a way of setting the scope of a personal access token such that it has read-only access to repositories. One instead has to enable the api scope which gives full control of private repositories.
Giving full control is not ideal as it means that anyone who gets control over the personal access token would also be able to write to any repositories the account has write access to. This is one of the reasons why read-only repository SSH keys bound to a specific repository are preferred.
When you are done with setting the scopes for the personal access token, click on Create personal access token and you will be shown the value of the token. Make sure you make a copy of this as you cannot view it later on in the GitLab settings.

We now need to create the secret from the command line using the oc secrets new-basicauth command, remembering to run oc secrets link to allow the builder service account to use it.
$ oc secret new-basicauth user-at-gitlab --username=machineuser --prompt
$ oc secrets link builder user-at-gitlab
You will need to supply the name of the user account which the personal access token was created under. It is better to create a machine user account for an organization, which has access to the repository, rather than use a personal user account.
The --prompt option means you will be asked to enter in the access token as the password. You could instead use the --password option and supply it on the command line.
Next annotate the secret with the URI for the repository. Because we are using a personal access token, this will be the HTTPS URI for the repository.
$ oc annotate secret/user-at-gitlab \

    'build.openshift.io/source-secret-match-uri-1=https://gitlab.com/osevg/private-repo.git'
We can then deploy our application from the private Git repository.
$ oc new-app httpd~https://gitlab.com/osevg/private-repo.git --name mysite
Using the BitBucket Hosting Service
In the next part in this series, we will finish up by looking at using the Bitbucket hosting service, and how the different credential types are setup with that service.
Access the rest of the series here:
저자 소개

유사한 검색 결과
과거의 운영 방식에서 벗어나 IT의 미래 구축
AI의 다음 변곡점: 에이전트를 엔터프라이즈 슈퍼유저로 전환
Edge computing covered and diced | Technically Speaking
Crack the Cloud_Open | Command Line Heroes
채널별 검색

오토메이션
기술, 팀, 인프라를 위한 IT 자동화 최신 동향

인공지능
고객이 어디서나 AI 워크로드를 실행할 수 있도록 지원하는 플랫폼 업데이트

오픈 하이브리드 클라우드
하이브리드 클라우드로 더욱 유연한 미래를 구축하는 방법을 알아보세요

보안
환경과 기술 전반에 걸쳐 리스크를 감소하는 방법에 대한 최신 정보

엣지 컴퓨팅
엣지에서의 운영을 단순화하는 플랫폼 업데이트

인프라
세계적으로 인정받은 기업용 Linux 플랫폼에 대한 최신 정보

애플리케이션
복잡한 애플리케이션에 대한 솔루션 더 보기
가상화
온프레미스와 클라우드 환경에서 워크로드를 유연하게 운영하기 위한 엔터프라이즈 가상화의 미래