
In this blog post, we’ll be going through deploying peer-pods on an OpenShift cluster running in AWS or vSphere cloud infrastructure. We will present how to create the virtual machine (VM) image for your peer-pod and demonstrate how to run workload in a peer-pod. The post assumes familiarity with Red Hat OpenShift and the cloud-provider which is in use.
Peer-pods is an extension of OpenShift sandboxed containers, and is currently available as dev-preview.
Deploying peer-pods is a bit more involved than deploying OpenShift sandboxed containers as the steps are manual. We'll be improving the install experience in subsequent releases. It is highly recommended to refer to the peer-pods solution overview prior to deploying it.
Prerequisites
- Configured OpenShift CLI client with access to your AWS or vSphere cluster
- git
- tar
- podman
- RHEL based podVM prerequisites (below)
- Having the sandboxed-containers-operator repository cloned and checked-out at “dev-preview” branch
- During the blog post it will be assumed this repository was cloned and located under your $HOME directory, if cloned elsewhere please adapt accordingly
$ git clone https://github.com/openshift/sandboxed-containers-operator -b dev-preview
AWS prerequisites
- A configured and running OpenShift cluster on AWS
- This blog post assumes a standard OpenShift cluster configuration with at least one worker node.
- AWS_ACCESS_KEY_ID and AWS_SECRET_ACCESS_KEY credentials that can be used to create additional EC2 instances in the same VPC of your OpenShift cluster
- AWS CLI tool installed and configured
- Internal cluster communication allowed on port 15150.
- You can use the following commands to enable internal cluster communication on port 15150
$ INSTANCE_ID=$(oc get nodes -l 'node-role.kubernetes.io/worker' -o jsonpath='{.items[0].spec.providerID}' | sed 's#[^ ]*/##g')
$ AWS_REGION=$(oc get infrastructure/cluster -o jsonpath='{.status.platformStatus.aws.region}')
$ SG=$(aws ec2 describe-instances --instance-ids ${INSTANCE_ID} --query 'Reservations[*].Instances[*].SecurityGroups[*].GroupId' --output text --region $AWS_REGION)
$ aws ec2 authorize-security-group-ingress --group-id $SG --protocol tcp --port 15150 --source-group $SG --region $AWS_REGION
- AWS AMI creation prerequisites (below)
vSphere prerequisites
- A configured and running OpenShift cluster on vSphere
- This blog post assumes a standard OpenShift cluster configuration with at least one worker node.
- Open ports 15150 and 9000.
- While configuring vSphere or your vCenter cluster to enable custom ports is beyond the scope of this article, please refer to the following VMWare KB article for creating custom firewall rules.
- vSphere VM template creation prerequisites (below)
Creating a peer-pod VM image
A VM image is required in order to be used for the peer-pod hosting VM. Every pod you’ll create will be initiated in a peer-pod VM, based on this image. The process of creating an image isn’t quick, however, it is mostly scripted and the image can be created once and then reused.
Image creation is comprised of two steps:
- Creating a qcow2 image based on RHEL or getting a publicly pre-built non-RHEL based qcow2 image having all the required peer-pod components.
- Creating an AMI for AWS or OVF template for vSphere based on the qcow2 image.
Using publicly available peer-pod qcow2 VM images
As part of the peer-pods upstream cloud-api-adaptor project non-RHEL based peer-pod VM images are also supported. There are publicly available qcow2 images that can be used as a base image for your peer-pod VM. The following explains how to fetch the pre-built qcow2 images:
- Pull the wrapper container image which contains the qcow2 image according to desired OS and the cloud-provider:
Pulling publicly available CentOS:
$ CLOUD_PROVIDER=<aws/vsphere>
$ IMG_ID=$(podman pull quay.io/confidential-containers/podvm-${CLOUD_PROVIDER}-centos)
Pulling publicly available Ubuntu:
$ CLOUD_PROVIDER=<aws/vsphere>
$ IMG_ID=$(podman pull quay.io/confidential-containers/podvm-${CLOUD_PROVIDER}-ubuntu)
- Extract the qcow2 image from the downloaded container image
$ podman save ${IMG_ID} | tar -xO --no-wildcards-match-slash '*.tar' | tar -x
Creating RHEL based peer-pod qcow2 VM image
RHEL based peer-pod VM prerequisites
- Registered & subscribed RHEL system with large disk (30GB+ of available storage for user), the following steps for creating RHEL based qcow2 VM image must be performed on the subscribed RHEL system
- podman, git and tar installed on the RHEL system
- For vSphere, libguestfs-tools is also required to be installed on the RHEL system
Downloading a base RHEL image
Get RHEL8 by using your Red Hat account to login to the customer portal and download the Red Hat Enterprise Linux 8.7 KVM Guest Image qcow2 image, locate the image on a memorable path on your RHEL system and also make sure to save the image checksum as specified under the download link.
- For vSphere, you’ll need to register and subscribe the RHEL guest image as follows:
- Point to the downloaded qcow2 image:
$ RHEL_IMAGE_URL=</path/to/rhel-8.7-x86_64-kvm.qcow2>
- Set the subscription-manager register command with your credentials, for example:
$ REGISTER_CMD="subscription-manager register --org=<orgID> --activationkey=<activation key>"
or
$ REGISTER_CMD="subscription-manager register --username=<username> --password=<password> –auto-attach"
- Use virt-customize to register the guest image system
$ virt-customize -a ${RHEL_IMAGE_URL} --run-command "${REGISTER_CMD}"- Note the new checksum
$ export RHEL_IMAGE_CHECKSUM=$(sha256sum ${RHEL_IMAGE_URL} | awk '{ print $1 }')Creating the peer-pod qcow2 VM image
Creating a base peer-pod VM image consists of the base image we downloaded in the previous step to install components required to run a peer-pod container.
- Change to the “podvm” directory under the sandboxed-containers-operator repository “dev-preview” branch (clone it as mentioned in the general prerequisites (above) if not cloned on the RHEL system):
$ cd $HOME/sandboxed-containers-operator/podvm
- Create a local builder container image for building the peer-pod VM image
$ podman build -t podvm_builder_rhel -f Dockerfile.podvm_builder.rhel
- Set the variables and create a peer-pod VM image using the previously built container, based on the downloaded RHEL image. If creating for vSphere, skip setting RHEL_IMAGE_URL and RHEL_IMAGE_CHECKSUM since they have already been set when configuring the base image.
$ export RHEL_IMAGE_URL=</path/to/rhel-8.7-x86_64-kvm.qcow2>
$ export RHEL_IMAGE_CHECKSUM=<copied checksum>
$ export CLOUD_PROVIDER=<aws/vsphere>
$ podman build -t podvm_rhel \
   --build-arg BUILDER_IMG=localhost/podvm_builder_rhel:latest \
   --build-arg CLOUD_PROVIDER=${CLOUD_PROVIDER} \
   --build-arg RHEL_IMAGE_CHECKSUM=${RHEL_IMAGE_CHECKSUM} \
   -v ${RHEL_IMAGE_URL}:/tmp/rhel.qcow2:Z \
-f Dockerfile.podvm.rhel- Extract the peer-pod qcow2 image from container to be converted in the next step to AMI format for AWS or OVF template for vSphere
$ podman save podvm_rhel | tar -xO --no-wildcards-match-slash '*.tar' | tar -x
AWS setup: create an Amazon Machine Image (AMI)
AWS AMI creation prerequisites
- peer-pod qcow2 image (as obtained above)
- qemu-img installed
- AWS CLI tool installed and configured
- The AWS region your cluster is running at
- Hint: run the following command against your cluster:
$ oc get infrastructure/cluster -o jsonpath='{.status.platformStatus.aws.region}'Create an Amazon Machine Image
The AWS AMI is created from the qcow2 we generated in the above step. The steps are as follows:
- Convert the image qcow2 format to a raw format image:
$ qemu-img convert -O raw </path/to/qcow2> base-podvm.raw
- Use the helper script from the "podvm" directory under the sandboxed-containers-operator repository's “dev-preview” branch to upload the image to a newly created s3 bucket and convert it to an AMI:
$ cd $HOME/sandboxed-containers-operator/podvm
$ ./raw-to-ami.sh </path/to/base-podvm.raw> < Some S3 Bucket Name> <AWS Region>
- Once the process is completed (which may take a while), save the AMI_ID you’ll get on the output for the next step
vSphere setup: create a VM template
vSphere VM template creation prerequisites
- peer-pod qcow2 image (as obtained above)
- qemu-img installed
- Powershell along with VMWare PowerCLI module installed
Create a VM template
We will use the peer-pods base image from the previous step to generate a vSphere OVF template. It comprises of the following steps:
- Setup your environment for prerequisites. This includes setting up VMware PowerCLI to communicate with vCenter and uploading a template.
- Convert the qcow2 to a vmdk.
$ qemu-img convert -O vmdk -o subformat=streamOptimized </path/to/qcow2> podvm-base.vmdk
- Use the vmdk to ovf script under the podvm directory of sandboxed-containers-operator repository's “dev-preview” branch to generate a ovf template on your vcenter setup.
$ cd $HOME/sandboxed-containers-operator/podvm
$ ./vmdk-to-ovf.sh <vCenter Server> <vCenter Username> <vCenter Password> <vCenter Cluster> <vCenter Datastore> <Template Name> </path/to/vmdk>
Note: When using a publicly available CentOS peer-pod VM image, you will have to configure the template to use legacy BIOS as compared to UEFI using the “-disableefi” option.
$ ./vmdk-to-ovf.sh <vCenter Server> <vCenter Username> <vCenter Password> <vCenter Cluster> <vCenter Datastore> <Template Name> </path/to/vmdk> -disableefi
- Once complete, the newly created template will be available on your vCenter setup.
Deploying peer-pods using the OpenShift sandboxed containers operator
- Change to the root directory of the OSC repository “dev-preview” branch:
$ cd $HOME/sandboxed-containers-operator
- Populate the “config/peerpods/peerpodssecret.yaml” file according with the AWS or vSphere specific parameters as follow:
AWS:
apiVersion: v1
kind: Secret
type: Opaque
metadata:
  name: peer-pods-secret
  namespace: openshift-sandboxed-containers-operator
stringData:
  CLOUD_PROVIDER: "aws"
  VXLAN_PORT: "9000"
  AWS_ACCESS_KEY_ID: "" # Your AWS access key id (provide)
  AWS_SECRET_ACCESS_KEY: "" # Your AWS secret access key (provide)
  PODVM_AMI_ID: "" # The AMI_ID you created in the previous step (provide)
 #PODVM_INSTANCE_TYPE: "t3.small" # optional
 #AWS_REGION: "" # optional
 #AWS_SG_IDS: "" # optional
 #AWS_SUBNET_ID: "" # optional
vSphere:
apiVersion: v1
kind: Secret
type: Opaque
metadata:
  name: peer-pods-secret
  namespace: openshift-sandboxed-containers-operator
stringData:
  CLOUD_PROVIDER: "vsphere"
  VXLAN_PORT: "9000"
  GOVC_URL: "" # The vcenter instance (provide)
  GOVC_USERNAME: "" # vcenter username (provide)
  GOVC_PASSWORD: "" # vcenter password (provide)
  GOVC_TEMPLATE: "" # Name of the template to use for the peerpods vm (provide)
  GOVC_DATASTORE: "" # The name of the datastore in the vcenter instance (provide)
  GOVC_DATACENTER: "" # The name of the datacenter (provide)
- Deploy the cert-manager operator and validate it’s resources are ready and running
$ oc apply -f https://github.com/cert-manager/cert-manager/releases/download/v1.10.1/cert-manager.yaml
$ oc get all -n cert-manager
- Deploy the OSC and peer-pods
$ oc apply -k config/peerpods
- Wait for worker MCP to be in “UPDATED” state (once “UPDATEDMACHINECOUNT” equals “MACHINECOUNT”)
$ watch oc get mcp/worker
- Set your clusters pull-secret to be available within the peer-pod VM as auth.json file deployed using a generic secret object:
$ oc create secret generic auth-json-secret --from-literal=auth.json=$(oc get -n openshift-config secret/pull-secret -ojson | jq -r '.data.".dockerconfigjson" | @base64d') -n openshift-sandboxed-containers-operator
- Create an instance of the KataConfig CR
$ oc apply -f config/samples/kataconfiguration_v1_kataconfig.yaml
- Wait for kata-oc MCP to be in “UPDATED” state (once “UPDATEDMACHINECOUNT” equals “MACHINECOUNT”)
$ watch oc get mcp/kata-oc
- Check if the peer-pods cloud-api-adaptor (caa) pods are running:
$ oc get pods -n openshift-sandboxed-containers-operator
- Validate webhook is running:
$ oc get pods -n peer-pods-webhook-system
Deploying peer-pod workloads
Running a peer-pod
Lets deploy a web-server application as a peer-pod
- Create a hello-openshift.yaml file with the following pod and service definitions:
apiVersion: v1
kind: Pod
metadata:
  name: hello-openshift
  labels:
    app: hello-openshift
spec:
  runtimeClassName: kata-remote-cc
  containers:
    - name: hello-openshift
      image: quay.io/openshift/origin-hello-openshift
      ports:
        - containerPort: 8888
      securityContext:
        privileged: false
        allowPrivilegeEscalation: false
        runAsNonRoot: true
        runAsUser: 1001
        capabilities:
          drop:
            - ALL
        seccompProfile:
          type: RuntimeDefault
---
kind: Service
apiVersion: v1
metadata:
  name: hello-openshift-service
  labels:
    app: hello-openshift
spec:
  selector:
    app: hello-openshift
  ports:
    - port: 8888
- The kata-remote-cc RuntimeClass indicates this pod will be run as peer pod
- Deploy the hello-openshift.yaml file and wait for the pod to be running
$ oc apply -f hello-openshift.yaml
$ oc get pod/hello-openshift
- Create a route to allow access from outside and get its URL:
$ oc expose service hello-openshift-service -l app=hello-openshift
$ APP_URL=$(oc get routes/hello-openshift-service -o jsonpath='{.spec.host}')
- Check a request sent to this address is served by the deployed application:
$ curl ${APP_URL}
Hello Openshift!- It’s assumed the application address is resolvable from this machine
Inspecting a peer-pod
As peer-pod resources are consumed mostly outside of the cluster, a mutating webhook is used to adjust the Pod resources entries to peer-pods.
Inspecting the Pod spec “resources” entry of a peer-pod will present a special entry (kata.peerpods.io/vm) which defines the amount of resources required from the cloud provider, in addition a special kata.peerpods.io/instance_type annotation is set to specify instance type in use:
$ oc get pods -o yaml | grep resources -A 4
      resources:
        limits:
          kata.peerpods.io/vm: "1"
        requests:
          kata.peerpods.io/vm: "1"
$ oc get pods -o yaml | grep instance_type
      kata.peerpods.io/instance_type: t2.small
Although the peer-pod VM is running outside of the worker node, some resources are still used on the worker node for peer-pod management, control etc. These are fixed and can be viewed under the overhead entry:
$ oc get pods -o yaml | grep overhead -A 3
overhead:
cpu: 250m
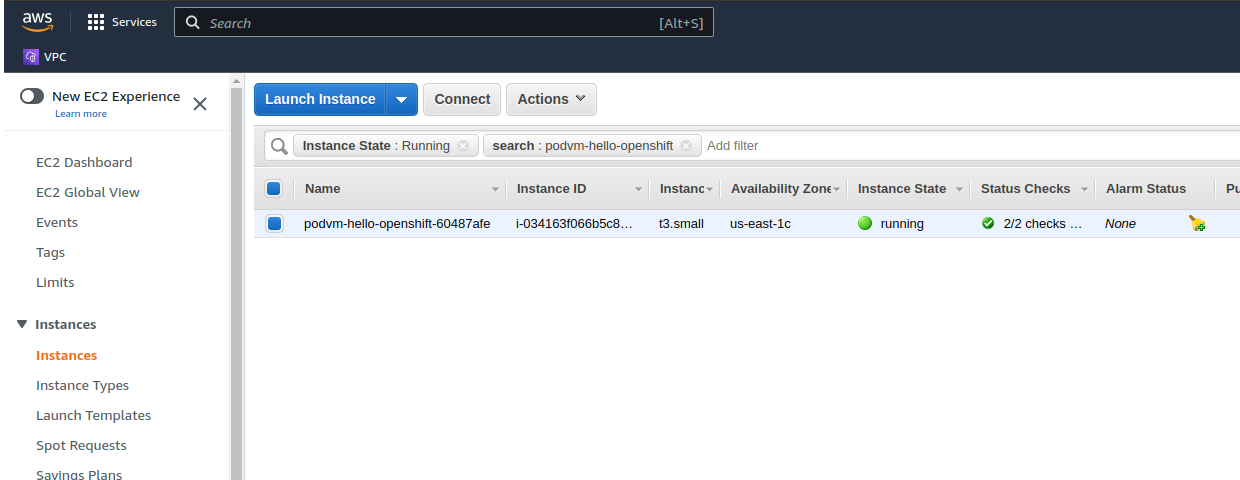
memory: 120MiInspecting resources on AWS console
By logging to your AWS EC2 Console (make sure cluster’s region is used) and selecting “Instances” you can view all of your EC2 VMs including Openshift’s nodes and peer-pod VMs.
Peer-pods VMs are named with “podvm-” prefix, use the “Search” bar to query for the freshly created peer-pod VM which is used for the hello-openshift app.
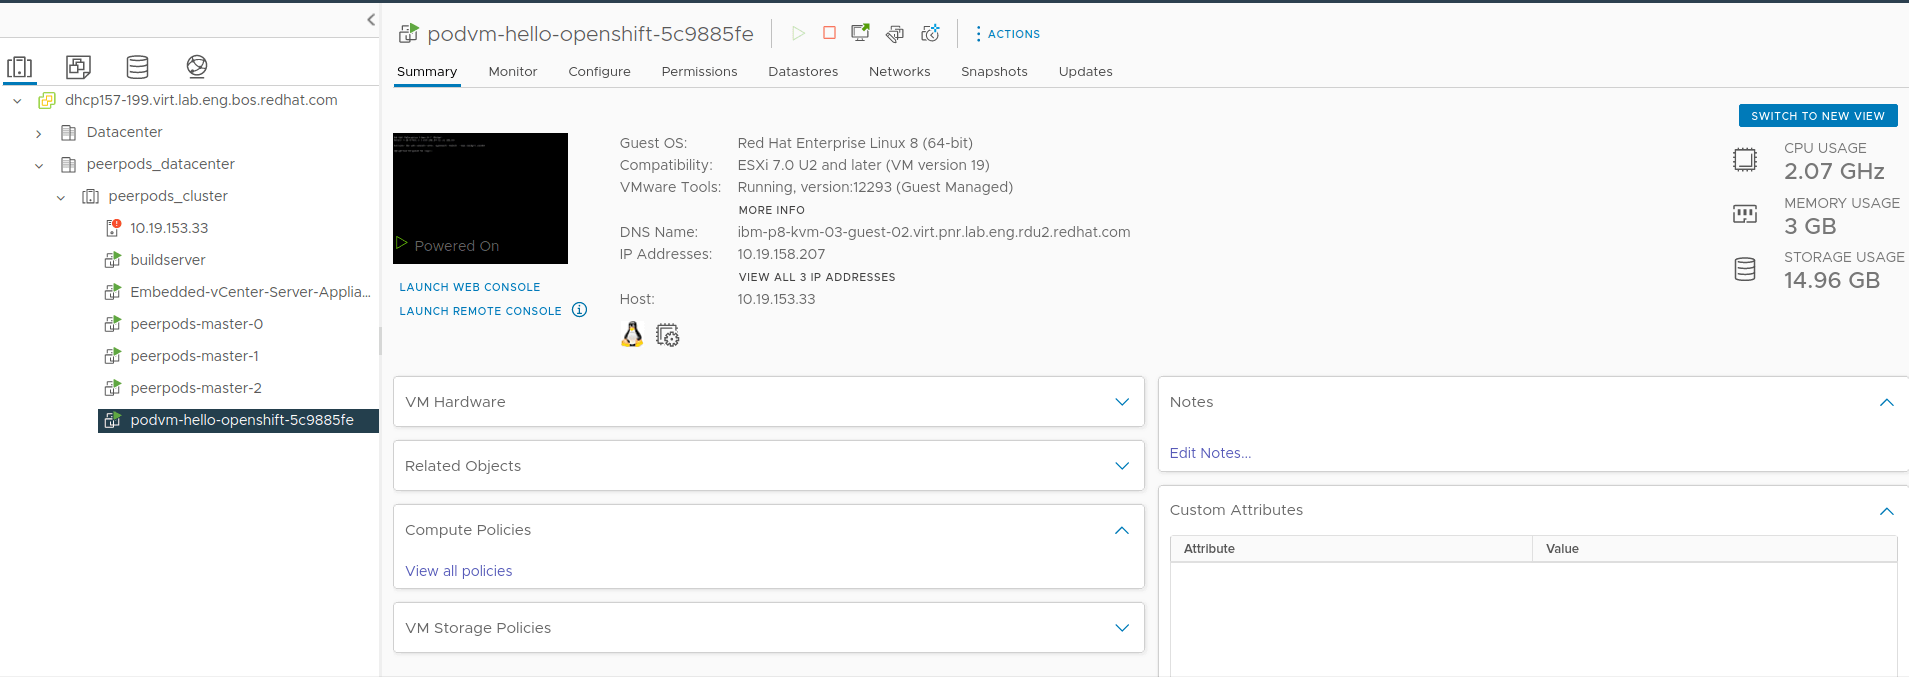
Inspecting resources on vSphere console
You can login to your vCenter instance to inspect peer-pod VMs and understand resource usage just like you would do for a regular VM. You can identify peer-pods (VMs) by their “podvm-” prefix under the cluster you selected for your template. Below, you can find a screenshot of a window displaying general information about a peer-pod VM.
Deleting a peer-pod
Delete peer-pods is just like deleting any other pod.
To delete the hello-openshift application pod, service and route objects run:
$ oc delete all -l app=hello-openshift
- This deletes the Kubernetes objects and the associated cloud instance.
Note: There could be scenarios where the cloud instance is not deleted. Please refer to the following issue for details. To avoid accidental cloud costs, please verify from the cloud provider management console (eg. AWS console) that the cloud instance (with prefix podvm) is deleted.
Undeploying peer-pods and the operator
1. Change to the root directory of the OSC repository “dev-preview” branch:
$ cd $HOME/sandboxed-containers-operator
2. Delete kataconfig
$ oc delete -f config/samples/kataconfiguration_v1_kataconfig.yaml
3. Delete the OSC operator and wait for worker MCP to be in “UPDATED” state
$ oc delete --ignore-not-found=true -k config/peerpods/
$ watch oc get mcp/worker
4. Delete cert-manager
$ oc delete --ignore-not-found=true -f https://github.com/cert-manager/cert-manager/releases/download/v1.10.1/cert-manager.yaml
Known Limitations
As expected with dev-preview release, there are some limitations that will be fixed in future releases.
vSphere:
- Only a single (vCenter) cluster with a single host is supported. Pod creation may fail if you have more than one cluster under your chosen datacenter in vCenter and more than one host under the cluster. If you are not using vSphere clusters then each datacenter can have one host
- Only insecure TLS/SSL mode for template creation and for deploying peer-pod VMs is supported
Summary
In this blog post, we introduced you to setting up peer-pods on AWS and vSphere. We gone over the steps to create a peer-pod VM image based on RHEL image and convert it to an AWS/vSphere compatible format. We also went through peer-pods deployment on existing cloud based OpenShift cluster and we ran a web server application on a peer-pod, sent to it an HTTP request and got a response from the application that is running as a pod inside a VM external to the worker node.
Please note that this project is still in a dev-preview, but we encourage you to experiment and share your feedback to improve the peer-pods solution. For further information please refer to part one and part two in this series.
저자 소개
유사한 검색 결과
강력한 보안, 즉시 사용 가능, 추가 비용 없이 제공: 컨테이너 보안의 진화
MCP 보안: 컨테이너화와 Red Hat OpenShift 통합
Collaboration In Product Security | Compiler
Keeping Track Of Vulnerabilities With CVEs | Compiler
채널별 검색

오토메이션
기술, 팀, 인프라를 위한 IT 자동화 최신 동향

인공지능
고객이 어디서나 AI 워크로드를 실행할 수 있도록 지원하는 플랫폼 업데이트

오픈 하이브리드 클라우드
하이브리드 클라우드로 더욱 유연한 미래를 구축하는 방법을 알아보세요

보안
환경과 기술 전반에 걸쳐 리스크를 감소하는 방법에 대한 최신 정보

엣지 컴퓨팅
엣지에서의 운영을 단순화하는 플랫폼 업데이트

인프라
세계적으로 인정받은 기업용 Linux 플랫폼에 대한 최신 정보

애플리케이션
복잡한 애플리케이션에 대한 솔루션 더 보기
가상화
온프레미스와 클라우드 환경에서 워크로드를 유연하게 운영하기 위한 엔터프라이즈 가상화의 미래