
The first two articles in this series on creating a model for making Configuration-as-Code (CaC) changes to an Ansible automation controller covered setting up GitLab Runner and configuring the base automation controller settings.
If you followed along with those tutorials, you have those configurations in place. Now you're ready to give organizational-level controls to the departments using the controller. These controls will allow the departments to make changes to their own organization without affecting any base controller settings or other organizations' configurations.
For clarity, it usually is best practice to have a department or product team line up directly with a controller organization. This makes it easier to segregate automation projects between departments.
[ Download now: A system administrator's guide to IT automation. ]
The previous articles configured an organizational admin user for DevOps and Engineering organizations. I will use the DevOps org as an example here.
Step 1: Create the repo
Begin by creating a Git repo to contain only the DevOps organization code:

Step 2: Set the vault password in GitLab
Next, get the vault password set in the CI/CD settings in the new repo. Each org should have its own vault password to handle the separation of organizations securely.

[ Learn more about server and configuration management by downloading Ansible for DevOps. ]
Step 3: Create the .gitlab-ci.yml file
Next, create the .gitlab-ci.yml file to configure the pipeline. You can copy this from the example written in the previous article. Notice I have added an inventory to the file:
stages:
  - Ansible EE Information
  - Configure Ansible Controller


display-ee-information:
  tags:
    - controller-system-ee
  stage: Ansible EE Information
  environment: dev
  only:
    - main
  script:
    - echo "Display Versions"
    - ansible --version
    - echo "Display Collections installed"
    - ansible-galaxy collection list

configure-controller:
  tags:
    - controller-system-ee
  stage: Configure Ansible Controller
  environment: dev
  only:
    - main
  script:
    - touch /tmp/vaultpass
    - echo ${VAULT_PASS} > /tmp/vaultpass
    - ansible-playbook automator.yml --vault-password-file /tmp/vaultpass --inventory inventory
[ Get the YAML cheat sheet. ]
Step 4: Create the inventory file
Next, create that inventory file. It simply contains controller. You will use this as a target for the host vars.
$ vim inventorycontrollerStep 5: Create the automation playbook
Populate the playbook that will do the configuration:
$ vim automator.yml---
- hosts: controller
connection: local
roles:
- infra.controller_configuration.dispatchStep 6: Add organizational configuration
You can now add the host vars related to controller in the inventory.
$ mkdir -r host_vars/controllerInside the host_vars/controller directory, add the controller_auth.yml so that you can connect to the controller. You created an admin user for each organization in the previous article (so you can refer back to that if you want). You need this account to access the controller and limit permissions so that the user cannot change the configurations for the main controller or other organizations. Make sure to use ansible-vault to encrypt the password:
$ ansible-vault encrypt_string --name 'password'$ vim host_vars/controller/controller_auth.yml---
controller_hostname: aapcontroller0.chrislab.internal
controller_validate_certs: false
controller_username: devops_org_admin
controller_password: <Encrypted Password>[ Related reading: How to encrypt sensitive data in playbooks with Ansible Vault ]
It makes sense to add some extra files under the container directory to make it easier for engineers to use. In the example below, the additional configuration files include the three inventory files, the job_templates, and projects files.
Populating the files is out of the scope of this article; however, I will give an example of adding a new project in the next step. You can find extra information regarding the variable data structure for each controller object in each role directory in the docs.
host_vars/
└── controller
    ├── controller_auth.yml
    ├── inventories.yml
    ├── inventory_source_vars.yml
    ├── inventory_sources.yml
    ├── job_templates.yml
    └── projects.yml
Step 7: Example of an engineer adding a project in their org
I will now show an example of how a developer can utilize this CaC approach using the DevOps org.
A new developer named Jessie Smith has joined the DevOps team. Jessie has created a new project in GitLab with a fantastic new playbook. It appears to be ready to deploy onto the automation controller.
Jessie creates a branch on the DevOps org CaC repository to work safely, knowing the code changes cannot affect automation controller configurations. (In the .gitlab-ci.yml, only code changes on the main branch will kick off the pipeline.)
$ git checkout -b add-awesome-automationJessie makes the following code changes. The first is creating a new project definition, ensuring the scm_url points to the new project. You can find information on project data structure in the controller_configuration.projects docs.
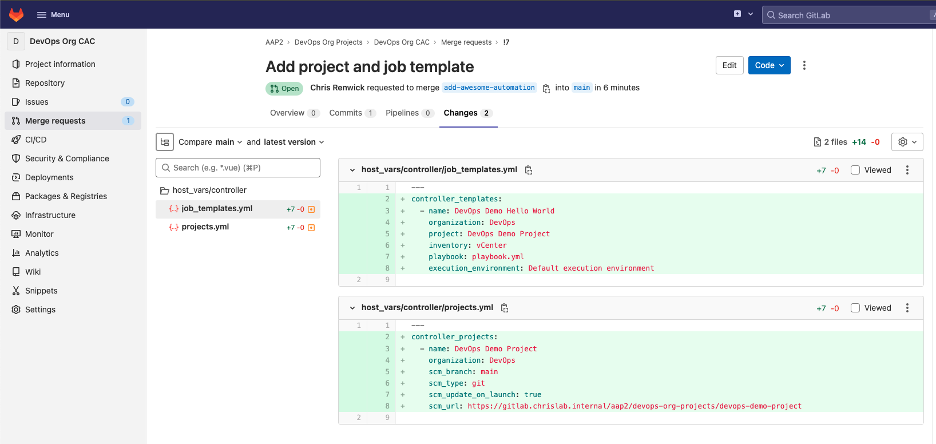
$ vim host_vars/controller/projects.yml---
controller_projects:
- name: DevOps Demo Project
organization: DevOps
scm_branch: main
scm_type: git
scm_update_on_launch: true
scm_url: https://gitlab.chrislab.internal/aap2/devops-org-projects/devops-demo-projectThe next step is defining the job template for that project, including the project it relates to (above), inventory, playbook to use, and execution environment. You can find information on job template data structure in the controller_configuration.job_templates docs.
$ vim host_vars/controller/job_templates.yml---
controller_templates:
- name: DevOps Demo Hello World
organization: DevOps
project: DevOps Demo Project
inventory: vCenter
playbook: playbook.yml
execution_environment: Default execution environmentNow that Jessie has defined the project and job template, the changes can be pushed to the newly created branch created:
$ git add .

$ git commit -m "project and job template added"

$ git push --set-upstream origin add-awesome-automation
Remember, this new branch should not kick off a pipeline. If it does, go back and review the GitLab CI configurations.
Once Jessie is happy with the changes, the next step is creating a merge request from Jessie's branch to the main branch.
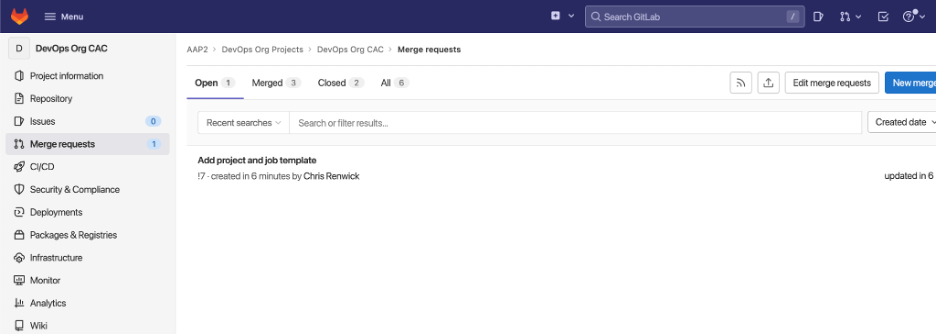
At this point, Jessie's org admin (or DevOps lead) will look at the configuration changes requested and merge them.
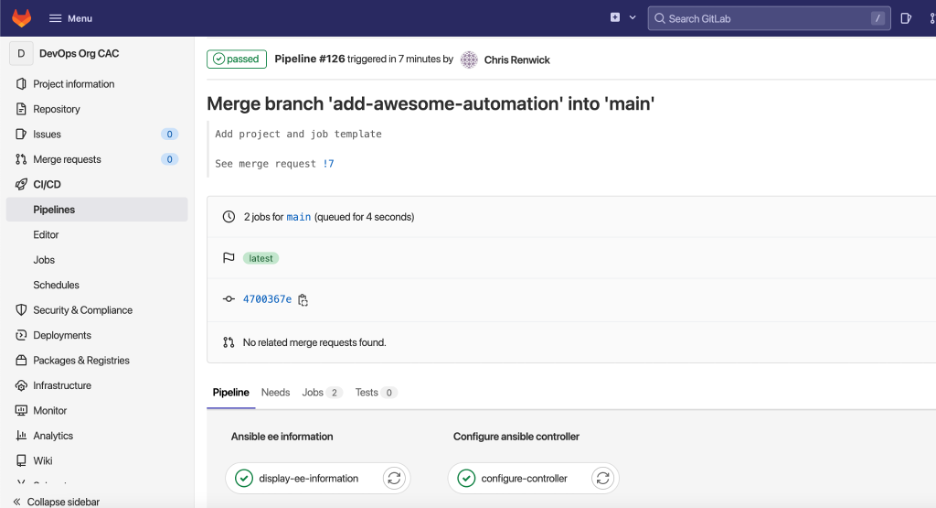
Note: It is a good idea for the org CaC repo to have a protected branching structure in place. This will allow an org leader (such as a DevOps team lead) to check and approve any merge requests (configuration changes, in this instance). When the code is merged into the main branch, it kicks off a pipeline to make the requested changes to the automation controller.
Jessie will see the pipeline initializing after the merge in CI/CD > Pipelines on the left side menu. It should complete successfully.
Jessie then checks the automation controller to confirm the new project has been configured.
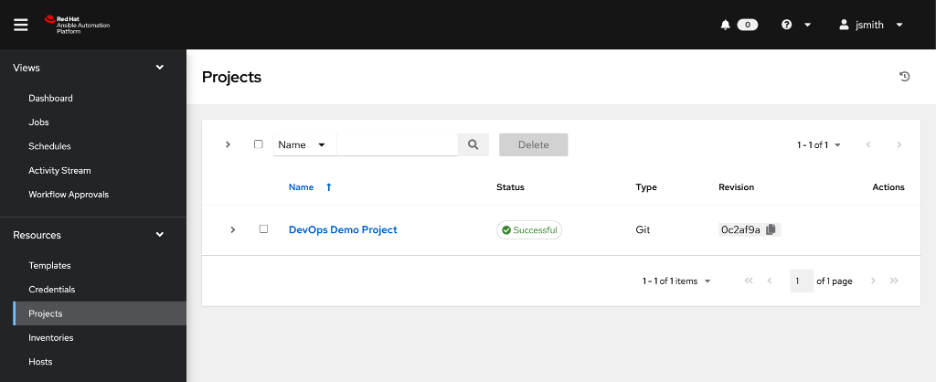
Jessie can then go and launch this new piece of automation.

[ Learn practical steps and best practices for enterprise network automation implementation: Download the Enterprise automation in a DevOps world checklist. ]
Wrap up
This model creates a reliable CaC approach to managing organizations within the automation controller. It allows engineers within an organization to be responsible for adding their own projects to an automation controller. This reduces reliance on an "org admin" team member to go in and make the changes manually. It also reduces the potential of making mistakes in the configuration, as the merge requests should require a code review. The configurations are "as code," so it also has great disaster-recovery benefits (the code can be rerun, restoring the automation controller).
저자 소개
As an experienced infrastructure consultant, Chris specializes in utilizing Ansible Automation Platform to drive automation and efficiency in enterprise environments. His passion for DevOps drives his pursuit in developing bleeding-edge technical solutions that deliver real business value.
유사한 검색 결과
빠르게 진화하는 AI 위협, 더 빠른 대응
귀사의 애플리케이션 플랫폼은 미래에 대비되어 있나요?
Untangling Networks | Compiler
Operating System Management | Compiler
채널별 검색

오토메이션
기술, 팀, 인프라를 위한 IT 자동화 최신 동향

인공지능
고객이 어디서나 AI 워크로드를 실행할 수 있도록 지원하는 플랫폼 업데이트

오픈 하이브리드 클라우드
하이브리드 클라우드로 더욱 유연한 미래를 구축하는 방법을 알아보세요

보안
환경과 기술 전반에 걸쳐 리스크를 감소하는 방법에 대한 최신 정보

엣지 컴퓨팅
엣지에서의 운영을 단순화하는 플랫폼 업데이트

인프라
세계적으로 인정받은 기업용 Linux 플랫폼에 대한 최신 정보

애플리케이션
복잡한 애플리케이션에 대한 솔루션 더 보기
가상화
온프레미스와 클라우드 환경에서 워크로드를 유연하게 운영하기 위한 엔터프라이즈 가상화의 미래