In a previous blog post, I discussed Istio multicluster service mesh and how it could be set up with Submariner across managed clusters in Red Hat Advanced Cluster Management for Kubernetes.
Actually with submariner in Red Hat Advanced Cluster Management for Kubernetes, we can easily set up a service mesh across multiple managed clusters with a shared Istio control plane in the hub cluster, while the Istio data plane (or the workloads with Istio sidecar proxies) will be deployed and running in the managed clusters. In edge scenario, this is pretty useful because the resources in edge device are expensive. The deployment model also allows a universal management and observability console of the whole multicluster mesh.
The aim of this blog is to show how to achieve that single Istio service mesh by leveraging Submariner and Istio in Red Hat Advanced Cluster Management for Kubernetes, and how it could simplify the mesh management for day-2 operations.
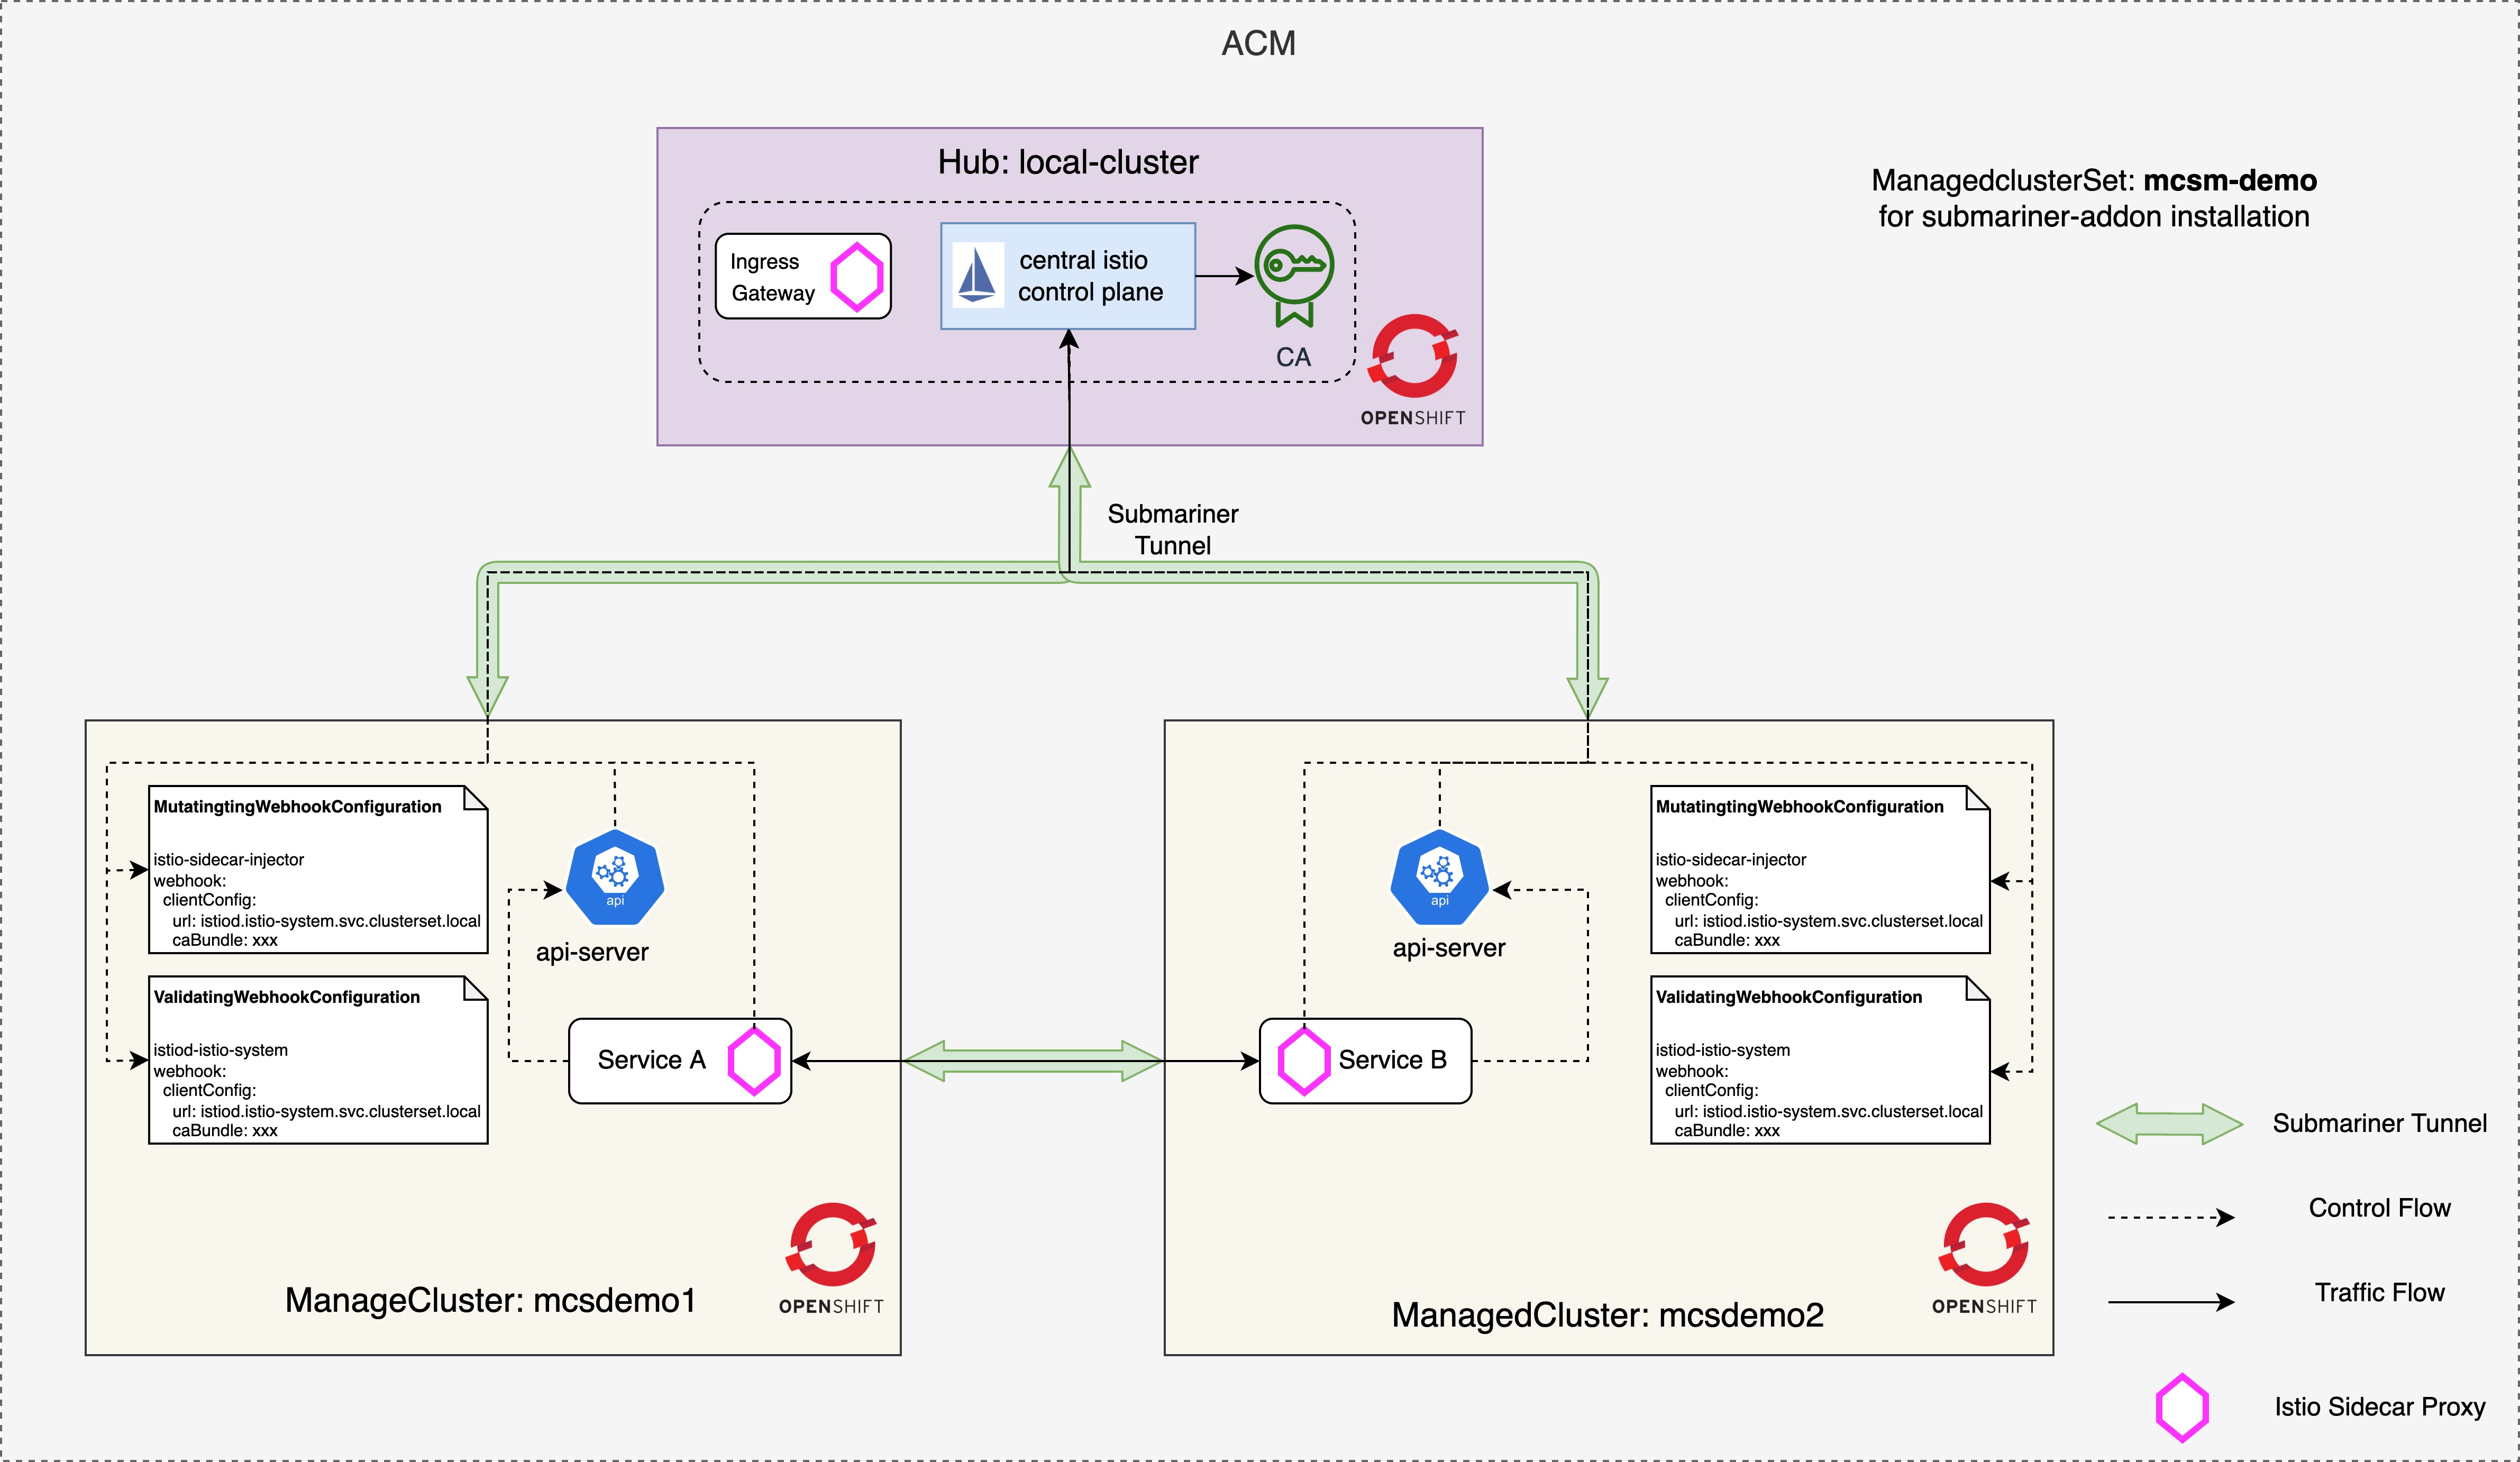
Before we start to the deploy steps, let's first take a look at what the architecture of the service mesh looks like:
Prerequisites
Before we begin the Istio service mesh installation, we need to complete the following procedure:
- Prepare three Red Hat OpenShift clusters with different IP CIDR ranges and install the hub of Red Hat Advanced Cluster Management for Kubernetes in one of the three clusters. In this blog, we create three Red Hat OpenShift clusters named
mcsdemo,mcsdemo1andmcsdemo2with the following IP CIDR ranges:
| Cluster | Pod CIDR | Service CIDR |
|---|---|---|
| mcsdemo | 10.128.0.0/14 | 172.30.0.0/16 |
| mcsdemo1 | 10.132.0.0/14 | 172.31.0.0/16 |
| mcsdemo2 | 10.140.0.0/14 | 172.32.0.0/16 |
- Then we need to import another two clusters by following the instructions.
- Then deploy Submariner network service to connect the three clusters by following the procedure in the Submariner documentation.
We also need to follow the instructions to download and install istioctl, which will be used throughout this blog.
Follow these instructions for configuring Istio on OpenShift to update security configurations for the two Red Hat OpenShift clusters before deploying Istio.
Installation
After we've completed all the necessary pieces of the cluster configuration requirements, we can now start the service mesh installation. To make it clearer, export the the following environment variables that will be used throughout to simplify the instructions:
export CTX_HUB_CLUSTER=<context of the hub cluster: mcsdemo>
export CTX_MC1_CLUSTER=<context of the managed cluster: mcsdemo1>
export CTX_MC2_CLUSTER=<context of the managed cluster: mcsdemo2>
export CENTRAL_ISTIOD_ADDR=<FQDN of the central istiod that can be accessed among the three clusters>
export LOCAL_CLUSTER_NAME=<name of the local-cluster: local-cluster>
export MC1_CLUSTER_NAME=<name of the managedcluster 1: mcsdemo1>
export MC2_CLUSTER_NAME=<name of the managedcluster 2: mcsdemo2>
For this demo environment, the the environment variables are as follow:
export CTX_HUB_CLUSTER=default/api-mcsdemo-red-chesterfield-com:6443/kube:admin
export CTX_MC1_CLUSTER=default/api-mcsdemo1-red-chesterfield-com:6443/kube:admin
export CTX_MC2_CLUSTER=default/api-mcsdemo2-red-chesterfield-com:6443/kube:admin
export CENTRAL_ISTIOD_ADDR=istiod.istio-system.svc.clusterset.local
export LOCAL_CLUSTER_NAME=local-cluster
export MC1_CLUSTER_NAME=mcsdemo1
export MC2_CLUSTER_NAME=mcsdemo2
Set up the Istio installation on managed clusters
- Create the Istio installation configuration by using the
externalprofile to configure the service mesh deployment in the managed cluster. This will install an injection webhook that uses the central control plane’s injector, instead of a locally deployed one:
cat <<EOF > istio-remote-config-${MC1_CLUSTER_NAME}.yaml
apiVersion: install.istio.io/v1alpha1
kind: IstioOperator
metadata:
  namespace: istio-system
spec:
  profile: external
  components:
    base:
      enabled: true
    cni:
      enabled: true
      namespace: kube-system
      k8s:
        overlays:
          - kind: DaemonSet
            name: istio-cni-node
            patches:
              - path: spec.template.spec.containers[0].securityContext.privileged
                value: true
  values:
    global:
      configCluster: true
      meshID: mesh1
      multiCluster:
        clusterName: ${MC1_CLUSTER_NAME}
      network: network1
      tracer:
        zipkin:
          address: zipkin.istio-system.svc.clusterset.local:9411
    pilot:
      configMap: true
    istiodRemote:
      injectionURL: https://${CENTRAL_ISTIOD_ADDR}:443/inject/:ENV:cluster=${MC1_CLUSTER_NAME}:ENV:net=network1
    base:
      validationURL: https://${CENTRAL_ISTIOD_ADDR}:443/validate
    cni:
      cniBinDir: /var/lib/cni/bin
      cniConfDir: /etc/cni/multus/net.d
      chained: false
      cniConfFileName: "istio-cni.conf"
      excludeNamespaces:
       - istio-system
       - kube-system
      logLevel: info
    sidecarInjectorWebhook:
      injectedAnnotations:
        k8s.v1.cni.cncf.io/networks: istio-cni
EOF
- Then install the Istio configurations on the managed cluster:
oc --context=${CTX_MC1_CLUSTER} create namespace istio-system
oc --context=${CTX_MC1_CLUSTER} label ns istio-system topology.istio.io/network=network1
istioctl manifest generate -f istio-remote-config-${MC1_CLUSTER_NAME}.yaml | oc \
    apply --context=${CTX_MC1_CLUSTER} -f -
-
Replace the
${MC1_CLUSTER_NAME}and${CTX_MC1_CLUSTER}with${MC2_CLUSTER_NAME}and${CTX_MC2_CLUSTER}and repeat step 1 and 2 for another managed cluster. -
Verify the Istio resources are created in the managed clusters:
oc --context=${CTX_MC1_CLUSTER} -n istio-system get sa,secret,cm
oc --context=${CTX_MC2_CLUSTER} -n istio-system get sa,secret,cm
oc --context=${CTX_MC1_CLUSTER} get mutatingwebhookconfiguration istio-sidecar-injector
oc --context=${CTX_MC1_CLUSTER} get validatingwebhookconfiguration istio-validator-istio-system
Note: We are supposed to see Istio resources are created in the managed clusters after executing the commands above.
Set up the Central Istio Control Plane on Hub Cluster
- Create the
istio-systemnamespace and service account for the central Istio ontrol plane in hub cluster:
oc --context=${CTX_HUB_CLUSTER} create ns istio-system
oc --context=${CTX_HUB_CLUSTER} -n istio-system create sa istiod-service-account
- The central Istio control plane in hub cluster needs access to the managed clusters to discover services, endpoints, and pod attributes. Create a secret with credentials to access the kube-apiserver of managed cluster and install it in hub cluster:
ISTIO_READER_SRT_NAME_FOR_MC1=$(oc --context=${CTX_MC1_CLUSTER} \
    -n istio-system get serviceaccount/istiod -o jsonpath='{.secrets}' | \
    jq -r '.[] | select(.name | test ("istiod-token-")).name')
istioctl x create-remote-secret \
    --context=${CTX_MC1_CLUSTER} \
    --name=${MC1_CLUSTER_NAME} \
    --type=remote \
    --namespace=istio-system \
    --service-account=istiod \
    --secret-name=${ISTIO_READER_SRT_NAME_FOR_MC1} \
    --create-service-account=false | \
    oc --context=${CTX_HUB_CLUSTER} apply -f -
- Execute the similar step for another managed cluster:
ISTIO_READER_SRT_NAME_FOR_MC2=$(oc --context=${CTX_MC2_CLUSTER} \
    -n istio-system get serviceaccount/istiod -o jsonpath='{.secrets}' | \
    jq -r '.[] | select(.name | test ("istiod-token-")).name')
istioctl x create-remote-secret \
    --context=${CTX_MC2_CLUSTER} \
    --name=${MC2_CLUSTER_NAME} \
    --type=remote \
    --namespace=istio-system \
    --service-account=istiod \
    --secret-name=${ISTIO_READER_SRT_NAME_FOR_MC2} \
    --create-service-account=false | \
    oc --context=${CTX_HUB_CLUSTER} apply -f -
- Verify the remote secrets are created successfully in hub cluster:
$ oc --context=${CTX_HUB_CLUSTER} -n istio-system get secret -l istio/multiCluster=true
NAME                            TYPE     DATA   AGE
istio-remote-secret-mcsdemo1    Opaque   1      59s
istio-remote-secret-mcsdemo2    Opaque   1      43s
Note: We should see two secrets named istio-remote-secret-mcsdemo1 and istio-remote-secret-mcsdemo2 are listed by the command above.
- Create the Istio configuration to deploy the central control plane and
istio-ingressgatewayinistio-systemnamespace of hub cluster:
cat <<EOF > istio-central-config-hub.yaml
apiVersion: install.istio.io/v1alpha1
kind: IstioOperator
metadata:
  namespace: istio-system
spec:
  profile: empty
  meshConfig:
    defaultConfig:
      discoveryAddress: ${CENTRAL_ISTIOD_ADDR}:15012
      proxyMetadata:
        XDS_ROOT_CA: /var/run/secrets/istio/root-cert.pem
        CA_ROOT_CA: /var/run/secrets/istio/root-cert.pem
  components:
    base:
      enabled: true
    cni:
      enabled: true
      namespace: kube-system
      k8s:
        overlays:
          - kind: DaemonSet
            name: istio-cni-node
            patches:
              - path: spec.template.spec.containers[0].securityContext.privileged
                value: true
    ingressGateways:
    - name: istio-ingressgateway
      enabled: true
    pilot:
      enabled: true
      k8s:
        overlays:
        - kind: Deployment
          name: istiod
          patches:
          - path: spec.template.spec.volumes[100]
            value: |-
              name: config-volume
              configMap:
                name: istio
          - path: spec.template.spec.volumes[100]
            value: |-
              name: inject-volume
              configMap:
                name: istio-sidecar-injector
          - path: spec.template.spec.containers[0].volumeMounts[100]
            value: |-
              name: config-volume
              mountPath: /etc/istio/config
          - path: spec.template.spec.containers[0].volumeMounts[100]
            value: |-
              name: inject-volume
              mountPath: /var/lib/istio/inject
        env:
        - name: EXTERNAL_ISTIOD
          value: "true"
        - name: SHARED_MESH_CONFIG
          value: istio
        - name: ISTIOD_CUSTOM_HOST
          value: ${CENTRAL_ISTIOD_ADDR}
  values:
    global:
      caAddress: ${CENTRAL_ISTIOD_ADDR}:15012
      operatorManageWebhooks: true
      meshID: mesh1
      multiCluster:
        clusterName: ${LOCAL_CLUSTER_NAME}
      network: network1
      tracer:
        zipkin:
          address: zipkin.istio-system.svc.clusterset.local:9411
    cni:
      cniBinDir: /var/lib/cni/bin
      cniConfDir: /etc/cni/multus/net.d
      chained: false
      cniConfFileName: "istio-cni.conf"
      excludeNamespaces:
       - istio-system
       - kube-system
      logLevel: info
    sidecarInjectorWebhook:
      injectedAnnotations:
        k8s.v1.cni.cncf.io/networks: istio-cni
EOF
- Apply the Istio configuration in hub cluster:
istioctl --context=${CTX_HUB_CLUSTER} install -f istio-central-config-hub.yaml --skip-confirmation
- Verify that the central
istiodandistio-ingressgatewayhave been successfully deployed in hub cluster:
$ oc --context=${CTX_HUB_CLUSTER} -n istio-system get pod,svc
NAME                                        READY   STATUS    RESTARTS   AGE
pod/istio-ingressgateway-86464c97f5-tp7mr   1/1     Running   0          22s
pod/istiod-98d586c48-zgt46                  1/1     Running   0          38s

NAME                           TYPE           CLUSTER-IP       EXTERNAL-IP   PORT(S)                                      AGE
service/istio-ingressgateway   LoadBalancer   172.30.251.10    <pending>     15021:32440/TCP,80:31976/TCP,443:32119/TCP   22s
service/istiod                 ClusterIP      172.30.93.244    <none>        15010/TCP,15012/TCP,443/TCP,15014/TCP        37s
Note: We should see pod and service for istiod and istio-ingressgateway are up and running in hub cluster with the command above.
- Export the central Istio control plane with
ServiceExportso that it can be accessed from other managed clusters:
cat << EOF | oc --context=${CTX_HUB_CLUSTER} apply -n istio-system -f -
apiVersion: multicluster.x-k8s.io/v1alpha1
kind: ServiceExport
metadata:
  name: istiod
  namespace: istio-system
EOF
- Expose the
istio-ingressgatewayservice with Red Hat Openshift route so that it can be accessed by user from outside:
oc --context=${CTX_HUB_CLUSTER} -n istio-system expose svc istio-ingressgateway --port=http2
Patch the DNS Configuration for the kube-apiserver of managed clusters
Due to a Submariner known issue, the kube-apiserver of managed clusters need to be patched to add DNS entry of Submariner exported service so that istio sidecar injector can be working. This can be done by executing the following steps:
- Get the clusterIP of the central Istio control plane in hub cluster:
oc --context=${CTX_HUB_CLUSTER} \
    -n istio-system get svc istiod -o jsonpath="{.spec.clusterIP}"
- Get all the kube-apiserver pods of each managed cluster and patch the
/etc/hostsfile for each kube-apiserver pod to add a new DNS entry, the IP of the DNS entry is the command output in step 1, while the FQDN wil beistiod.istio-system.svc.clusterset.local. An example result after this step will be similar to the following output:
$ oc --context=${CTX_MC1_CLUSTER} -n openshift-kube-apiserver get pod -l apiserver=true
NAME                                          READY   STATUS    RESTARTS   AGE
kube-apiserver-ip-10-0-131-252.ec2.internal   5/5     Running   0          2h
$ oc --context=${CTX_MC1_CLUSTER} -n openshift-kube-apiserver exec -it kube-apiserver-ip-10-0-131-252.ec2.internal -- vi /etc/hosts  # add DNS entry manually
$ oc --context=${CTX_MC1_CLUSTER} -n openshift-kube-apiserver exec -it kube-apiserver-ip-10-0-131-252.ec2.internal -- cat /etc/hosts # verify
127.0.0.1   localhost localhost.localdomain localhost4 localhost4.localdomain4
::1         localhost localhost.localdomain localhost6 localhost6.localdomain6
172.31.197.220 image-registry.openshift-image-registry.svc image-registry.openshift-image-registry.svc.cluster.local # openshift-generated-node-resolver
172.30.182.132 istiod.istio-system.svc.clusterset.local
Note: The step 2 needs to be executed against each of the two managed clusters.
Deploy the Bookinfo Application
Before we start to the deploy the bookinfo application, let's first take a look at the overall deployment model we will install:
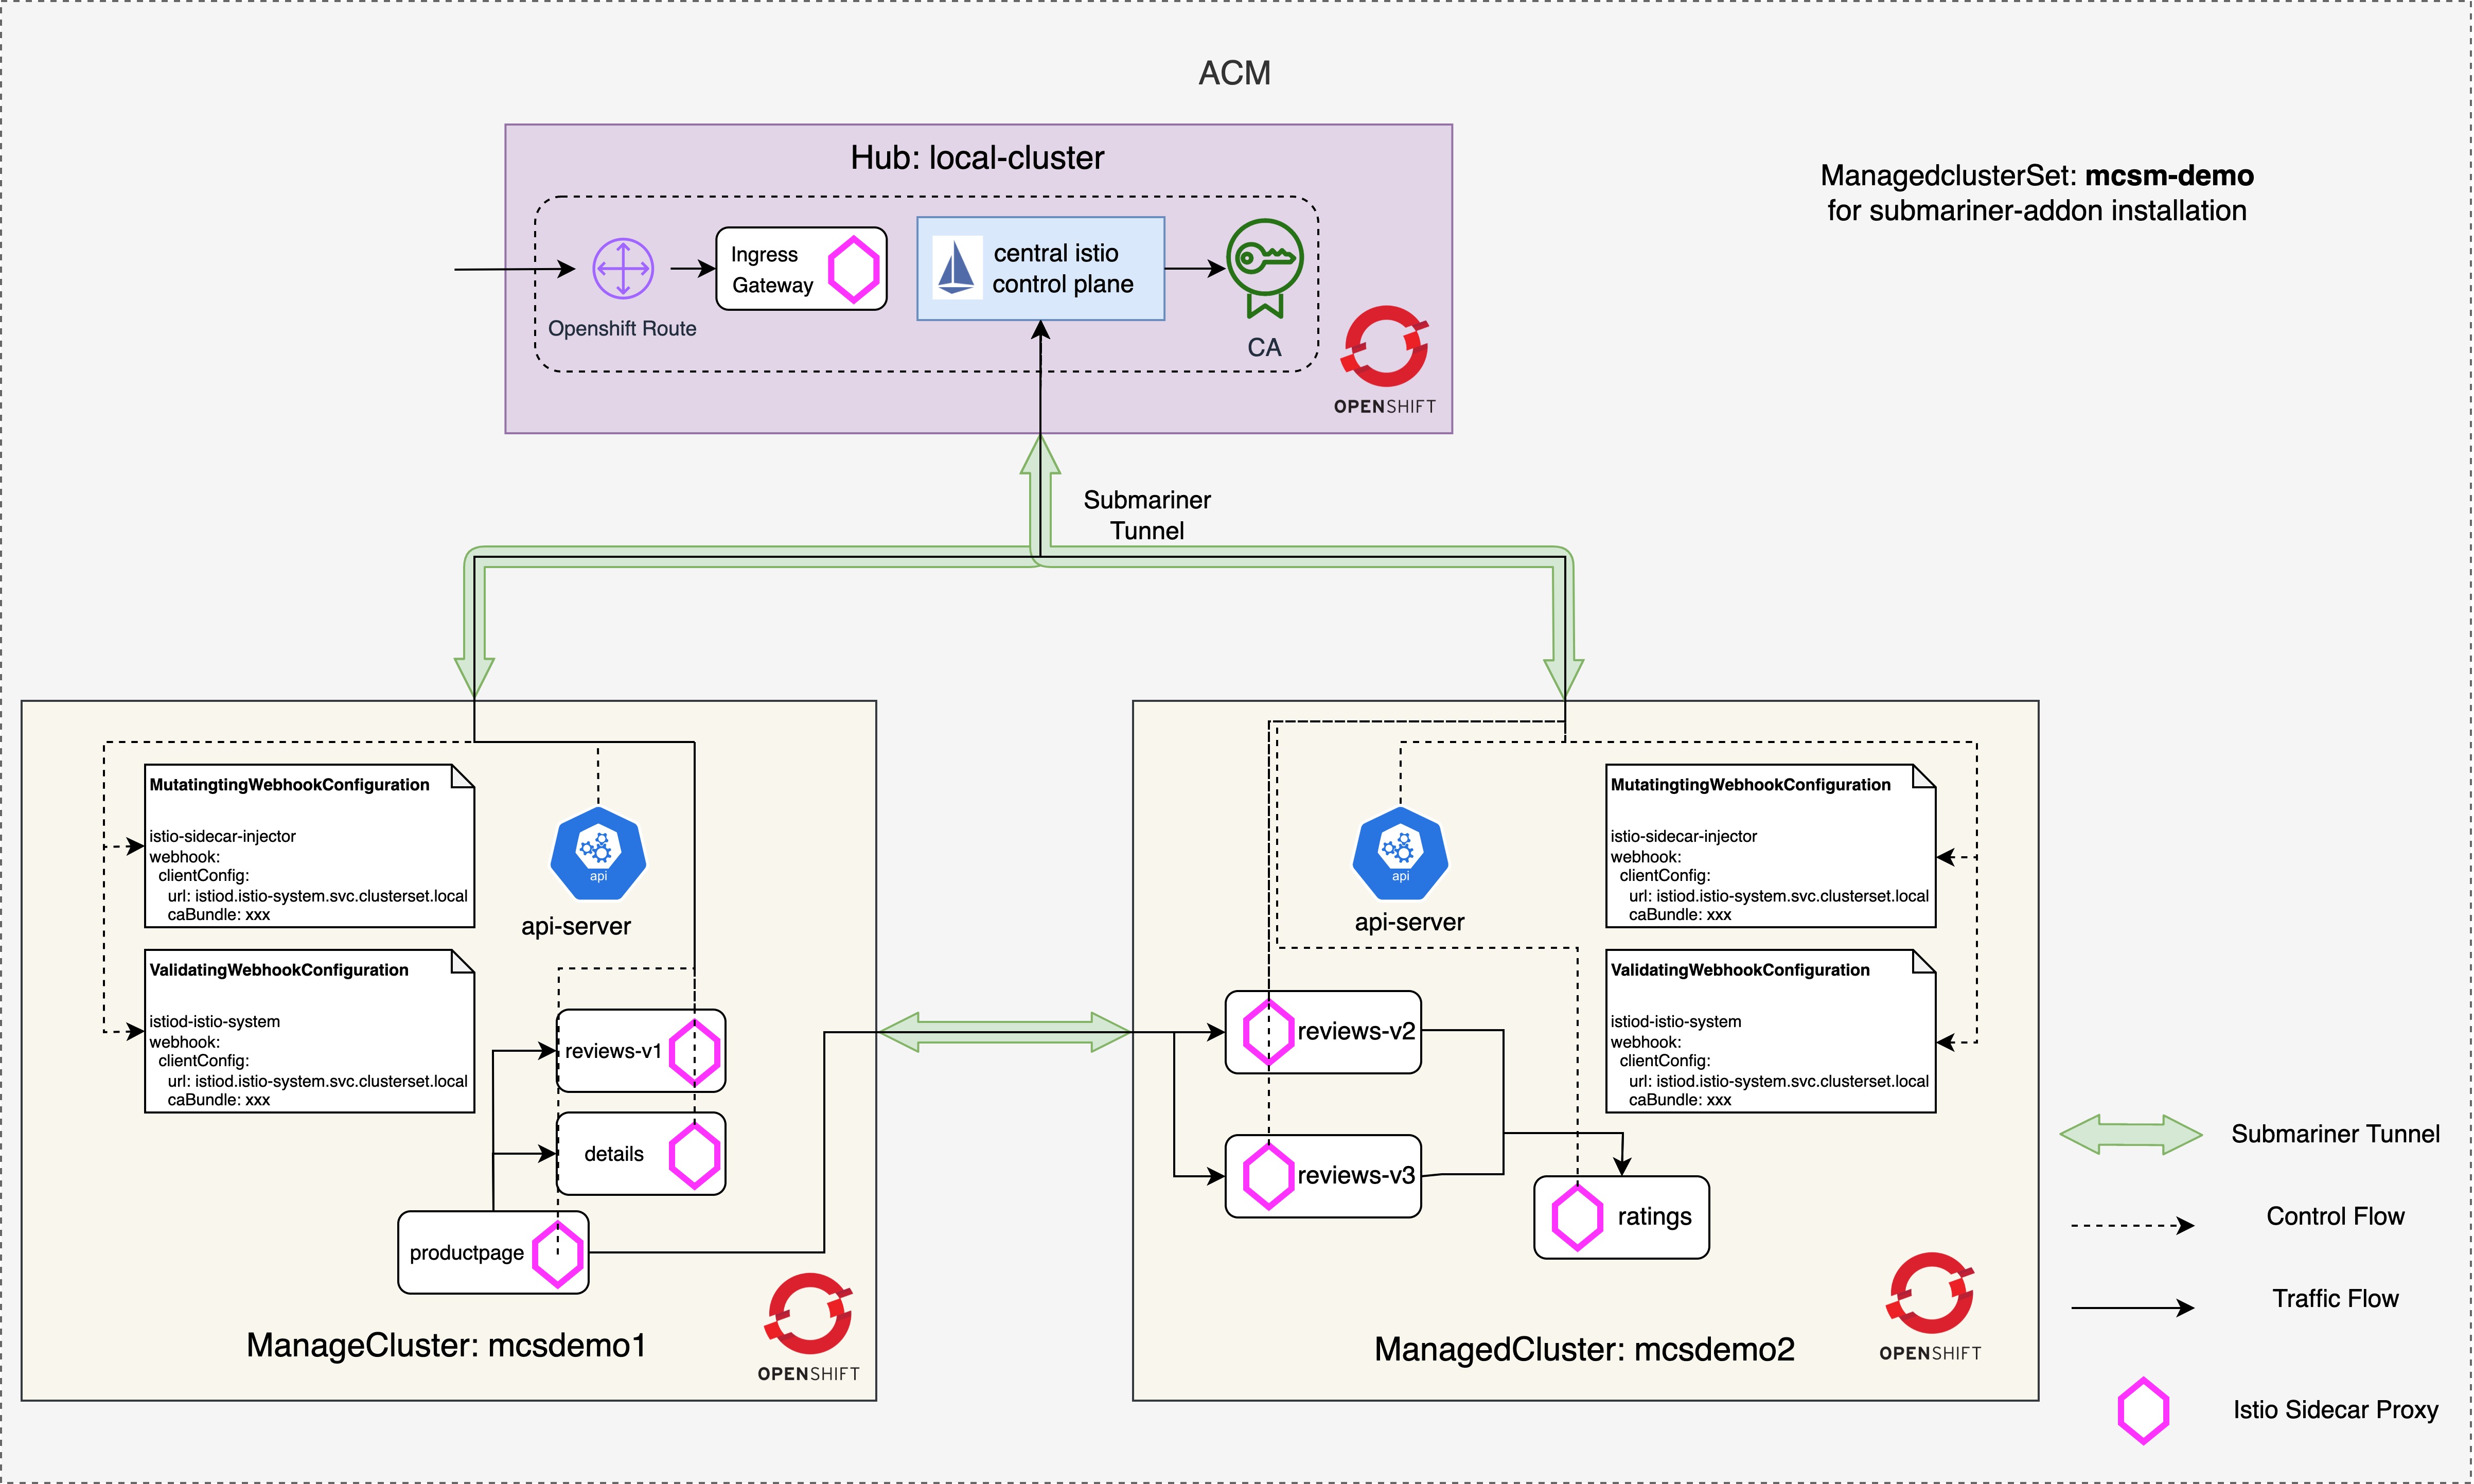
As you can see from above diagram, productpage, details and reviews-v1 microservices will be deployed in the first managed cluster, while reviews-v2, reviews-v3 and ratings microservices will be deployed in abother managed cluster. We also have deployed the Istio ingress gateway in hub cluster so that the bookinfo can be accessed via that.
- Deploy the productpage, details and reviews-v1 microservices into
istio-appsnamespace of the first managed cluster:
oc --context=${CTX_MC1_CLUSTER} apply -n istio-apps -l account=productpage \
    -f https://raw.githubusercontent.com/istio/istio/release-1.11/samples/bookinfo/platform/kube/bookinfo.yaml
oc --context=${CTX_MC1_CLUSTER} apply -n istio-apps -l service=productpage \
    -f https://raw.githubusercontent.com/istio/istio/release-1.11/samples/bookinfo/platform/kube/bookinfo.yaml
oc --context=${CTX_MC1_CLUSTER} apply -n istio-apps -l app=productpage,version=v1 \
    -f https://raw.githubusercontent.com/istio/istio/release-1.11/samples/bookinfo/platform/kube/bookinfo.yaml
oc --context=${CTX_MC1_CLUSTER} apply -n istio-apps -l account=details \
    -f https://raw.githubusercontent.com/istio/istio/release-1.11/samples/bookinfo/platform/kube/bookinfo.yaml
oc --context=${CTX_MC1_CLUSTER} apply -n istio-apps -l service=details \
    -f https://raw.githubusercontent.com/istio/istio/release-1.11/samples/bookinfo/platform/kube/bookinfo.yaml
oc --context=${CTX_MC1_CLUSTER} apply -n istio-apps -l app=details,version=v1 \
    -f https://raw.githubusercontent.com/istio/istio/release-1.11/samples/bookinfo/platform/kube/bookinfo.yaml
oc --context=${CTX_MC1_CLUSTER} apply -n istio-apps -l account=reviews \
    -f https://raw.githubusercontent.com/istio/istio/release-1.11/samples/bookinfo/platform/kube/bookinfo.yaml
oc --context=${CTX_MC1_CLUSTER} apply -n istio-apps -l service=reviews \
    -f https://raw.githubusercontent.com/istio/istio/release-1.11/samples/bookinfo/platform/kube/bookinfo.yaml
oc --context=${CTX_MC1_CLUSTER} apply -n istio-apps -l app=reviews,version=v1 \
    -f https://raw.githubusercontent.com/istio/istio/release-1.11/samples/bookinfo/platform/kube/bookinfo.yaml
- Deploy reviews-v2, reviews-v3 and ratings microservices into
istio-appsnamespace of another managed cluster:
oc --context=${CTX_MC2_CLUSTER} apply -n istio-apps -l account=reviews \
    -f https://raw.githubusercontent.com/istio/istio/release-1.11/samples/bookinfo/platform/kube/bookinfo.yaml
oc --context=${CTX_MC2_CLUSTER} apply -n istio-apps -l service=reviews \
    -f https://raw.githubusercontent.com/istio/istio/release-1.11/samples/bookinfo/platform/kube/bookinfo.yaml
oc --context=${CTX_MC2_CLUSTER} apply -n istio-apps -l app=reviews,version=v2 \
    -f https://raw.githubusercontent.com/istio/istio/release-1.11/samples/bookinfo/platform/kube/bookinfo.yaml
oc --context=${CTX_MC2_CLUSTER} apply -n istio-apps -l app=reviews,version=v3 \
    -f https://raw.githubusercontent.com/istio/istio/release-1.11/samples/bookinfo/platform/kube/bookinfo.yaml
oc --context=${CTX_MC2_CLUSTER} apply -n istio-apps -l account=ratings \
    -f https://raw.githubusercontent.com/istio/istio/release-1.11/samples/bookinfo/platform/kube/bookinfo.yaml
oc --context=${CTX_MC2_CLUSTER} apply -n istio-apps -l service=ratings \
    -f https://raw.githubusercontent.com/istio/istio/release-1.11/samples/bookinfo/platform/kube/bookinfo.yaml
oc --context=${CTX_MC2_CLUSTER} apply -n istio-apps -l app=ratings,version=v1 \
    -f https://raw.githubusercontent.com/istio/istio/release-1.11/samples/bookinfo/platform/kube/bookinfo.yaml
- Verify the bookinfo pods are injected with Istio sidecars and started successfully:
$ oc --context=${CTX_MC1_CLUSTER} -n istio-apps get pod
NAME                              READY   STATUS    RESTARTS   AGE
details-v1-79f774bdb9-ngb7x       2/2     Running   0          4m20s
productpage-v1-6b746f74dc-bh97j   2/2     Running   0          4m21s
reviews-v1-545db77b95-gt2vw       2/2     Running   0          4m18s
$ oc --context=${CTX_MC2_CLUSTER} -n istio-apps get pod
NAME                          READY   STATUS    RESTARTS   AGE
ratings-v1-b6994bb9-hfw78     2/2     Running   0          2m24s
reviews-v2-7bf8c9648f-6lzpg   2/2     Running   0          2m26s
reviews-v3-84779c7bbc-gljfp   2/2     Running   0          2m25s
Note: We should see the bookinfo pods are up and running, also the Istio sidecars should be injected into the pods.
- Verify the istio sidecars are connected to the central control plane:
$ istioctl --context=${CTX_HUB_CLUSTER} proxy-status
NAME                                                  CDS        LDS        EDS        RDS          ISTIOD                     VERSION
details-v1-79f774bdb9-ngb7x.istio-apps                SYNCED     SYNCED     SYNCED     SYNCED       istiod-98d586c48-zgt46     1.11.4
istio-ingressgateway-86464c97f5-tp7mr.istio-system    SYNCED     SYNCED     SYNCED     NOT SENT     istiod-98d586c48-zgt46     1.11.4
productpage-v1-6b746f74dc-bh97j.istio-apps            SYNCED     SYNCED     SYNCED     SYNCED       istiod-98d586c48-zgt46     1.11.4
ratings-v1-b6994bb9-hfw78.istio-apps                  SYNCED     SYNCED     SYNCED     SYNCED       istiod-98d586c48-zgt46     1.11.4
reviews-v1-545db77b95-gt2vw.istio-apps                SYNCED     SYNCED     SYNCED     SYNCED       istiod-98d586c48-zgt46     1.11.4
reviews-v2-7bf8c9648f-6lzpg.istio-apps                SYNCED     SYNCED     SYNCED     SYNCED       istiod-98d586c48-zgt46     1.11.4
reviews-v3-84779c7bbc-gljfp.istio-apps                SYNCED     SYNCED     SYNCED     SYNCED       istiod-98d586c48-zgt46     1.11.4
- Create
gatewayandvirtualserviceresources in hub cluster so that we can access thebookinfoapplication with theistio-ingressgateway:
oc --context=${CTX_HUB_CLUSTER} create ns istio-apps
oc --context=${CTX_HUB_CLUSTER} apply -n istio-apps \
    -f https://raw.githubusercontent.com/istio/istio/release-1.11/samples/bookinfo/networking/bookinfo-gateway.yaml
- Verify that the
bookinfoapplication can be accessed by running the following command:
$ export GATEWAY_URL=$(oc --context=${CTX_HUB_CLUSTER} \
    -n istio-system get route istio-ingressgateway \
    -o jsonpath="{.spec.host}")
$ curl -s "http://${GATEWAY_URL}/productpage" | grep "Simple Bookstore App"
    <title>Simple Bookstore App</title>
Note: We can also point our browser to http://$GATEWAY_URL/productpage to view the bookinfo web page. If we refresh the page several times, we should see different versions of reviews shown in product page, presented in a round robin style (red stars, black stars, no stars), since we haven’t yet created Istio traffic rule to control the version routing.
- Create default destination rules for the bookinfo application:
oc --context=${CTX_HUB_CLUSTER} apply -n istio-apps \
    -f https://raw.githubusercontent.com/istio/istio/release-1.11/samples/bookinfo/networking/destination-rule-all.yaml
- To route to one version only, we create virtual services in hub cluster that set the default version for the microservices. In this case, the virtual services will route all traffic to v1 of each microservice:
oc --context=${CTX_HUB_CLUSTER} apply -n istio-apps \
    -f https://raw.githubusercontent.com/istio/istio/release-1.11/samples/bookinfo/networking/virtual-service-all-v1.yaml
- Test the new configurations once again by refreshing the
/productpageof thebookinfoapplication. Notice that the reviews part of the page displays with no rating stars, no matter how many times we refresh. This is because we configured Istio to route all traffic for the reviews service to the versionreviews:v1and this version of the service does not access the star ratings service.
Note: We can create any arbitrary route configuration in hub cluster to verify the whole mesh is working as expected.
Summary
In the context of Istio multicluster service mesh, the use of Submariner, would remove the need to manage the east-west gateways, allowing for the selected services to be accessed directly just like they are in the same cluster. We set up a single service mesh across multiple clusters and a central management entrance for the whole mesh.
저자 소개

유사한 검색 결과
과거의 운영 방식에서 벗어나 IT의 미래 구축
AI의 다음 변곡점: 에이전트를 엔터프라이즈 슈퍼유저로 전환
Crack the Cloud_Open | Command Line Heroes
Edge computing covered and diced | Technically Speaking
채널별 검색

오토메이션
기술, 팀, 인프라를 위한 IT 자동화 최신 동향

인공지능
고객이 어디서나 AI 워크로드를 실행할 수 있도록 지원하는 플랫폼 업데이트

오픈 하이브리드 클라우드
하이브리드 클라우드로 더욱 유연한 미래를 구축하는 방법을 알아보세요

보안
환경과 기술 전반에 걸쳐 리스크를 감소하는 방법에 대한 최신 정보

엣지 컴퓨팅
엣지에서의 운영을 단순화하는 플랫폼 업데이트

인프라
세계적으로 인정받은 기업용 Linux 플랫폼에 대한 최신 정보

애플리케이션
복잡한 애플리케이션에 대한 솔루션 더 보기
가상화
온프레미스와 클라우드 환경에서 워크로드를 유연하게 운영하기 위한 엔터프라이즈 가상화의 미래