Red Hat Virtualization (RHV) 4.3 is hot off the proverbial presses, having just been released a few days ago, and if you’re anxious to get started exploring Red Hat Virtualization in your environment, then this blog post is for you! We’re going to walk through a quick start scenario with the new release to get you up and running so that you can start creating and migrating your virtual machines as soon as possible.
The amount of time to deploy Red Hat Virtualization and start hosting virtual machines can vary quite a bit depending on how complex your environment is, whether you have all the information ready before starting, how many machines you’re working with, and even hardware speed. On average, getting your first hypervisor deployed and Red Hat Virtualization Manager running will take 1-2 hours. Remember, most of the hard work and decisions get made in the planning phase so that this part is much easier!
Prerequisites
It’s a good idea to review the Planning and Prerequisites Guide before getting started but, if you decide not to view the entire document, at a minimum, chapter 4 and the content below are a great start.
If you’re not familiar with Red Hat Virtualization, there are two primary software components:
-
Red Hat Virtualization Manager (RHV-M), also referred to simply as “manager” and/or “engine” in the documentation. In this quick start we’re going to be using the hosted engine deployment model, where RHV-M is deployed to the same hypervisors it’s managing, however RHV-M may also be deployed to a standalone physical (or virtual) host if desired.
-
Red Hat Virtualization Hypervisors. There are two hypervisor options available with Red Hat Virtualization: Red Hat Enterprise Linux or RHV Host (RHV-H). Both have the same functionality, however RHV-H is intended to be deployed as an appliance, with the majority of management happening through RHV-M and/or Cockpit.
Both of these are available from the Red Hat Virtualization software page in the portal.
As you would expect, we also need some hardware to host the virtual machines. There are three things we will need:
-
Compute, a.k.a. servers:
While it is technically possible to deploy a single physical server which hosts RHV-M and other virtual machines, you should only do this in non-production, testing and validation environments. This configuration is not supported but, with the right amount of resources, is a good way to experiment and become familiar with Red Hat Virtualization.
Two physical hosts is the recommended minimum for Red Hat Virtualization for a number of reasons. Arguably the most important is that it gives the ability to live migrate virtual machines, enabling high availability for the workloads if one of the servers needs to be restarted or taken down for updates, maintenance, or any other reason.
For most situations, three or more nodes should be used per cluster. This gives the most flexibility and gives you a great deal of resiliency and availability. Red Hat Virtualization supports up to 400 hosts in a single cluster, with no maximum number of virtual machines, so go as big as you like to get the resources you need!
As a general rule, the barest minimum hardware requirements for a hypervisor host are one dual core CPU, 4GB of RAM, 25GB of local storage, and a single 1GbE NIC. This is only usable for proof-of-concept or to familiarize yourself with Red Hat Virtualization. If you’re going to be hosting production virtual machines, you’ll want to evaluate the resource requirements of your workloads and size the servers accordingly. An example, minimal hardware config is 2x quad core (or more) CPUs, 32GB of RAM, 25GB of local storage, and 2x 10GbE NICs.
The planning guide provides several recommendations for compute resources. -
Network:
Red Hat Virtualization can operate with only one network connection. However, as you would expect, this limits performance and availability for the virtual machines being hosted. At a minimum, two physical network connections configured in a mode 1 bond (active/passive failover) is highly suggested for a production workload, and more than two network connections in a mode 4 bond (802.3ad / LACP link aggregation) is recommended. Optionally, but recommended, the traffic types may be logically separated using VLANs, if desired. 10GbE is highly recommended, especially if only two network connections are being used.
A more robust deployment would have multiple, redundant, isolated connections for management, storage, migration, and virtual machine network traffic all spread across more than one network switch. For example, two 1GbE mode 1 bonded links for management, two+ 10GbE+ mode 4 bonded links for IP storage, and two+ 10GbE+ mode 4 bonded links for migration and virtual machines.
Ultimately, the amount of network throughput you’ll need depends on a large number of factors and there are nearly infinite different ways of configuring the network resources. The planning guide outlines some considerations here and here, but you can also work with Red Hat to help identify the optimal way of configuring the network if desired. -
Storage:
Shared storage is a requirement when you want to be able to live migrate your virtual machines between Red Hat Virtualization hypervisors in your clusters. The storage domains can be provided from NFS, iSCSI, or FCP storage, giving you the freedom to use what meets your needs. Importantly, all of the hosts in the same logical data center must be able to access all of the storage domains.
Be sure to use storage which is capable of delivering the capacity (GB), IOPS, and latency needed for your virtual workloads. The storage considerations in the planning guide can be found here.
Step one: Deploying the hypervisor operating system
The first thing we need to do is deploy the operating system for our hypervisor hosts. The full steps for RHV-H can be found in the documentation here, but an overview of the process is:
-
Download the ISO and create bootable media.
-
Attach the bootable media to the physical host, power it on, and boot to the RHV-H installation disk.
-
Follow the installation prompts, providing hostname, management network configuration, and local storage configuration. Once the install starts, be sure to set a secure root password!
- After the install finishes, reboot the server, and log in (locally at the terminal, using SSH, or via Cockpit) to register the system and subscribe to the needed repos. If using the terminal or SSH, this command will both register and attach the host:
	# register and attach the host
	subscription-manager register --auto-attach

	# enable the RHV-H repo
	subscription-manager repos --enable=rhel-7-server-rhvh-4-rpms
If you’re using RHEL as your hypervisor OS, the process is very similar (full documentation here). We recommend you choose the minimal deployment option, but you can choose whichever best suits your needs. After installing the OS, you’ll need to take two additional steps:
-
After registering the system, enable these repos:
subscription-manager repos --disable='*' \ --enable=rhel-7-server-rpms \ --enable=rhel-7-server-rhv-4-mgmt-agent-rpms \ --enable=rhel-7-server-ansible-2-rpms - Install Cockpit:
	# install using yum
	yum install cockpit-ovirt-dashboard

	# enable and start the service
	systemctl enable --now cockpit.socket

	# open the firewall for Cockpit
	firewall-cmd --permanent --add-service=cockpit
Finally, if you have a complex network environment, it may be easier to manually configure networking before moving on. This is particularly true when doing additional configuration remotely may lead to the management network becoming disconnected, or if you need additional network configuration for storage connectivity on the host where RHV-M will be deployed in the next step.The documentation highlights some common practices and makes some recommendations for configuration.
Step two: Installing Red Hat Virtualization Manager
Now that we have the hypervisor hosts ready, we can move on to deploying RHV-M. Self-hosted RHV-M may be deployed using either the CLI or Cockpit, depending on your preference. We’ll cover the Cockpit based deployment below, but be sure to check the documentation for CLI instructions if that’s your method. If you don’t want to use the self-hosted RHV-M you can find the requirements for the physical (or virtual) machine and deployment instructions in the documentation here.
Before getting started, if you haven’t already, be sure that at least one storage domain, with at least 100GB of free capacity, has been provisioned and is accessible by the host. If there is a firewall between the network where RHV-M will be deployed and the hypervisor management interfaces, be sure that the correct ports have been opened as well.
With those two checks out of the way, we can deploy RHV-M. For reference, the full documentation can be found here. If, at any time you encounter issues, be sure to check the troubleshooting section of the documentation.
-
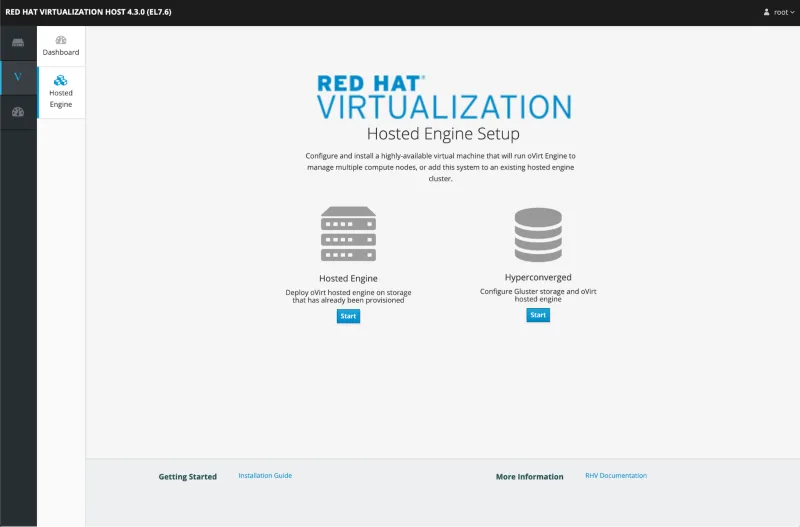
Log in to the Cockpit interface on the host you want to deploy RHV-M using the URL
https://FQDNorIP:9090. After logging in, browse to Virtualization then select Hosted Engine. Choose the option to deploy hosted engine.
-
Fill out the RHV-M virtual machine information on the following screen, including the fully qualified domain name (make sure forward and reverse DNS works for the name you use!), network configuration, root password, and quantities of CPU and RAM resources you desire to assign. After you’re satisfied with the configuration, press the next button.

-
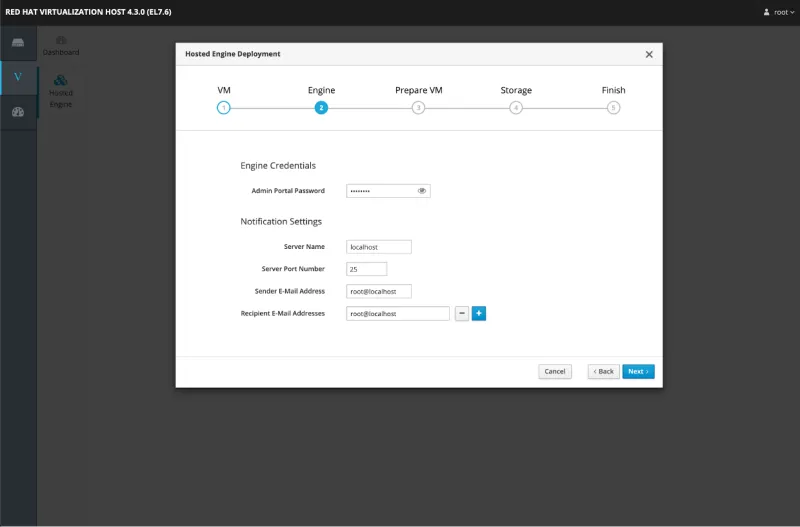
Provide a strong default admin user password on the next screen, along with information for where to send notifications. When done, press next.

-
This screen is a review of the information you’ve input to this point. Press the “Prepare VM” button to create the RHV-M virtual machine. This process will take a few minutes, so if your coffee cup is empty, now is a good time to get a refill.

-
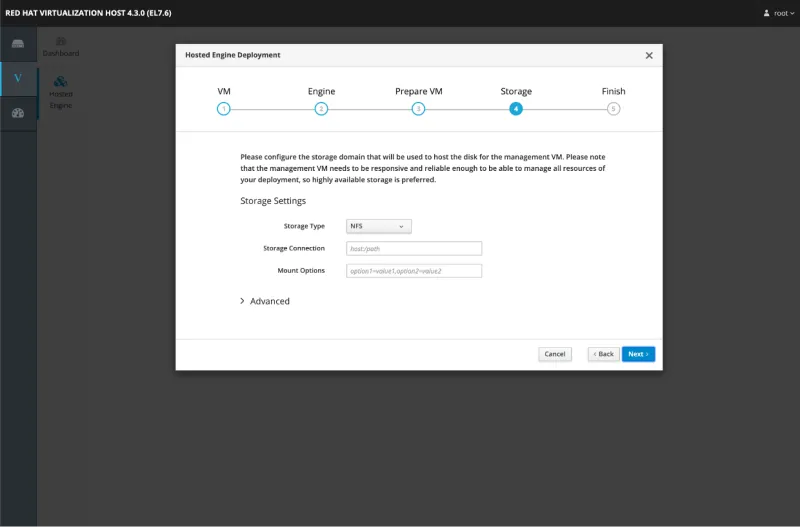
Once the VM has been created, press next and the installer will prompt for information about the first storage domain. Select your storage type, complete the fields, including specifying the size of the virtual machine disk image, and press next. Review the data you just provided, then click “Finish Deployment”.

-
The installer will finish the deployment and configuration process, most likely taking a few more minutes. Take a walk around the office for some exercise while you wait! When all of the tasks have completed, click “Close” to exit the install wizard.

If you want to use an external authentication/authorization provider, such as an LDAP server, you can do that now following this part of the documentation.
At this point, we want to log in to RHV-M (using admin@internal and the password you specified earlier). Notice that the installer has created a data center and cluster, with the hypervisor where RHV-M was deployed already added, and the storage domain has been attached.
The last tasks we need to do before moving on is to add the remaining resources and configure them. This means, among other things:
-
Review the datacenter and cluster configuration to ensure it meets your needs, create new cluster(s) if desired
-
Add additional hosts to the cluster(s), remember you need at least two hosts in a cluster for high availability! When adding hosts, be sure to select the option for at least one additional hypervisor to host RHV-M too!
-
Attach any additional storage domains
-
Creating QoS policies for storage, VM and host network, and CPU resources
-
And, last but not least, checking to make sure that RHV-M and the hosts are updated
Step three: Start creating virtual machines!
That’s it! Red Hat Virtualization is ready for your applications! You can start by creating some templates to quickly deploy virtual machines or customize each of your VMs using the creation wizard. Or, automate your environment using Ansible, the REST API, or the Java / Python / Ruby SDKs.
Are you tired of creating virtual machines? Hand off the work to the application and VM owners using the VM portal, which enables users to self-serve themselves, creating virtual machines, performing power operations, create / revert / destroy snapshots, connect to the console, see resource utilization, and much more. The VM portal is deployed automatically alongside the RHV-M administrator portal, once your resources are ready, you need to assign permissions to the resources you want the users have access to and they’re ready to go!
If you want detailed metrics for your virtual machines, hosts, storage domains, etc. then you should deploy the metrics store and configure your Red Hat Virtualization deployment for it. For more information about the metrics store, including system requirements and deployment details, refer to the documentation.
Backup and disaster recovery for your virtual machines are important parts of a business continuity plan, so be sure to work with your virtual machine and application administrators to identify which VMs and hosts need to have high availability enabled and review the disaster recovery guidelines.
Last, but not least, if you want to learn more technical details about Red Hat Virtualization, the Technical Reference Guide is a great start and dives into many aspects of Red Hat Virtualization, from storage and network, to virtual machine capabilities.
Trusted, reliable, scalable
Red Hat Virtualization 4.3 provides a robust platform for hosting your virtual machines and the applications inside them. This post has walked through the process of getting up and running with Red Hat Virtualization 4.3 and provides a large number of links to relevant documentation and other considerations. We love to hear your feedback, concerns, and issues! If you’re interested in contacting us or sharing, please open a support case or reach out via the Customer Portal Discussions!
Sobre o autor
Navegue por canal
Automação
Últimas novidades em automação de TI para empresas de tecnologia, equipes e ambientes
Inteligência artificial
Descubra as atualizações nas plataformas que proporcionam aos clientes executar suas cargas de trabalho de IA em qualquer ambiente
Nuvem híbrida aberta
Veja como construímos um futuro mais flexível com a nuvem híbrida
Segurança
Veja as últimas novidades sobre como reduzimos riscos em ambientes e tecnologias
Edge computing
Saiba quais são as atualizações nas plataformas que simplificam as operações na borda
Infraestrutura
Saiba o que há de mais recente na plataforma Linux empresarial líder mundial
Aplicações
Conheça nossas soluções desenvolvidas para ajudar você a superar os desafios mais complexos de aplicações
Virtualização
O futuro da virtualização empresarial para suas cargas de trabalho on-premise ou na nuvem
