
An enterprise class virtualization platform must provide support for whatever flavor of virtual operating system its users may require, and OpenShift Virtualization is no exception. Whether you are looking to run a virtual machine infrastructure with a mix of Windows and Linux desktops or carrying along legacy applications which have not been (or may not ever be) ported to containers, it is important to support non-Linux virtual machines as well as Linux ones. To demonstrate OpenShift Virtualization’s flexibility, we will show how to get a Microsoft Windows 10 virtual machine running on the latest OpenShift Virtualization 2.5 release, all while logged in as a regular authenticated user.
Download and Prepare the VM Image
For the purpose of this article, I chose a relatively small VM image offered by Microsoft, their Microsoft Edge test suite here. I chose “MSEdge on Win 10 (x64) Stable” and “VMware (Windows, Mac)” as the platform. This download yields a zipped file out of which you can expand a VMDK with the VM’s disk1 image.
OpenShift Virtualization requires RAW or QCOW2 images so we will need to convert the VMDK image before uploading. This conversion may be performed using the qemu-img command line tool. The qemu-img tool is available from an RPM of the same name through RHEL 8’s base Appstream repository.
To convert the VMDK to QCOW2
qemu-img convert -f vmdk -O qcow2 \
    MSEdge-Win10-VMware-disk1.vmdk \
    msedge-w10.qcow2
Before uploading the QCOW2 to a PVC in the OpenShift cluster, check its expected virtual size using qemu-img:
qemu-img info msedge-w10.qcow2
image: msedge-w10.qcow2
file format: qcow2
virtual size: 40G (42949672960 bytes)
disk size: 13G
cluster_size: 65536
Format specific information:
    compat: 1.1
    lazy refcounts: false
    refcount bits: 16
    corrupt: false
Upload the VM Image to OpenShift Virtualization
OpenShift Virtualization includes a Containerized Data Importer (CDI) proxy for which SSL certificates must be trusted by your browser to upload an image. If you are using a trusted CA for the OpenShift cluster certificates, this will be sufficient. If not, you will need to browse to the cdi-uploadproxy-openshift-cnv application under your ingress URL and accept its SSL certificate. You may ignore any 404 errors during the process. You may use the following command to generate the URL:
oc whoami --show-console | sed 's/console-openshift-console/cdi-uploadproxy-openshift-cnv/'
As an example, our URL for a cluster called “cnv” with base domain “example.com” yields:
https://cdi-uploadproxy-openshift-cnv.apps.cnv.example.com/
You will need a project to work in. For our example, we use “sandbox” owned by a regular user we named “mydev”.
To upload the image into a 40GiB DataVolume, navigate to Storage -> Persistent Volume Claims. Click on “Create Persistent Volume Claim” and choose “With Data upload form”.
Click “Browse…” and select the QCOW2 image created above. Set a name, e.g. “msedge-w10” Recalling the virtual size of the disk image from earlier, enter that value for Size and click the Upload button.
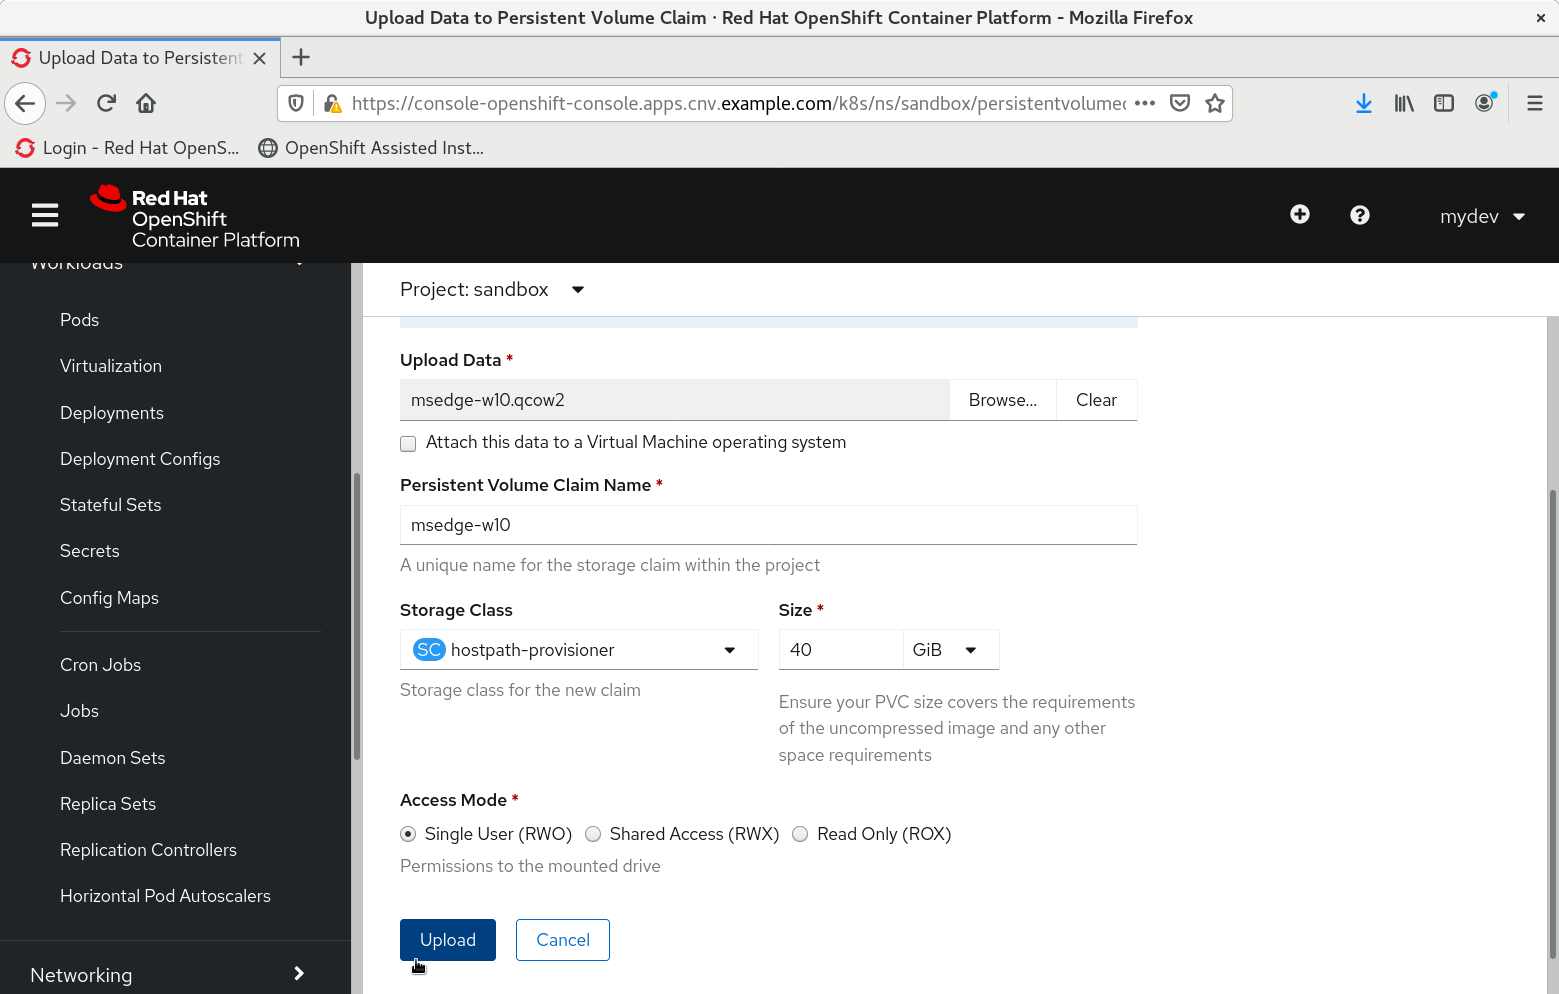
Keep the browser tab open as instructed while the image uploads.
Create a Virtual Machine from the VM Image
Once the PersistentVolumeClaim is imported, it is time to create a virtual machine. In the OpenShift console, navigate to Workloads -> Virtualization and click “Create Virtual Machine”. Select “New with Wizard” from the drop down menu.
In the “General” tab, fill out a name for the VM, select “Microsoft Windows 10” as the Operating System, “Medium” as the flavor, “desktop” as the Workload Profile, and “Existing PVC” as the Boot Source. Make sure the checkbox for “Mount Windows guest tools” is checked, as you will need the drivers on that image. Click the Next button to continue through the “Networking” tab and again to the “Storage” tab.
In the storage tab you will see the CD-ROM disk already set up for the “windows-guest-tools” container image. Click “Add Disk” to include the PVC just uploaded. Choose “Use an existing PVC” for Source, select the PVC you just uploaded under Persistent Volume Claim. Name may be left to its default, and Interface should be left as the recommended, “virtio”. Click “Add” to add this disk definition to the VM and return to the Storage tab. Change Boot Source to the name of the disk just added and click “Review and confirm”.
Review the settings, select the check box for “Start virtual machine on creation”, and click “Create Virtual Machine”. Click “See virtual machine details” on the next page to view the virtual machine.
Start the Windows VM
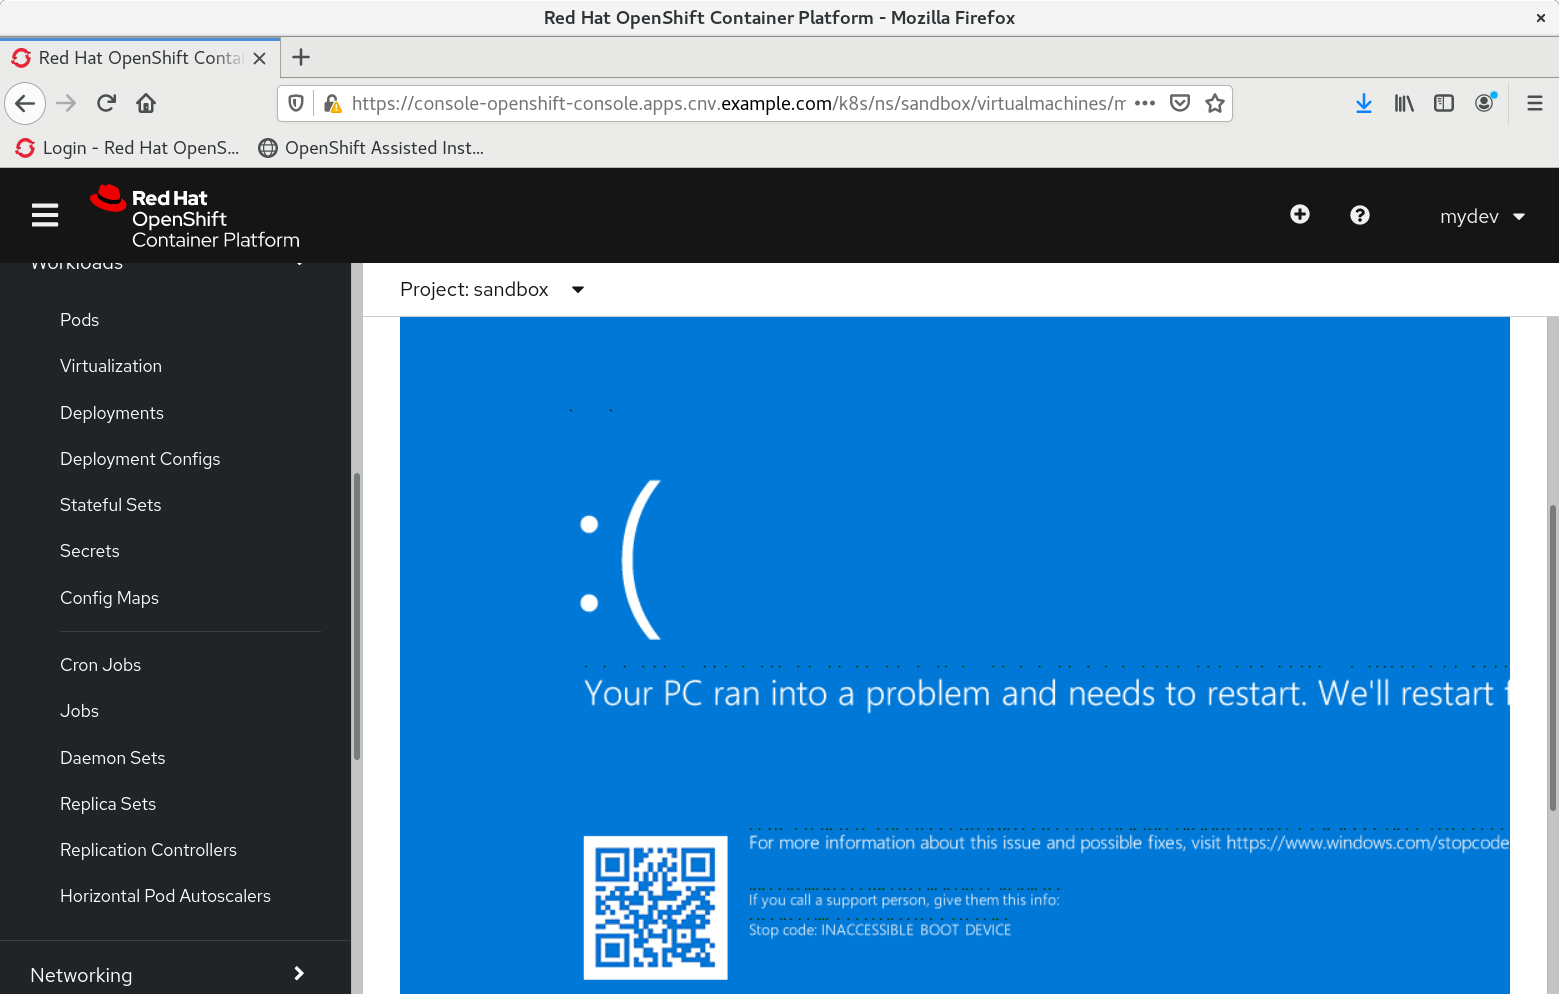
Click on the “Console” tab to view the virtual machine’s graphical console.
Due to the missing disk driver, the system will fail to boot normally, reboot, and bring up the Microsoft Windows 10 Recovery Environment (WinRE) which starts with a keyboard layout selection.
After choosing the keyboard layout, Select the “Troubleshoot” button for “Advanced Options” and then select “Command Prompt”.
In the CMD.EXE window, the WinRE environment is on X:\ and the guest tools ISO is on D:\.
To load the driver into WinRE’s temporary driver store, use drvload
drvload D:\amd64\w10\viostor.inf /install
Now the virtual hard drive should show up as a drive letter. Depending on the image, there could be reserved partitions which push the system root partition’s letter up the alphabet, but for the MSEdge evaluation VMDK for this demo, the Windows folder may be found at C:\Windows.
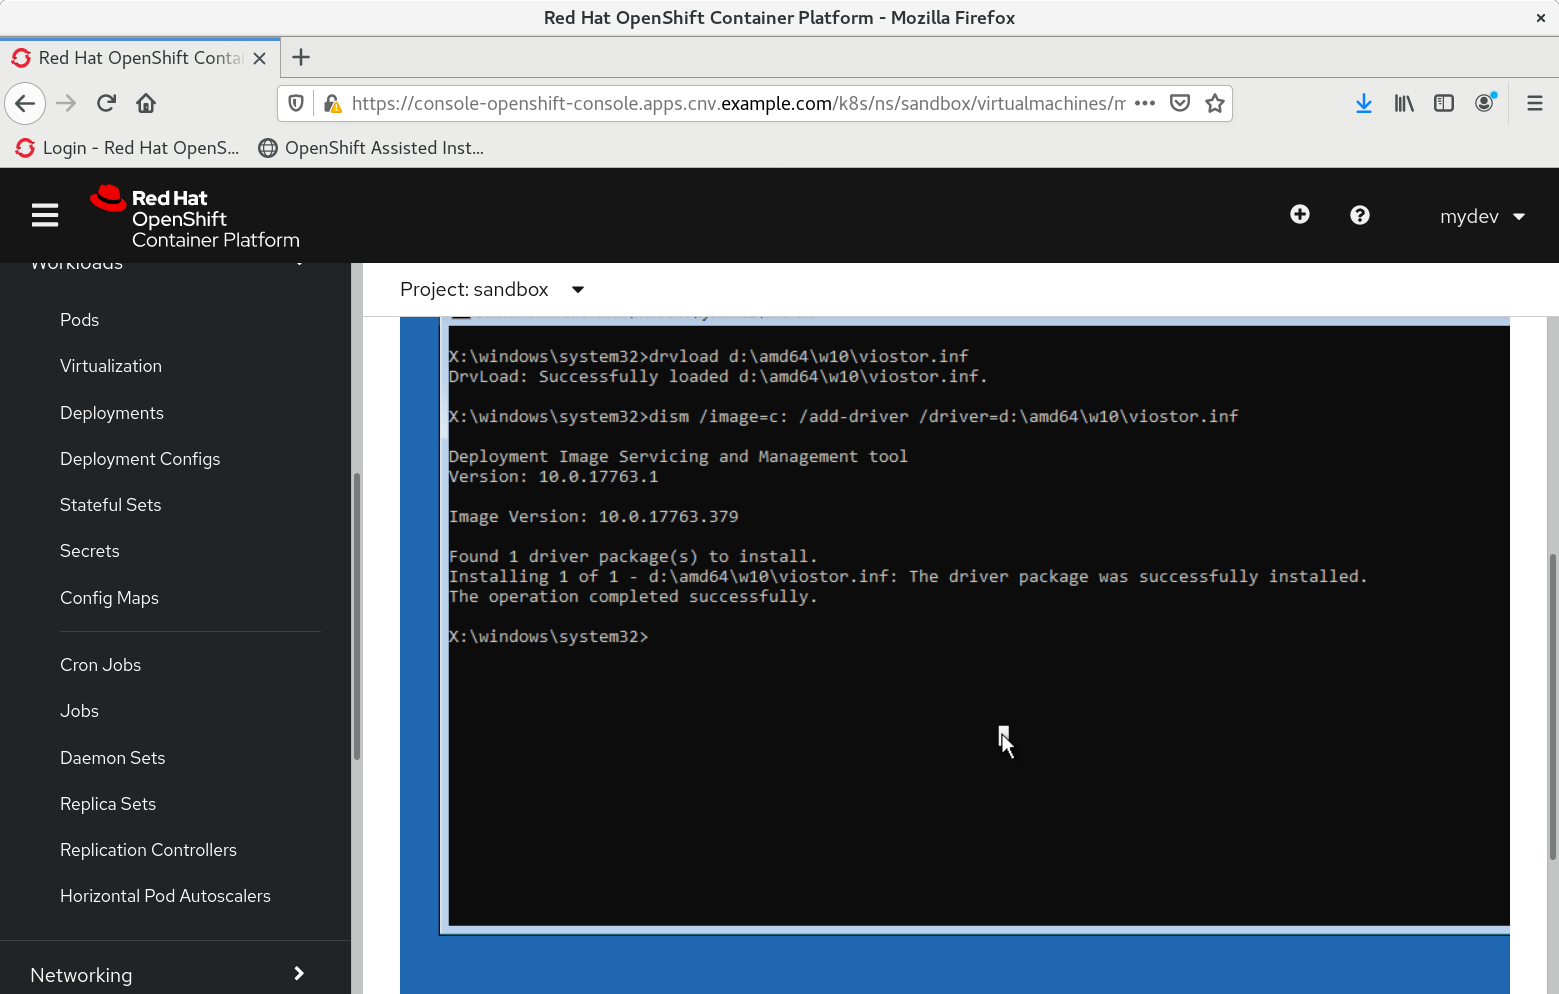
Now use dism to inject the driver into the pre-boot environment:
dism /image=C:\ /add-driver /driver=D:\amd64\w10\viostor.inf
Exit from the CMD.EXE terminal and select “Continue” to boot through to Windows 10 using the newly installed VirtIO storage driver.
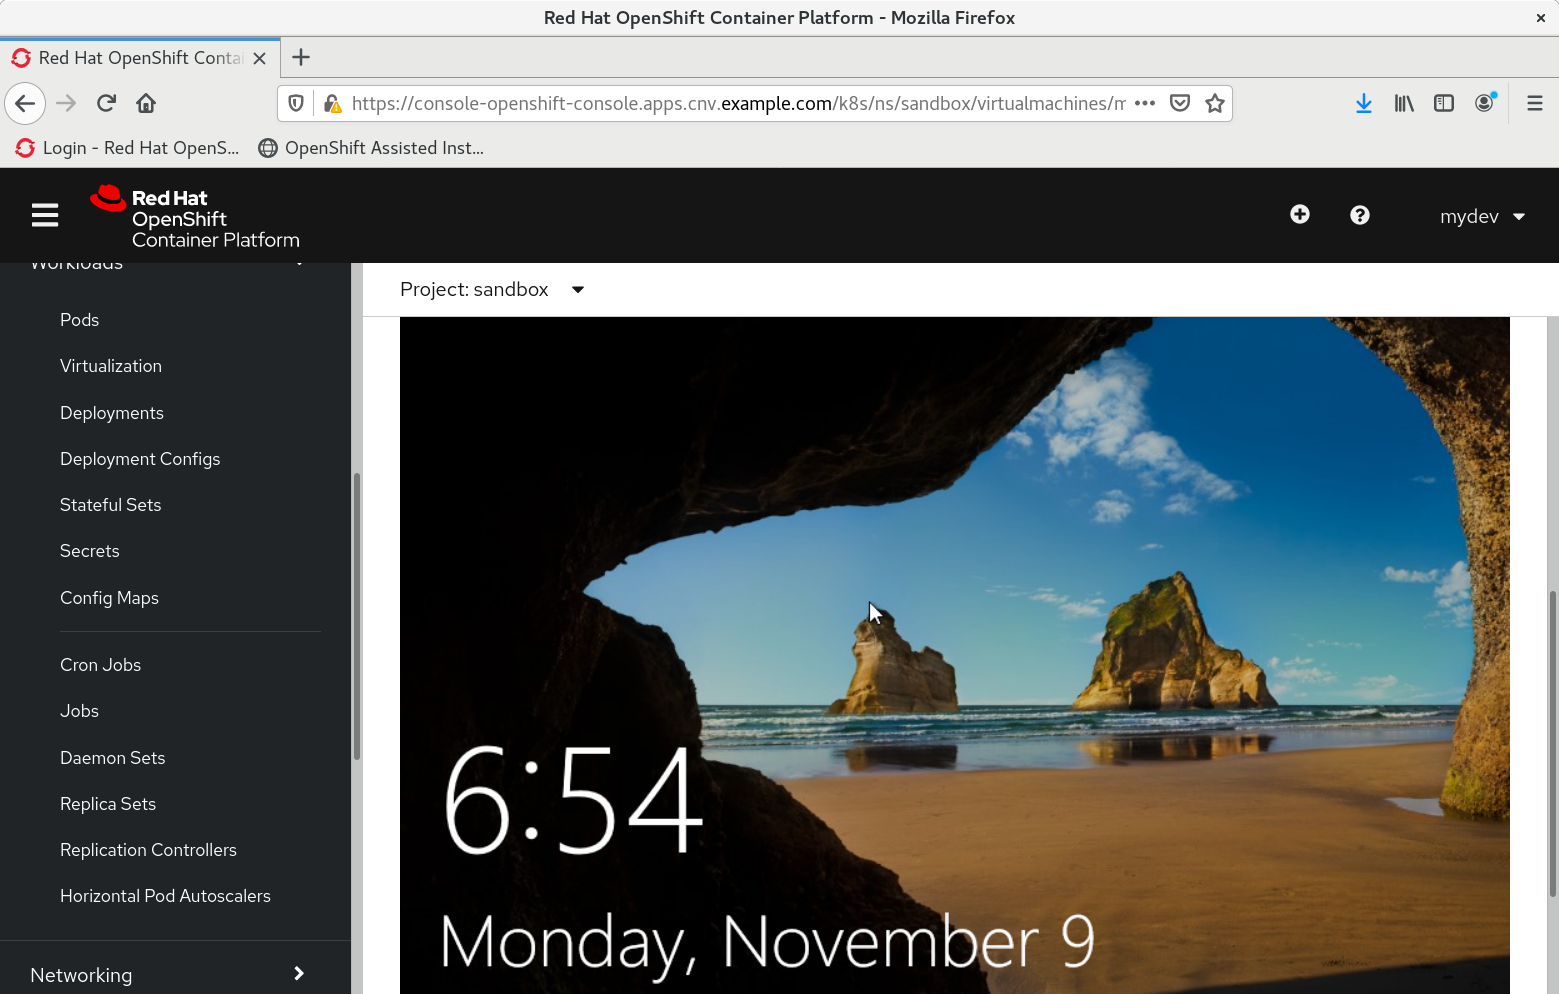
Once Windows comes up, log in and run the “virtio-win-guest-tools.exe” installer from the root of the CD-ROM guest tools image. This will install a range of drivers for virtual devices including the network interface card as well as the virtual guest agent which allows CNV better access to the operating system state.

Once the installation finishes, the guest tools CD-ROM may be removed from the VirtualMachine definition. Shut down the VM, then click on the Disks tab. Once the VM is fully shut down, the CD-ROM container may be removed by selecting DELETE from the menu at the end of its line.
Conclusion
At this point, the new virtual machine is available for use. In a future article, we will show how to set a PVC as the default operating system image to allow it to be cloned by multiple VMs. Cloning the disk image after adding the drivers allows developers to get to work more quickly without having to go through the steps of installing drivers and rebooting their virtual machines.
저자 소개
유사한 검색 결과
과거의 운영 방식에서 벗어나 IT의 미래 구축
Red Hat Device Edge, 이제 NVIDIA Jetson Orin에서 사용 가능
Avoiding Failure In Distributed Databases | Code Comments
Transforming Your Database | Code Comments
채널별 검색

오토메이션
기술, 팀, 인프라를 위한 IT 자동화 최신 동향

인공지능
고객이 어디서나 AI 워크로드를 실행할 수 있도록 지원하는 플랫폼 업데이트

오픈 하이브리드 클라우드
하이브리드 클라우드로 더욱 유연한 미래를 구축하는 방법을 알아보세요

보안
환경과 기술 전반에 걸쳐 리스크를 감소하는 방법에 대한 최신 정보

엣지 컴퓨팅
엣지에서의 운영을 단순화하는 플랫폼 업데이트

인프라
세계적으로 인정받은 기업용 Linux 플랫폼에 대한 최신 정보

애플리케이션
복잡한 애플리케이션에 대한 솔루션 더 보기
가상화
온프레미스와 클라우드 환경에서 워크로드를 유연하게 운영하기 위한 엔터프라이즈 가상화의 미래