
Having a lab where you can test your application or configuration before sending it to a production environment is an invaluable resource to ensure deployments are smooth and production is stable.
It's no different when it comes to container orchestration. Whether your production environment is a small cluster, a large on-premises environment, or even a Red Hat OpenShift Service on AWS (ROSA) cluster on the cloud, ensuring your configuration is sound by properly testing it in a local lab environment brings the same benefits.
OpenShift Local allows developers to deploy a small, single-node OpenShift cluster on their own machines so that they can test their application locally. They can also see how it would behave when running in a container orchestrator.
In this article I'll show you how to install OpenShift Local on your local Linux machine. You can also install OpenShift Local with other operating systems. For more information consult the official documentation.
[ Cloud services for cloud-native development ]
Get started with OpenShift Local
For Linux, OpenShift Local deployments are supported in the 2 latest releases of Fedora and Red Hat Enterprise Linux. You can also install it on other Linux distributions if you have the following requirements:
- Network manager
- Libvirt
- Qemu (
qemu-kvm)
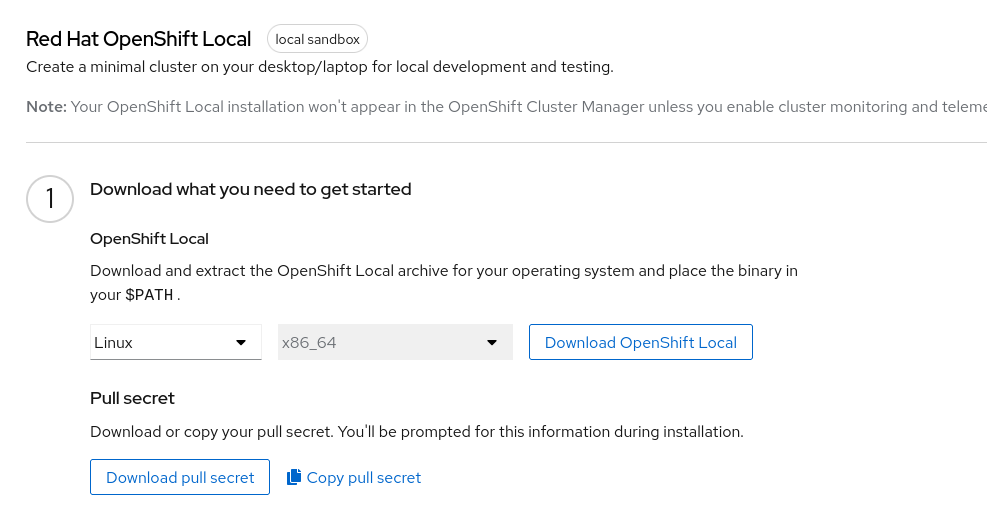
To get started with OpenShift Local, download the crc tool from the Red Hat Console. If you don't have a Red Hat account, you can create one for free with the Red Hat Developer program.
After you log in, download both the installation package and the pull secret from the Red Hat OpenShift Local screen:
When the download finishes, decompress the crc tool and move it to a location within your PATH. If you prefer to keep everything local to your user account, then create a directory and add it to your PATH like this:
$ cd ~/Downloads/

$ tar xvf crc-linux-amd64.tar.xz
crc-linux-2.16.0-amd64/
crc-linux-2.16.0-amd64/LICENSE
crc-linux-2.16.0-amd64/crc

$ mkdir -p ~/local/bin

$ mv crc-linux-*-amd64/crc ~/local/bin/

$ export PATH=$HOME/local/bin:$PATH

$ crc version
CRC version: 2.16.0+05b62a75
OpenShift version: 4.12.9
Podman version: 4.4.1

$ echo 'export PATH=$HOME/local/bin:$PATH' >> ~/.bashrc
OpenShift Local runs as a single node cluster in a virtual machine (VM) on your system. Because of this, it has some limitations compared to a real production environment:
- Control plane and worker node run on the same machine
- The cluster is ephemeral
- The cluster does not support automatic updates
For other differences, consult the documentation.
Set up your machine
Before running your local OpenShift cluster, you need to set up your machine by using the crc setup.
The crc setup uses the directory $HOME/.crc to cache the virtual machine images required by the install. Ensure you have at least 35GB of free space in your home directory. If you use LVM, you can create a logical volume for it and mount .crc before running the command.
When you run the setup for the first time, crc asks whether you want to provide anonymous data to help improve the product. To prevent this question from showing, you can configure your option upfront using crc config:
$ crc config set consent-telemetry <yes/no>

$ crc config view
- consent-telemetry                     : yes
Now you can run the setup to configure your machine:
$ crc setup
You need to provide your sudo password allowing crc to add some network configuration to the NetworkManager so that you can connect to your cluster when it's running.
At this point, crc downloads and decompresses the virtual machine image for your local cluster. This may take a long time depending on your network and disk speed.
[ Explore the versatility of virtual machines with the Everyday virtualization on Linux guide. ]
Start OpenShift Local
The crc setup command configures your system to run OpenShift and caches the VM image in $HOME/.crc. However, it does not start the cluster automatically. At this point you could start the cluster with the default configuration. If your machine has more resources and you want to increase the resources available for your OpenShift cluster, you can adjust the VM configuration—like the number of CPUs or RAM—using crc config.
The default configuration creates a VM with 4 virtual CPUs and 9GB of RAM. This is enough for many cases but you may require more resources depending on your application requirements. For example, to increase the number of virtual CPUs to 8 and the memory to 16GB, run crc config like this:
$ crc config set cpus 8

$ crc config set memory 16384

$ crc config view
- consent-telemetry                     : yes
- cpus                                  : 8
- memory                                : 16384
Now, start your cluster with the command crc start. You can also pass the full path to the pull-secret file you downloaded before in the command line to avoid having to paste it during the install:
$ crc start -p ~/Downloads/pull-secret
The crc start command creates the VM and starts the cluster. You can see the VM resources by using virsh:
$ virsh -c qemu:///system dumpxml crc | grep -e vcpu -e "memory unit"
  <memory unit='KiB'>16777216</memory>
  <vcpu placement='static'>8</vcpu>
After a few minutes, the cluster is up and running and crc prints the connection information:
Started the OpenShift cluster.

The server is accessible via web console at:
  https://console-openshift-console.apps-crc.testing

Log in as administrator:
  Username: kubeadmin
  Password: ahYhw-xJNMn-NyxMT-47t22

Log in as user:
  Username: developer
  Password: developer

Use the 'oc' command line interface:
  $ eval $(crc oc-env)
  $ oc login -u developer https://api.crc.testing:6443
Access your new cluster
With your OpenShift Local cluster up and running, you can access it to deploy applications. When you ran crc setup, it also downloaded additional command-line tools like oc so that you can connect to your cluster from the command line. To use these tools, you need to set up your environment to make sure they can find your cluster:
$ eval $(crc oc-env)
Then, connect to your cluster as administrator using kubeadmin with the password generated by the crc setup command:
$ oc login -u kubeadmin https://api.crc.testing:6443
You can now access cluster information. For example, confirm that you're running a single node that works both as control plane and worker node using the command oc get nodes:
$ oc get nodes
NAME                STATUS  ROLES                        AGE  VERSION
crc-8tnb7-master-0  Ready   control-plane,master,worker  20d  v1.25.7+eab9cc9
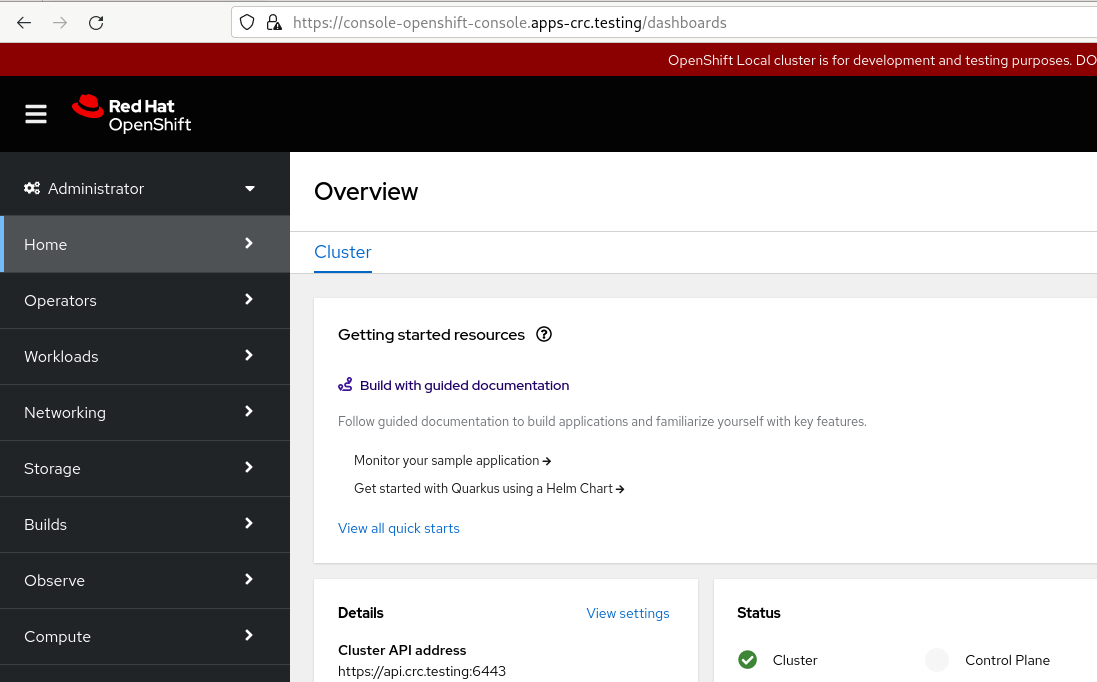
If you prefer to use the graphical console, you can access it by pointing your browser to https://console-openshift-console.apps-crc.testing:
[ Learning path: Getting started with Red Hat OpenShift Service on AWS (ROSA) ]
What's next
OpenShift Local provides a quick and easy way to set up a local OpenShift cluster on your desktop or laptop. This allows you to test your applications and configuration parameters before sending them to production. It's also a great option to learn or practice OpenShift skills that will be useful in real production environments.
Now that your cluster is running, I'll show you in my next article how to deploy a sample application on it.
저자 소개
Ricardo Gerardi is a Principal Consultant at Red Hat, having transitioned from his previous role as a Technical Community Advocate for Enable Sysadmin. He's been at Red Hat since 2018, specializing in IT automation using Ansible and OpenShift.
With over 25 years of industry experience and 20+ years as a Linux and open source enthusiast and contributor, Ricardo is passionate about technology. He is particularly interested in hacking with the Go programming language and is the author of Powerful Command-Line Applications in Go and Automate Your Home Using Go. Ricardo also writes regularly for Red Hat and other blogs, covering topics like Linux, Vim, Ansible, Containers, Kubernetes, and command-line applications.
Outside of work, Ricardo enjoys spending time with his daughters, reading science fiction books, and playing video games.
유사한 검색 결과
강력한 보안, 즉시 사용 가능, 추가 비용 없이 제공: 컨테이너 보안의 진화
Red Hat Universal Base Image (다시) 소개
The Containers_Derby | Command Line Heroes
Can Kubernetes Help People Find Love? | Compiler
채널별 검색

오토메이션
기술, 팀, 인프라를 위한 IT 자동화 최신 동향

인공지능
고객이 어디서나 AI 워크로드를 실행할 수 있도록 지원하는 플랫폼 업데이트

오픈 하이브리드 클라우드
하이브리드 클라우드로 더욱 유연한 미래를 구축하는 방법을 알아보세요

보안
환경과 기술 전반에 걸쳐 리스크를 감소하는 방법에 대한 최신 정보

엣지 컴퓨팅
엣지에서의 운영을 단순화하는 플랫폼 업데이트

인프라
세계적으로 인정받은 기업용 Linux 플랫폼에 대한 최신 정보

애플리케이션
복잡한 애플리케이션에 대한 솔루션 더 보기
가상화
온프레미스와 클라우드 환경에서 워크로드를 유연하게 운영하기 위한 엔터프라이즈 가상화의 미래