Learn to install Red Hat Advanced Cluster Management for Kubernetes on CodeReady Containers (CRC), and to create two additional Kubernetes-Demo-Clusters on the same Virtual Machine (VM) to import into Red Hat Advanced Cluster Management. In this example, we use a Red Hat Enterprise Linux (RHEL) 8.2 VM with 128 GB. The following example in this blog is for flexible and cost-efficient test, and demo-environments. This demonstration can only be used in enterprise-environments.
You can use scripts to setup a CRC with Red Hat Advanced Cluster Management from this repository.
Prerequisites:
- Download and install Red Hat CRC. For more information you can check the Red Hat Customer Portal.
- You must have a valid pull secret. Download the pull secret from your Red Hat OpenShift Container Platform 4.
Installing CRC
Complete the following steps to download and install Red Hat CRC:
-
Install the required software packages for Red Hat CRC. Run the following command:
dnf install wget git qemu-kvm qemu-img libvirt virt-install libvirt-client -
Run the following commands to prepare the set up for Red Hat CRC:
su - kni

mkdir ~/crc

wget https://mirror.openshift.com/pub/openshift-v4/clients/crc/latest/crc-linux-amd64.tar.xz

tar -xvf crc-linux-amd64.tar.xz

mv ~/crc-linux-1.15.0-amd64/* ~/crc

cd ~/crc

chmod +x crc -
Add the CRC to your
PATHby running the following command:export PATH=$PATH:~/crc -
Download the pull secret and setup CRC by running the following commands:
crc setup

crc config set cpus 16

crc config set memory 64000

crc config set pull-secret-file pull-secret
Verify CRC installation
Complete the following steps to verify that your Red Hat CRC is installed and configured:
-
Run the following command to start the CRC virtual machine which represents the OpenShift cluster:
crc start -
Access your OpenShift cluster by running the following commands:
eval $(crc oc-env)

oc login -u kubeadmin -p $(crc console --credentials | awk -F "kubeadmin" '{print $2}' | cut -c 5- | rev | cut -c31- | rev) https://api.crc.testing:6443
Install Red Hat Advanced Cluster Management for Kubernetes
Now we can install Red Hat Advanced Cluster Management for Kubernetes by completing the following steps. View the following sections for more details on the installation process.
-
Clone the
acminstallrepository and install Red Hat Advanced Cluster Management for Kubernetes:git clone https://github.com/ch-stark/acminstall
cd acminstall/rhacmv2 -
Apply the install to the
open-cluster-managementnamespace with the following command:oc apply -f v2_namespace.yaml -n open-cluster-management -
You need to create a secret from the downloaded pull secret and add it into the appropriate namespace. Run the following command:
oc create secret generic pull-secret -n open-cluster-management --from-file=.dockerconfigjson=../../pull-secret --type=kubernetes.io/dockerconfigjson -
Create and apply an OperatorGroup and Subscription to Red Hat Advanced Cluster Management with the following commands:
oc apply -f v2_operatorgroup.yaml -n open-cluster-management
oc apply -f v2_subscription.yaml -n open-cluster-management -
Verify that your pods are functional by running the following command:
oc get pods -n open-cluster-managementYour results might resemble the following content:
NAME                                                              READY   STATUS    RESTARTS   AGE
cluster-manager-5cbcc76654-4qp6x                                  1/1     Running   0          75s
cluster-manager-5cbcc76654-gnjbn                                  1/1     Running   0          40s
cluster-manager-5cbcc76654-wp8b5                                  1/1     Running   0          55s
hive-operator-7449bc7ff4-c2qsc                                    1/1     Running   0          75s
multicluster-operators-application-7dc7755dcf-9lgkk               4/4     Running   0          74s
multicluster-operators-hub-subscription-5b798f6b6d-lwfzk          1/1     Running   0          74s
multicluster-operators-standalone-subscription-78d4bf8d6c-s29qb   1/1     Running   0          74s
multiclusterhub-operator-5fbcf8cc49-mk9wv 1/1 Running 0 75s -
Apply the Operator-CRD by running the following command:
oc apply -f v2_multiclusterhub.yaml -n open-cluster-managementThe Operator YAML file might resemble the following content:
apiVersion: operator.open-cluster-management.io/v1
kind: MultiClusterHub
metadata:
  name: multiclusterhub
spec:
  availabilityConfig: High
  hive:
    backup:
      velero: {}
    failedProvisionConfig: {}
  imagePullSecret: pull-secret
  ingress:
    sslCiphers:
      - ECDHE-ECDSA-AES256-GCM-SHA384
      - ECDHE-RSA-AES256-GCM-SHA384
      - ECDHE-ECDSA-CHACHA20-POLY1305
      - ECDHE-RSA-CHACHA20-POLY1305
      - ECDHE-ECDSA-AES128-GCM-SHA256
      - ECDHE-RSA-AES128-GCM-SHA256
  overrides: {}
separateCertificateManagement: false -
Verify which pods are functional by running the following commands:
oc get pods -n open-cluster-management
oc get pods -n open-cluster-management-hub
oc get pods -n hive
Your results might resemble the following content:
NAMESPACE                                          NAME                                                              READY   STATUS        RESTARTS   AGE
hive                                               hive-controllers-b98849fc8-mbf6t                                  1/1     Running       0          3h9m
hive                                               hiveadmission-6854b49659-4w4f4                                    1/1     Running       0          81m
hive                                               hiveadmission-6854b49659-rw2b7                                    1/1     Running       0          81m
open-cluster-management-hub                        cluster-manager-registration-controller-65f86d66dc-4hl45          1/1     Running       0          3h9m
open-cluster-management-hub                        cluster-manager-registration-controller-65f86d66dc-6stxv          1/1     Running       0          3h9m
open-cluster-management-hub                        cluster-manager-registration-controller-65f86d66dc-ksx45          1/1     Running       0          3h9m
open-cluster-management-hub                        cluster-manager-registration-webhook-5ff66dc4c9-hlt67             1/1     Running       0          3h9m
open-cluster-management-hub                        cluster-manager-registration-webhook-5ff66dc4c9-nwhx9             1/1     Running       0          3h9m
open-cluster-management-hub                        cluster-manager-registration-webhook-5ff66dc4c9-rpw2p             1/1     Running       0          3h9m
open-cluster-management                            application-chart-7cc65-applicationui-7f959f4d7f-phd8p            1/1     Running       0          3h7m
open-cluster-management                            application-chart-7cc65-applicationui-7f959f4d7f-xx8dk            1/1     Running       0          3h7m
open-cluster-management                            cert-manager-1d535-5dc95c59f6-88hlm                               1/1     Running       0          3h10m
open-cluster-management                            cert-manager-1d535-5dc95c59f6-qbtph                               1/1     Running       0          3h10m
open-cluster-management                            cert-manager-webhook-b697c47bb-8kzxs                              1/1     Running       0          76m
open-cluster-management                            cert-manager-webhook-b697c47bb-ff5nh                              1/1     Running       0          76m
open-cluster-management                            cert-manager-webhook-fafb4-cainjector-6ff887db4d-d6tn5            1/1     Running       1          3h8m
open-cluster-management                            cert-manager-webhook-fafb4-cainjector-6ff887db4d-z4zlr            1/1     Running       1          3h8m
...
Note: When you work from a remote-computer and want to access a CRC from a browser, it might be helpful to set up a VNCServer. I recommend that you review the Install VNC server on CentOS 8/RHEL 8 blog for more tips.
Add a minikube-managed cluster
Add a Minikube cluster to run Kubernetes locally. For more information, see Kuberentes Using Minikube to Create a Cluster. The minikube-managed cluster can communicate with the hub cluster. Complete the following steps to add a minikube-managed cluster to the hub cluster:
-
Install Minikube with the following commands:
curl -Lo minikube https://storage.googleapis.com/minikube/releases/latest/minikube-linux-amd64 \
&& chmod +x minikube

sudo mkdir -p /usr/local/bin/
sudo install minikube /usr/local/bin/ -
Open firewall ports to monitor network traffic and restart your Daemon service. Run the following commands:
sudo firewall-cmd --permanent --zone=trusted --change-interface=virbr0

sudo firewall-cmd --permanent --zone=trusted --add-port=6443/tcp

sudo firewall-cmd --reload

sudo service libvirtd restart -
Start and configure Minikube. Run the following commands:
## start minikube with kvm2 driver
minikube start --memory=12000 --cpus=12 --kubernetes-version="v1.18.3" --driver=kvm2 -p minikube

# set the context
kubectl config use-context minikube

# search for configmap
kubectl edit cm coredns --namespace kube-system

# change it and add crc.testing
data:
  Corefile: |
    .:53 {
        errors
        health {
            lameduck 5s
        }

        ready
        kubernetes cluster.local in-addr.arpa ip6.arpa {
            pods insecure
            fallthrough in-addr.arpa ip6.arpa
            ttl 30
        }
        prometheus :9153
        forward . /etc/resolv.conf
        cache 30
        loop
        reload
        loadbalance
    }
    crc.testing {
      hosts {
          192.168.130.11 api.crc.testing
      }
}-
Verify that the pods are running with the following command:
kubectl get  pods  --namespace kube-system

NAME                               READY   STATUS    RESTARTS   AGE
coredns-66bff467f8-l6dzl           1/1     Running   0          175m
coredns-66bff467f8-r78th           1/1     Running   0          175m
etcd-minikube                      1/1     Running   0          175m
kube-apiserver-minikube            1/1     Running   0          175m
kube-controller-manager-minikube   1/1     Running   1          175m
kube-proxy-fsbvx                   1/1     Running   0          175m
kube-scheduler-minikube            1/1     Running   1          175m
storage-provisioner 1/1 Running 0 175m -
Delete the
CoreDNSpods with the following command:kubectl delete pods coredns-66bff467f8-l6dzl coredns-66bff467f8-r78th --namespace kube-system
pod "coredns-66bff467f8-l6dzl" deleted
pod "coredns-66bff467f8-r78th" deleted
-
-
Now let's import the
minikube-managedcluster to the hub cluster. For more information, see the product documentation.After import is complete, a list of running pods are dispalyed. Your results might resemble the following content:
open-cluster-management-agent-addon   klusterlet-addon-appmgr-5794cb5589-92fpt                     1/1     Running     0          1m
open-cluster-management-agent-addon   klusterlet-addon-certpolicyctrl-786fd7fbdd-rz775             1/1     Running     0          1m
open-cluster-management-agent-addon   klusterlet-addon-iampolicyctrl-56f6cbb6d7-j26zc              1/1     Running     0          1m
open-cluster-management-agent-addon   klusterlet-addon-operator-76cfc678-6pj9t                     1/1     Running     0          1m
open-cluster-management-agent-addon   klusterlet-addon-policyctrl-config-policy-57b6f64f4d-tv9k7   1/1     Running     0          1m
open-cluster-management-agent-addon   klusterlet-addon-policyctrl-framework-6c9bcdfb44-4qv7f       3/3     Running     0          1m
open-cluster-management-agent-addon   klusterlet-addon-search-85869f6775-6d6vp                     1/1     Running     0          1m
open-cluster-management-agent-addon   klusterlet-addon-workmgr-79868b5fc4-692ps                    1/1     Running     0          1m
open-cluster-management-agent         klusterlet-5f979dcc67-5k94t                                  1/1     Running     0          9m
open-cluster-management-agent         klusterlet-registration-agent-68b54549f6-dsvmb               1/1     Running     0          8m
open-cluster-management-agent         klusterlet-registration-agent-68b54549f6-gn49j               1/1     Running     0          8m
open-cluster-management-agent         klusterlet-registration-agent-68b54549f6-z9tvd               1/1     Running     0          8m
open-cluster-management-agent         klusterlet-work-agent-8454d74649-c9bp4                       1/1     Running     2          8m
open-cluster-management-agent         klusterlet-work-agent-8454d74649-cbpbj                       1/1     Running     2          8m
open-cluster-management-agent         klusterlet-work-agent-8454d74649-vf8zg                       1/1     Running     2          8m
Add a minishift-managed cluster
Add a Minishift cluster to help run OpenShift 3.11 cluster locally. For more information, see OKD Minishift. Complete the following steps to add a minishift-managed to the hub cluster:
-
Install Minishift by running the following commands:
# this step was necessary else minishift fails to start as the kvm-driver cannot be loaded
curl -L https://github.com/dhiltgen/docker-machine-kvm/releases/download/v0.10.0/docker-machine-driver-kvm-centos7 >/tmp/docker-machine-driver-kvm
chmod +x /tmp/docker-machine-driver-kvm
sudo cp /tmp/docker-machine-driver-kvm /usr/local/bin/docker-machine-driver-kvm

wget https://github.com/minishift/minishift/releases/download/v1.34.0/minishift-1.34.0-linux-amd64.tgz
tar xzf minishift-1.34.0-linux-amd64.tgz
sudo cp minishift-1.34.0-linux-amd64/minishift /usr/local/bin
sudo chmod +x /usr/local/bin/minishift

# it is important to set the OpenShift 3.11 Client when interacting with the 3.11 Minishift-Cluster
eval $(minishift oc-env)

minishift start
oc config use-context minishift
# login with a user who has admin-permissions
oc login -u system:admin -
Add an entry into the hosts file to make the name resolution work. Run the following command:
minishift ssh
sudo echo '192.168.130.11 api.crc.testing' | sudo tee -a /etc/hosts
Because minishift is adding a new interface, you must add it to the firewall. Run the following commands:
sudo firewall-cmd --permanent --zone=trusted --add-interface=virbr2
sudo firewall-cmd --reload

# this step was also sometimes necessary
sudo service libvirtd restart- Import the
minishift-managedcluster to the hub cluster, similar to how Minikube was imported. For more information, see the product documentation.
Summary
In conclusion, we achieved the following task in this blog:
- Installed Red Hat OpenShift Container Platfrom 4.5.7 with Red Hat Advanced Cluster Management for version 2.0.2.
- Imported the following managed clusters to Red Hat Advanced Cluster Management:
- Minikube with Kubernetes 1.18.3
- Minishift with OpenShift 3.11.0 and Kubernetes 1.11.0
View the following screenshot to see an example of where the managed cluster information can be accessed on Red Hat Advanced Cluster Management for Kubernetes:
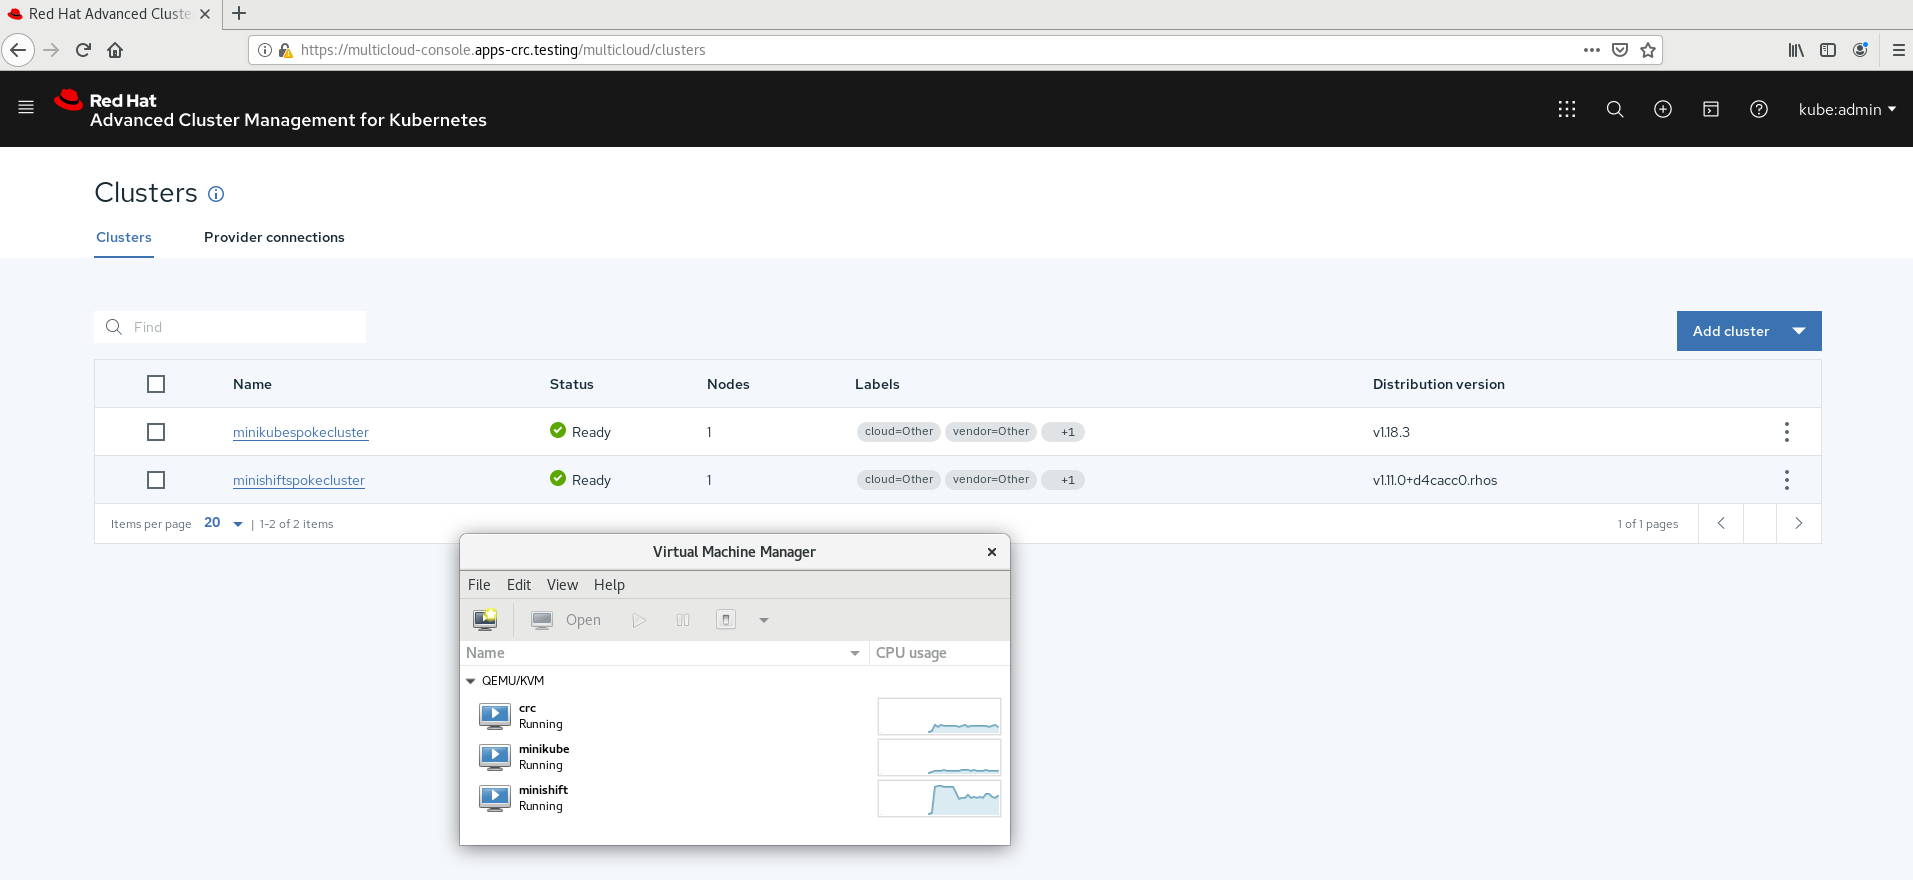
It would be great to get feedback about this example and how to improve it. For example, this demonstration can be enhanced with other test-clusters like Kind. To learn more about Red Hat Advanced Cluster Management, see the product page.
저자 소개

채널별 검색

오토메이션
기술, 팀, 인프라를 위한 IT 자동화 최신 동향

인공지능
고객이 어디서나 AI 워크로드를 실행할 수 있도록 지원하는 플랫폼 업데이트

오픈 하이브리드 클라우드
하이브리드 클라우드로 더욱 유연한 미래를 구축하는 방법을 알아보세요

보안
환경과 기술 전반에 걸쳐 리스크를 감소하는 방법에 대한 최신 정보

엣지 컴퓨팅
엣지에서의 운영을 단순화하는 플랫폼 업데이트

인프라
세계적으로 인정받은 기업용 Linux 플랫폼에 대한 최신 정보

애플리케이션
복잡한 애플리케이션에 대한 솔루션 더 보기
가상화
온프레미스와 클라우드 환경에서 워크로드를 유연하게 운영하기 위한 엔터프라이즈 가상화의 미래