
All but the smallest networks are typically split into Virtual Local Area Networks (VLANs, for short), and I discussed VLAN basics a the previous article. Understanding how to properly configure and troubleshoot VLANs can save you hours of back-and-forth with your network team. In this article, cover VLAN configuration in Red Hat Enterprise Linux (RHEL) systems. By the end of this article, you should be pretty comfortable configuring VLANs on RHEL.
With the background knowledge out of the way, It's time to get your hands dirty with configuration. I’ll start with the most basic VLAN configuration: no VLAN.
Simple example
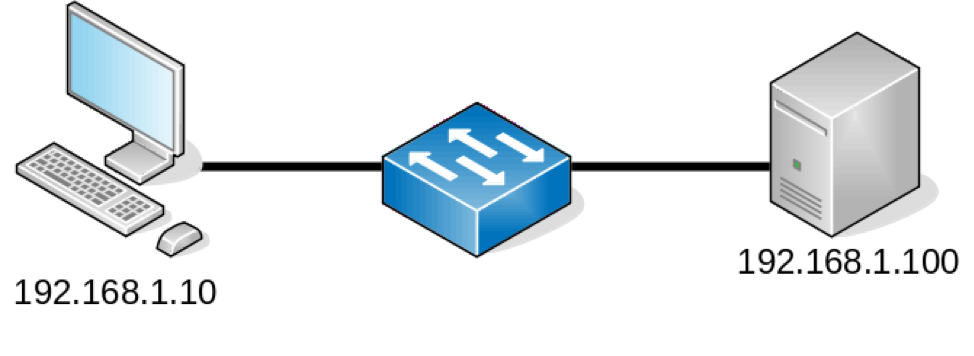
One of the most common topologies that you will encounter as a sysadmin is a host connected to a switch’s access port. VLAN configuration is handled on the switch, and you configure the interface without any regard for the underlying network topology.
In the simple topology without VLANs that I discussed previously, your hosts are on the same VLAN and IP subnet. The interface configuration is a simple, static IP address:
Network symbols provided by the LibreOffice VRT Network Equipment extension.
# ip addr sh eth0
2: eth0: <BROADCAST,MULTICAST,UP,LOWER_UP> mtu 1500 qdisc pfifo_fast state UP group default qlen 1000
	link/ether 52:54:00:82:d6:6e brd ff:ff:ff:ff:ff:ff
	inet 192.168.1.100/24 brd 192.168.1.255 scope global noprefixroute eth0
   	valid_lft forever preferred_lft forever
	inet6 fe80::5054:ff:fe82:d66e/64 scope link
   	valid_lft forever preferred_lft forever


# cat /etc/sysconfig/network-scripts/ifcfg-eth0
TYPE=Ethernet
PROXY_METHOD=none
BROWSER_ONLY=no
BOOTPROTO=none
DEFROUTE=yes
IPV4_FAILURE_FATAL=no
NAME=eth0
UUID=04cb4fa6-f820-45c0-b847-df94e9628bc5
DEVICE=eth0
ONBOOT=yes
GATEWAY=192.168.1.254
IPADDR=192.168.1.100
NETMASK=255.255.255.0
The above configuration is probably familiar to most who have administered a Linux server. There isn’t any VLAN configuration on the host, but the switch is likely configured to place the host on a particular VLAN.
Complex example
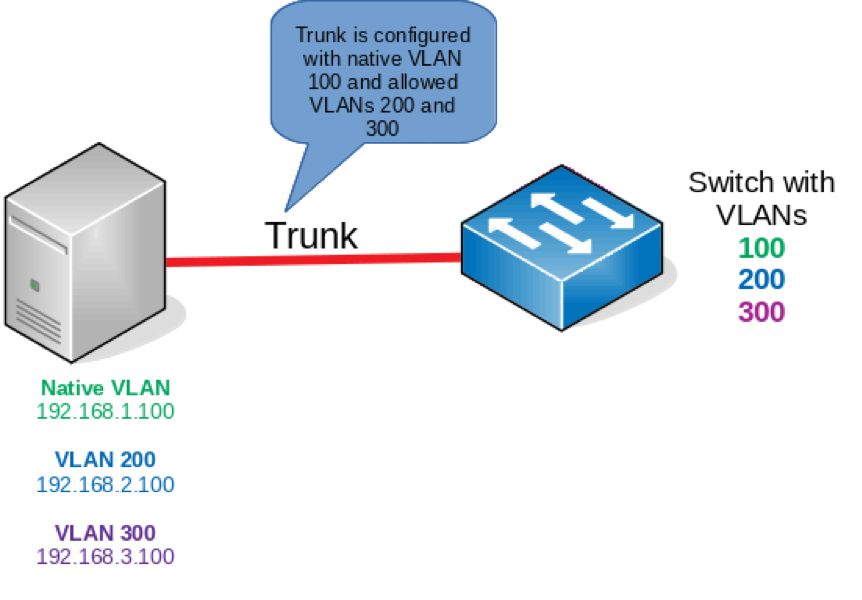
Next, take a look at a more complex topology. In the topology below, you can see a host (A KVM hypervisor, for example) connected to a switch’s trunk port with three VLANs involved. The first is VLAN 100, which is carried untagged across the port because it’s the native VLAN. The second and third VLAN (200 and 300) are carried across the trunk with an 802.1Q tag. Therefore, you need to configure your host to recognize that VLANs are involved here:
Network symbols provided by the LibreOffice VRT Network Equipment extension.
First, ensure that the 802.1Q kernel module is loaded. In practice, this module is automatically loaded if you configure a VLAN subinterface. However, I’ll manually enable it for the sake of demonstration:
# lsmod | grep 8021q

# modprobe 8021q

# lsmod | grep 8021q
8021q              	33208  0
garp               	14384  1 8021q
mrp                	18542  1 8021q
Like most network configurations, you set up VLANs in the appropriate /etc/sysconfig/network-scripts interface configuration file. This network configuration looks like any other interface with a few important distinctions. First, specify the interface name in the form of parentInterface.vlanID. This practice associates the VLAN with the appropriate parent interface. Second, use the VLAN=yes directive to configure this subinterface as a VLAN.
You already saw the configuration necessary for the untagged (native) VLAN: It’s the same configuration that used above for eth0. The output below shows the configuration that is needed for VLANs 200 and 300:
# cat /etc/sysconfig/network-scripts/ifcfg-eth0.200
TYPE=Ethernet
PROXY_METHOD=none
BROWSER_ONLY=no
BOOTPROTO=none
DEFROUTE=yes
IPV4_FAILURE_FATAL=no
NAME=eth0.200
UUID=04cb4fa6-f820-45c0-b847-df94e9628bc5
DEVICE=eth0.200
ONBOOT=yes
IPADDR=192.168.2.100
NETMASK=255.255.255.0
VLAN=yes

# cat /etc/sysconfig/network-scripts/ifcfg-eth0.300
TYPE=Ethernet
PROXY_METHOD=none
BROWSER_ONLY=no
BOOTPROTO=none
DEFROUTE=yes
IPV4_FAILURE_FATAL=no
NAME=eth0.300
UUID=04cb4fa6-f820-45c0-b847-df94e9628bc5
DEVICE=eth0.300
ONBOOT=yes
IPADDR=192.168.3.100
NETMASK=255.255.255.0
VLAN=yes
Once your VLANs have been configured, perform a quick restart of the network service to bring up the interfaces. You should then be able to see your new VLAN interfaces:
# systemctl restart network

# ip --br link show
lo           	UNKNOWN    	00:00:00:00:00:00 <LOOPBACK,UP,LOWER_UP>
eth0         	UP         	52:54:00:82:d6:6e <BROADCAST,MULTICAST,UP,LOWER_UP>
eth0.200@eth0	UP         	52:54:00:82:d6:6e <BROADCAST,MULTICAST,UP,LOWER_UP>
eth0.300@eth0	UP         	52:54:00:82:d6:6e <BROADCAST,MULTICAST,UP,LOWER_UP>


# ip --br addr sh
lo           	UNKNOWN    	127.0.0.1/8 ::1/128
eth0         	UP         	192.168.1.100/24 fe80::5054:ff:fe82:d66e/64
eth0.200@eth0	UP         	192.168.2.100/24 fe80::5054:ff:fe82:d66e/64
eth0.300@eth0	UP         	192.168.3.100/24 fe80::5054:ff:fe82:d66e/64
The output above clearly shows that you have two new interfaces: eth0.200 and eth0.300. These interfaces correspond to the VLANs that you configured, and any packets sent out of these interfaces will be tagged with the appropriate VLAN ID on the trunk.
Recall that trunks add an 802.1Q field to the Ethernet header to provide the upstream device with the appropriate VLAN ID. Now that you have some VLANs configured, you can see the 802.1Q field in a packet capture, as shown below. Notice that the VLAN ID of 200 corresponds to your configured VLAN subinterface:

Network symbols provided by the LibreOffice VRT Network Equipment extension.
Wrapping up
That’s really all there is to configuring VLANs in Red Hat Enterprise Linux, at least on the server side. Your network team also needs to create the VLANs on the upstream switch and ensure that the port is correctly configured for trunking. If you need more VLANs (and you probably will), then you can create additional interface files.
[Want to try out Red Hat Enterprise Linux? Download it now for free.]
저자 소개
Anthony Critelli is a Linux systems engineer with interests in automation, containerization, tracing, and performance. He started his professional career as a network engineer and eventually made the switch to the Linux systems side of IT. He holds a B.S. and an M.S. from the Rochester Institute of Technology.
유사한 검색 결과
Red Hat Device Edge, 이제 NVIDIA Jetson Orin에서 사용 가능
장기적인 안정성 지원: Red Hat Enterprise Linux Extended Life Cycle, Premium 출시
Infrastructure At The Edge | Compiler
Operating System Management | Compiler
채널별 검색

오토메이션
기술, 팀, 인프라를 위한 IT 자동화 최신 동향

인공지능
고객이 어디서나 AI 워크로드를 실행할 수 있도록 지원하는 플랫폼 업데이트

오픈 하이브리드 클라우드
하이브리드 클라우드로 더욱 유연한 미래를 구축하는 방법을 알아보세요

보안
환경과 기술 전반에 걸쳐 리스크를 감소하는 방법에 대한 최신 정보

엣지 컴퓨팅
엣지에서의 운영을 단순화하는 플랫폼 업데이트

인프라
세계적으로 인정받은 기업용 Linux 플랫폼에 대한 최신 정보

애플리케이션
복잡한 애플리케이션에 대한 솔루션 더 보기
가상화
온프레미스와 클라우드 환경에서 워크로드를 유연하게 운영하기 위한 엔터프라이즈 가상화의 미래