
This article is part two of two in a short series. In case you missed it, be sure to read the first article, How to set up PXE boot for UEFI hardware.
In the first article, you created a functioning PXE server, a DHCP server configured for delivering IP addresses to PXE booted systems, and a TFTP server to deliver a bootable system and ISO images. This article continues the task of finishing your environment and includes some troubleshooting tips for when things go wrong.
HTTP setup
An HTTP server is needed to provide the new server with the Kickstart file as well as the OS to be installed. It is possible to provide these files over HTTPS, but for most new servers, for simplicity, HTTP is used.
Here are the steps to set up the HTTP server:
1- Install the HTTP server:
# yum install -y httpd
2- Mount the Red Hat Virtualization Host ISO image (if it is not mounted):
# mount -t iso9660 /path/iso-file.iso /mnt -o loop,ro
3- Copy the Squash image and ISO files to the target locations:
# mkdir /var/www/html/rhv4.3/{ISO,image}

# cp -a /mnt /var/www/html/rhv4.3/ISO

# cp /mnt/Packages/redhat-virtualization-host-image-update* /tmp

# rpm2cpio redhat-virtualization-host-image-update* | cpio -idmv

# cp /tmp/usr/share/redhat-virtualization-host-version_number_version.squashfs.img /var/www/html/rhv4.3/image
4- Copy the Kickstart file to the target location:
# mkdir /var/www/html/kickstarts/

# vi /var/www/html/kickstarts/ks.cfg 🡪 Create a new file called ks.cfg
5- Enable and start the httpd service:
#systemctl enable httpd; systemctl start httpd
Kickstart file
Here is sample Kickstart file which can be used to install the RHVH OS. Red Hat strongly recommends using the "Automatically configure portioning" option in the installation destination.
lang en_US
keyboard us
eula --agreed
rootpw Redhat --plaintext

#platform x86, AMD64, or Intel EM64T
reboot
text
bootloader --location=mbr --append="rhgb quiet crashkernel=auto"
zerombr
liveimg --url=http:// 192.168.1.10/rhv4.3/image/redhat-virtualization-host-version_number_version.squashfs.img
clearpart --drives=sda --all
ignoredisk --only-use=sda
autopart --type=thinp

%post --erroronfail
nodectl init
%end
Remarks:
1- The URL below is provided by Red Hat and can be used to build a customized Kickstart file:
[https://access.redhat.com/labs/kickstartconfig/](https://access.redhat.com/labs/kickstartconfig/)
2- In the %post section of the Kickstart file, Linux commands can be added to set the static IPs for the ovirtmgmt as well as the hostname.
Automation options
This procedure is suitable to install multiple servers, but it requires manual changes. It can be fully automated in different ways, however.
Automation is out of the scope of this article, but two different options for automation will be mentioned here on a high level:
Using Ansible to automate powering on the servers
Most of HW vendors now have their Ansible modules to retrieve different details regarding the servers, as well as to power them on and off, so to automate the OS installation, we need to create an Ansible playbook to do the following:
- Play 1: Create Jinja2 template for the
Kickstartfile where the static IP and hostname are properly replaced in the post section, using a variable file which maps the MAC address of the PXE interface to the static IP and the hostname for every server, then push the dynamically generatedKickstartfile to the relevant location in HTTP server. - Play 2: Power on the needed server by using the MAC address of the PXE interface.
- Play 3: Probe the newly installed server using the static IP prior to moving to another server to install.
Pros:
- No manual activity is needed other than updating the variable file in case of new servers.
Cons:
- This option requires integration with the hardware management API.
- This option can install an OS on one server at a time (You can have only one kickstart file hosted in the http server at a time).
Using Ansible to post configure the hosts after OS is installed
Here in the dhcpd.conf we hard code the IP address which will be assigned for every MAC address of a new server in the Provisioning Network. Next, we create an inventory file including these IPs, as well as creating a variable file containing the hostname and static IP address for every server which is mapped to its IP address in the provisioning network. Finally, create one Ansible play to post configure the server after the OS installed.
Pros:
- No dependency on the Ansible modules from the hardware vendor.
- Multiple servers can be configured in parallel.
Cons:
- Not fully automated as the
dhcpd.confneeds to be modified, as well as the variables for new servers, must be added. Additionally, the servers need to be powered on manually.
[ Need more on Ansible? Take a free technical overview course from Red Hat. Ansible Essentials: Simplicity in Automation Technical Overview ]
Firewalld and network setup
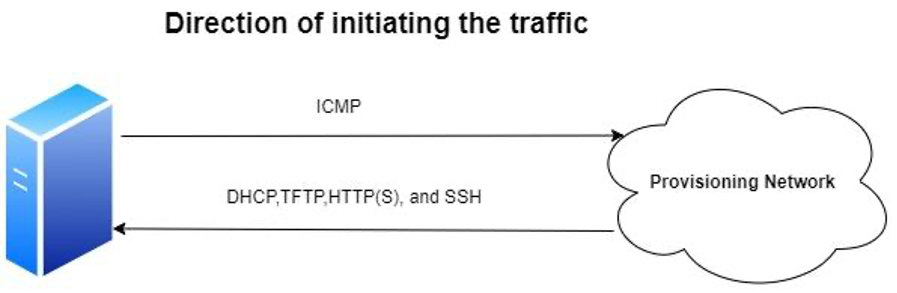
If there are firewalls between the PXE servers and Provisioning Networks, incoming TFTP and HTTP traffic from the Provisioning Networks towards the PXE servers must be permitted. ICMP traffic from the PXE servers towards the Provisioning Networks (new servers must be pingable from the DHCP server) must also be permitted.
Incoming SSH traffic from the Provisioning Networks towards the PXE servers has to be enabled for the sake of troubleshooting, as will be explained in the following section.
Furthermore, bonding the PXE interface on the new servers complicates the setup, and it is not needed.
From the PXE servers DHCP, TFTP, and HTTP services must be enabled by firewalld. Assuming that DHCP, TFTP, and HTTP services are all located on the same server, the following command must be executed:
# firewall-cmd --permanent --add-service=http --add-service=dhcp --add-service=tftp

# firewall-cmd –reload
Troubleshooting
PXE setups require some effort in the beginning, and troubleshooting might be an issue because we cannot do much on the new servers because they have no OS yet. Here are some hints which might help in troubleshooting:
- Check that the server is reachable via the DHCP IP. This can be done by finding the relevant DHCP IP address in
/var/lib/dhcpd/dhcpd.leases(or by using any of the Python scripts available in public to parse this file) and then ping it. - Use
tcpdumpon the PXE server(s) to help in troubleshooting. - Collecting
/run/initramfs/rdsosreport.txtlog in case the server installation fails.
This is the most tricky part in troubleshooting. If the installation fails you won't have any network to transfer this file, and Red Hat support won't be able to help you without this file.
There are many ways to collect this file, but the easiest way is as follows:
- Boot the new server from RHEL 7 iso.
- Choose the
Rescueoption. - Press
Shift+F2to get the shell prompt. - Use
fdiskto create a new partition on/dev/sdaof Linux type. - Unmount the ISO.
- Reboot the server.
- Once the installation fails and you are on the Dracut command line prompt, do the following:
#mkdir /mnt

#mount /dev/sda1 /mnt

#cp /run/initramfs/rdsosreport.txt /dev/sda1

#umount /dev/sda1
- Reboot the server again and repeat steps from 1 to 3.
- Mount
/dev/sda1
#mkdir /mnt

#mount /dev/sda1 /mnt
- Here you have two options:
- Get a DHCP IP address by using:
#dhclient

#scp /mnt/rdsosreport.txt root@192.168.1.10:/root
- Mount a directory on your laptop as a partition on your new server, and copy the
rdsosreport.txtto this partition.
Wrapping up
Congratulations on reaching this point. You now have a functioning PXE system that can deploy new RHV hosts. Remember to refer to the troubleshooting section, if everything isn't working as expected. You also need to complete each step as written to successfully get to this point. Check your work because there are many detailed steps. Good luck to you with your new environment.
References
Sobre o autor
I am Ashraf Hassan, originally from Egypt, but currently, I am living in the Netherlands
I started my career in 1998 in the telecom industry, specifically the value-added services.
Although my official studies were in the area of telecommunications, I was always attracted to system administration and scripting. I started to sharpen these skills in 2008, during my free time, I like to test new tips and tricks using my home lab.
Working as a senior designer enriched my skills further.
In 2016 I decided to start the journey to be an “RHCA” which I accomplished in 2019, but as IT is a fast-changing domain, I need to keep studying, testing and learning.
In 2019 I joined Red Hat Accelerators once they expanded the program to include Europe; being a member of highly skilled technical experts helped me further.
Please feel free to contact me (info@free-snippets.com) regarding my posts or questions that can pop up related to any of Red Hat Products.
Mais como este
Simplifique as operações do Catalyst com o Red Hat Ansible Automation Platform
Avanço dos recursos pós-quânticos de SSH no Red Hat Enterprise Linux
Untangling Networks | Compiler
Infrastructure At The Edge | Compiler
Navegue por canal

Automação
Últimas novidades em automação de TI para empresas de tecnologia, equipes e ambientes

Inteligência artificial
Descubra as atualizações nas plataformas que proporcionam aos clientes executar suas cargas de trabalho de IA em qualquer ambiente

Nuvem híbrida aberta
Veja como construímos um futuro mais flexível com a nuvem híbrida

Segurança
Veja as últimas novidades sobre como reduzimos riscos em ambientes e tecnologias

Edge computing
Saiba quais são as atualizações nas plataformas que simplificam as operações na borda

Infraestrutura
Saiba o que há de mais recente na plataforma Linux empresarial líder mundial

Aplicações
Conheça nossas soluções desenvolvidas para ajudar você a superar os desafios mais complexos de aplicações
Virtualização
O futuro da virtualização empresarial para suas cargas de trabalho on-premise ou na nuvem