All system admins should be lazy. Not as in not doing their job, but as in doing it as efficiently as possible. Why do you have to do things manually when you can automate them? The more complicated a task, the more reason for automation.
Identity Management is an application that makes sense to automate when rolling it out. Red Hat Identity Management (IdM) is fairly easy to install, but the larger your environment, the more machines you need. In a typical datacenter you would probably have an intranet and a DMZ, and you would probably have your servers divided into development and production. The people that should access your servers will probably be divided up into groups as well, consisting of database, web and application administrators. Not to mention your system admins that need access to everything.
Why you should choose automation over a manual installation
Trying to manage administrative files like sudo and access.conf can be very time consuming depending on the size of your environment. When you have to add or remove a user, you have to make changes to all of the affected servers. This can take time and reduce a person's productivity. It can also cause a security hole if a person's access is valid after their departure. IdM can centralize this management for you, and automating the installation and configuration will save you time in getting your environments up and running.
Setting up automation
In this example I will use a simple IdM environment. It consists of one IdM domain that has two IdM servers running RHEL 8.5. One is the primary which holds the certificate authority (CA), and the second will be the replica and it will also be the backup CA.
To make IdM administration easier, the developers created an upstream project called ansible-freeipa and this has been pulled into the repositories. Now I bet you are saying to yourself, “but Ansible is a subscription.” Well that is true, but Red Hat Enterprise Linux (RHEL) includes the core Ansible components so you can use it for running playbooks created, or generated, by Red Hat products such as RHEL System Roles, OpenSCAP or Insights remediation playbooks, and the ansible-freeipa playbooks.
The environment
Since we are making this a simple environment, we will need three virtual machines. One will be the primary IdM server, the second will be the replica, and the third will be used for Ansible, and it will also be a client. All three servers are built using the same configuration of 2 vCPUS, 4 Gb of RAM and 30 Gb of storage.
Ansible only needs to be installed on one machine, so we will install it on the IdM client. For RHEL releases 8.5 and earlier, we will need to add the ansible-2.9-for-rhel-8-x86_64-rpms repository. This repo is included with the RHEL subscription for automating RHEL applications. For RHEL 8.6 and later, Ansible Engine has been replaced with Ansible Core. This is included in the App Stream repo, so you will not have to enable a separate repo to get it.
Your repository list should look like this:

You will need to install Ansible, ansible-freeipa and the RHEL system roles. The ansible-freeipa package is available from the rhel-8-for-x86_64-appstream-rpms repository and it provides the modules needed to automate the installation and configuration of IdM. The RHEL system roles will be used to update the nameserver entries to point to the IdM server.
Once the packages have been installed, we can start working on both the inventory and playbook files.
Inventory file
In the default install of Ansible, the inventory file is called hosts and it can be found in /etc/ansible. We will put all of our host information and variables in this file. I will be using the YAML format, so it will look different to you if you are used to the INI format.
To build our IdM primary server you will need to edit the hosts file and add three specialized groups: ipaserver, ipareplicas and ipaclients.
The ipaserver group is your primary IdM server. This is where the CA revocation service lies. The ipareplicas group is all of the IdM replicas you will be installing. Finally, there is the ipaclients group. This group is only for the clients that will have the ipa-client package installed.

Variables can be broken up into Base, Server, Client, DNS and Special.
Base variables are ones that are required to do a basic installation of IdM. These consist of passwords, and the realm, domain and host names.
Server variables are ones that consist of what options to set up, like KRA and DNS, and some that are used to configure the IdM environment like the starting user and group id numbers and do not redirect the Web UI.
Client variables are geared towards the clients and can consist of what is configured on the client on whether or not to configure ssh, sudo or NTP.
DNS variables as the name suggests consist of DNS options. Allowing zone overlap, creating a reverse DNS, or configuring forwarders.
And lastly we have the special variables. These variables are ones that do not fit anywhere else and contain options for the firewall zone to use and few others.
There are Certificate System, AD Trust and SSL variables as well, but since we are doing a basic install we will not be using any of them.
We will also be adding a few extra variables to help simplify any additions or changes to the playbook later on; idm_short, root_domain and nameserver. Both idm_short and root_domain will be joined to make our FQDN and the nameserver variable will be used to update our DNS and point to the IP of our primary IdM server.
Each host will have their own set of variables, but we will make those that will be used multiple times into global variables and add them to the extra variables.
We need to add the ipaadmin_password and the ipadm_password. This will allow us to login to both the Web UI (ipaadmin_password) and the LDAP (ipadm_password). These passwords should be different from each other for better security.
So the global variable section should look like this:

Now that we have our global variables, we will move on to the ipaserver variables. We will add them under the host. Since we are adding variables to the host entry, we will need to remove the “null” entry at the end of it. This entry means there are no host variables.
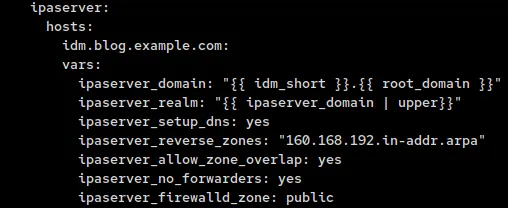
For our domain and realm entries, we will use the idm_short and root_domain variables that we added earlier to create the ipaserver_domain, which is then used for the ipaserver_realm variable.
Next we will set up the DNS by adding ipaserver_setup_dns, ipaserver_reverse_zones, ipaserver_allow_zone_overlap and ipaserver_no_forwarders to our variable list. These will tell Ansible to install DNS, create a reverse zone, not to check if there is already a DNS entry with our name out there and not to configure forwarders.
Lastly, we will tell the IdM server which firewall zone to attach the firewalls to. If you only have public then you don’t need this, but we have seen customers that do not use public so they could not install replicas or clients due to this.
So our server variable list should like the image below:

For replicas we use a lot of variables similar to the ones used for the server. The admin password is reused so we do not need to create a new one, and we do not need the domain or realm variables since that is set only on the server.
This leaves us with the DNS and firewall variables we need to recreate, and since we are going to have a backup CA, we will need to add that variable as well.
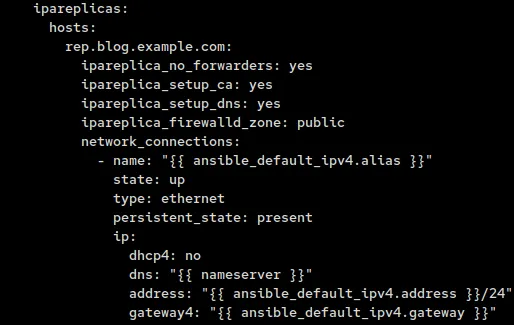
Instead of using ipaserver as our prefix, we will replace it with ipareplica and add ipareplica_setup_ca so that we have a backup CA.
So that the replicas can resolve the DNS entries of the new IdM environment we need to change the nameservers to point to the primary DNS. To do this we will use the network system role. We created a global variable for it earlier.
Since we are using a static IP, we will need to configure dhcp4, dns, address and gateway4. For both address and gateway4 we will use the facts that Ansible gathers and reuse both the IP and gateway. The dhcp4 variable we will set to no, and for the dns variable we will use the nameserver variable we created earlier with the ipaserver IP.
So the addition to the vars section of our inventory file should look like:

Finally, we come to what our clients need. It is rather simple as we only need to add the ability to create a home directory when a user logs in for the first time, and change the nameserver like we did with the ipareplicas group.

This is a fairly simple inventory file and for our setup only consists of 29 lines. You can add more replicas and clients as you desire, but I would not add too many replicas with the CA option, as this can cause network congestion. We recommend only having 3 or 4 CAs out there, including the primary server.
Once completed, the inventory file should look similar to this:

Playbook
The playbook is rather simple. Besides for the playbook, I will be creating one role that will enable the PTR sync on for both the forward and reverse domains as it is disabled by default, whether the install is done manually or through automation. Enabling PTR sync will allow PTR records to be created so you do not have to go back and do it manually later.
First I run a mkdir command to create the directory structure I need for this role.
Then I create the main.yml file and use ipadnszone to ensure both allow_sync_ptr and dynamic_update are enabled on both the forward and reverse zones.

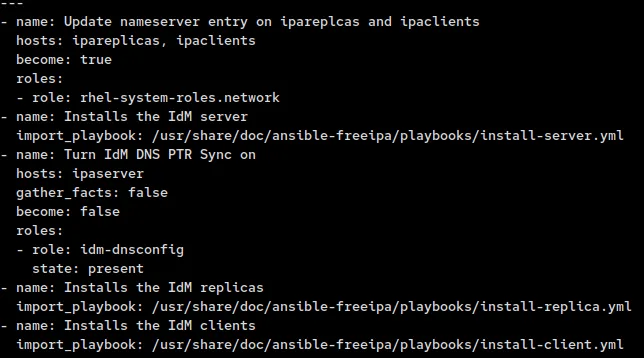
Now all we need to do is to create the actual playbook we will be using. For this role we will call three ansible-freeipa playbooks (install-server.yml, install-replica.yml and install-client.yml) and one RHEL system role (network). We will first update the DNS servers on both the ipareplicas and ipaclients. This is done because they need to be able to resolve the ipaserver and its SRV records.
Then between the server and replica installs we will put the idm-dnsconfig role so that when we add the replica(s) and client(s) we create the PTR records for them.

There are a few more things we need to do before we can run this playbook. We need to ensure that the Ansible host, rh8.blog.example.com, knows how to resolve the IPs of the IdM servers and the clients. To do this, we will add them to /etc/hosts on the Ansible host.
If you are running this as root, you will need to edit the ansible.cfg files and set ask_pass = True. If you are using a different account, you will also need to set become=True, become_method=sudo, become_user=root and become_ask_pass=True that are further down the file.
Once all this is done you are ready to run the playbook.


I am running this as root so I have not had to enable the “privilege_escalation” section of the ansible.cfg file. If your security policy does not allow root login through SSH, you will need to enable these and use an account that has sudo privileges. You will also need to add “become: true” to the network task as it requires root privileges.
Final words
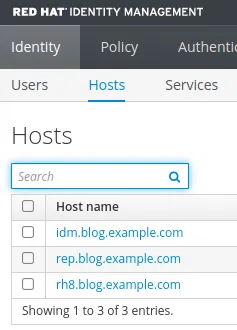
Here we see that I am able to log in and view the servers we installed in this environment

You can break down what we went through here and just install the server, or just replicas if you have a server already installed. If you only need to roll out clients, you just need a couple of variables and the install-client.yml playbook. You can even configure IdM with the modules included in the ansible-freeipa RPM.
If you would like to learn more about IdM, Ansible, and ansible-freeipa please visit these links. You can also get a copy of the playbook I used at my GitHub repo.
Sobre el autor
Mike Ralph is a Principal Technical Account Manager for Red Hat where he started working in 2019. He is a Platform and Ansible TAM specializing in IdM and Ansible. He has over 25 years of experience as a systems administrator in both the public and private sectors.
Más como éste
AI insights with actionable automation accelerate the journey to autonomous networks
IT automation with agentic AI: Introducing the MCP server for Red Hat Ansible Automation Platform
Technically Speaking | Taming AI agents with observability
Transforming Your Secrets Management | Code Comments
Navegar por canal
Automatización
Las últimas novedades en la automatización de la TI para los equipos, la tecnología y los entornos
Inteligencia artificial
Descubra las actualizaciones en las plataformas que permiten a los clientes ejecutar cargas de trabajo de inteligecia artificial en cualquier lugar
Nube híbrida abierta
Vea como construimos un futuro flexible con la nube híbrida
Seguridad
Vea las últimas novedades sobre cómo reducimos los riesgos en entornos y tecnologías
Edge computing
Conozca las actualizaciones en las plataformas que simplifican las operaciones en el edge
Infraestructura
Vea las últimas novedades sobre la plataforma Linux empresarial líder en el mundo
Aplicaciones
Conozca nuestras soluciones para abordar los desafíos más complejos de las aplicaciones
Virtualización
El futuro de la virtualización empresarial para tus cargas de trabajo locales o en la nube
