
The Red Hat Ansible Network Automation engineering team is continually adding new resource modules to its supported network platforms. Ansible Network Automation resource modules are opinionated network modules that make network automation easier to manage and more consistent for those automating various network platforms in production. The goal for resource modules is to avoid creating and maintaining overly complex jinja2 templates for rendering and pushing network configuration, as well as having to maintain complex fact gathering and parsing methodologies. For this blog post, we will cover standard return values that are the same across all supported network platforms (e.g. Arista EOS, Cisco IOS, NXOS, IOS-XR, and Juniper Junos) and all resource modules.
Before we get started, I wanted to call out three previous blog posts covering resource modules. If you are unfamiliar with resource modules, check any of these out:
- acls - the resource module for configuring access control lists on network devices. For example: junos_acls on Juniper Junos
Deep Dive: ACL Configuration Management Using Ansible Network Automation Resource Modules - ospfv2 - the resource module for configuring the routing protocol OSPF. For example: ios_ospfv2 for OSPF configuration on Cisco IOS
Getting Started With OSPFV2 Resource Modules by Rohit Thakur - vlans - the resource module for configuring VLANS on network devices. For example: eos_vlans for VLANS configuration on Arista EOS
Deep dive on VLANS resource modules for network automation
What are resource module return values?
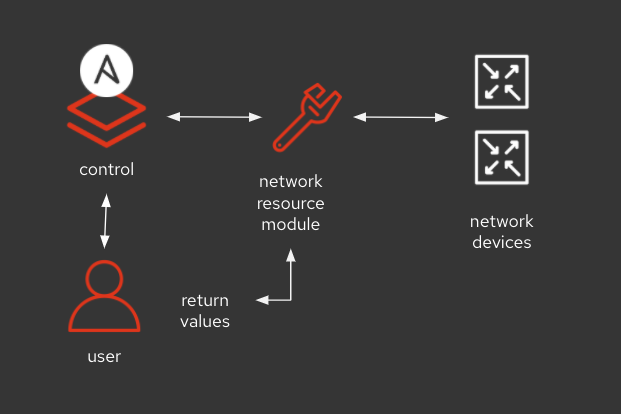
Return values are what are returned from the resource modules when it finishes execution. Let’s cover when you would use them, how to use them, and why you should care!
So let's get started: All currently released resource modules have the exact same return values to make it easy to automate consistently across any network resource module. They are the following:
|
after |
The configuration as structured data after module completion. |
|
before |
The configuration as structured data prior to module invocation. |
|
commands |
The set of commands pushed to the remote device. |
Why are return values important? They give you state before and after modifications happen. The before value lets you know the state of the device before you do any modification. This makes it easy to revert changes or simply compare the before and after of any particular resource. The commands return value will actually be in the network platform’s device syntax, so if you are automating an Arista EOS switch, you will get Arista commands. This is important because it allows a network operator to quickly see what the automation actually did, and in the syntax that is expected of the operator. There is no abstraction happening that impacts the network operator from the tool, so trust is gained with automation, which can help with establishing a positive culture between network automation engineers and folks that might just be starting their automation journey.
A practical example
Let's look at a practical example using the Arista eos_l2_interfaces module from the Arista Network Collection. The quick summary for those that don’t know what a Collection is: it’s how content is packaged, including Ansible Modules. The modules that you know and love still work exactly the same way you are used to but packaged in a more portable and flexible format.
The l2_interfaces resource modules configure layer 2 access and trunk ports on network devices. Lets look at an Ansible Playbook example:
---
- name: l2_interfaces example for blog
  hosts: arista
  gather_facts: false
  tasks:

    - name: merge configuration
      arista.eos.eos_l2_interfaces:
       config:
       - name: Ethernet1
         mode: trunk
This Ansible Playbook turns network port Ethernet1 into a 802.1q trunk port. We can run this with verbosity turned on using the -v option to see the return values quickly in our terminal window:
[sean@RHEL8 ~]$ ansible-playbook arista_example.yml -v -l rtr2The -v refers to verbosity while the -l refers to a limit where the Ansible Playbook will only run on the specified node rtr2 (which is a Arista vEOS device I have running 4.22.1FX-VEOSRouter-cloud on AWS for demonstration purposes).
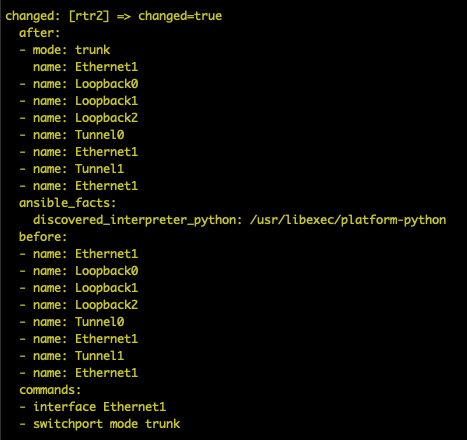
Here is output from the task:
(Output is also provided in Public Gist)
Let's break this down, but only for Ethernet1, to simplify this a bit for blog purposes!
The before return value shows us the data model before we modify (execute any commands) on the Arista network switch.
  before:
  - name: Ethernet1
The commands return value shows us the actual command that Ansible executes to enforce the configuration we specified in our Ansible Playbook.
  commands:
  - interface Ethernet1
  - switchport mode trunk
Finally, we can look at the after return value, which will show us the new data model on the network device, after we ran the commands specified above.
  after:
  - name: Ethernet1
    mode: trunk
Using return values
The above example only shows verbosity of return values to the terminal window. The return values can also be stored and used in subsequent tasks. Let's look at the following example playbook:
---
- name: l2_interfaces example for blog
  hosts: arista
  gather_facts: false
  tasks:

    - name: merge configuration
      arista.eos.eos_l2_interfaces:
       config:
       - name: Ethernet1
         mode: trunk
      register: example

    - name: display output
      debug:
        msg:
          - "before:"
          - "{{ example.before | to_nice_yaml }}"
          - ""
          - "commands:"
          - "{{ example.commands | to_nice_yaml }}"
          - ""
          - "{{ example.after | to_nice_yaml }}"
We have added a register to the first task. This saves all return values to the variable example. I also added one debug task where I broke out each of the three return values. The debug task allows us to return output to the terminal window. In an example for production, we would save this information into a SoT (source of truth) or create some dynamic documentation into markdown or a website. For an example of a source of truth, check out our previous blog on Using NetBox for Ansible Source of Truth. I also added a filter to_nice_yamlto convert the structured data to human readable YAML:

(output is also provided in Public Gist)
In summary, the return values can be stored and used for auditing, logging or simply helping network engineers understand what has changed, what commands were used to make the change, and what the final configuration looks like post execution. The most important takeaway from these return values are that they are the same across all platforms and all network resource modules, making the experience predictable and stable for folks using Ansible Network Automation.
Where do I go next?
Where can I get a trial?
If you want to get a trial to Red Hat Ansible Automation Platform, please visit red.ht/try_ansible
Where can I learn Ansible?
Are you new to Ansible automation and want to learn? Check out our getting started guide lessons on developers.redhat.com: developers.redhat.com/products/ansible/getting-started
For network engineers check out our Network Getting Started guide
Where can I learn about Ansible Content Collections?
If you are unfamiliar with Ansible Collections, check out our YouTube playlist for everything about Ansible Collections. We have tons of great videos that will get you up to speed quickly.
I missed AnsibleFest 2020. where is the content?
We got you covered, check out this video: AnsibleFest 2020! I missed it! Where is the content?
Explore everything on-demand for free on www.ansible.com/ansiblefest
À propos de l'auteur
Sean is a Principal Technical Marketing Manager, Ansible, where he brings over 10 years of experience building and automating computer networks. Sean previously worked for both Cumulus Networks (acquired by Nvidia) and Cisco Systems where he helped customers deploy, manage and automate their network infrastructure. He resides in Chapel Hill, NC with his wife and children and tweets from @IPvSean.
Plus de résultats similaires
Présentation d'OpenShift Service Mesh 3.2 avec intégration du mode ambiant d'Istio
Présentation d'OpenShift Service Mesh 3.1
Parcourir par canal

Automatisation
Les dernières nouveautés en matière d'automatisation informatique pour les technologies, les équipes et les environnements

Intelligence artificielle
Actualité sur les plateformes qui permettent aux clients d'exécuter des charges de travail d'IA sur tout type d'environnement

Cloud hybride ouvert
Découvrez comment créer un avenir flexible grâce au cloud hybride

Sécurité
Les dernières actualités sur la façon dont nous réduisons les risques dans tous les environnements et technologies

Edge computing
Actualité sur les plateformes qui simplifient les opérations en périphérie

Infrastructure
Les dernières nouveautés sur la plateforme Linux d'entreprise leader au monde

Applications
À l’intérieur de nos solutions aux défis d’application les plus difficiles
Virtualisation
L'avenir de la virtualisation d'entreprise pour vos charges de travail sur site ou sur le cloud