This is a guest post by Julian Khoo, VP Product Development and Co-Founder at Joget Inc. Julian has almost 20 years of experience in the IT industry, specifically in enterprise software development. He has been involved in the development of various products and platforms in application development, workflow management, content management, collaboration and e-commerce.
Introduction to Joget and Autoscaling
As an open source, no-code/low-code platform to visually build enterprise Web apps for coders and non-coders, Joget is an ideal complement to Red Hat OpenShift to accelerate the application development process.
With Joget, it is possible to build a full-fledged app with dashboards, calendar, approval workflow and data management within 30 minutes. And, it can be done without coding as you essentially drag-and-drop, point-and-click and configure your way through instead. The video here demonstrates an authentic, real-time example of building the app from scratch.
Users can also download the Joget Mobile App from the Apple App Store and Google Play Store to access the very same app with the UI automatically tailored for mobile devices.
Autoscaling is an OpenShift feature where the system can automatically increase or reduce the number of containers based on load. By using autoscaling, you would have better fault tolerance, and higher availability with the correct capacity to handle the current load, and better cost management to fully maximize cost efficiency.
In this article, we’ll look at deploying the new Red Hat Certified Container for Joget on JBoss EAP 7. The JBoss EAP application server in this image is configured to support clustering and session replication, so we'll set up autoscaling to automatically scale apps based on load, and then present several deployment options for managing multiple apps.
Deploy Joget on OpenShift
Deploy using the OpenShift Web Console
Step 1: Create OpenShift Project
Access the OpenShift Web Console and login
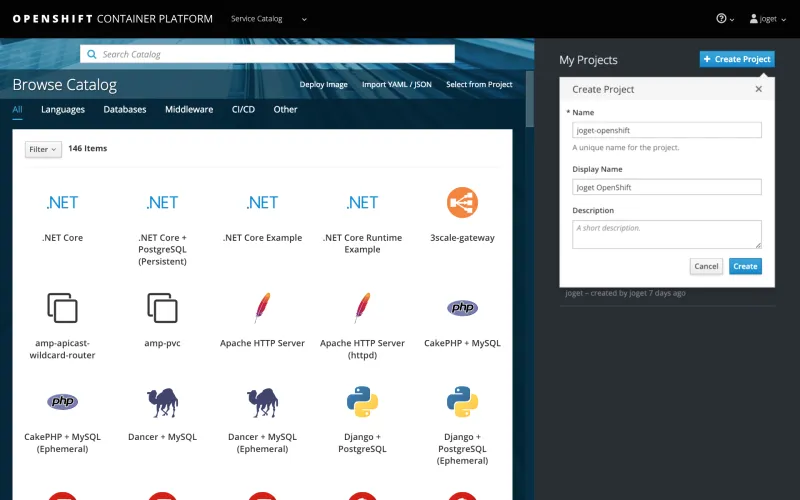
Create a project using the Create Project button and key in the desired Name, Display Name and Description.
Step 2: Deploy MySQL Database
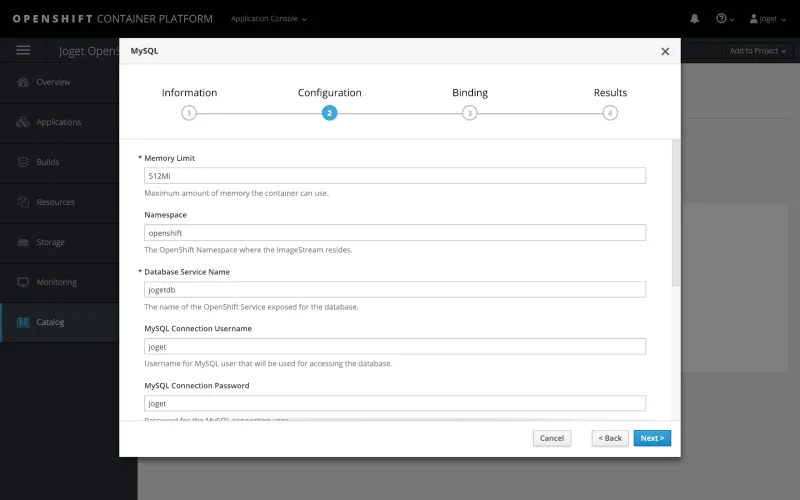
Under the selected project, select Add to Project > Browse Catalog and select the MySQL image.
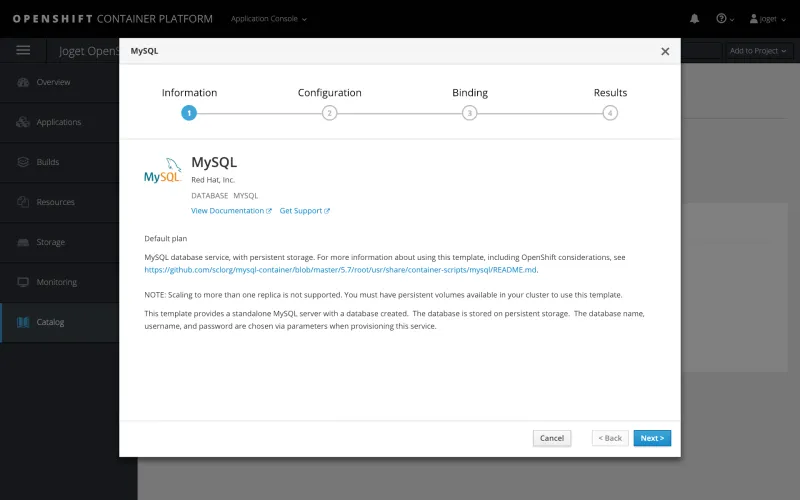
Key in the appropriate settings and click on Create e.g.
|
Namespace |
openshift |
|
Database Service Name |
jogetdb |
|
MySQL Connection Username |
joget |
|
MySQL Connection Password |
joget |
|
MySQL Database Name |
jwdb |
Step 3: Deploy Joget Platform
To access the Red Hat Container Catalog, a valid username and password that is used to log in to the Red Hat Customer Portal is required.
If you do not have an account, you can acquire one by registering for one of the following options:
- Red Hat Developer Program. This account gives you access to developer tools and programs.
- 30-day Trial Subscription. This account gives you a 30-day trial subscription with access to select Red Hat software products.
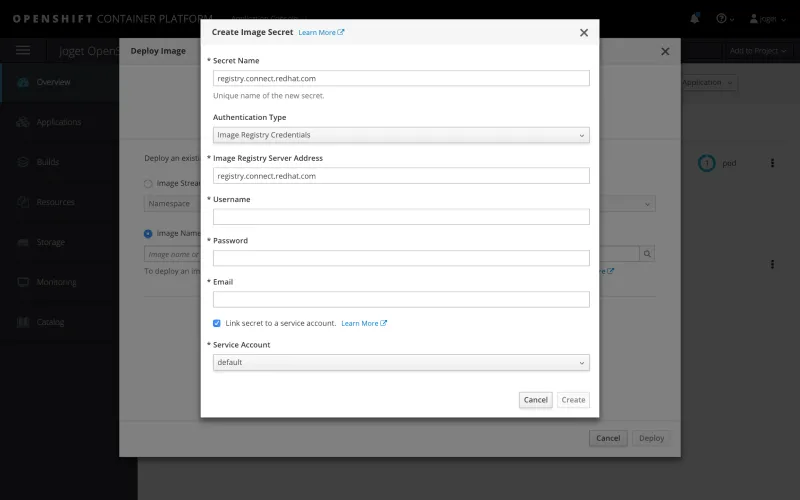
Under the selected project, select Add to Project > Deploy Image and click on create an image pull secret link. In the ensuing popup, key in the Red Hat login details for the registry.
|
Secret Name |
registry.connect.redhat.com |
|
Authentication Type |
Image Registry Credentials |
|
Image Registry Server Address |
registry.connect.redhat.com |
|
Username |
Red Hat account username |
|
Password |
Red Hat account password |
|
|
Red Hat account email |
|
Link secret to a service account |
Yes |
|
Service Account |
default |
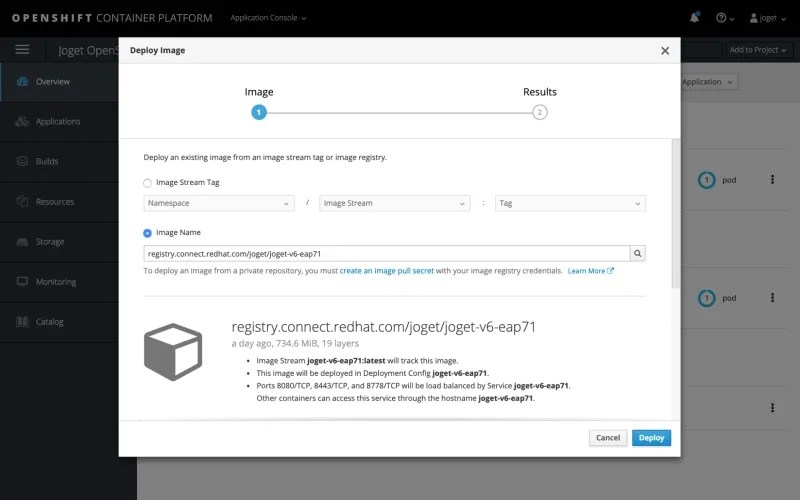
Once the secret has been created, select Add to Project > Deploy Image, select the Image Name option and key in registry.connect.redhat.com/joget/joget-v6-eap71. Click on the small search icon to load the image details from the registry, key in the desired Name then click Deploy.
|
Image Name |
registry.connect.redhat.com/joget/joget-v6-eap71 |
|
Name |
joget-v6-eap71 |
Step 4: Add Persistent Storage
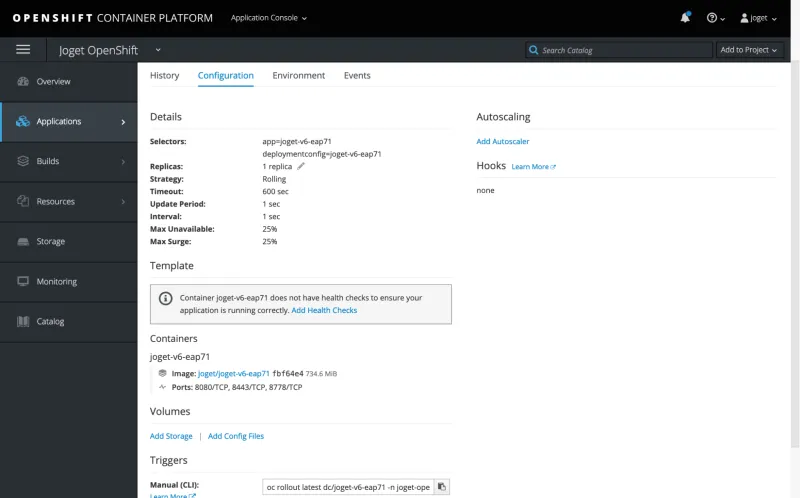
The next step is to add persistent storage to the container for storing configuration files and persistent file uploads. Under Applications > Deployments, select the application, then the Configuration tab. Scroll down to the Volumes section and click on the Add Storage link.
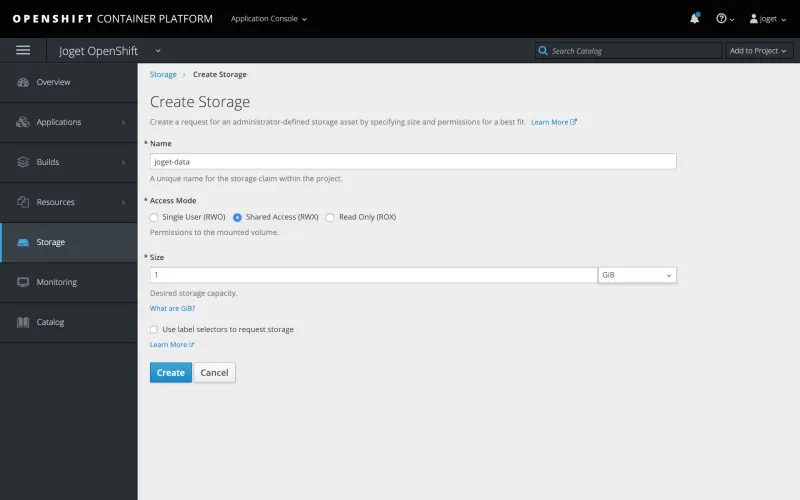
In the Add storage page, click on the small create storage link. Create the new storage with the desired values e.g.
|
Name |
joget-data |
|
Access Mode |
Shared Access (RWX) |
|
Size |
1GB (or as required) |
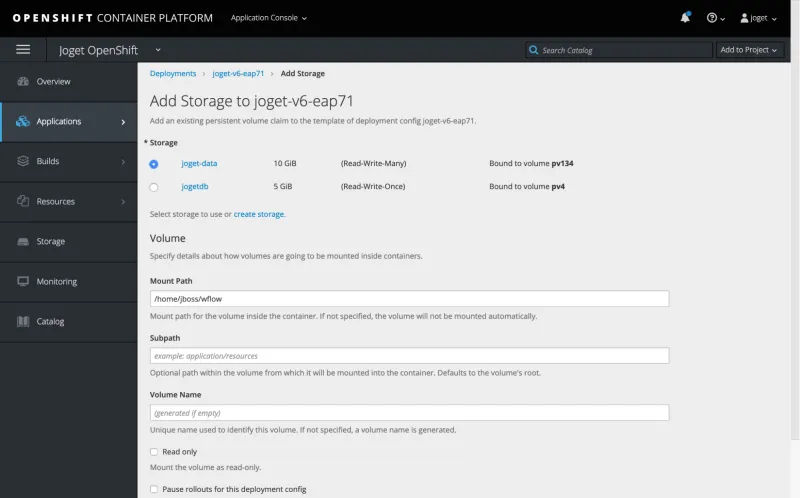
Back in the Add Storage page, select the newly created storage, set the Mount Path to /home/jboss/wflow, then Add.
|
Mount Path |
/home/jboss/wflow |
Step 5: Create Service Route for External Access
At this point, the service is not accessible from an external Web browser, so you will need to create a route, which exposes a service at a host name.
Click on Applications > Services and select joget-v6-eap71.
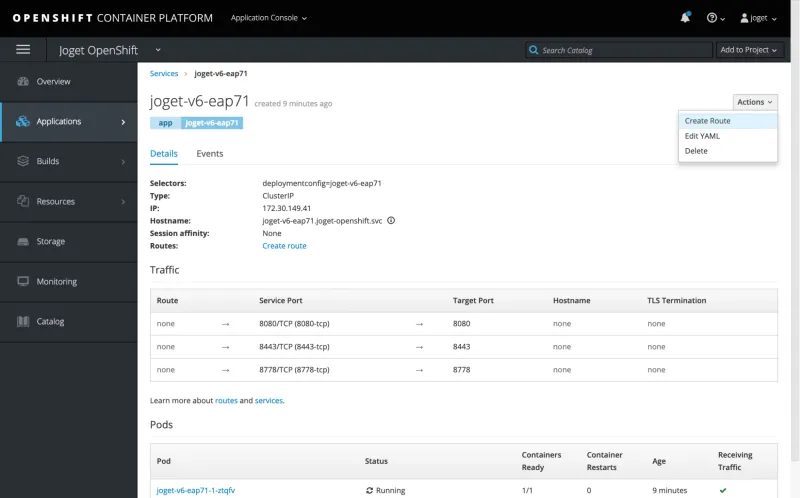
Select Actions > Create Route, set the Path to /jw and click on Create.
|
Path |
/jw |

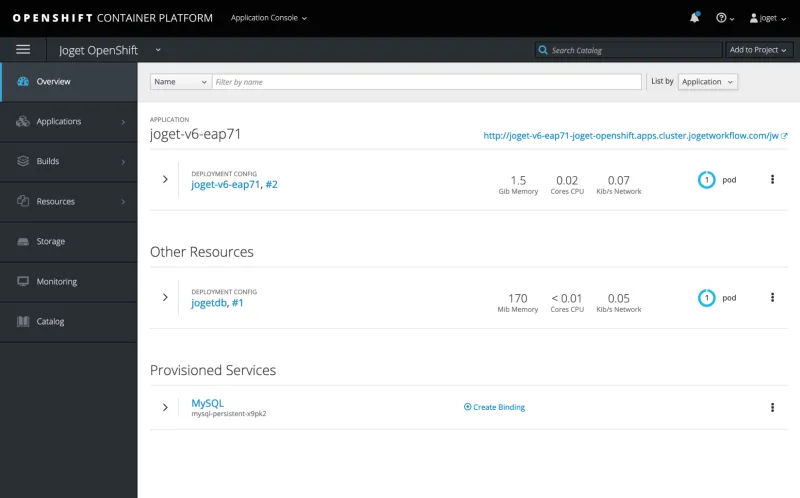
Return to the Overview and click on the URL next to the application name to launch the Joget platform.
Deploy using the OpenShift CLI
For those more inclined to use a non-graphical command line interface, it is actually faster to use the OpenShift command line interface (CLI) to deploy the Joget platform.
The following is a Linux script to accomplish a similar Joget platform deployment. Before running this script, install the CLI and login. Change the environment variables in the script accordingly, at least the four values below:
|
PROJECT_NAME |
The desired project name |
|
REGISTRY_USERNAME |
Red Hat account username |
|
REGISTRY_PASSWORD |
Red Hat account password |
|
REGISTRY_EMAIL |
Red Hat account email |
#!/bin/sh
export PROJECT_NAME=joget-openshift
export REGISTRY_USERNAME=email@domain
export REGISTRY_PASSWORD=password
export REGISTRY_EMAIL=email@domain
export REGISTRY_SERVER=registry.connect.redhat.com
export IMAGE_NAMESPACE=joget
export IMAGE_NAME=joget-v6-eap71
export IMAGE_TAG=latest
export APP_NAME=joget-v6-eap71
export DB_APP_NAME=joget-mysql
export STORAGE_NAME=joget-data
export MYSQL_DATABASE=jwdb
export MYSQL_USER=joget
export MYSQL_PASSWORD=joget

echo === deploy Joget on OpenShift ===
echo PROJECT_NAME: $PROJECT_NAME
echo REGISTRY_SERVER: $REGISTRY_SERVER
echo REGISTRY_USERNAME: $REGISTRY_USERNAME
echo REGISTRY_EMAIL: $REGISTRY_EMAIL
echo IMAGE_NAMESPACE: $IMAGE_NAMESPACE
echo IMAGE_NAME: $IMAGE_NAME
echo IMAGE_TAG $IMAGE_TAG
echo IMAGE_NAME: $IMAGE_NAME
echo APP_NAME: $APP_NAME
echo DB_APP_NAME: $DB_APP_NAME
echo STORAGE_NAME: $STORAGE_NAME
echo MYSQL_DATABASE: $MYSQL_DATABASE
echo MYSQL_USER: $MYSQL_USER
echo MYSQL_PASSWORD: $MYSQL_PASSWORD

echo === create project ===
oc new-project $PROJECT_NAME

echo === deploy MySQL ===
oc new-app openshift/mysql:5.7 --name $DB_APP_NAME -e MYSQL_USER=$MYSQL_USER -e MYSQL_PASSWORD=$MYSQL_PASSWORD -e MYSQL_DATABASE=$MYSQL_DATABASE

echo === create and bind secret to pull Joget image ===
oc create secret docker-registry $REGISTRY_SERVER --docker-server=$REGISTRY_SERVER --docker-username=$REGISTRY_USERNAME docker-password=$REGISTRY_PASSWORD --docker-email=$REGISTRY_EMAIL
oc secrets link default $REGISTRY_SERVER --for=pull

echo === import Joget image ===
oc import-image $PROJECT_NAME/$IMAGE_NAME --from=$REGISTRY_SERVER/$IMAGE_NAMESPACE/$IMAGE_NAME --confirm

#echo === grant pull permission if from different project ===
#oc policy add-role-to-user system:image-puller system:serviceaccount:$PROJECT_NAME:default -n $IMAGE_NAMESPACE

echo === deploy Joget ===
oc new-app $PROJECT_NAME/$IMAGE_NAME:$IMAGE_TAG --name $APP_NAME

echo === create persistent storage claim ===
cat <<EOF > pvc.yaml
apiVersion: "v1"
kind: "PersistentVolumeClaim"
metadata:
 name: "$STORAGE_NAME"
spec:
 accessModes:
   - "ReadWriteMany"
 resources:
   requests:
     storage: "1Gi"
EOF
oc create -f pvc.yaml
rm pvc.yaml

echo === mount storage ===
oc set volume dc/$APP_NAME --add --type=persistentVolumeClaim --claim-name=$STORAGE_NAME --mount-path=/home/jboss/wflow

echo === expose service route for external excess ===
oc expose svc $APP_NAME --path=/jw
oc annotate route $APP_NAME --overwrite haproxy.router.openshift.io/timeout=60s
oc get route
echo URL: http://$(oc get route $APP_NAME --template='{{ .spec.host }}')/jw
Set up Database
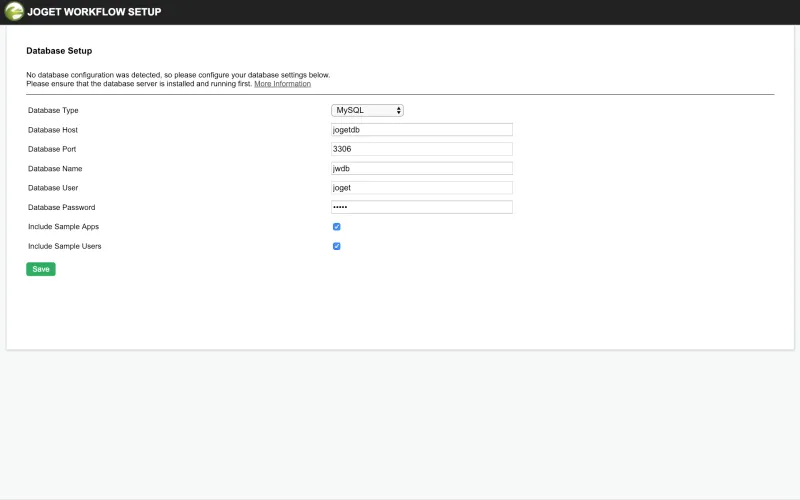
The first time the Joget platform is accessed, the Database Setup page will be displayed. Configure the database settings using the values defined when deploying the MySQL database previously e.g.
|
Database Host |
jogetdb |
|
Database Port |
3306 |
|
Database Name |
jwdb |
|
Database User |
joget |
|
Database Password |
joget |
Upon successful configuration, the Joget App Center will be loaded.
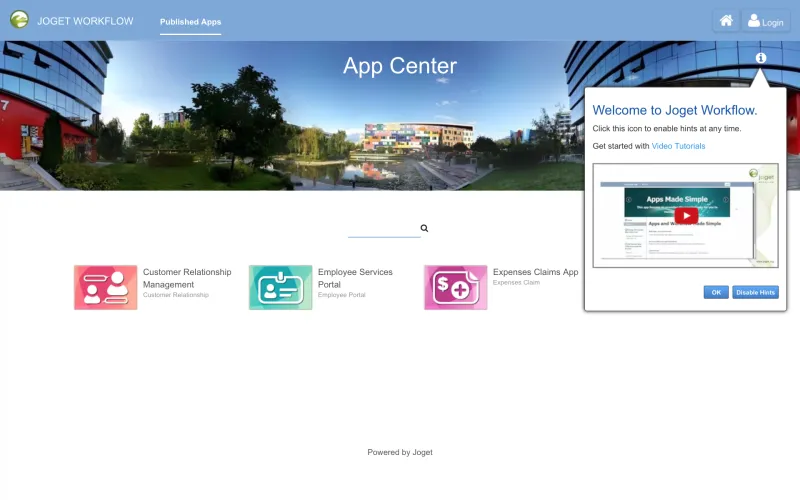
NOTE: If you encounter a 504 Gateway Timeout during the database setup, it is caused by the database initialization taking longer than the default OpenShift Route timeout. You can actually ignore the error and wait a couple of minutes before accessing the Application URL from the Overview page again.
You can also increase the route timeout using the OpenShift CLI i.e.
oc annotate route $APP_NAME --overwrite haproxy.router.openshift.io/timeout=60s
Configure Clustering and Autoscaling
Before enabling autoscaling, we’ll first need to enable clustering on JBoss EAP.
Configure JBoss EAP Clustering
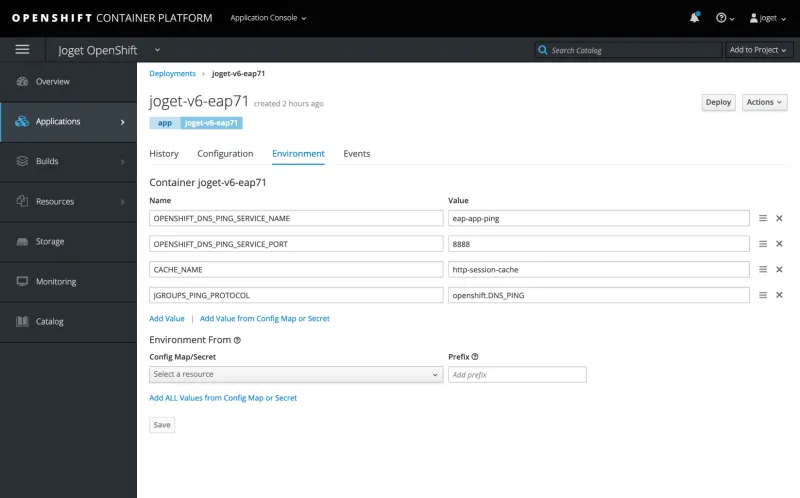
In this configuration, we will be using the DNS_PING discovery mechanism.
Step 1: Set Environment Variables
Using the OpenShift CLI, create the appropriate environment variables:
export APP_NAME=joget-v6-eap71

oc set env dc/${APP_NAME} JGROUPS_PING_PROTOCOL=openshift.DNS_PING -e OPENSHIFT_DNS_PING_SERVICE_NAME=eap-app-ping -e OPENSHIFT_DNS_PING_SERVICE_PORT=8888 -e CACHE_NAME=http-session-cache
Step 2: Create and Expose Service
Using the OpenShift CLI, create and expose the service:
oc expose dc/${APP_NAME} --port=8888 --name=eap-app-ping --cluster-ip=None
Configure Autoscaling
At this point, clustering is enabled so you are able to perform manual scaling, by increasing or decreasing pods as required. The next steps will enable autoscaling so that the system will automatically manage the number of running pods based on system load.
Step 1: Set Resource Limits
oc set resources dc/${APP_NAME} --limits=cpu=1000m,memory=2048Mi --requests=cpu=100m,memory=1024Mi
Step 2: Set Autoscaling Configuration
oc autoscale dc/${APP_NAME} --min 1 --max 3 --cpu-percent=50
Autoscaling In Action
Once the autoscaling has been configured, the deployment will automatically increase or decrease the pods when the average CPU usage hits a specific level, e.g. 50 percent in the configuration used above. The screenshots below demonstrate autoscaling in action during load spikes when monitored in the Web Console:
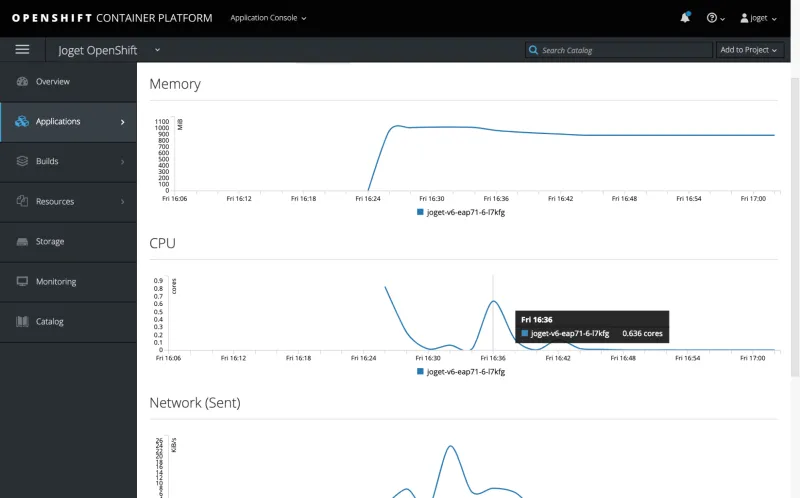
CPU Load Spike
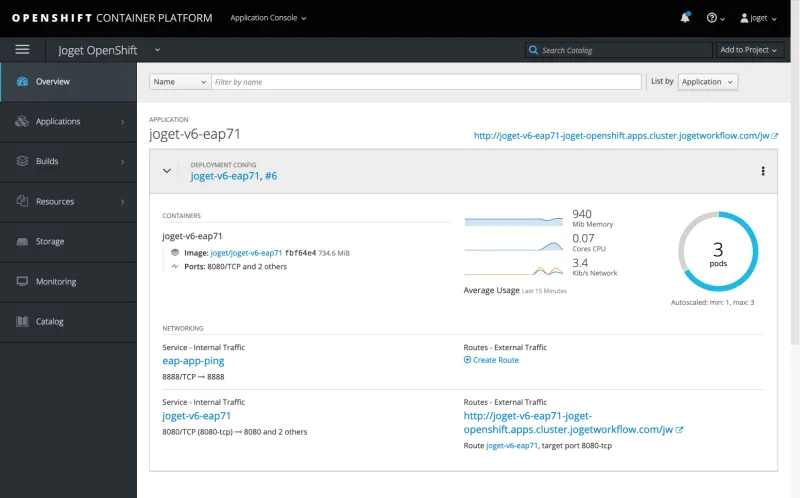
Autoscaled to Maximum Number of Pods
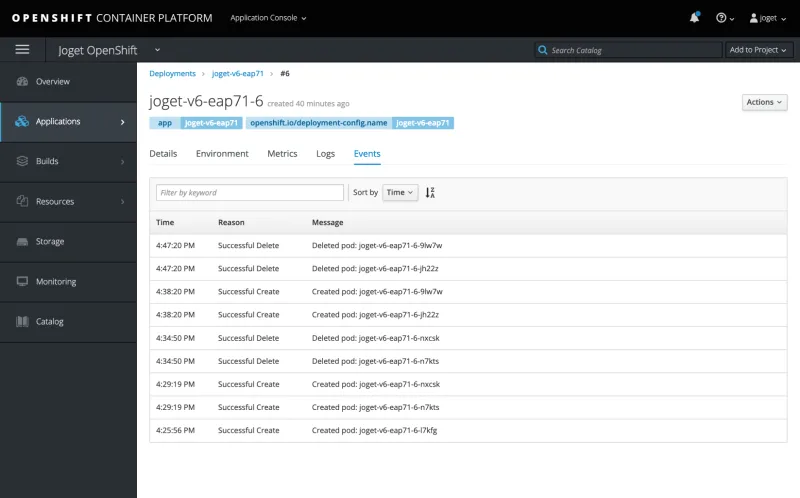
Automatic Creation and Deletion of Pods Shown in Events
Deployment Options for Multiple Apps
Now that we have covered how to deploy clustering and autoscaling for Joget on OpenShift, let’s explore a couple of deployment options when you have multiple apps to be deployed for an organization. The suitable deployment option would depend on the number and type of apps, dependency between applications, as well as the expected load.
There are scenarios where it would be optimal to deploy only one app per cluster, while there are other scenarios where having multiple apps per cluster is more appropriate. The good news is that you do have the flexibility to choose the deployment option that matches your business goals and environment.
One App Per Cluster
In this scenario, you would have a Joget cluster that hosts and manages a single app. Each time a new app is required, a new separate cluster is created. You will also likely integrate with a directory server (e.g. LDAP or Active Directory) to centralize user management.
Scenarios when you want to deploy one app per cluster:
- Larger applications that require independent monitoring and high availability.
- Less or no dependency on other applications.
- Data intensive applications to avoid impact to co-deployed applications.
Pro:
Able to monitor and scale each app independently.
Con:
More work required whenever a new app is needed, requiring a separate deployment in OpenShift.
Multiple Apps Per Cluster
In this scenario, a cluster of Joget pods can host and manage multiple apps. App creation is handled directly from within the Joget platform itself.
Scenarios when you want to deploy multiple apps per cluster:
- Dependent applications that needs to be co-deployed.
- Reusable components that can be used by multiple applications.
- Plugins are being shared across multiple applications.
Pro:
Creation of new apps is easy and accessible.
Con:
Load for multiple apps is shared within a cluster, so it is more difficult to isolate apps with higher load demands or problems.
Get Started with Joget
To learn more and get started with the Joget platform:
- Visit the Joget Workflow product page
- Learn with the Getting Started Guide in the Knowledge Base.
- Learn via the Joget Academy.
À propos de l'auteur
Plus de résultats similaires
Introducing OpenShift Service Mesh 3.2 with Istio’s ambient mode
Red Hat Enterprise Linux now available on the AWS European Sovereign Cloud
Bringing Deep Learning to Enterprise Applications | Code Comments
Transforming Your Identity Management | Code Comments
Parcourir par canal
Automatisation
Les dernières nouveautés en matière d'automatisation informatique pour les technologies, les équipes et les environnements
Intelligence artificielle
Actualité sur les plateformes qui permettent aux clients d'exécuter des charges de travail d'IA sur tout type d'environnement
Cloud hybride ouvert
Découvrez comment créer un avenir flexible grâce au cloud hybride
Sécurité
Les dernières actualités sur la façon dont nous réduisons les risques dans tous les environnements et technologies
Edge computing
Actualité sur les plateformes qui simplifient les opérations en périphérie
Infrastructure
Les dernières nouveautés sur la plateforme Linux d'entreprise leader au monde
Applications
À l’intérieur de nos solutions aux défis d’application les plus difficiles
Virtualisation
L'avenir de la virtualisation d'entreprise pour vos charges de travail sur site ou sur le cloud

