You’ve spent the time and effort to get your Red Hat Satellite server installed and configured. It’s up and running. What now? Ideally, systems in your environment would be bootstrapped to the new Satellite server. What about those new systems, the ones just waiting for installation of Red Hat Enterprise Linux? This can be done with PXE-less discovery, which has been available since the release of Red Hat Satellite 6.1.5. The discovery feature is a significant enhancement to use in environments that don’t allow or have PXE enabled. It’s relatively easy to setup and configure, and can make provisioning a non-event rather than a dreaded chore.
Configuring the discovery service
First, enable the discovery plugin on the Satellite server.
# satellite-installer --enable-foreman-plugin-discovery
After this completes, a few additional packages are required.
# yum install foreman-discovery-image rubygem-smart_proxy_discovery
After the package installation, edit one of the provisioning templates by updating the name of your Satellite server. Log into the WebUI of the Satellite and navigate to Hosts > Provisioning templates. Choose PXELinux global default. Edit the template and change SATELLITE_CAPSULE_URL to your Satellite server’s hostname.
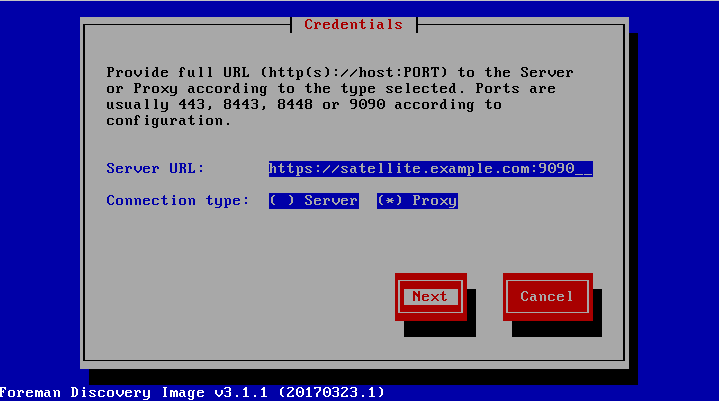
proxy.url=https://satellite.example.com:9090
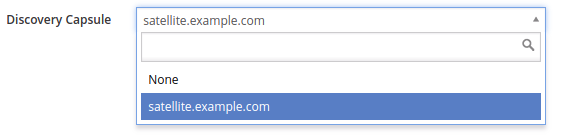
The subnets with discoverable hosts require a Discovery Capsule to be associated with the subnet to provide the discovery service. To enable this for your subnet, navigate to Infrastructure > Subnets, select a subnet, click on the Capsules tab, and select the Discovery Capsule to assign to the subnet.
Optionally, if you would like the host to be auto-provisioned during discovery, edit the setting Administer > Settings > Discovered. Modify discovery_auto to true. With this enabled the host will auto-provision according to the discovery rules that are defined.

Discovery rules
It’s time to create the discovery rules that will be used to classify systems and then apply the rule definitions to the discovered system for provisioning. Navigate to Configure > Discovery rules and we’ll add a few new rules to use in the environment. The rules will be selected based off of physical parameters of the servers, one for web servers and the other for database servers. Rule priority scores help break a tie if more than one rule matches a host. In this example, if the host has four or more CPUs, it qualifies to become a web server. If it has over 4GB of RAM, it’s a database server. When the host has more than four CPUs and more than 4GB of RAM, it’s a database server since the priority for the database discovery rule is higher than the web server discovery rule.
First, we’ll create the web server rule. The search parameter determines if the rule is applied to a discovered host, in this case, if it has four or more CPUs. If there is a match, then the Host Group is assigned, and a hostname generated with the prefix of ‘websrv’ and a randomly generated three-digit number is used. Note that this has been assigned priority 1. The lower the number, the higher the rule is in priority.

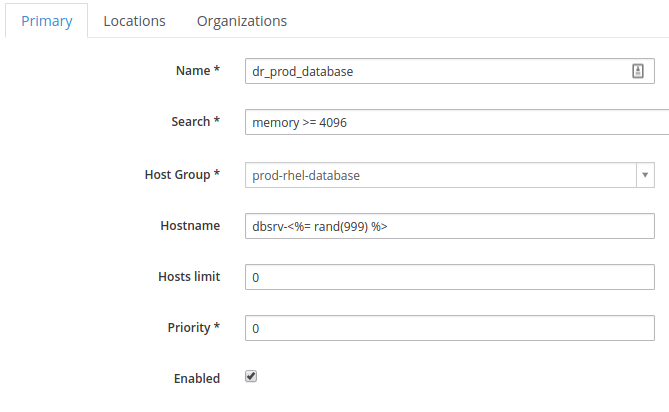
For the database discovery rule, we will again use the search parameter to define a database system as having 4GB of RAM or more. The hostname will have a prefix of ‘dbsrv’ with a randomly generated three digit number. Lastly, we’ll assign this rule a priority of 0, ensuring the discovered host will be built as a database server if it matches the rules for both a web server and a database server.
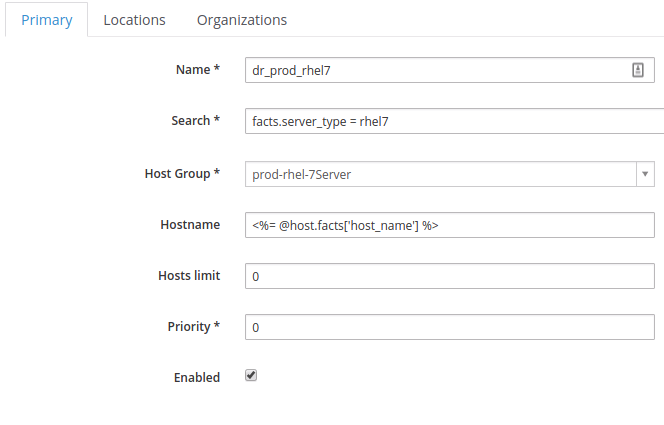
We will create one more rule that will make use of custom facts. We will send these custom facts during the discovery process from the discovered host. The search parameter and the hostname are defined from data that is entered by the end user during the discovery process. The custom search parameter of server_type will expect the value of rhel7, which is just a generic server image. The hostname will be assigned by the data we pass to host_name during the discovery. More about that later.
Discovery image
The final step to complete is the preparation of the discovery image. The discovery image is part of the rpm package foreman-discovery-image that was previously installed. The image is located in /usr/share/foreman-discovery-image/. You can either use the image as is or modify it for your environment.
$ cd /usr/share/foreman-discovery-image

$ cp foreman-discovery-image*.iso ~/

$ sudo discovery-remaster ISO_IMAGE\ "proxy.url=https://satellite.example.com:9090 proxy.type=proxy"
The command is just a simple modification that encodes the Satellite server hostname to the discovery image. Other options can be used to define parameters such as networking information and custom facts, but in this example, the only modification is the Satellite server hostname.
With our image modified and the Satellite server configured, we can now use the discovery feature to provision systems.
Provisioning
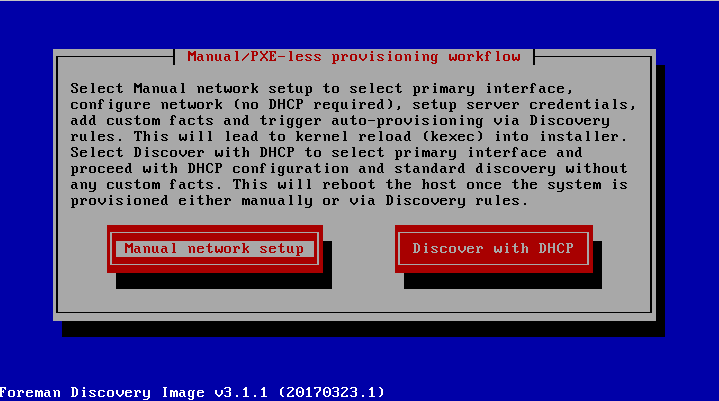
With the discovery image in hand, that first system is ready to be provisioned. The image can be burned to physical media, transferred to a thumb drive, or used from the virtual console access from the system.
When the system boots into the discovery image select either DHCP or static networking, whichever is relevant for the subnet on which the discovered host is provisioning.
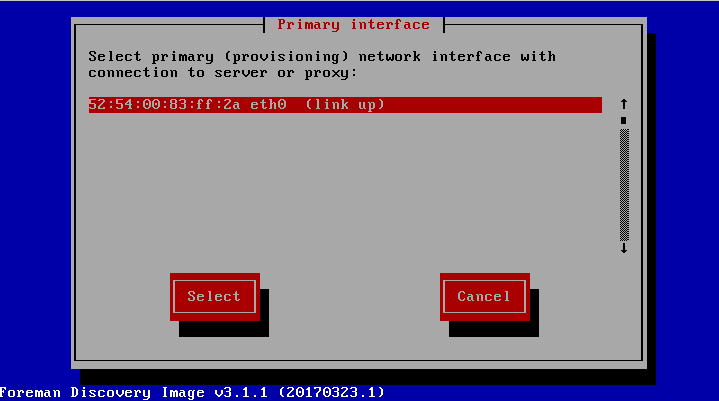
After entering the networking parameters, select the appropriate network interface.
The server URL parameter was auto-populated since we previously used the ‘discovery-remaster’ command to encode the server URL into the discovery image.
In the custom facts section, do not enter facts if you want to have the provisioned server check against the search parameters of our defined web server and database server discovery rules. Depending on the hardware setup of the server, one of the rules will match, and the system will be auto-provisioned accordingly.
Recall from earlier that our custom discovery rule contains the search parameter of facts.server_type = rhel7 with the hostname of <%= @host.facts['host_name'] %>. If this discovery rule is used, then a generic Red Hat Enterprise Linux 7 server is installed. In the Custom Facts menu, enter the variable names defined (e.g., server_type and host_name) with the appropriate values.

Once you hit ‘Confirm’ the discovery rules will be queried and then if they match the auto-provision will begin!
Although discovery rules work in conjunction with PXE, the inclusion of the PXE-Less discovery in Red Hat Satellite provides greater ease and control over provisioning systems. The ability to define search parameters that are relevant to host groups allows for the convenience needed in managing fundamental to complex environments. The example covered is just a scratch on the surface of what is possible. Go forward and create, discover, and provision!

A Red Hat Technical Account Manager (TAM) is a specialized product expert who works collaboratively with IT organizations to strategically plan for successful deployments and help realize optimal performance and growth. The TAM is part of Red Hat’s world-class Customer Experience and Engagement organization and provides proactive advice and guidance to help you identify and address potential problems before they occur. Should a problem arise, your TAM will own the issue and engage the best resources to resolve it as quickly as possible with minimal disruption to your business.
Connect with TAMs at a Red Hat Convergence event near you! Red Hat Convergence is a free, invitation-only event offering technical users an opportunity to deepen their Red Hat product knowledge and discover new ways to apply open source technology to meet their business goals. These events travel to cities around the world to provide you with a convenient, local one-day experience to learn and connect with Red Hat experts and industry peers.
Open source is collaborative curiosity. Join us at Red Hat Summit, May 8-10, in San Francisco to connect with TAMs and other Red Hat experts in person! Register now for only US$1,100 using code CEE18.
À propos de l'auteur

Plus de résultats similaires
Redefining automation governance: From execution to observability at Bradesco
How llm-d brings critical resource optimization with SoftBank’s AI-RAN orchestrator
Data Security And AI | Compiler
Data Security 101 | Compiler
Parcourir par canal

Automatisation
Les dernières nouveautés en matière d'automatisation informatique pour les technologies, les équipes et les environnements

Intelligence artificielle
Actualité sur les plateformes qui permettent aux clients d'exécuter des charges de travail d'IA sur tout type d'environnement

Cloud hybride ouvert
Découvrez comment créer un avenir flexible grâce au cloud hybride

Sécurité
Les dernières actualités sur la façon dont nous réduisons les risques dans tous les environnements et technologies

Edge computing
Actualité sur les plateformes qui simplifient les opérations en périphérie

Infrastructure
Les dernières nouveautés sur la plateforme Linux d'entreprise leader au monde

Applications
À l’intérieur de nos solutions aux défis d’application les plus difficiles
Virtualisation
L'avenir de la virtualisation d'entreprise pour vos charges de travail sur site ou sur le cloud