
Back in August, we shared a preview of the enhancements to the Red Hat Enterprise Linux (RHEL) system role for Microsoft SQL Server that allow it to support Always On availability groups. Microsoft’s Amit Khandelwal followed up with a blog post on how to use the role to configure availability groups in Azure.
With RHEL 8.7 and RHEL 9.1 now generally available, these features are jointly supported by Red Hat and Microsoft as part of the latest RHEL distributions and through the Ansible Automation Hub. The previous blogs gave you an idea of the scope of the functionality we’ve delivered, this one will cover how to use the functionality.
To help with the setup and configuration, Red Hat is providing community-supported playbooks via Github that will allow you to set up a SQL Server availability group in Azure, bare metal (also works with virtual machines (VMs) hosted on either RHEL or OpenShift Virtualization), and VMware VSphere deployments.
When using these playbooks, installation occurs in three steps:
- Step 1 installs and configures an initial SQL Server on the primary RHEL node and populates its database
- Step 2 installs and configures to additional SQL Servers on RHEL that will participate in the cluster
- Step 3 is the platform-specific step and is responsible for configuring the SQL Server availability group and the pacemaker service provided with the RHEL High Availability add-on
The files provided include:
- run.sh - the main driver script that shows how to invoke the playbooks.
- create_example_db.j2 - a sample T-SQL script that is used to create a database on the SQL Server we create in step1.yml
- inventory - a file that contains the names of the servers that we'll be configuring into a SQL Server cluster.
- step1.yml - an Ansible playbook that uses the Microsoft SQL Server collection to configure a SQL Server on RHEL and populates it with the database we create with the T-SQL script create_example_db.j2
- step2.yml - a playbook that uses the Microsoft SQL Server collection to configure two additional SQL Server on RHEL systems for use in creating an Always On availability group cluster.
- step3 playbooks: Each playbook listed below configures a SQL Server Always On availability group using the Microsoft SQL Server Ansible collection and then configures the RHEL High Availability add-on for a specific type of virtual, physical or cloud environment using the RHEL System Role for High Availability:
- step3-rhkvm.yml - This example configures a RHEL HA cluster that is designed for use with Bare Metal, RHEL KVM virtualization, Red Hat Virtualization, or Red Hat OpenShift Virtualization.
- step3-rhvmw.yml - This example configures a RHEL HA cluster that is designed for use with VMWare VSphere.
- step3-rhazure.yml - This example configures a RHEL HA cluster that is designed for use with Microsoft Azure.
To get started, you’ll want to set up three VMs, each running RHEL 8.7 and the RHEL High Availability add-on. Be sure to enable a watchdog timer virtual device for each VM. If you are using RHEL virtualization and OpenShift Virtualization, both support the i63000esb device. For example, if you’re using virtualization on RHEL and installing your VMs with the virt-install utility, you can use the command:
# virt-install --name mssql1 --memory 4096 --vcpus 2 --disk size=20 --os-variant rhel8.7 --watchdog i6300esb,action=reset --cdrom=/mnt/isos/rhel-8.7-x86_64-dvd.iso
You’ll also want to follow the process outlined in the blog, Introduction to RHEL system roles to install and configure the ansible-core and rhel-system-roles packages. Once you’ve completed that, you’ll need to install the Microsoft SQL Server role with:
# dnf install ansible-collection-microsoft-sql
Get started by modifying the inventory file to meet your needs. This file contains the names of the physical hosts or VMs that you’ll be deploying your cluster on. It looks like this:
all:
  hosts:
    mssql1:
      mssql_ha_replica_type: primary
    mssql2:
      mssql_ha_replica_type: synchronous
    mssql3:
      mssql_ha_replica_type: witness
Modify each host so that the name matches one of the hosts in your cluster. This example uses three hosts named: mssql1, mssql2, and mssql3. The first, mssql1, will be the initial primary host, while mssql2 will be a synchronous replica, and mssql3 will act as a configuration-only replica. If you’d like to use two synchronous replicas, you can specify that the third replica is synchronous instead.
Next up is to modify the files, step1,yml and step2,yml. In both files, you’ll probably want to modify these parameters:
- mssql_password - the password you’ll configure for the sa account on each server. It’s best to use the same password so that in the event of a failover, your password still works.
- mssql_edition - the edition of SQL Server you’ll use, potential choices include Enterprise, Standard, Developer, or (for a configuration-only replica) Express.
In the step1.yml file, you’ll also modify the mssql_ha_db_name parameter which specifies the name of the database you want to replicate.
Now modify the create_example_db.j2 file. This is the file written in T-SQL where we load a database. You can either create a new database, or you can restore one from backup. Either way, make sure the database name matches the one you set for mssql_ha_db_name.
For step3.yml, as we saw above, there are three potential choices, depending on which environment you are going to run in. For our example today, we’re going to use RHEL VMs so we’ll modify the step3-rhkvm.yml file as follows:
- mssql_password - the password we’re using for the sa account
- mssql_ha_virtual_ip - the virtual IP address we’ll use to connect to SQL Server. This address will move to a different member of the group if there is a host failure or software issue. You can set a host name in your host file or DNS for this floating address. It will be associated with the SQL Server listener.
- mssql_ha_ag_name - the name of your availability group which will be displayed in tools like SQL Server Management Studio and Azure Data Studio.
- mssql_ha_db_names - a list of the databases you would like to replicate.
- mssql_ha_master_key_password
- mssql_ha_private_key_password - pick strong passwords used to secure SQL Server data replication between the nodes in the availability group.
- mssql_ha_login_password - pick a strong password that will be associated with the pacemaker account created in SQL Server.
- ha_cluster_hacluster_password - pick a strong password for the hacluster account.
With all this in place, from the working directory (where you’ve copied your scripts on your control node) kick off the execution of the playbooks with:
$ ./run.sh
To verify that your configuration is up and running use the command:
# pcs status
With a healthy cluster this will produce output like this:
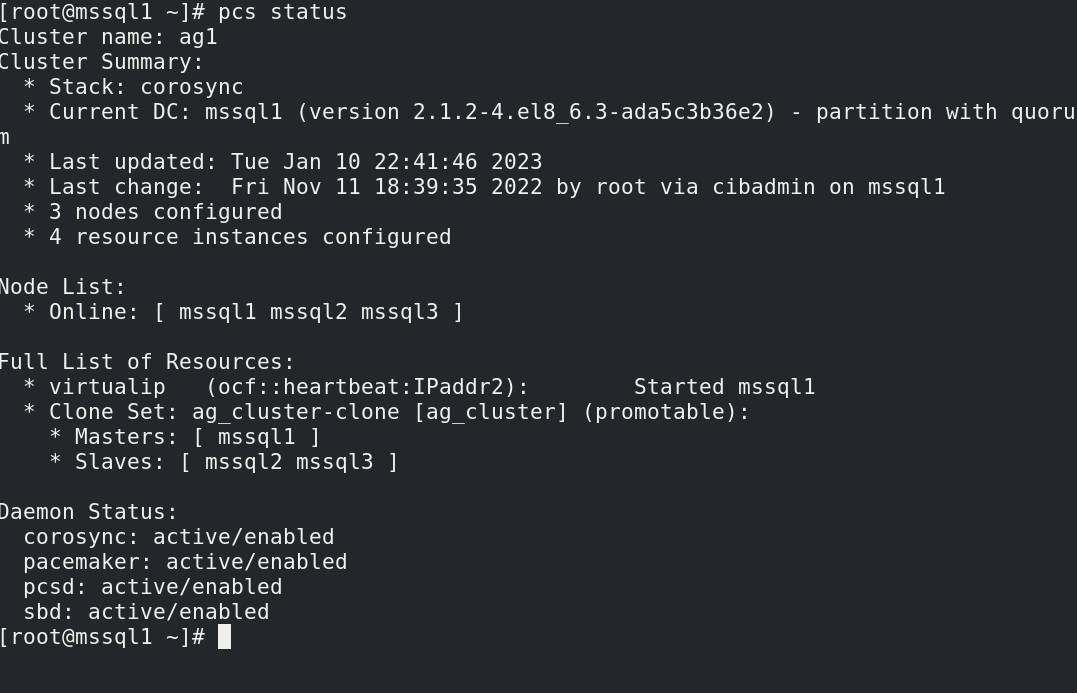
Here we can see that we have three nodes participating in the cluster: mssql1, mssql2, and mssql3. All nodes are online. The virtualip resource is associated with mssql1, so this is the active node.
To determine the floating virtual address being used by SQL Server listener run the command:
# pcs resource config
The resulting output will provide you the floating virtual IP address you configured for your applications to access:

Here we see that the IP address we’re looking for, in this example, is 192.168.200.254.
From the command line, I can connect using the command:
$ /opt/mssql-tools/bin/sqlcmd -S 192.168.200.254 -U sa -P <mssql_password>
Where mssql_password is the strong password I set for the SA account above.
To verify that failover works correctly, we can simply restart the primary node with:
# halt
We simply ssh into another, still active, node in the cluster and check the status there with:
# pcs status

Here we see that mssql2 and mssql3 are online. The database can’t be served from mssql3, since we configured it as a configuration-only replica, so we know that mssql2 is going to be the primary node. We see that the virtual IP is up and running on mssql2 and that mssql1 is stopped. We can verify that our database server is up and running by once again running:
$ /opt/mssql-tools/bin/sqlcmd -S 192.168.200.254 -U sa -P <mssql_password>
Verify that you connect successfully, and that’s it! The whole process of setting up a SQL Server Always On availability group can be completed in about six minutes in a typical environment. Ten minutes if you include the verification steps. A lot of best practices for validation are included in the system role. It generally verifies each step in the process after a change is made.
You can watch all of this come together by registering to view the on-demand webinar: Reduce administrator support and maintenance time with Microsoft SQL Server 2022 on Red Hat Enterprise Linux.
Presented by Red Hat’s Louis Imershein and Microsoft’s Amit Khandelwal, this presentation includes a demonstration of the process outlined in this blog post and shows off some of the new features available on RHEL with the newly released Microsoft SQL Server 2022 as well.
As always, for information on why you should standardize on RHEL for your SQL Server deployments visit: Red Hat Enterprise Linux for Microsoft SQL Server.
저자 소개
Louis Imershein is a Product Manager at Red Hat where his focus is on improving the Red Hat Enterprise Linux software developer experience. He has an extensive background in software development, architecture, quality assurance, technical support, and product management on a wide range of OS, management, security, and storage software projects. Louis joined Red Hat as part of the acquisition of Permabit Technology Corporation, where he was VP of Product.
유사한 검색 결과
Red Hat Enterprise Linux의 이미지 모드를 지금 바로 사용해야 하는 4가지 이유
Red Hat Enterprise Linux, 양자 컴퓨팅 시대를 대비한 SSH 보안 역량 강화
Infrastructure At The Edge | Compiler
Operating System Management | Compiler
채널별 검색

오토메이션
기술, 팀, 인프라를 위한 IT 자동화 최신 동향

인공지능
고객이 어디서나 AI 워크로드를 실행할 수 있도록 지원하는 플랫폼 업데이트

오픈 하이브리드 클라우드
하이브리드 클라우드로 더욱 유연한 미래를 구축하는 방법을 알아보세요

보안
환경과 기술 전반에 걸쳐 리스크를 감소하는 방법에 대한 최신 정보

엣지 컴퓨팅
엣지에서의 운영을 단순화하는 플랫폼 업데이트

인프라
세계적으로 인정받은 기업용 Linux 플랫폼에 대한 최신 정보

애플리케이션
복잡한 애플리케이션에 대한 솔루션 더 보기
가상화
온프레미스와 클라우드 환경에서 워크로드를 유연하게 운영하기 위한 엔터프라이즈 가상화의 미래