In this post, learn:
-
About Infoblox DNS Traffic Control (DTC)
-
How to automate a DNS-based GSLB solution
-
How the Red Hat Ansible Automation Platform and Infoblox DTC workflow reduces errors, saves time, and helps ensure optimum uptime for your applications.
Companies are pushing data closer and closer to the edge to meet the demands of users who are increasingly sensitive to delays in application responsiveness. These changes to the way data is delivered and consumed presents challenges to IT organizations. In this post we'll talk about how an organization can provide optimum uptime while also delivering data as quickly as possible.
An Application Delivery Controller (ADC) is one solution, but it often relies on expensive software and hardware to direct network traffic to available resources across datacenters. In addition to the traditional DNS infrastructure, an ADC solution often employs Global Server Load Balancing (GSLB) to dynamically reply to a Domain Name System (DNS) query with the IP address of the closest, or healthiest, server.
Beyond the monetary cost of maintaining two separate DNS solutions, an ADC introduces another layer of complexity to a network.
One way to simplify the administration of DNS and GSLB is to combine the two systems into one pane of glass with Infoblox DNS Traffic Control (DTC) and incorporate automation into the workflow using Red Hat Ansible Automation Platform.
Simplify with a single pane of glass
With Infoblox DTC, administrators can use extensible attributes and various load-balancing algorithms within Infoblox NIOS to precisely control DNS responses to individual requests. In this scenario, Red Hat Ansible Automation Platform can act as a source of truth and automatically push changes to disparate systems.
For instance, an administrator can automatically update their DTC settings when a new datacenter server comes online. Or they can automate disaster recovery testing, saving hours of manual work.
How to automate a DNS-based GSLB solution
Infoblox splits DTC into distinct objects in NIOS. Servers are the IP addresses for the services that will be load balanced. Pools are logical groupings of servers.
Typically, the pools are for servers in one geographical area, but that is not a requirement. Load Balanced Domain Name (LBDN) is the DTC object that handles the DNS queries for pools and servers. Different load balancing methods, like round-robin, ratio, geographic location, can be utilized.
Many organizations use a version control system, such as git, to manage their code. You can find the code used in this article on GitHub.
With this understanding, you are ready to learn how to automate DTC in a scalable way.
As part of their certified infoblox.ios_modules collection, Infoblox provides three modules to manage DTC objects in NIOS. The collection is available to Red Hat Ansible Automation Platform subscribers on Automation Hub and to non-subscribers on Ansible Galaxy.
-
nios_dtc_lbdn – Manage Infoblox NIOS DTC LBDN records
-
nios_dtc_pool – Manage Infoblox NIOS DTC pools
-
nios_dtc_server – Manage Infoblox NIOS DTC server records
Each module will be part of a role. The first task is to define the servers that will be load balanced. As shown in the dtc_servers.yml file below, placing the data in an Ansible variable, or vars, file allows the operator to add more servers as needed. Please take note of the variable type, as it will come in handy later.
# dtc_servers.yml vars file
---
servers:
  - name: SERVER62
    ip: 192.168.50.62
    comment: Managed by Ansible
    ratio: 1
    type: webservers
    state: present
  - name: SERVER63
    ip: 192.168.50.63
    ratio: 1
    type: webservers
    comment: Managed by Ansible
    state: present
  - name: SERVER73
    ip: 192.168.50.73
    ratio: 1
    type: appservers
    comment: Managed by Ansible
    state: present
  - name: SERVER74
    ip: 192.168.50.74
    ratio: 1
    type: appservers
    comment: Managed by Ansible
    state: present
    ip: 192.168.50.74
    ratio: 1
    type: appservers
    comment: Managed by Ansible
    state: present
# dtc_servers role
---
- name: create DTC server
  infoblox.nios_modules.nios_dtc_server:
    name: "{{ item.name }}"
    host: "{{ item.ip }}"
    comment: "{{ item.comment }}"
    state: "{{ item.state }}"
    provider: "{{ nios_provider }}"
  loop: "{{ servers }}"
A vars dictionary defines the pools. You can set the load balancing method, health check type, and pool name here.
# dtc_lbdn.yml vars file
---

pools:
  - name: webservers
    lb_method: ROUND_ROBIN
    comment: Managed by Ansible
    state: present
    monitor_name: monitor1
    monitors:
      type: icmp

  - name: appservers
    lb_method: ROUND_ROBIN
    comment: Managed by Ansible
    state: present
    monitor_name: monitor1
    monitors:
      type: icmp
Because you can have multiple pools with different names, you need to use a Jinja2 template to create the pools.yml playbook. You can find the template in the `roles/dtc_pools/templates/pools.j2` file on the GitHub page. Use the variable `type` from the server vars file to match each server to a specific pool.
---
{% for pool in pools %}
  - name: create DTC {{ pool.name}} pool
    infoblox.nios_modules.nios_dtc_pool:
      name: {{ pool.name }}
      lb_preferred_method: {{ pool.lb_method }}
      servers:
{% for server in servers -%}
{%   if server.type|string() == pool.name|string() %}
      - server: {{ server.name }}
        ratio: {{ server.ratio }}
{% endif %}
{% endfor %}
      monitors:
      - name: monitor1
        type: {{ pool.monitors.type }}
      comment: {{ pool.comment }}
      state: {{ pool.state }}
{%- raw %}
      provider: "{{ nios_provider }}"

{% endraw %}
{% endfor %}
This next role will create and run the pools.yml file.
# dtc_pools role
---
- name: Create pool.yml playbook
  template:
    src: "pools.j2"
    dest: "/tmp/pools.yml"
    lstrip_blocks: yes
  with_items: '[{{ servers }}, {{ pools }}]'

- name: create pools
  include_tasks: /tmp/pools.yml
Next, use a vars dictionary to define the LBDN.
# dtc_lbdn.yml vars file
---
lbdn:
  - name: webservers_lbdn
    lb_method: GLOBAL_AVAILABILITY
    pool: webservers
    ratio: 2
    ttl: 100
    zone: lab.local
    pattern: '*.lab.local'
    type: A
    comment: Managed by Ansible
    state: present
Create the LBDN with the nios_dtc_lbdn module
# dtc_lbdn role
---
  - name: create DTC LBDN
    infoblox.nios_modules.nios_dtc_lbdn:
      name: "{{ item.name }}"
      lb_method: "{{ item.lb_method }}"
      pools:
      - pool: "{{ item.pool }}"
        ratio: "{{ item.ratio }}"
      ttl: "{{ item.ttl }}"
      auth_zones:
      - "{{ item.zone }}"
      patterns:
      - "{{ item.pattern }}"
      types:
      - "{{ item.type }}"
      comment: "{{ item.comment }}"
      state: "{{ item.state }}"
      provider: "{{ nios_provider }}"
    loop: "{{ lbdn }}"
Changes to DNS in Infoblox NIOS often require the service to be restarted. You can use a playbook to handle that as well.
# restart NIOS services role
---
 - name: restart services
   infoblox.nios_modules.nios_restartservices:
     provider: "{{ nios_provider }}"
Let’s tie it all together. The nios_zones role in the playbook below creates a zone, but this might not be necessary for a production environment.
# dtc.yml
---
- hosts: localhost
  connection: localhost
  gather_facts: false

  collections:
    - infoblox.nios_modules
  roles:
    - nios_zones
    - dtc_servers
    - dtc_pools
    - dtc_lbdn
    - dtc_restart
The infoblox-client Python library must be installed on the Ansible control node for the NIOS modules to work. If you are running Red Hat Ansible Automation Platform 2.0 with Automation controller, you will need an execution environment with the client software installed. I have created one and made it available on Quay.io. It can be used for testing or as a base configuration for your execution environment. The build file is on GitHub.
In Automation controller, you can create a job template to launch the `dtc.yml` playbook. You can add a survey to prompt an operator for the server, pool, or LBDN details.
Please note the Execution Environment (EE), which tells the controller to use the Infoblox EE with the needed python client libraries. Figure 1 is an example of the job template in Automation controller

Figure 1. Example of the job template
Next, you can verify that the DTC objects were created by logging into the NIOS web UI. The ICMP health check tells you that two servers are running.
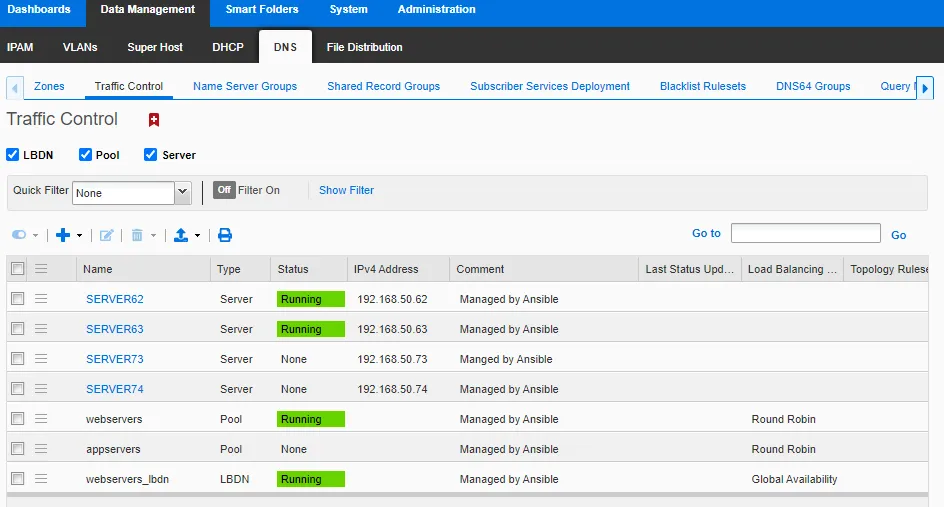
Figure 2. NIOS web UI
Conclusion
Red Hat Ansible Automation Platform and Infoblox DTC work together to create a highly automated and scalable solution to DNS-based GSLB. By using the variable dictionary files and checking the code into a version control system, an organization can create a source of truth that can be tested or rolled back as needed. Such a workflow can reduce errors, save time, and help ensure optimum uptime for their applications.
Try Red Hat Ansible Automation Platform and Infoblox DTC
You can get a no-cost 60-day trial of Red Hat Ansible Automation Platformhere. See the Infoblox website for more information on deploying DTC in Infoblox NIOS.
À propos de l'auteur

George James came to Red Hat with more than 20 years of experience in IT for financial services companies. He specializes in network and Windows automation with Ansible.
Plus de résultats similaires
Planification de votre parcours de mise à niveau vers Red Hat Ansible Automation Platform 2.6
Simplifiez votre exploitation réseau avec Red Hat Ansible Automation Platform et Cisco Meraki
Technically Speaking | Taming AI agents with observability
Get into GitOps | Technically Speaking
Parcourir par canal

Automatisation
Les dernières nouveautés en matière d'automatisation informatique pour les technologies, les équipes et les environnements

Intelligence artificielle
Actualité sur les plateformes qui permettent aux clients d'exécuter des charges de travail d'IA sur tout type d'environnement

Cloud hybride ouvert
Découvrez comment créer un avenir flexible grâce au cloud hybride

Sécurité
Les dernières actualités sur la façon dont nous réduisons les risques dans tous les environnements et technologies

Edge computing
Actualité sur les plateformes qui simplifient les opérations en périphérie

Infrastructure
Les dernières nouveautés sur la plateforme Linux d'entreprise leader au monde

Applications
À l’intérieur de nos solutions aux défis d’application les plus difficiles
Virtualisation
L'avenir de la virtualisation d'entreprise pour vos charges de travail sur site ou sur le cloud