This multi-part topic finds us deep in the dark realm of storage subsystems. We are going to venture beyond the application layer into the OS and onto the filesystem where all your data resides. Once we arrive at the filesystem we’ll dig below it into the land of Red Hat Enterprise Linux software raid (mdraid).
Inevitably at some point during the course of managing and/or re-configuring backing storage devices, capacities can change. Generally speaking, in most cases the capacity increases. This can happen for a variety of reasons:
-
A HW raid volume drive upgrade/replacement with larger drive(s)
-
Example Online capacity expansion of a LSI Megaraid Raid1 volume.
-
-
Expansion of a remote ISCSI, AOE or FIBRE Channel block device.
-
An underlying block or file backed storage device attached to a Virtual Machine has been expanded.
-
The contents of a device which is part of an existing mdraid device has been cloned to, and replaced with a larger device.
-
Some other scenario not listed here where a block storage device has been grown in size.
Any of the latter block storage devices can be utilized with Red Hat Enterprise Linux software raid (mdraid). Generally, the configuration of a mdraid device is commonly regarded as somewhat static in nature. Most of the time mdraid devices are configured from underlying storage devices and are sent on their way to become a physical member (PV) of a Logical Volume Manager group (VG). Device expansion specifically with the likes of LVM is relatively easy. However with mdraid, capacity expansion is not generally a topic covered very well, nor is especially documented. That said, with a bit of black magic, nerves of steel and a steady hand it is possible. So let's go ahead and dig in using a virtual machine for today’s example.
Before we begin a few disclaimers:
-
Expanding a mdraid will always involve the filesystem/mdraid device being taken offline.
-
As with any potentially risky change to a storage subsystem, ensure you have appropriate backups of your data!
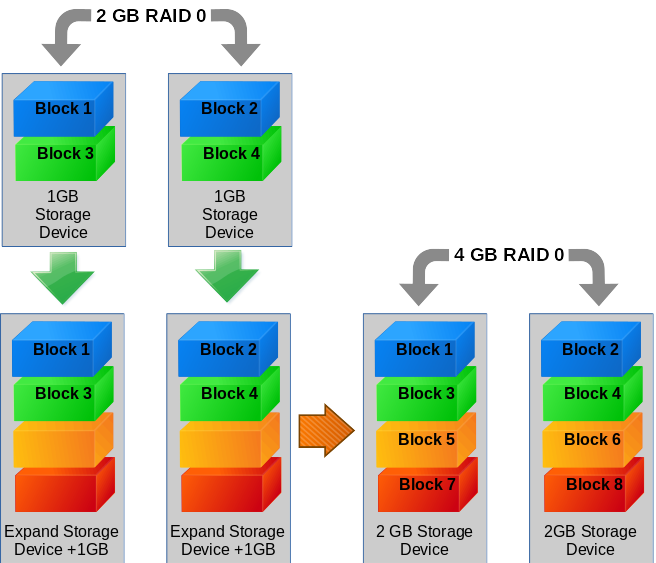
Let’s start with a simple scenario of expanding an md raid0 array formatted with an ext4 filesystem.
Example 1: Grow a MD Raid0 array consisting of two devices with an ext4 filesystem.
First we need to find out about the block devices present in the system:
# lsscsi --size
[0:0:0:0]    cd/dvd  ATA      CD-ROM      1.0   /dev/sr0        -
[1:0:0:0]    disk    ATA      HARDDISK    1.0   /dev/sda   8.58GB
[2:0:0:0]    disk    ATA      HARDDISK    1.0   /dev/sdb   1.07GB
[3:0:0:0]    disk    ATA      HARDDISK    1.0   /dev/sdc   1.07GB
It looks like /dev/sdb and /dev/sdc would be good candidates to use, but let's check first and make sure they are not mounted and being used.
# mount | grep sd[abc]
/dev/sda1 on / type ext4 (rw,relatime,seclabel,data=ordered)
After checking, we see that /dev/sdb and /dev/sdc are free and clear to use, so we can go ahead and create our raid0 array with them.
# mdadm --create /dev/md127 --name=foo --level=raid0 --raid-devices=2 --chunk=128K /dev/sdb /dev/sdc
mdadm: Defaulting to version 1.2 metadata
mdadm: array /dev/md127 started.
Now that we have created a new array, we need to create or check for the presence of /etc/mdadm.conf. By default, mdadm does not write out a configuration file (/etc/mdadm.conf). It instead relies upon scanning /proc/partitions, device superblock/bitmaps data and /proc/mdstat to assemble any arrays which are found.
First we need to check to see if /etc/mdadm.conf already exists:
# ls -l /etc/mdadm.conf
If the file does not exist, we need to create it and capture the mdraid configuration into /etc/mdadm.conf and verify its contents. (*NOTE* this command will overwrite an existing conf)
# mdadm --detail --scan /dev/md127 > /etc/mdadm.conf && cat /etc/mdadm.conf
ARRAY /dev/md127 metadata=1.2 name=fclive:foo UUID=18971e61:42f99f77:a8bddcb1:ba944549
If the file already exists, we need to append to the mdraid configuration for our newly created array into /etc/mdadm.conf and verify its contents.
# mdadm --detail --scan /dev/md127 >> /etc/mdadm.conf && cat /etc/mdadm.conf
ARRAY /dev/md0 metadata=1.2 name=fclive:sys UUID=17771f82:63a78d76:a7badcd1:bf133289
ARRAY /dev/md127 metadata=1.2 name=fclive:foo UUID=18971e61:42f99f77:a8bddcb1:ba944549
Now that we have our config file created, we can check how much disk space is seen and is being utilized by the array.
# mdadm --detail /dev/md127 | grep 'Array Size'
    Array Size : 2095104 (2046.00 MiB 2145.39 MB)
We can now create an ext4 filesystem on the mdraid device /dev/md127.
# mkfs.ext4 -L foo /dev/md127
mke2fs 1.43.3 (04-Sep-2016)
Creating filesystem with 523776 4k blocks and 131072 inodes
Filesystem UUID: e037435a-ae56-4fa9-9248-4395387c9600
Superblock backups stored on blocks:
32768, 98304, 163840, 229376, 294912


Allocating group tables: done
Writing inode tables: done
Creating journal (8192 blocks): done
Writing superblocks and filesystem accounting information: done
Now we want to mount the ext4 file system at /foo and check out the size.
# mkdir /foo
# mount /dev/md127 /foo && df -kh | grep md127
/dev/md127      2.0G  6.0M  1.9G   1% /foo
Everything looks good so let's go ahead and unmount the filesystem.
# umount /foo
We are now ready to grow the underlying storage so we need to stop and remove the mdraid device /dev/md127.
# mdadm --stop /dev/md127 && mdadm --remove /dev/md127
Now that the array is offline, we can expand the associated virtual block devices. In almost all cases this operation occurs offline and outside the control of the guest operating system.
Our example VM is utilizing the qemu/libvirt virtualized SATA controller, so we can simply "hot-plug" the virtual SATA block devices to grow them.
Referring back to the lsscsi output from earlier, we see that /dev/sdb and /dev/sdc which made up /dev/md127 are attached to SCSI_HOST devices 2:0:0:0 and 3:0:0:0.
[root@fclive ~]# lsscsi --size
[0:0:0:0]    cd/dvd  ATA      CD-ROM      1.0   /dev/sr0        -
[1:0:0:0]    disk    ATA      HARDDISK    1.0   /dev/sda   8.58GB
[2:0:0:0]    disk    ATA      HARDDISK    1.0   /dev/sdb   1.07GB
[3:0:0:0]    disk    ATA      HARDDISK    1.0   /dev/sdc   1.07GB
At this point we need to “hot-plug” our virtual SATA block devices so we can grow them.
First we need to inform the kernel to delete the SATA devices at SCSI_HOST address 2:0:0:0 and 3:0:0:0.
# echo 1 > /sys/class/scsi_device/2\:0\:0\:0/device/delete
# echo 1 > /sys/class/scsi_device/3\:0\:0\:0/device/delete
Check to make sure the SATA devices that were at SCSI_HOST address 2:0:0:0 and 3:0:0:0 are gone.
# lsscsi --size
[0:0:0:0]    cd/dvd  ATA      CD-ROM      1.0   /dev/sr0        -
[1:0:0:0]    disk    ATA      HARDDISK    1.0   /dev/sda   8.58GB
You can proceed to grow the block devices. I won't cover all the possible methods and technologies here (refer back to the brief list of examples above).
With the wave of a hand, magically the devices have now grown larger...
The virtual block devices have now been expanded in capacity and it is time to bring them back online. After hot-plugging the devices back on to the VM, the guest OS should pick up on the change in sizes and geometry. If the guest OS does not pick up on the latter we will need to force a rescan.
If you need to force a rescan, one of two methods can be employed:
Method 1 (This method will scan for for new devices):
# echo "- - -" > /sys/class/scsi_host/host2/scan
# echo "- - -" > /sys/class/scsi_host/host3/scan
OR
Method 2 (This method will scan for existing and/or missing devices):
# echo 1 > /sys/class/scsi_device/2\:0\:0\:0/device/rescan
# echo 1 > /sys/class/scsi_device/3\:0\:0\:0/device/rescan
We should now see our virtual SATA block devices re-attached as /dev/sdb and /dev/sdc except that they have now each grown another 1GB in size.
# lsscsi --size
[0:0:0:0]    cd/dvd  ATA      CD-ROM      1.0   /dev/sr0        -
[1:0:0:0]    disk    ATA      HARDDISK    1.0   /dev/sda   8.58GB
[2:0:0:0]    disk    ATA      HARDDISK    1.0   /dev/sdb   2.14GB
[3:0:0:0]    disk    ATA      HARDDISK    1.0   /dev/sdc   2.14GB
Chances are that once the virtual drives were re-attached they were recognized as mdraid devices. If md did so, then it most likely restarted the array. However, the md auto scan does not update device size changes in the metadata so we need to manually tell md the devices have grown larger.
We can check to see if this is the case like so:
# mdadm --query /dev/md127
/dev/md127: 2046.00MiB raid0 2 devices, 0 spares. Use mdadm --detail for more detail.
Thus if we find the latter, we will need to stop the array and remove again.
# mdadm --stop /dev/md127 && mdadm --remove /dev/md127
Now let's re-assemble our 2 drive raid0 array and inform md that the drives have increased in capacity.
# mdadm --assemble --update=devicesize /dev/md127
mdadm: /dev/md127 has been started with 2 drives.
Now that we have informed md of the device size and it has updated the metadata let’s make sure that the additional disk space is seen and is being utilized.
# mdadm --detail /dev/md127 | grep 'Array Size'
    Array Size : 4192256 (4.00 GiB 4.29 GB)
Now we need to inform the ext4 filesystem on /dev/md127 about the additional space.
First run e2fsck on the filesystem to verify things are ok.
# e2fsck -f /dev/md127
e2fsck 1.43.3 (04-Sep-2016)
Pass 1: Checking inodes, blocks, and sizes
Pass 2: Checking directory structure
Pass 3: Checking directory connectivity
Pass 4: Checking reference counts
Pass 5: Checking group summary information
foo: 12/131072 files (0.0% non-contiguous), 17965/523776 blocks
We can now grow our ext4 filesystem.
# resize2fs /dev/md127
resize2fs 1.43.3 (04-Sep-2016)
Resizing the filesystem on /dev/md127 to 1048064 (4k) blocks.
The filesystem on /dev/md127 is now 1048064 (4k) blocks long.
Now we can mount the ext4 file system and check things out.
# mount /dev/md127 /foo && df -kh | grep md127
/dev/md127      4.0G  8.0M  3.7G   1% /foo
If you have arrived here, congratulations you have now successfully grown your raid0 mdraid array!
Closing thoughts
Whew! Who knew growing an mdraid array could be so easy - yet so complicated all at the same time. Hopefully this helped to demystify block device expansion concerns in regards to mdraid maintenance and administration. You will now no longer fear upgrading your drives when needed. No more worries about having to acquire and replace your drives with exactly the same capacity and model. Thanks for reading and stay tuned for part two where we will look at expanding an md raid 10 array with an XFS file-system.

A Red Hat Technical Account Manager (TAM) is a specialized product expert who works collaboratively with IT organizations to strategically plan for successful deployments and help realize optimal performance and growth. The TAM is part of Red Hat’s world class Customer Experience and Engagement organization and provides proactive advice and guidance to help you identify and address potential problems before they occur. Should a problem arise, your TAM will own the issue and engage the best resources to resolve it as quickly as possible with minimal disruption to your business.
À propos de l'auteur

Plus de résultats similaires
Slash VM provisioning time on Red Hat Openshift Virtualization using Red Hat Ansible Automation Platform
Red Hat Ansible Automation Platform: Measuring Business Impact with Dashboard and Analytics
Technically Speaking | Platform engineering for AI agents
Technically Speaking | Driving healthcare discoveries with AI
Parcourir par canal

Automatisation
Les dernières nouveautés en matière d'automatisation informatique pour les technologies, les équipes et les environnements

Intelligence artificielle
Actualité sur les plateformes qui permettent aux clients d'exécuter des charges de travail d'IA sur tout type d'environnement

Cloud hybride ouvert
Découvrez comment créer un avenir flexible grâce au cloud hybride

Sécurité
Les dernières actualités sur la façon dont nous réduisons les risques dans tous les environnements et technologies

Edge computing
Actualité sur les plateformes qui simplifient les opérations en périphérie

Infrastructure
Les dernières nouveautés sur la plateforme Linux d'entreprise leader au monde

Applications
À l’intérieur de nos solutions aux défis d’application les plus difficiles
Virtualisation
L'avenir de la virtualisation d'entreprise pour vos charges de travail sur site ou sur le cloud