
C-What now?
Computers are hard. In 2017, we’ve come full circle in that it is rare to have a single physical host running just one thing. Even a box containing a single application may have that application fragmented into different processes, containers, or even virtual machines running on one physical system. Red Hat Enterprise Linux 7 does well balancing demand when all of these different workloads are requesting resources from the system. However, the default configuration can act a little too much like your grandmother when she is handing out her homemade chocolate chip cookies. Like your grandmother, Red Hat Enterprise Linux 7 says, “All of you need to share nicely with each other! No Jimmy, you can not have more cookies than Jane, that would not be fair.” While everyone getting an equal share might sound great in theory, sometimes the realities of business mean that some processes, containers or VMs *are* more important and do need a bigger chunk of that cookie jar.
Ok, enough of that before we all get distracted and decide to search the kitchen for a yummy treat.
While Linux has provided some tools over the years to control resource usage (such as nice, ulimit and other such things) with the advent of Red Hat Enterprise Linux 7 and systemd, we now have a powerful set of tools built into the OS for managing resource utilization. You see, a core component of systemd is a fully configured set of cgroups that your system is already using.
“That’s nice, Marc,” you might say “but just what the heck is a cgroup and what does it have to do with managing resources or performance?”
Glad you asked.
Kernel-based controllers
Starting with kernel 2.6.24 (released in January 2008), work done by several Google engineers for what they originally called “process containers” was merged into the kernel under the new name “control groups”. In short, cgroups is a kernel feature that limits, accounts for, and isolates the resource usage (CPU, memory, disk I/O, network, etc.) of a collection of processes. They also have the ability to freeze processes for checkpointing and restarting. These controllers were first available in Red Hat Enterprise Linux 6, but required manual configuration by the system administrator. It wasn’t until Red Hat Enterprise Linux 7 and systemd that the default set of cgroups came preconfigured with the OS.
Since all of this work is happening at the kernel level, we now have powerful control over every process on the system. It’s extremely difficult for rogue processes to grind the system to a halt, although buggy code with direct hardware access (such as drivers) can still take out a system. That being said, the controllers provide an interface to the cgroup functionality and in Red Hat Enterprise Linux 7, these knobs and switches are accessed primarily via systemd commands.
Resources as pie
Here we go with the food again.
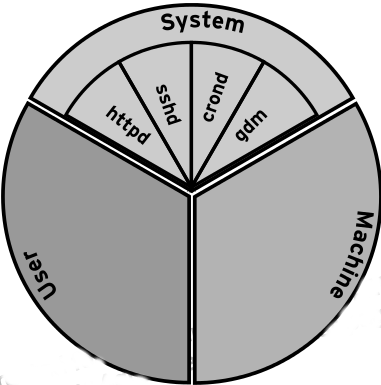
The pie chart below shows the three default cgroups on a Red Hat Enterprise Linux 7 server. As you can see, they are System, User and Machine. Each of these cgroups is also known as a “slice”. A slice can have child slices, as we can see illustrated by the System slice in the diagram. Just like a real pie, all of these yummy slices always add up to 100% of the total resources for a specific controller.
Now, there are a few important concepts with cgroups. Let’s walk through this using CPU as an example.
Looking at our pie chart, the three top level slices (system, user and machine) are each granted equal CPU time with each other - but this only happens once the system ends up under load. If a single process in the User slice wants 100% and nothing else does, this process will be granted that CPU time.
The three top level slices all have specific workloads that end up as sub-slices.
-
System is where daemons and services are placed.
-
User is where user sessions are placed. Each user gets a single slice under the main group, multiple logins using the same UID *do not* create more slices. This prevents clever nerds from stealing more resources than they are allowed.
-
Machine is where hosted virtual machines are placed, such as KVM guests.
One method of controlling resource usage is with the concept of “shares”. Shares are a relative value and the actual numbers only matter when compared to other values in the same cgroup. By default, slices are set to a value of 1024. So in our system slice above, httpd, sshd, crond and gdm are each set to use 1024 CPU shares. System, User and Machine are each set to 1024 themselves. If you’re having a hard time visualizing that, sometimes looking at it in the form of a tree helps:
-
System - 1024
-
httpd - 1024
-
sshd - 1024
-
crond - 1024
-
gdm - 1024
-
-
User - 1024
-
bash (mrichter) - 1024
-
bash (dorf) - 1024
-
-
Machine - 1024
-
testvm - 1024
-
In this case, we have a few daemons running, two users logged in (you’ll meet both of them later) and a single virtual machine. Now let’s pretend that each of these processes starts to ask for as much CPU as possible.
-
System will be given 33.333% of CPU. Each daemon will get one-quarter of that, which works out to around 8.25% of CPU time.
-
User will be given 33.333% of CPU. Each logged in user will be able to use 16.5% of CPU. Should mrichter log off or kill whatever he was running, dorf will then be able to use 33% of CPU.
-
Machine will be given 33.333% of CPU. If the VM is shut down or goes to full idle, then System and User will each get approx 50% of CPU each, to be distributed between their child slices.
It is also possible to cap a daemon, user or virtual machine to an absolute percent of one or more CPUs. For instance, setting the property CPUQuota on mrichter’s slice to 20% will cap that user to a maximum of 20% of a single CPU, regardless of what else is happening on the system. (More about properties later.) It would be valid to set CPUQuota to values higher than 100% - on a multicore system, that will allow a slice to be granted the resources from more than one processor. A setting of 200% would cap a slice to two full cores, as an example. Do keep in mind that assigning CPU quotas in this way will *not* reserve that processor time on a busy system - instead, it represents the highest amount of CPU time a slice can use, with all other settings and slices factored in.
Turn it up to 11!
How do we actually change settings for the slices?
Every slice has multiple properties that can be set on it. As is always the case in Linux, we can create configuration files by hand or use the command line to set them.
“systemctl set-property” is used for the command line method. Here’s a screen capture with that command followed by the target slice (in this case, User) and then the Tab key, to show available options:
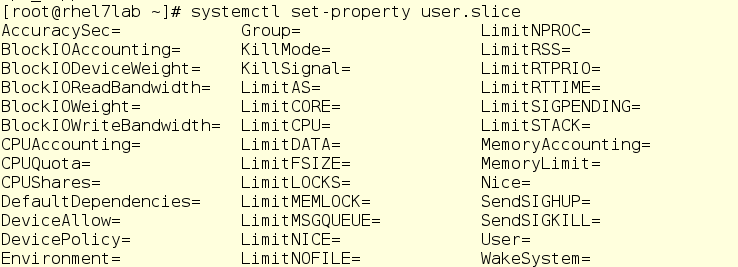
Not all of these properties are cgroup settings...the properties we primarily are concerned about start with Block, CPU and Memory.
If you prefer to use config files (perhaps your system configuration tool is used to push down config files to the managed hosts, for instance) then you can directly manipulate the drop in files that are contained in the /etc/systemd/system sub directory. These files are created automatically when using the systemctl command to set properties but can also be created by a text editor, plopped on the system via Puppet or even generated on the fly with custom scripts.
We’ve looked at some basics behind cgroups. In my next installment, we will walk through some scenarios and see how changing different properties impacts performance.

Innovation is only possible because of the people behind it. Join us at Red Hat Summit, May 2-4, to hear from TAMs and other Red Hat experts in person! Register now for only US$1,000 using code CEE17.
A Red Hat Technical Account Manager (TAM) is a specialized product expert who works collaboratively with IT organizations to strategically plan for successful deployments and help realize optimal performance and growth. The TAM is part of Red Hat’s world class Customer Experience and Engagement organization and provides proactive advice and guidance to help you identify and address potential problems before they occur. Should a problem arise, your TAM will own the issue and engage the best resources to resolve it as quickly as possible with minimal disruption to your business.
Sull'autore
Marc Richter (RHCE) is a Principal Technical Account Manager (TAM) in the US Northeast region. Prior to coming to Red Hat in 2015, Richter spent 10 years as a Linux administrator and engineer at Merck. He has been a Linux user since the late 1990s and a computer nerd since his first encounter with the Apple 2 in 1978. His focus at Red Hat is RHEL Platform, especially around performance and systems management.
Altri risultati simili a questo
Le minacce dell'IA si muovono rapidamente. Anche le tue difese dovrebbero farlo.
Il punto di svolta per l’IA: perché la sovranità non è più facoltativa
Container Roundup | Compiler
Untangling Networks | Compiler
Ricerca per canale

Automazione
Novità sull'automazione IT di tecnologie, team e ambienti

Intelligenza artificiale
Aggiornamenti sulle piattaforme che consentono alle aziende di eseguire carichi di lavoro IA ovunque

Hybrid cloud open source
Scopri come affrontare il futuro in modo più agile grazie al cloud ibrido

Sicurezza
Le ultime novità sulle nostre soluzioni per ridurre i rischi nelle tecnologie e negli ambienti

Edge computing
Aggiornamenti sulle piattaforme che semplificano l'operatività edge

Infrastruttura
Le ultime novità sulla piattaforma Linux aziendale leader a livello mondiale

Applicazioni
Approfondimenti sulle nostre soluzioni alle sfide applicative più difficili
Virtualizzazione
Il futuro della virtualizzazione negli ambienti aziendali per i carichi di lavoro on premise o nel cloud