If you recall from part one of the Automating Content Management series, we are working to minimize the management effort of maintaining the Red Hat Satellite managed content for a large fleet of servers. We developed a simple plan that aligns with the guide to Building a Red Hat Enterprise Linux Standard Operating Environment (SOE) and allows us to automate our process.
The simple model is: update the content, publish the content, validate the content, promote the content to the next life cycle environment, rinse and repeat.

We broke the process down into eight steps. Now it is time to implement those steps in Red Hat Ansible Automation Platform.
Note: This article assumes that you have a functional Red Hat Satellite or Foreman instance configured for provisioning and an Ansible Automation Control Node (Ansible automation controller) instance configured to run Ansible automation plays. Full configuration information or automation code for these environments is beyond the scope of these articles.
There is another project associated with this series called ACMExport. This project contains code to automate Ansible Automation Platform Controller to create the credentials, projects, inventories, job templates and the workflow template to Automate Content Management.
Following the post and using the project will allow you to create a workflow that demonstrates one model for automating the publication, testing and promotion of code within a Red Hat Satellite environment.
Red Hat Ansible Automation Platform
Red Hat Ansible Automation Platform is an enterprise framework for building and operating IT automation at scale. For this article, we will be working with the automation controller, formerly called Ansible Tower, and pulling the needed automation tooling from the Red Hat Automation Hub and from a GitHub account.
Check out more details on Ansible Automation Platform through the landing page. If you need to set up your Ansible Automation Platform, you can get started with an evaluation. For the remainder of this article, we are assuming that you have familiarity with configuring Ansible Automation Platform and running automation jobs from it.
Controlling Satellite via an Ansible Collection
The new, supported Ansible collection redhat.satellite makes Red Hat Satellite automation easy. If your instance doesn’t already have the collection available, you can install it from the Automation Hub on the Red Hat Hybrid Cloud Console. With the redhat.satellite collection, you are able to control everything from activation keys to user groups.
The collection provides 65 modules and 11 roles for managing your Satellite configuration. Here is a simple example of updating a setting within Satellite using the collection.
- name: "Set a Setting"
  redhat.satellite.setting:
    username: "{{ vaulted_username }}"
    password: "{{ vaulted_password }}"
    server_url: "https://satellite.example.com"
    name: "http_proxy"
    value: "http://localhost:8088"
Figure 1: Keep sensitive data in a secure location.
You can determine if the redhat.satellite collection is already installed on your automation controller by running the ansible-galaxy collection list command from inside an Ansible execution environment container.
[root@tower ~]# podman run -it \
registry.redhat.io/ansible-automation-platform-20-early-access/ee-supported-rhel8 /bin/bash
...

bash-4.4# ansible-galaxy collection list
# /usr/share/ansible/collections/ansible_collections
Collection               Version
------------------------ -------
ansible.controller       4.0.0
ansible.netcommon        2.2.0
ansible.network          1.0.1
ansible.posix            1.2.0
ansible.security         1.0.0
ansible.utils            2.3.0
...
...
redhat.insights          1.0.5
redhat.openshift         2.0.1
redhat.rhel_system_roles 1.0.1
redhat.rhv               1.4.4
redhat.satellite         2.0.1
...
Figure 2: Note that if you are running a Ansible Tower 3.8 environment the ansible-galaxy command does not support the list directive
Red Hat Ansible Automation Platform can be configured to automatically download collections and update them as part of an Ansible Automation Platform project. We will be using a requirements.yml file to configure collection import for the automation controller (AC) from the Automation Hub. To do this we will create credentials to have the AC login to the Automation Hub and a create project to automate the import and update of the collections that we need.
Let’s create our credentials on the Red Hat Portal. This is really simple.
-
Navigate to https://console.redhat.com/ansible/automation-hub/token/.
-
Click Load Token.
-
Click the copy icon to copy the API token to the clipboard.
-
Paste the API token into a file and store in a secure location.
You may want to put the Server URL and SSO URL in another file. (Hint: you can encrypt the files on your system using Ansible Vault if you like…) You will see something like the following image. The token has been obfuscated.
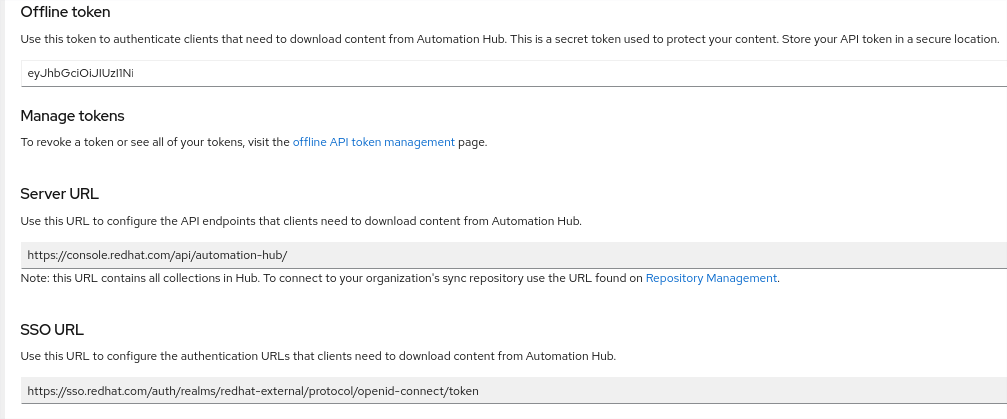
Figure 3: Screenshot of token creation on console.redhat.com
Once we have this information, we can log into our Red Hat Automation Platform Controller Web UI and create a new Credential. Credentials have various types and are used for everything from connecting to external repositories and connecting to hosts and inventories. In this instance, we are going to create an ‘Ansible Galaxy / Automation Hub API Token’ credential type.
Log in to your AC instance and navigate to Resources -> Credentials and click Add. You can select the Ansible Galaxy / Automation Hub API Token type from the drop down and copy the information that saved from creating the Token.

Figure 4: Screenshot of credential creation in the Ansible automation controller web UI
Click Save.
You can create another credential for your GitHub account as well using a GitHub Personal Access Token or a Source Control credential type. You will need one of these to access your automation content that will control Satellite.
The next task is to create our requirements.yml text file and add that to a project to synchronize the Ansible Collections we need to automate Satellite. Here is an example of my requirements.yml file.
Yours may differ, but we want the redhat.satellite collection for our work. Store your requirements.yml file in a repository on your source code control platform. In our case, we used GitHub and created a GitHub credential for the AC to access the content.
#requirements.yml
# This requirements file lists all the collections from
# the red hat ansible automation hub that we want installed on Tower
collections:

- ansible.netcommon
- ansible.posix
- ansible.utils
- ansible.windows
- ansible.tower

- redhat.satellite
- redhat.satellite_operations
- redhat.rhel_system_roles
- redhat.insights
- azure.azcollection
Figure 5: requirements.yml defining the collections that we are using within our project#requirements.yml
Now, we create a project to add this content to the Automation Controller. Navigate to Resources -> Projects. Click Add. Provide a name, descriptions and select the proper Source Control Credential Type for your project. Here is my example. Complete the information to select your project and the name of the credential you created for your Source Code Control access.

Click Save. After saving your changes, you can click on the Sync button to have the AC download the collection. You should see a job run in the job monitor.

Now we have the collections on the automation controller that we need to run our Satellite Automation Jobs. Next, we need to create the project to pull our code.
Note: If you are running your Satellite server with self-signed or custom SSL certificates you will have to add the CA certificate chain to your container image for your execution environment or set the validate_certs attribute to false in your Ansible playbooks.
Aside: Creating a custom execution environment
To create a custom execution environment container for use with Ansible Automation Platform, please follow the documentation instructions in the Ansible Builder Guide. Ansible Builder is a tool for creating custom execution environment containers and uses standard Red Hat container tools.
To create your image containing your SSL certificates follow the directions above and place your ca.crt in the context directory in your build folder and use a similar execution-environment.yml file to the one below. You can add additional collections to your requirements.yml file to ensure the container has everything you need.
---
# This is the base execution for running against parmstrong.ca
# systems and includes the appropriate certificates

version: 1

build_arg_defaults:
  EE_BASE_IMAGE: "registry.redhat.io/ansible-automation-platform-20-early-access/ee-supported-rhel8:2.0.1"

ansible_config: "/etc/ansible/ansible.cfg"

dependencies:
  galaxy: requirements.yml
  python: requirements.txt
  system: bindep.txt

additional_build_steps:
  append:
    - ADD ca.crt /etc/pki/ca-trust/source/anchors/
    - RUN update-ca-trust extract
Figure 3: This will take ca.crt from the context directory and add it to the images trusted CAs. Your Ansible code will then be able to call satellite APIs with validate_certs: true
Creating Projects and Job Templates in Ansible Automation Platform
If you are familiar with creating projects and templates in Ansible, the next section is very straightforward. Ensure that you have credentials to your source code repository—GitHub in our examples—create one or more projects, then create the necessary job templates and select the playbooks to run for each job.
We will be creating multiple job templates and linking them together through a workflow. This will allow for better portability of our Ansible code and allow us to control the flow more easily without having to make code changes. This also allows us to create more elaborate automation workflows in future. Let’s look at one example of creating a template.
Creating a Credential
Log in to your Ansible controller instance web UI. Select Resources > Credentials and click the add button. Create a credential as type Source Control. Provide the appropriate credentials to log in to the resource. This will be the resource that contains your Ansible code. In our example this is the cloned GitHub repository that you created from the sample code repository.
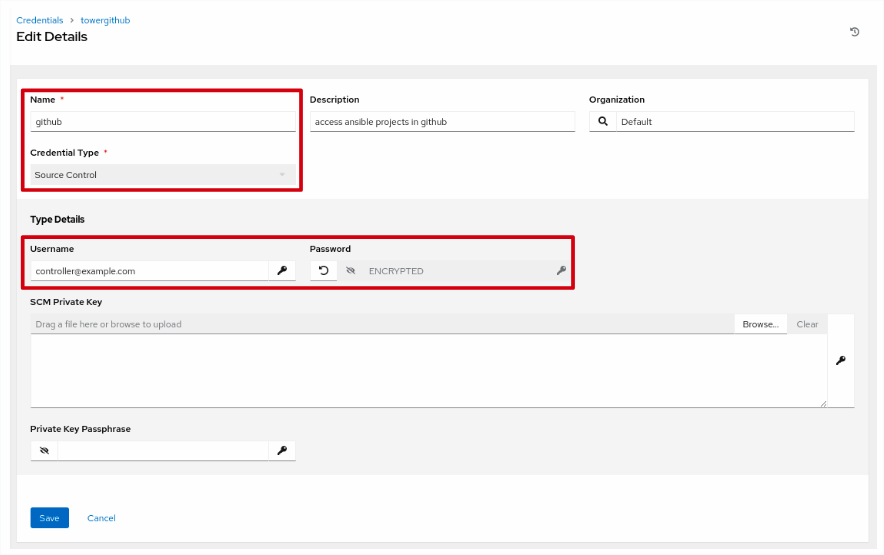
Figure 4: Create a source control credential. You can also use a private key.
Create a Project based on a particular source code repository. Select Resources > Projects and click Add. Selecting a Source Code Credential Type of “Git” will display a form like figure 5.
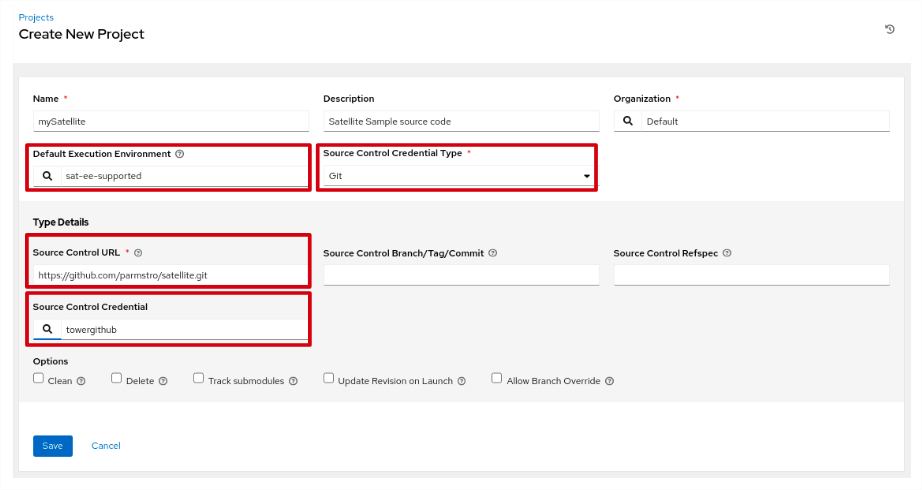
Figure 5: In our example, we have selected a custom execution environment as our default for this project. The container for this EE has the CA certificate installed.
Provide the URL for the project and select the credential that you created in the previous step. Click Save.
When we run our plays, we aren’t really running Ansible on the target; in some instances we are actually running our code on the Ansible controller and calling an API on the target. This is the way all our calls to Satellite work. Our inventory is then our automation controller instance. Create an inventory called TheAutomationController that contains just the automation controller as a host.

Building the steps in the workflow
In the next set of steps, we start building the templates to publish our Satellite content. The steps in our model will map to job templates that we create on the automation controller. If you recall, the steps in our workflow are:
-
Update the Content View Filters to include the latest patches.
-
Publish the content views (CVs) with the latest patches to the Library.
-
Publish the composite content views (CCVs) to the Library.
-
Promote the CVs and CCVs to the first SOE environment.
-
Build some test machines.
-
Install and configure standard software packages on the test machines.
-
Smoke test the new builds to see that builds didn’t get broken.
-
If basic tests succeed, promote the CVs and CCVs to the next environment.
-
Rinse and repeat as necessary to get these CVs and CCVs up the environment stack.
We factored the activities in our workflow into a number of playbooks that we will use to manage the promotion and testing of content in Satellite.
PublishOnly.yml - updates the filter end dates with the current date and publishes the existing content views and composite content views to the Satellite Library. To specify a date in the past, you can override the filter_enddate variable.
PromoteOnly.yml - promotes content views and composite content views along a life cycle path.
CreateHostFromHostGroup.yml - creates a bare metal or virtual machine from a hostgroup. Remember the hostgroup defines all the particulars of creating and provisioning a host. We will use this to build our test virtual machines.
CreateSnapshot.yml - creates a snapshot of a virtual machine hosted in VMware. You can replace this playbook with appropriate snapshot code for your environment.
RevertSnapshot.yml - this playbook reverts a virtual machine hosted in VMware to a previous snapshot or state. You can replace this playbook with the appropriate revert snapshot code for your environment.
A set of simple build scripts to build some sample applications on the test servers. These scripts pull in application code and deploy it appropriately.
A set of simple “smoke test” scripts. These are simple scripts that run some basic tests against the systems to verify that the new operating system (OS) code did not break the deployment.
We will reference these playbooks with appropriate variables in a series of templates and then combine the templates together to generate an Ansible workflow template that will complete our complex task. Note that these tests are relatively trivial, your actual tests can be far more elaborate.
The basics for creating a template are in the following sections If you are familiar with the process, you can skip ahead to the list of templates and their configuration and get to work at building the set you need for the completed workflow.
Create your first template
In this example, we are going to create the first job template called PublishContent. In Satellite parlance, to publish is the act of creating a new version of a content view or composite content view in the Library - the central content store in Satellite. From here, administrators promote the CV or CCV along a life cycle environment path, for example Dev -> QA -> Prod.
NOTE: The code for this section can be found on my GitHub account.
Log in to your controller web UI. Select Resources > Templates. Click Add > Add job template. There are a lot of options in the form presented that help you control the execution of a job based on the template. We will focus on the required entries.
Use the configuration table down below for the required values. Provide a name for the template, select a job type of “Run”, select the inventory that contains your automation controller server, select the project created in the previous step, “Satellite”, and then select a playbook. For this template we will use the PublishOnly.yml playbook.
This playbook uses the all.yml variable file from the Satellite project. You can override the vault_sat_publisher_username and vault_sat_publisher_password values in the variables section, or provide your own vault file, vault_all.yml, containing the variables. If you provide a vault_all.yml, remember to update your repo and sync your project. Create a Vault type credential with the password used to create the vault_all.yml file. See the Credentials section in the Automation Controller Documentation for more information.
Also, if you have created custom certificates for your Satellite, you will need to use a custom execution environment that contains the public certificate for the CA that signed the satellite’s certificate or override the sat_validate_certs variable to false. Below we have selected a custom execution environment.

Click Save.
For your convenience, I have exported the Ansible configuration of the project to a repository on GitHub. Using the ACMExport repository, you can back up and restore the assets for your project using yaml files. This allows you to quickly recreate the configuration that I have. Please ensure that you follow the README.md file in the repo. There is reconfiguration work to do to make this work in your environment. Most of the values are parameterized so that after import you should only have to modify some of the extra_vars in the job templates. Hostnames, Content View names and similar values will have to change.
I am sure that many of you can already see the value of these techniques to back up, share, move and copy complete Ansible automation environments within your organization. Automating automation is as powerful as automation itself!
Templates and Configuration Values
We are going to work a little like a cooking show here. We will discuss some of the components inline and then jump to the final workflow.
There are numerous values that are specific to an environment. When we automate we capture these values in variables. Our project has a number of variable files that manage our configurations. If you are importing the Ansible Automation Platform configuration assets using the ACMExport project, the main variable file is in group_vars/all.yml. Your Ansible Automation Platform controller name and credentials must be set using this file and the vault_all.yml file in order to run the import.
The ACM project has variable files that define the content views that are being promoted by satellite, the application configurations that we are using in our test scenarios and vault files for storing secrets. Most of these we will not need to touch, some, particularly vault files will need to be recreated or edited.
Next you'll find definitions of each of the assets that need to be created within Ansible Automation Platform to create our workflow. The list contains Ansible credentials, projects, job templates and a workflow template.
These will allow you to configure your Ansible Automation Platform controller manually using the web UI or you can use the ACMExport project to generate the artifacts. Either way, the following also contains additional descriptive information, instructions for use and information on standards used that you will find beneficial in working through the project and in your own development.
Credentials
towergithub - Type: Source Control - set up a credential to access your cloned repository on GitHub. If you are using a different source control source, configure appropriately.
default - Type: machine - set up this credential and your systems to provide for the Ansible login for a user with escalated privileges
ACM_vault - Type: vault - this is the vault credential that will decrypt the secrets for the project.
Aside:
We are using a standard pattern throughout the projects for vaulting secrets. Secrets like the Satellite username and password allow the controller to have the ability to create new hosts, and publish and promote content views. These need to be protected. In our variable file and in our code we define a variable that will be used. For example, in the file:
AutomatingContentManagement/group_vars/all/sat_server.yml
We define the variables used by systems to connect to the Satellite server like this:
---
sat_server_url: "https://sat6.parmstrong.ca/"
sat_organization: "Default Organization"
sat_location: "Default Location"
sat_publisher_username: "{{ vault_sat_publisher_username }}"
sat_publisher_password: "{{ vault_sat_publisher_password }}"
sat_validate_certs: true
As you can see, we define the sat_publisher_username variable and reference another variable that is stored in an Ansible Vault protected file. This allows us to create a more portable project. You can reuse the code easily without having to search through all the code for vaulted variables and your vaulted values can be protected in distinct files for easy management and separation of responsibility. We define our vaulted variables in the file:
AutomatingContentManagement/group_vars/all/vault.yml
This file contains the secrets. For example:
---
vault_sat_publisher_username: your_sat_username
vault_sat_publisher_password: your_sat_secret_password
The file gets encrypted using the ansible-vault command line utility. You are asked to confirm the password.
# ansible-vault encrypt vault_all.yml
New Vault password:
Confirm New Vault password:
Encryption successful
In the web UI for the Ansible Automation Platform controller, you will create a credential and supply the password that you used. The credential will be used to decrypt the vaulted variable files at run time. This is stored in encrypted format in the Ansible Automation Platform database. For simplicity and demonstration purposes, we used the same vault credentials everywhere within the project.
If you are using the ACMExport project to recreate the Ansible Automation Platform assets, we use the same model to provide the vault passwords configured for the credentials. This is doubly important for ACMExport as the import process will actually launch synchronization jobs for the project that gets created. It needs a value for the credentials, or the project synchronization will fail. If the project sync fails, the job template imports will fail as the API will not be able to verify the playbook references.
In the README.md for the ACMExport project is a template vault_all.yml file with blank values. Review these and provide the appropriate entries for use with your environment.
Projects
Name: AutomatingContentManagement
Description: automating content management in Satellite 6.9 with Ansible Automation Platform
Execution Environment: Default
Type: Source Code Control - Git
URL: https://github.com/parmstro/AutomatingContentManagement.git
Branch: main
Credential: towergithub
Options: Clean, Track submodules
You will need to provide the appropriate credential and URL for your cloned copy of the project.
The ACMExport the all.yml variable file has a variable so that you can set the project’s scm url to your own cloned version of the project. Clone the ACM project first, then update the variable. When you run ImportConfig.yml from the ACMExport project, the controller will try to sync the project immediately. If the credentials and the URL are set up appropriately, it should be smooth sailing!
Inventories
TheAutomationController - in our configuration, this is an inventory that contains a single hostname under hosts—the hostname of the Ansible Automation Platform server that is launching all our plays.
ACMTestContent - this is the inventory for the test servers. It contains three servers and six groups. It can be expanded to support a larger number of hosts and configurations.
hosts:
-
testjboss.parmstrong.ca
-
testlamp.parmstrong.ca
-
testwordpress.parmstrong.ca
groups:
JBoss:
-
testjboss.parmstrong.ca
LAMP:
-
testlamp.parmstrong.ca
WordPress:
-
testwordpress.parmstrong.ca
webservers:
-
testlamp.parmstrong.ca
dbservers:
-
testlamp.parmstrong.ca
wordpress-server:
-
testwordpress.parmstrong.ca
Templates
There are a total of 13 Templates that get created to manage the workflow. The template names are created to assist you in pulling the templates together into a workflow in the proper order. The wiki pages of the Automating Content Management project go through all the job templates in detail. Each of the playbooks in the workflow has its own wiki page that describes its purpose, playbook actions and its variables.
As you work through these job templates, it is a good idea to test them as you go. If you are making code changes, remember to set your project(s) to synchronize on launch. This will ensure that you are running the latest version of your code with every run of the job. Once we get to the end, we will have a workflow and can test the behavior of the entire chain.
Putting it all together
Now that we’ve got the components lined up, let’s see how they are assembled together into a workflow that can help build a repeatable process for delivering OS content to your respective teams in a timely manner. We’ll cover that in the third part of the series.
In the meantime, you can review part one to see how we started planning this workflow.
Über den Autor

Paul Armstrong helps customers meet business outcomes through an in-depth understanding of complex business problems and by designing, building and documenting complete solutions using Red Hat and open source technologies.
Ähnliche Einträge
From manual to agentic: streamlining IT processes with Red Hat OpenShift AI
Automating Microsoft Endpoint Configuration Manager with Red Hat Ansible Automation Platform
Technically Speaking | Taming AI agents with observability
You Can’t Automate Expectations | Code Comments
Nach Thema durchsuchen

Automatisierung
Das Neueste zum Thema IT-Automatisierung für Technologien, Teams und Umgebungen

Künstliche Intelligenz
Erfahren Sie das Neueste von den Plattformen, die es Kunden ermöglichen, KI-Workloads beliebig auszuführen

Open Hybrid Cloud
Erfahren Sie, wie wir eine flexiblere Zukunft mit Hybrid Clouds schaffen.

Sicherheit
Erfahren Sie, wie wir Risiken in verschiedenen Umgebungen und Technologien reduzieren

Edge Computing
Erfahren Sie das Neueste von den Plattformen, die die Operations am Edge vereinfachen

Infrastruktur
Erfahren Sie das Neueste von der weltweit führenden Linux-Plattform für Unternehmen

Anwendungen
Entdecken Sie unsere Lösungen für komplexe Herausforderungen bei Anwendungen
Virtualisierung
Erfahren Sie das Neueste über die Virtualisierung von Workloads in Cloud- oder On-Premise-Umgebungen