
What’s this about?
Virtual machines with KVM are a well proven and mature technology on Linux. KVM guests are used in many places to abstract an operating system from the hardware below. Guests can be snapshot/resumed, migrated to other hypervisors and much more.
Right from the start, the goal was to provide guest environments that were as complete as possible. The hypervisor fulfills ring 0 functionality, but for many years this functionality was not available in the guest itself and thus a guest could not be used to host further guests. This functionality is known as ‘nesting’ or ‘cascading’ of guests.
Of course, each layer of virtualization has some overhead, the higher layer guests will be slower. In this article, I plan to describe the cascaded setup and look at the impact of this ‘inception’.
While Red Hat is now doing some level of QA for cascaded KVM, we are not supporting it - so it is clearly not meant for production use. In this article, I optimize for fast deployment and not data reliability, for example, discs of guests are configured with ‘cache=unsafe’ - which Red Hat does not support for production systems. With this, the kickstart installation time of the first level guest (guest1) reduces by 30-40%. On the other hand, the only way to ensure that the guests’ data gets synced to disc is to shut down the guest and use ‘sync’.
Editor's Note: the following paragraph was added for clarification after the initial blog was published:
If you want to snapshot or live migrate the L1 (parent) guest, ensure that the underlying (L2, child) guests are not running. Trying this without properly shutting down the L2 guests, will crash the L1 guest or its migration fails. L2 guests can be migrated without problems.
Why would one want to use nested guests?
KVM guests make a sysadmin’s and problem solver’s life easier by allowing them to run dedicated operating systems with applications. With this, Linux specialists run multiple Red Hat Enterprise Linux versions in parallel and debug their interactions, simulate cluster environments consisting of multiple nodes and much more.
Recently, even more complex setups need to be virtualized. OpenShift setups are typically composed of multiple nodes with different roles. For many years, these systems have been virtualized as single KVM guests on a hypervisor - but then also often complex network layouts have to be set up directly on the hypervisor. OpenStack environments consist of even more systems and complex network setups between the nodes.
Cascading KVM guests now allow to distribute for example a complex OpenStack test environment in a single KVM guest. Once that guest is started on a hypervisor, it can run the complex network inside, as well as the OpenStack nodes. The whole setup stays contained in one VM, this allows, for example, simpler snapshotting for testing an OpenStack upgrade, or distribution of the setup to attendees of a training course.
Or maybe you just want to implement xkcd 350 with virtual guests, and want an additional layer for security. :)
Setup hypervisor on physical hardware
AMD CPUs do most virtualization directly in the CPU, nesting has been available for quite some time, and enabled by default. I will use Intel’s hardware virtualization for testing here. My system also supports VT-d, so nesting is possible. The following custom module options are used for kvm-intel kernel module:
[root@fedora ~]# cat /etc/modprobe.d/kvm_intel.conf
options kvm-intel nested=1
options kvm-intel enable_shadow_vmcs=1
options kvm-intel enable_apicv=1
options kvm-intel ept=1
[root@fedora ~]#
Fedora 26 acts here as hypervisor on the hardware, I will call it guest0. I use virt-install and kickstart to deploy Red Hat Enterprise Linux 7.4 in my KVM guests. After deploying a guest with Red Hat Enterprise Linux 7.4, I prepare the guest for nested KVM and start the next level guest inside. Let’s call these cascaded systems guest1, guest2 and guest3.
Setting up the guests
In the guests I am installing KVM and virt-install, configuring NAT so the guest can reach my kickstart server hosted on guest0, and install the next guest. This example is setting up guest2 on top of guest1.
[root@guest1 ~]# yum install qemu-kvm virt-install libvirt
[root@guest1 ~]# systemctl start libvirtd
[root@guest1 ~]# iptables -A POSTROUTING -t nat -o eth0 \
   -s 192.168.122.0/24 -j MASQUERADE
[root@guest1 ~]# qemu-img create -f qcow2 \
 -o preallocation=metadata,compat=1.1 /tmp/image.qcow2 36G
[root@guest1 ~]# chown qemu /tmp/image.qcow2
[root@guest1 ~]# virt-install -n guest2 -r 4096 --vcpus 2 --cpu host \
 --disk path=/tmp/image.qcow2,format=qcow2,bus=virtio,cache=unsafe \
 --location http://192.168.4.1/repos/rhel-7.4 --boot menu=on,useserial=on \
 --graphics none --console pty --os-variant rhel7 \
 --network bridge=virbr0,model=virtio --extra-args "ip=192.168.122.2 ksdevice=eth0 netmask=255.255.255.0 ks=http://192.168.4.1/ks/guest2 gateway=192.168.122.1 nameserver=10.0.0.23 repo=http://192.168.4.1/repos/rhel-7.4/ console=tty0 console=ttyS0,115200n8 net.ifnames=0"
Benchmarking guests kickstart installation
The first benchmark situation I was curious about was the kickstart installation - this is, of course, performed often for reproducer systems, and uses a combination of disk I/O, CPU, and network resources. Since I used my desktop system for the tests, I was not able to benchmark my bare metal system.
I assigned 2 cores, 4GB RAM and a thin provisioned qcow2 disk to the guest and measured the kickstart time. I measured 2 setups, a slim and a big installation with more packages.
|
slim installation (483 packages) |
bigger installation (1141 packages) |
|
|
guest1 |
221 seconds |
422 seconds |
|
guest2 |
370 seconds |
511 seconds |
|
guest3 |
1297 seconds |
1984 seconds |
We see quite a slowdown of installation time for the guest3, installation here feels much like using a modem in the old times and logging into a BBS. So one should consider carefully if a guest3 is really required, or if one layer less is acceptable.
Benchmarking block read performance
Here I was looking at the speed of reading the block device of the root disk. For guest0, the Fedora system, I looked at /dev/sda which is backed by a SSD.
For these tests,
-
I dropped all caches in the guest
-
Read for 3 times the same data from the disk device (without cache dropping in between)
-
And measured the data read speed
I measured the read speed for several data sizes between 1 and 32GB.

The cold cache reads are measured with an empty cache on the measuring system. The hypervisor’s SSD reads data with around 550 MByte/sec, independent of how much data is read. The guest[1-3] systems are virtualized, so the cache in the system below is striking in - and helping guest1 and guest2 to achieve better performance than the hypervisor itself.
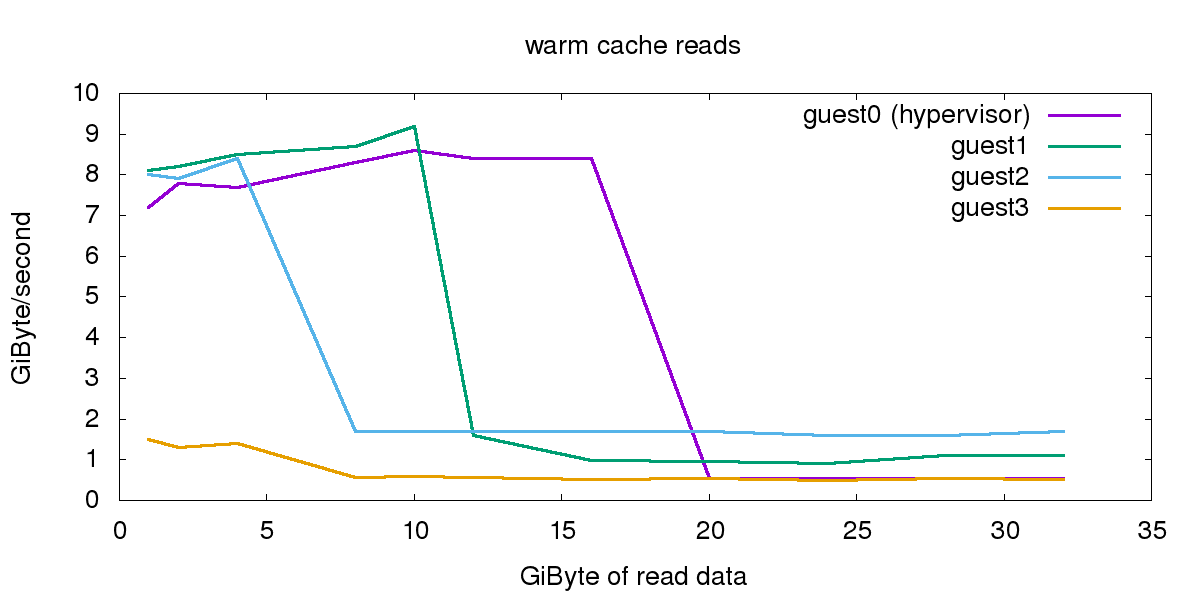
These are the reads with warm caches. The guests (apart from guest3) show performance quite similar to the hypervisor. The guests had in this test different RAM sizes, so they did keep up the performance as long as they could serve cached data from RAM: guest0 had 20GB, guest1 12GB, guest2 8GB and guest3 4 GB of RAM.
Benchmarking cpu performance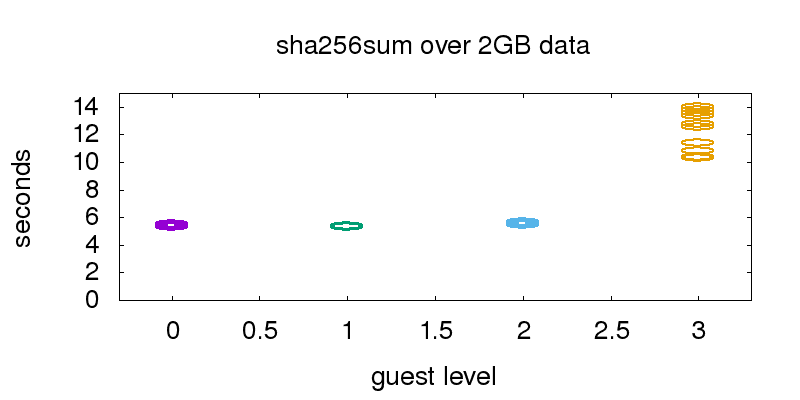
For the cpu benchmark, the sha256 hash of a 2GB file filled with data from /dev/urandom was computed.
This hash generation was executed multiple times on the hypervisor and the guests, illustrated by ellipses in the graphic. The file was served out of the file system cache, to prevent I/O influence.
Guest0 (hypervisor), guest1 and guest2 performance is almost identical, so the single ellipses illustrating the runtime of the test runs are hard to distinguish in the plotted graph. Guest3 was much slower, and the performance was also less predictable.
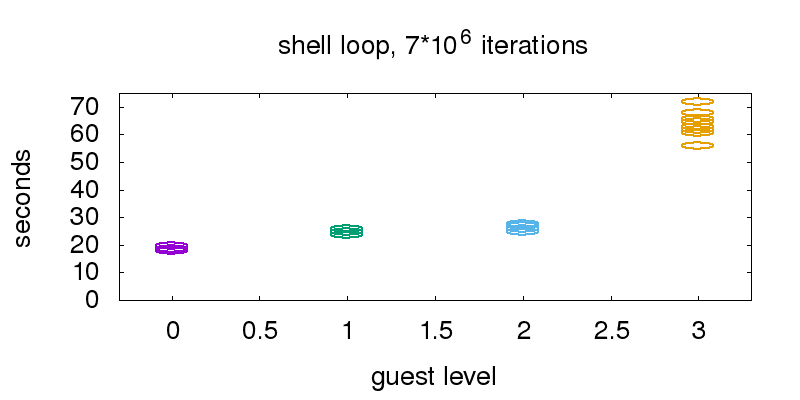
The second graphic is a comparison of the time it takes to execute a big bash shell loop. From guest0 (hypervisor) to guest1 we need 29% more time, from guest1 to guest2 6%. From guest2 to guest3 we need 140% more time.
Benchmarking network performance
For investigating network throughput, a 2.5GB Fedora iso image was offered via HTTP. The network setups used normal Linux bridges and the virtio_net driver. First, it was verified that the file was in the hypervisors cache, then the throughput to the guests was measured.
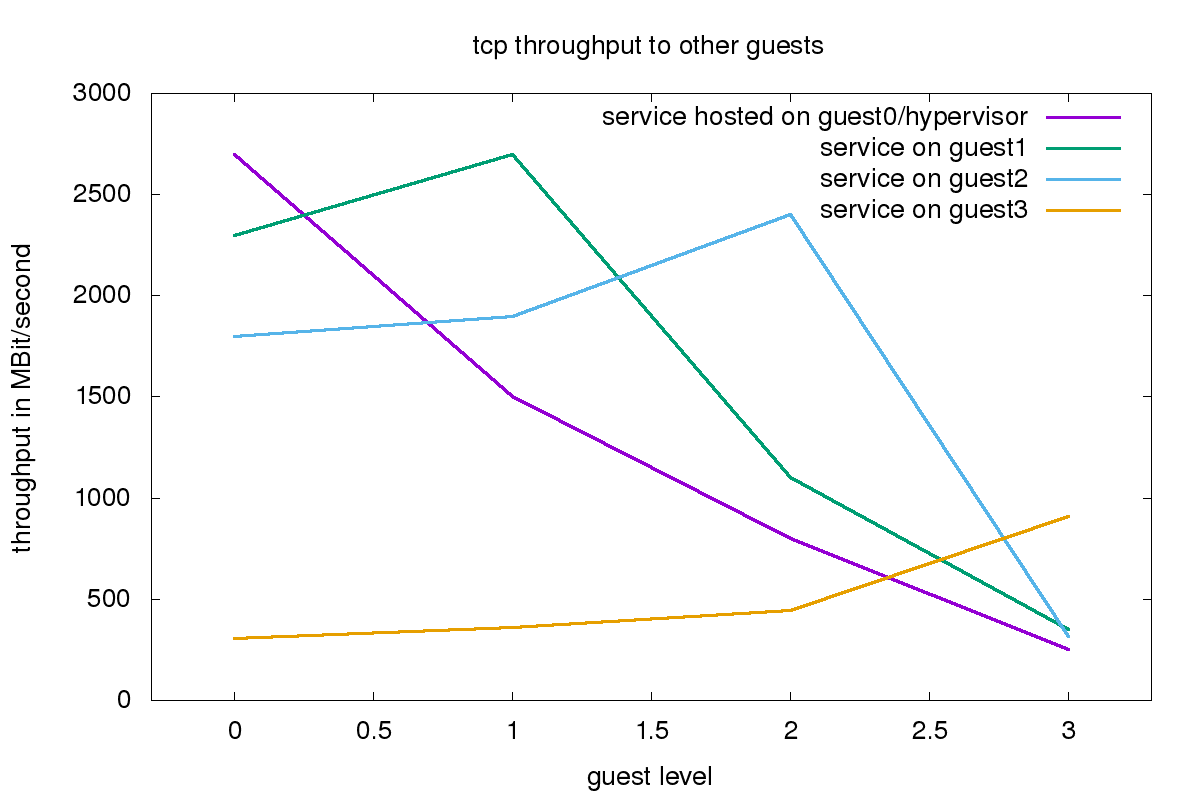
In all cases, the highest throughput was achieved when accessing the HTTP service directly from the system hosting the service. For guest0, guest1 and guest3 we also see that access from the neighbor layers is quite fast, but the further away, the lower the throughput. Guest3 achieves by far the lowest throughput.
Final thoughts
-
Red Hat, at this point, does not support nested KVM, it is not intended for production. My testing options here focused on development/test environments and fast execution, at the cost of reliability.
-
performance of guest0, 1 and 2 are mostly comparable. Spinning up guest3 is possible but performance is quite limited. So deploying complex setups like OpenShift environments inside of a guest1, including several guest2 systems, can make sense for testing/development.
-
Several settings could be used to optimize for certain performance aspects of guests, for example assigning fewer cores to the guest than the system above the guest has available.

Christian Horn is a Red Hat AMC TAM in Tokyo. AMC refers to the Red Hat Advanced Mission Critical program, where partners, together with Red Hat, provide support for systems which are especially essential for companies and business. In his work as Linux Engineer/Architect in Germany since 2001, later as Red Hat TAM in Germany and Japan, Virtualization, operations and performance tuning are among the returning topics of this daily work.
A Red Hat Technical Account Manager (TAM) is a specialized product expert who works collaboratively with IT organizations to strategically plan for successful deployments and help realize optimal performance and growth. The TAM is part of Red Hat’s world-class Customer Experience and Engagement organization and provides proactive advice and guidance to help you identify and address potential problems before they occur. Should a problem arise, your TAM will own the issue and engage the best resources to resolve it as quickly as possible with minimal disruption to your business.
Connect with TAMs at a Red Hat Convergence event near you! Red Hat Convergence is a free, invitation-only event offering technical users an opportunity to deepen their Red Hat product knowledge and discover new ways to apply open source technology to meet their business goals. These events travel to cities around the world to provide you with a convenient, local one-day experience to learn and connect with Red Hat experts and industry peers.
Über den Autor
Christian Horn is a Senior Technical Account Manager at Red Hat. After working with customers and partners since 2011 at Red Hat Germany, he moved to Japan, focusing on mission critical environments. Virtualization, debugging, performance monitoring and tuning are among the returning topics of his daily work. He also enjoys diving into new technical topics, and sharing the findings via documentation, presentations or articles.
Ähnliche Einträge
IT-Stack vereinheitlichen: VMs, Cloud und KI vereint
Red Hat OpenShift Virtualization in 2026: Vorteile entdecken
Nach Thema durchsuchen

Automatisierung
Das Neueste zum Thema IT-Automatisierung für Technologien, Teams und Umgebungen

Künstliche Intelligenz
Erfahren Sie das Neueste von den Plattformen, die es Kunden ermöglichen, KI-Workloads beliebig auszuführen

Open Hybrid Cloud
Erfahren Sie, wie wir eine flexiblere Zukunft mit Hybrid Clouds schaffen.

Sicherheit
Erfahren Sie, wie wir Risiken in verschiedenen Umgebungen und Technologien reduzieren

Edge Computing
Erfahren Sie das Neueste von den Plattformen, die die Operations am Edge vereinfachen

Infrastruktur
Erfahren Sie das Neueste von der weltweit führenden Linux-Plattform für Unternehmen

Anwendungen
Entdecken Sie unsere Lösungen für komplexe Herausforderungen bei Anwendungen
Virtualisierung
Erfahren Sie das Neueste über die Virtualisierung von Workloads in Cloud- oder On-Premise-Umgebungen