This blog series will take a close look at Jenkins running on Red Hat OpenShift 3.11 and the various possibilities we have to improve its performance. The first post illustrated the deployment of a Jenkins master instance and a typical workload. This second post will deal with different approaches for improving the performance of Jenkins on OpenShift.
OpenShift on AWS Test Environment
All posts in this series use a Red Hat OpenShift Container Platform on AWS setup that includes 8 EC2 instances deployed as 1 master node, 1 infra node, and 6 worker nodes that also run Red Hat OpenShift Container Storage Gluster and Heketi pods.
The 6 worker nodes are basically the storage provider and persistent storage consumers (Jenkins). As shown in the following, the OpenShift Container Storage worker nodes are of instance type m5.2xlarge with 8 vCPUs, 32 GB Mem, and 3x100GB gp2 volumes attached to each node for OCP and one 1TB gp2 volume for the OCS storage cluster.
The AWS region us-west-2 has availability zones (AZs) us-west-2a, us-west-2b, and us-west-2c, and the 6 worker nodes are spread across the 3 AZs, 2 nodes in each AZ. This means the OCS storage cluster is stretched across these 3 AZs. Below is a view from the AWS console showing the EC2 instances and how they are placed in the us-east-2 AZs.

Baselining
In order to get a measurement of the performance of Jenkins we need to establish a baseline. That means that we will use the same type of build job throughout the entire course of this blog, but we will vary the different configurations and tuning to find the best fit for our specific build. Please keep in mind that there is no one-size-fits-all solution, your application may have different requirements.
During this episode we will encounter 3 different scenarios concerning the usage of storage:
- The first scenario is Jenkins using ephemeral storage for its builds / pipelines. This is the most common way of using it.
- The second scenario is when a Jenkins build pod starts a build for the first time with an empty Persistent Volume attached. This typically only happens once, but we will go through the same number of iterations as we do for the other tests.
- The third and most important scenario is a Jenkins build pod with a pre-populated Persistent Volume attached, where all the dependencies have already been downloaded.
We’re using a fork of the Game of Life example (https://github.com/wakaleo/game-of-life). Let’s setup a maven project for our build in the Jenkins UI, using the ‘New Item’ button:

We want our project to be built on maven pods only, so we restrict it to those below:

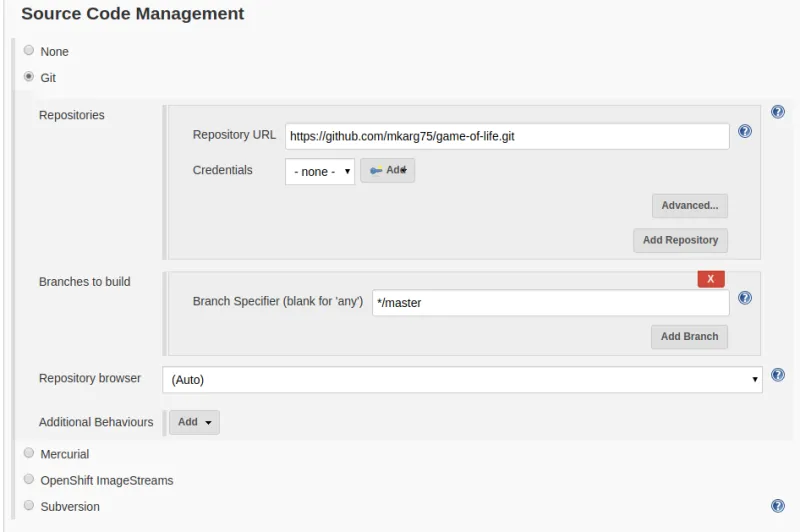
The source code is in my personal fork of the Game of Life repository.

We save the configuration, leaving the remaining fields unchanged, getting back to the project view in Jenkins.

We are now ready to start the first build, so let’s do that. Since we want to know what’s actually happening behind the curtain, we will also monitor our pods in a terminal window:
watch oc get pods

NAME              READY STATUS   RESTARTS AGE

jenkins-2-zrtg4   1/1 Running   0 1h
So far only our Jenkins master is running, but shortly after we click on ‘Build now’ we will see the slave pod spinning up.
The Build History box will start to output the current state of the build, beginning with the spin-up of the slave pod. As long as the grey ball keeps blinking, the build is ongoing. This will take a few moments. Once the ball turns to a solid blue, click on the build number right next to it:

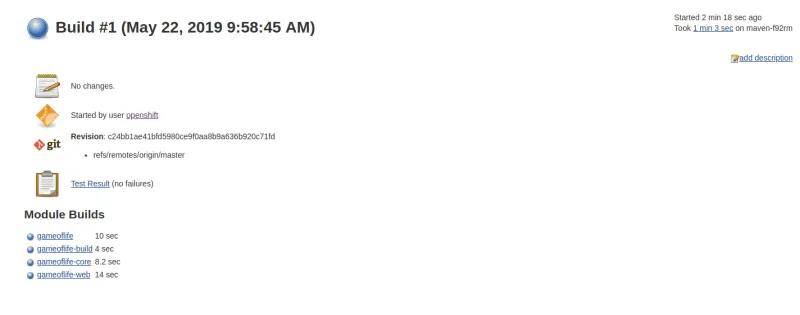
In the build details, we will find information on whether the build was successful, which git revision has been used and most importantly how long the build took, divided into the different build stages.

The times above do not include the time it took to download all the required libraries to the maven slave pod. The overall time spent on the build can be found in the right top corner, in my case that’s been 1 minutes 3 seconds. The majority of the time is spent on downloading libraries.
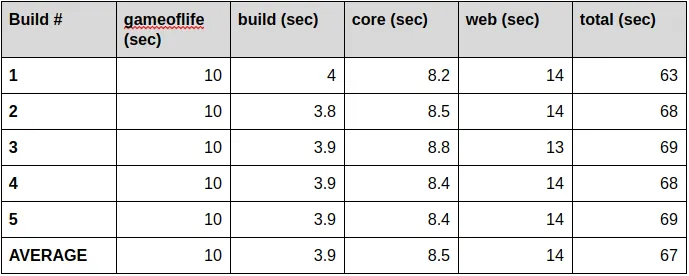
A single test is not enough to establish a baseline, so we will repeat the build for another four times and take the average durations. These results are now our baseline.

Using a Persistent Volume for Libraries
One way to improve the performance of our builds is to reduce the time it takes to get the required library files to every build pod. To prevent the slave pods from pulling down all the dependencies, we will create a shared Persistent Volume (PV) that gets attached to all slave pods during their creation. This way we only need to download the dependencies once.
The PV has to be a ‘Read-Write Many’ or RWX volume so that all the build pods running at the same time can access it in parallel. We will not run parallel builds here, but it’s a very common scenario for larger software projects.
Let’s create the PVC in the OpenShift CI project:
cat shared_pvc.yaml

apiVersion: v1

kind: PersistentVolumeClaim

metadata:

  annotations:

  name: libraries

  namespace: ci

spec:

  accessModes:

  - ReadWriteMany

  resources:

    requests:

      storage: 50Gi

  storageClassName: glusterfs-storage

status:

  accessModes:

  - ReadWriteMany

  capacity:

    storage: 50Gi

oc apply -f shared_pvc.yaml

oc get pvc

NAME        STATUS VOLUME                                     CAPACITY ACCESS MODES STORAGECLASS AGE

jenkins     Bound pvc-701d5de1-7590-11e9-bcaf-02eec490626a   10Gi RWO glusterfs-storage 8d

libraries   Bound pvc-f11dd855-7c83-11e9-a46a-02eec490626a   50Gi RWX glusterfs-storage 21s
Now that we have a RWX Persistent Volume (PV), we need to automatically attach it to every newly created maven pod on the Jenkins side. For that, go to ‘Manage Jenkins’ - ‘Configure System’ and scroll down to the ‘Kubernetes Pod Template’ for maven. In the ‘Volumes’ section choose ‘Add Volume’ and then ‘Persistent Volume Claim’:

Make sure to mount the ‘libraries’ PV to /home/jenkins/.m2 and save your changes.
With a persistent volume attached to every maven pod that gets created, we should see a decrease in the overall time it takes to build our Game of Life project, just not for the first run. You may ask why. The answer is simple: the first run looks identical to our previous runs, it will have to pull down the dependencies for all consecutive runs. So let’s kick off that build and see how long it will take.

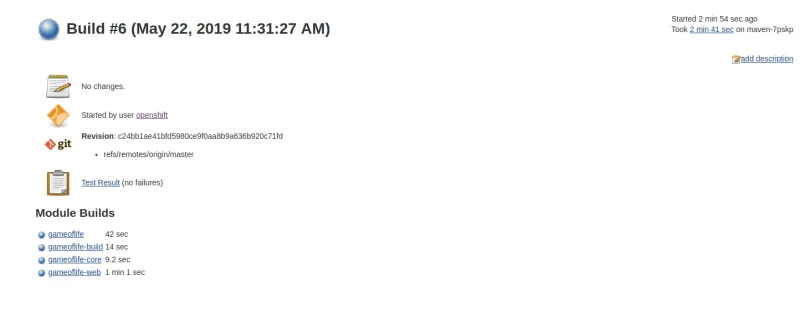
For the sake of completeness, we will also do 5 runs (as was done to establish the baseline) in which we create and attach an empty PV and do a build. It’s important to note that this kind of build only happens a single time in practice, when the PV is attached and empty. Therefore it will take some extra time to download and store the data in the PV.

The builds with a freshly created and attached PV do take some more time. This is due to the way in which PVs are created: They are thin-provisioned volumes so the first write to it takes longer than consecutive writes. In addition to that, so far our maven build pods have only used ephemeral storage which is not replicated like volumes in OCS. Every build that follows will benefit from the already downloaded dependencies afterwards as shown in the next table.
Let’s move on to builds with a pre-populated libraries directory as a result of each of the runs above. Again we’re doing 5 runs and will take the average times.

The direct comparison between our tests with ephemeral storage and with a pre-populated PV shows an improvement of 15% faster overall build times. It is important to note here that our test project is a very small one with an equally small amount of dependencies. With an increased amount of required libraries, the positive effect of the shared PV will be even higher.
 A second example with a PVC and a pipeline
Thus far we have seen a 15% improvement in overall build times with a PV provided to the build pods. Let’s see if we can find another example that provides even more. We will use the os-tasks project (https://github.com/redhat-gpte-devopsautomation/openshift-tasks.git) this time.
A quick word on the difference between a build and a pipeline in Jenkins: A build typically only generates the binary (most commonly a .war file) then stops. A pipeline is meant to be used for consecutive tests on the freshly built binary.
This Jenkins pipeline script checks out the git repository and uses a maven pod to build the war file:
pipeline {

  agent {

    // Using the maven builder agent

    label "maven"

  }

  stages {

    // Checkout Source Code and calculate Version Numbers and Tags

    stage('Checkout Source') {

      steps {

        git url: "https://github.com/redhat-gpte-devopsautomation/openshift-tasks.git"

       script {

          def pom = readMavenPom file: 'pom.xml'

          def version = pom.version

        }

      }

    }

    // Using Maven build the war file

    // Do not run tests in this step

    stage('Build App') {

      steps {

        echo "Building war file"

        sh "mvn clean package -DskipTests=true"

      }

    }

  }

}
Similar to our previous tests, we run 5 builds without a PV attached to the build pods and 5 with a pre-populated PV. The following tables have the results:

Let’s have a closer look at these results:
- The source checkout stage has not changed at all, which is not surprising. Every pod has to pull down the git repository every single time.
- The overall time of each individual run has not changed significantly. That’s interesting as it means that pulling down dependencies is not affecting the total build time as much as it did in our first example. Here it’s the time it takes OpenShift to stand up the maven build pods.
- The most important change we can see in this second example is that we’ve brought the time it takes to build the app (the compile time) down by almost 50%! So with a larger code base and its resulting dependencies, the gains in compile time can increase drastically.
Tuning pod startup behaviour
If you have performed these steps so far in your environment, you may have noticed that Jenkins spawns build pods rather conservatively. Say, if there are 2 builds in the queue; it won't spawn 2 executors immediately. It will spawn one executor and wait for sometime for the first executor to be freed before deciding to spawn the second executor. Jenkins makes sure every executor it spawns is utilized to the maximum. If you want to override this behaviour and spawn an executor for each build in queue immediately without waiting, you can use these flags during Jenkins startup:
-Dhudson.slaves.NodeProvisioner.initialDelay=0

-Dhudson.slaves.NodeProvisioner.MARGIN=50

-Dhudson.slaves.NodeProvisioner.MARGIN0=0.85
These variables can be added to the environment variable JENKINS_OPTS in the Environment section in the Jenkins OpenShift project deployment configuration and they can also be made on the console:
<b>oc set env dc/jenkins JENKINS_JAVA_OVERRIDES="-Dhudson.slaves.NodeProvisioner.initialDelay=0 -Dhudson.slaves.NodeProvisioner.MARGIN=50 -Dhudson.slaves.NodeProvisioner.MARGIN0=0.85 -Dorg.jenkinsci.plugins.durabletask.BourneShellScript.HEARTBEAT_CHECK_INTERVAL=300"</b>
We’re running the tests again:

Here’s the comparison to our tests without the pod startup tunings in place:

While the improvements are not as distinct as they are with the introduction of the PV, they are still far from negligible.
Summary
In this second episode of the blog series, we’ve introduced two new payloads, the Game of Life and the OpenShift Tasks. For both we’ve conducted a series of tests, illustrating the effects of using OpenShift Container Storage (OCS) persistent volumes vs. ephemeral storage.
While the effect of that only improved the overall times for the Game of Life by 15% we also demonstrated that this depends heavily on the “workload.” The OpenShift Tasks build time was reduced by a respectable 48%. These improvements are possible when using OCS, as that is one of the possible ways to provide Read-Write-Many or RWX volumes.
Lastly, by tuning the way OpenShift spins up new build pods we managed to reduce these times even further, by another 10%.
A possible way to get even more performance improvements out of the usage of RWX volumes could be within pipelines: Imagine your tests would make use of large databases and do operations on them. Without Persistent Volumes attached to the build pods, these databases would have to be downloaded every single time. Not requiring the databases to be downloaded each time results in even further optimizations on the storage side.
Sobre el autor
Markus Eisele is a Red Hat Developer Tools Marketing Lead at Red Hat. He is also a JavaTM Champion, former Java EE Expert Group member, founder of German JavaLand and a speaker at Java conferences around the world.
Más como éste
Manage clusters and applications at scale with Argo CD Agent on Red Hat OpenShift GitOps
Data-driven automation with Red Hat Ansible Automation Platform
Technically Speaking | Taming AI agents with observability
You Can't Automate Buy-In | Code Comments
Navegar por canal
Automatización
Las últimas novedades en la automatización de la TI para los equipos, la tecnología y los entornos
Inteligencia artificial
Descubra las actualizaciones en las plataformas que permiten a los clientes ejecutar cargas de trabajo de inteligecia artificial en cualquier lugar
Nube híbrida abierta
Vea como construimos un futuro flexible con la nube híbrida
Seguridad
Vea las últimas novedades sobre cómo reducimos los riesgos en entornos y tecnologías
Edge computing
Conozca las actualizaciones en las plataformas que simplifican las operaciones en el edge
Infraestructura
Vea las últimas novedades sobre la plataforma Linux empresarial líder en el mundo
Aplicaciones
Conozca nuestras soluciones para abordar los desafíos más complejos de las aplicaciones
Virtualización
El futuro de la virtualización empresarial para tus cargas de trabajo locales o en la nube
