A typical deployment of OpenShift Container Platform has multiple master, application, and infrastructure nodes for highly available configuration. In this configuration, there is no single point of failure for the cluster, unless there is only a single HAproxy server configured to load balance cluster data.The following article discusses how to configure Keepalived for maximum uptime of HAproxy. This process is mostly automated with Ansible in the "vsphere on OCP" reference architecture. This article breaks down that automated process in a step-by-step how-to.
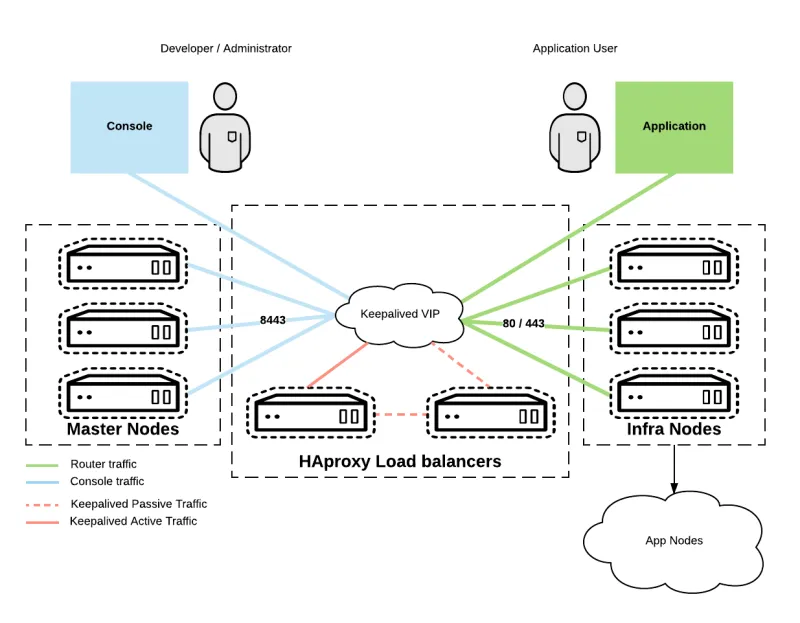
HAproxy load balances port socket connections to a pool of servers, in this case, the OpenShift cluster nodes. The following discusses the process of adding a second HAproxy server to an existing OpenShift deployment. This configures the environment into a highly available cluster using Keepalived. Keepalived is routing software written in C that establishes a floating virtual IP address using Virtual Router Redundancy Protocol (VRRP) that can belong to any node in a cluster. For more information regarding Keepalived: http://www.keepalived.org. In this configuration, there is a backup and master node. After the configuration is deployed and tested, a node failure is simulated. As this failure takes place, the master fails over to the backup. Lastly, the bottom of the page has completed configuration files that can be modified to suit any environment.
HAproxy Load Balancer Ports
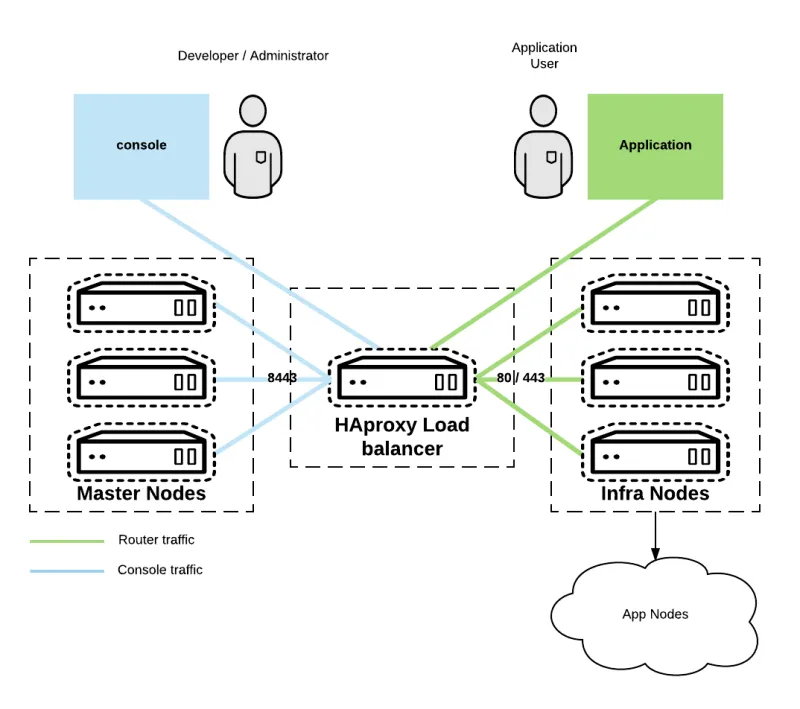
The HAproxy load balancers distribute traffic across two different port groups.The HAproxy port configuration is shown below:
- masters - port 8443 for web console
frontend main *:8443

default_backend mgmt8443
backend mgmt8443
 balance source
 mode tcp
 server master-0.example.com master-0.example.com:8443 check
- infra nodes - ports 80, 443 for the routers
frontend main *:80
default_backend router80backend router80
balance source
mode tcp
server infra-0.example.com infra-0.example.com:80 checkfrontend main *:443
default_backend router443
backend router443
balance source
mode tcp
server infra-0.example.com infra-0.example.com:80 check
This article assumes a base configuration matching the one depicted in the graphic below:

Preparing the HAproxy servers for Keepalived
The following steps should be run on both HAproxy servers for a highly available HAproxy configuration:
- Install Keepalived and psmisc
NOTE: psmisc provides killall for the HAproxy check for VRRP
[root@haproxy-1 ~]# yum install -y keepalived psmisc
- Determine the interface for use with the services:
[root@haproxy-0 ~]# ip link show

1: lo: LOOPBACK,UP,LOWER_UP mtu 65536 qdisc noqueue state UNKNOWN mode DEFAULT qlen 1

link/loopback 00:00:00:00:00:00 brd 00:00:00:00:00:00

2: ens192: BROADCAST,MULTICAST,UP,LOWER_UP mtu 1500 qdisc mq state UP mode DEFAULT qlen 1000

link/ether 00:50:56:a5:a5:54 brd ff:ff:ff:ff:ff:ff
NOTE: This interface could be a dedicated interface or a shared interface. It needs to belong on the same broadcast domain as the VIP.
- Allow all connections from the interface for traffic use. The IP addresses below should be interfaces for HAproxy:
iptables -A INPUT -s 10.19.114.227 -j ACCEPT

iptables -A INPUT -s 10.19.114.228 -j ACCEPT
- Allocate an IP address from the existing HAproxy network to be used for the floating IP address for the load balancers. Prepare to update the existing cluster DNS name to the newly assigned IP address.
-
Generate a random external password for Keepalived's AUTH_PASS:
[root@haproxy-0 ~]# uuidgen

1cee4b6e-2cdc-48bf-83b2-01a96d1593e4
-
Configure Keepalived
NOTE: See Keepalived configuration below -
Start and enable the services:
[root@haproxy-0 ~]# systemctl enable keepalived; systemctl start keepalived
Keepalived Configuration
The master configuration is discussed below:
global_defs {
router_id ovp_vrrp
}vrrp_script haproxy_check {
script "killall -0 haproxy"
interval 2
weight 2
}vrrp_instance OCP_EXT {
interface ens192virtual_router_id 51
priority 100
state MASTER
virtual_ipaddress {
10.19.114.231 dev ens192
}
track_script {
haproxy_check
}
authentication {
auth_type PASS
auth_pass 1cee4b6e-2cdc-48bf-83b2-01a96d1593e4
}
}
The important parts of the configuration file are:
1. state MASTER: This denotes it is the primary HAproxy server.
2. priority line: In the event that a master server has to be elected, the highest priority wins.
3. virtual_ipaddress: This is the IP address to be used for the floating VIP and the local device to bind to 10.19.114.231 and ens192
The master and backup configurations are very similar. A comparison of the 2 files shows:
[root@haproxy-1 ~]# diff backup-keepalived.conf master-keepalived.conf
16,17c16,17
- priority 98
- state BACKUP---
- priority 100
- state MASTER
The only difference in the two configurations is the assignment of the master and the priorities.
The new layout is depicted in the image below:

Verifying functionality and simulating a failure
After a successful deployment, the HAproxy nodes route traffic via HAproxy and the VRRP vip is present:
[root@haproxy-1 ~]# ss -tlpn | grep haproxy
LISTEN 0 128 *:80 *:* users:(("haproxy",pid=2606,fd=7))
LISTEN 0 128 *:8443 *:* users:(("haproxy",pid=2606,fd=9))
LISTEN 0 128 *:443 *:* users:(("haproxy",pid=2606,fd=8))
LISTEN 0 128 *:9000 *:* users:(("haproxy",pid=2606,fd=5))[root@haproxy-1 ~]# ip addr show dev ens192
2: ens192: BROADCAST,MULTICAST,UP,LOWER_UP mtu 1500 qdisc mq state UP qlen 1000
link/ether 00:50:56:a5:18:73 brd ff:ff:ff:ff:ff:ff
inet 10.19.114.228/23 brd 10.19.115.255 scope global ens192
valid_lft forever preferred_lft forever
inet 10.19.114.231/32 scope global ens192
[root@haproxy-1 ~]# cat /etc/keepalived/keepalived.conf | grep MASTER
state MASTER
Note that in this deployment that haproxy-1 is the master. haproxy-1 has just been patched and needs to be rebooted. Below is a ping on the virtual IP address:
dav1x-m:~ dphillip$ ping haproxy.example.com

PING haproxy.example.com (10.19.114.231): 56 data bytes

64 bytes from 10.19.114.231: icmp_seq=0 ttl=54 time=120.903 ms

64 bytes from 10.19.114.231: icmp_seq=1 ttl=54 time=119.683 ms

64 bytes from 10.19.114.231: icmp_seq=2 ttl=54 time=119.945 ms

64 bytes from 10.19.114.231: icmp_seq=3 ttl=54 time=119.907 ms

64 bytes from 10.19.114.231: icmp_seq=4 ttl=54 time=120.771 ms

64 bytes from 10.19.114.231: icmp_seq=5 ttl=54 time=119.627 ms

64 bytes from 10.19.114.231: icmp_seq=6 ttl=54 time=119.696 ms

64 bytes from 10.19.114.231: icmp_seq=7 ttl=54 time=120.184 ms

64 bytes from 10.19.114.231: icmp_seq=8 ttl=54 time=119.258 ms

Request timeout for icmp_seq 9

64 bytes from 10.19.114.231: icmp_seq=10 ttl=54 time=121.358 ms

64 bytes from 10.19.114.231: icmp_seq=11 ttl=54 time=120.285 ms

64 bytes from 10.19.114.231: icmp_seq=12 ttl=54 time=119.652 ms
The single blip in the ping shows the node failover. Now, haproxy-0 has been elected master until the haproxy-1 is back online:
[root@haproxy-0 ~]# ip addr show dev ens192

2: ens192: BROADCAST,MULTICAST,UP,LOWER_UP mtu 1500 qdisc mq state UP qlen 1000

link/ether 00:50:56:a5:18:73 brd ff:ff:ff:ff:ff:ff

inet 10.19.114.227/23 brd 10.19.115.255 scope global ens192

valid_lft forever preferred_lft forever

inet 10.19.114.231/32 scope global ens192
Accompanying OCP Installation Vars and DNS Configuration
To start a fresh OCP deployment installation, variables need to be set to inform OpenShift to use the load balancer VIP:
wildcard_zone: apps.example.com

osm_default_subdomain: "{{ wildcard_zone }}"

openshift_master_default_subdomain: "{{osm_default_subdomain}}"

deployment_type: openshift-enterprise

load_balancer_hostname: haproxy.example.com

openshift_master_cluster_hostname: "{{ load_balancer_hostname }}"

openshift_master_cluster_public_hostname: "{{ load_balancer_hostname }}"
In the event of a migration to keepalived from a single HAproxy make sure to change the DNS including wildcard to point to the new VIP that was created above.
$ORIGIN apps.example.com.

*           A   10.19.114.231

$ORIGIN example.com.

haproxy         A   10.19.114.231

haproxy-0       A   10.19.114.227

haproxy-1       A   10.19.114.228
Conclusion
This post has described the installation and configuration of HAproxy and Keepalived to keep OpenShift Container Platform's service online and highly available in the event of a load balancer failure. This configuration coupled with OCP's HA features provide maximum uptime for containers and microservices in your production environment.
Complete Configuration Files:
Über den Autor
Ähnliche Einträge
Introducing OpenShift Service Mesh 3.2 with Istio’s ambient mode
F5 BIG-IP Virtual Edition is now validated for Red Hat OpenShift Virtualization
Kubernetes and the quest for a control plane | Technically Speaking
Get into GitOps | Technically Speaking
Nach Thema durchsuchen
Automatisierung
Das Neueste zum Thema IT-Automatisierung für Technologien, Teams und Umgebungen
Künstliche Intelligenz
Erfahren Sie das Neueste von den Plattformen, die es Kunden ermöglichen, KI-Workloads beliebig auszuführen
Open Hybrid Cloud
Erfahren Sie, wie wir eine flexiblere Zukunft mit Hybrid Clouds schaffen.
Sicherheit
Erfahren Sie, wie wir Risiken in verschiedenen Umgebungen und Technologien reduzieren
Edge Computing
Erfahren Sie das Neueste von den Plattformen, die die Operations am Edge vereinfachen
Infrastruktur
Erfahren Sie das Neueste von der weltweit führenden Linux-Plattform für Unternehmen
Anwendungen
Entdecken Sie unsere Lösungen für komplexe Herausforderungen bei Anwendungen
Virtualisierung
Erfahren Sie das Neueste über die Virtualisierung von Workloads in Cloud- oder On-Premise-Umgebungen
