
When architecting a login service for a software project, you have a choice: You can create a custom solution, or you can choose a ready-made option like Keycloak. There are several reasons to choose Keycloak, including:
- Keycloak is an open source identity and access management (IAM) tool.
- It can overwrite and customize almost every aspect of a product or module.
- It implements almost all standard IAM protocols, including OAuth 2.0, OpenID, and SAML.
- It's a solid product with a good community.
OAuth 2.0 is the industry standard authorization protocol, but it's also huge, complex, and even a bit scary at first. However, as I've learned over the past two years building microservices architecture, it is possible to master OAuth2 with Keycloak.
How Keycloak authorization works
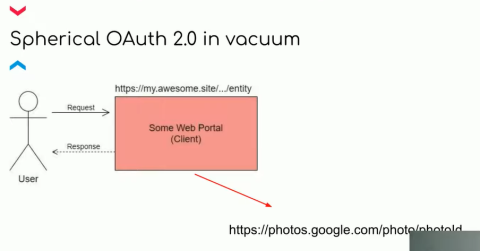
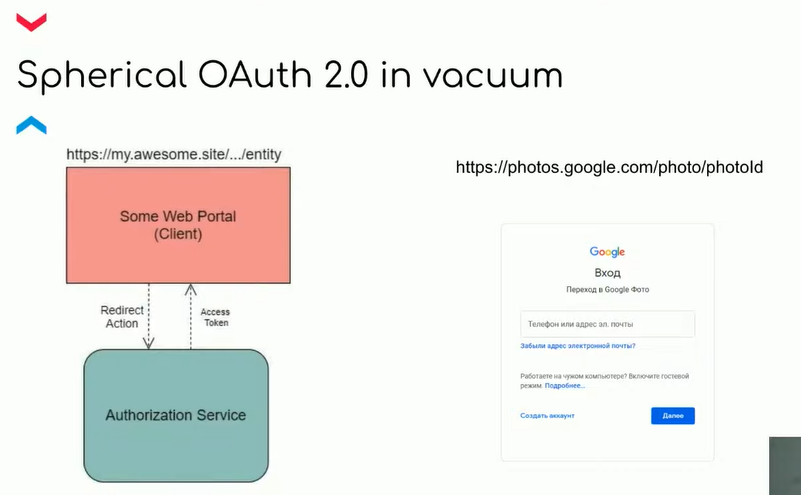
Imagine you want to download a photo from Google Drive. To ensure you're authorized to download the photo, the web client portal redirects you to the authorization service. That service opens a login page where you enter your username and password, and it verifies you have permission to download this photo.
[ Learn how to build a flexible foundation for your organization. Download An architect's guide to multicloud infrastructure. ]
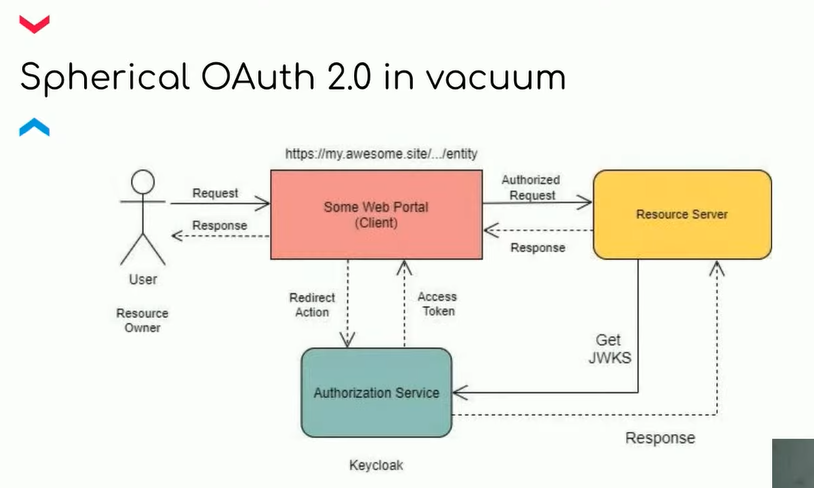
If you successfully authorize and get the token, the portal takes you to the resource server. The resource server is a microservice architecture where all the business logic happens.
To get your photo file, you need to call that microservice's API. But the microservice shouldn't give the API to just anyone, even if the request came with a token. It must verify that the token is signed by your authorization service, which, in this example, is Keycloak.
Therefore, the microservice makes a request for a JSON Web Key Set (JWKS), which is a set of keys used to validate a token signature using a Key ID. If the signature is valid, the process returns a response—in this case, the photo you want.
[ Learn how to use Keycloak to configure SSO for command-line applications. ]
Understanding Keycloak users, clients, services, and realms
The following illustration shows the system from the top down. This is the standard three-step OAuth 2 authentication scheme. As the user, you are the resource owner, the client application is the web portal, the authorization service is Keycloak, and the resource server is a set of microservices.
Imagine you enter a large shopping mall with many stores. This mall is Keycloak, and the stores are your realm. All the action takes place inside these realms. Every place in the mall is a department—as soon as you walk in, you are in the "entrance department."
Those departments are your clients. When you log into Keycloak, you are logging into a certain client. (In the shopping mall analogy, you've entered a certain section of the retail department.)
[ A complimentary guide from Red Hat: The automation architect's handbook. ]
You also have users—people who buy things, work behind the cash register, serve customers, and so on. These are roles, and Keycloak allows role management. Cashiers have one role, and customers have another. Therefore, you need to differentiate users by department and also by shop. For example, if someone can take things for free in shop one, it doesn't mean that they can take things for free in shop two.
Here is an example of a standard Keycloak login URL; you can see the realm and the client:
https://someDomain/auth/realms/myRealm/protocol/openid-connect/auth?client_id=myClient…
Build a microservices architecture
When building microservices, you start by creating the architecture. The following is a top-level diagram of a microservice, including how it interacts with Keycloak.
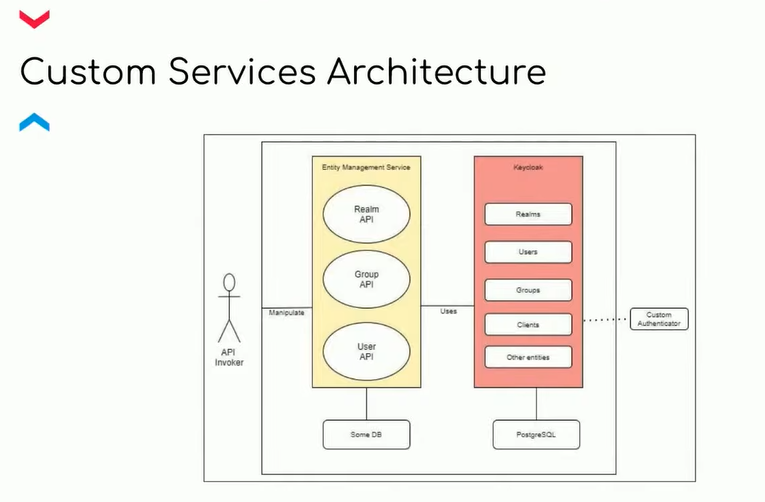
Keycloak has realms, users, groups, clients, and roles. It stores all this metadata in a PostgreSQL database. A large enterprise project on a large SaaS platform has a lot of data, so it's better to keep it in a non-relational database (such as MongoDB). But it's not wise to store your metadata with Keycloak entities. Instead, stick to single responsibility— everything should be isolated.
You need to write a custom microservice or set of microservices that will communicate with Keycloak. This allows you to access it using a specific URL. If you want to create a realm, it will be a post request, and if you want to update it, it will be a put request. Accordingly, you need a microservice that provides an API to perform custom logic when accessing Keycloak.
Because Keycloak does not have solutions to address the API out of the box, you need to come up with a software development kit (SDK) to plug into the microservices as needed. This makes it possible to make HTTP requests to Keycloak, not through the web client, but by using ready-made methods implemented in the SDK.
Scaling problems
Imagine a large organization needs you to set up a user-management API so its employees can work with the organization's machines. You also need to implement specific roles and machine tool capabilities.
These machines have a feature that allows you to make HTTP calls to the portal and send your data to your platform. You learn there are hundreds of related customers with different requirements. You need to accommodate them quickly. What should you do?
Keycloak allows you to create any number of realms and any number of clients and users in them. But you need to be thoughtful as you scale up because as the number of entities grows, Keycloak slows down. When you log in as a superuser in the admin panel, even if you have only 1,500 realms, it will take a few minutes or even crash on timeout. Creating a new realm will take about 20 to 30 seconds. You need to change your logic and interaction with Keycloak.
One solution is to implement an asynchronous mechanism. Say a customer says: We need to load our entire network of users who will work in the context of our order, but they will work later. So, you don't need to load Keycloak yet. To do this, you can teach the microservice to send an event to Kafka upon user creation, and Keycloak will listen to those requests. This makes it possible to create users asynchronously: you can create some metadata in the custom microservice and have it reach Keycloak later.
On the other hand, by using Kafka and asynchronously creating, deleting, or changing entities, you can create and delete users from Keycloak, and they will appear later in your custom microservices. You can try to solve the problem with vertical scaling (adding resources), but it may be expensive.
[ Learn How to explain orchestration in plain English. ]
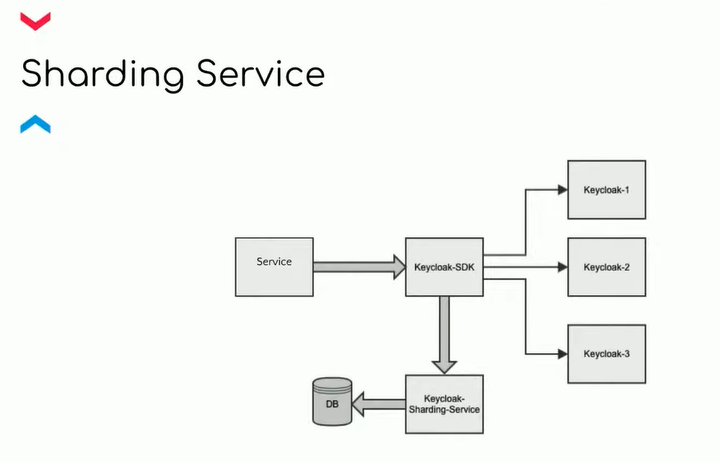
Another solution: limit an instance to 500 realms and create a new instance for every 501st realm. To do this, you need to make an input point that understands that if a user comes from a particular realm, then Keycloak must go to that instance, and if it comes from another realm, it goes to a different instance.
This mechanism is both a benefit and a challenge. You have to figure out how to connect instances and custom services. Plus, you have to remember that can be a bottleneck. If it goes down, there is no convenient way to know where the user should enter. This will cause serious problems.
Keycloak's developers realize that their product is often not used the way they originally expected. That's why they are working to increase data handling and enable faster startup and less pain in new versions of Keycloak.
Using Keycloak themes
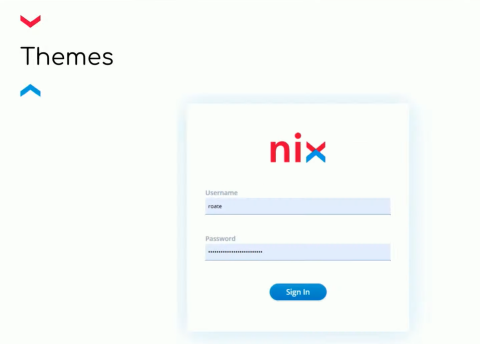
Keycloak provides themes to customize the login page for different customers. Keycloak's standard theme (shown below) is simple and unassuming.
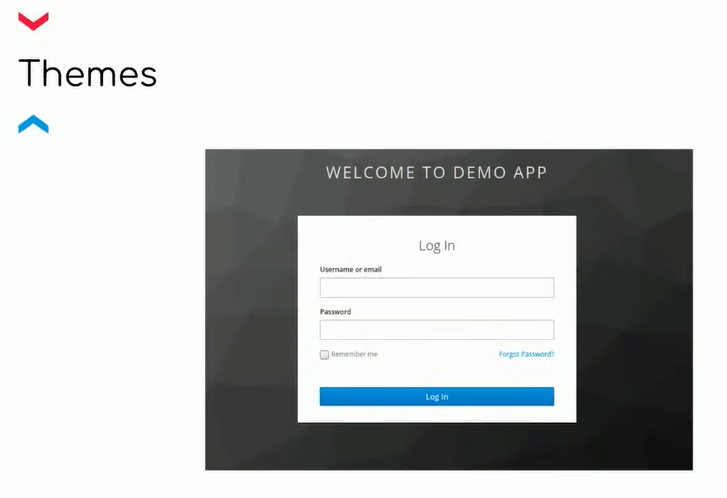
Keycloak provides a set of Freemarker Template Language (FTL) pages for customizing templates. FTL is a symbiosis between Java, JavaScript, and HTML. By redefining the set of FTL pages, you can add custom themes quite easily and quickly.
Managing roles
Now imagine each realm has thousands of users. Each already has a resource reading role, but you want to change them—maybe to add resources to this role or to combine them into one custom role. Keycloak provides composite roles for this use case. You can specify the administrator role and which users have access to read, delete, or update files.
What if you need to give an additional role to the administrator across all the organizations or remove a role and replace it with several smaller ones? You must implement it in all realms for all users at once. Here is an example of a microservice for this task.

You still log into Keycloak and get a token. But the responsibility for role management is transferred from Keycloak to this custom product. Then, when services interact with each other, they contact this permission service and get the right set of permissions. On the service side, you validate whether the user can perform an operation based on their permissions.
You could also implement APIs to add or modify roles in real time, instead of asking developers to handle the operation.
Create organizations based on templates
Imagine the number of customers keeps increasing. Each one has different goals, capabilities, and priorities. Some need more role management; others need more flexible interaction with entities. In this case, you can set up templates to create specific entities. When a new customer comes along, you can offer them different sets out of the box. You can also implement a basic set of functions to meet the customer's requirements and enable the customer to finish it off according to its requirements.
You can also create this as a realm in Keycloak. The custom microservice that generates realms will receive information in the request indicating what realm type it wants to create, pull a realm from Keycloak, add the passed custom information, and generate a new realm. There is also an option to store it all on a local machine.
The realm is a typical JSON object, which can be changed. But, it's a problem to have to modify it from release to release, keep the current version, and be sure it's valid. You have to provide a caching procedure so that the microservice will save these templates during startup and will not disrupt Keycloak's traffic with redundant calls.
Promote change based on the environment
Creating a product involves development and testing before you get any revenue from the end user using the product. So you need to figure out how to deliver changes from the lowest to the highest environments in the correct form and quantity and be confident they are correct.
For example, imagine a release creates 100 realms for 100 clients with different business logic, and you need to move them to testing and production after getting comments from testers. You can force the developer to migrate all these changes manually, or you can write a custom microservice to deliver all the changes through migration once per release.
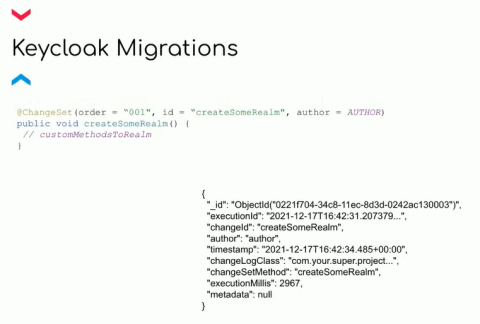
What does this look like in our project? We use Liquibase, which handles version control while migrating to a relational database. We also use the Mongock migration tool with our MongoDB non-relational database.
First, we create changelogs, or lists of changes to be delivered. They contain changesets—described changes. With Mongock annotations, we specify the exact sequence the migrations should go in. The realm must first be created and then updated, in that order. You can also store custom metadata by author type, the order in which things should run, and the ID. The latter is the most important because Mongock uses the ID to check the migration's uniqueness and prevent it from running a second time.
Prioritize major and minor migrations
All of this leads to the next problem. You need to get changes from development to testing and on to production during the deployment process. If there are a lot of migrations, they can run for a very long time, which is expensive to keep track of. Therefore, you need to prioritize migrations, which must run before any other microservices.
Some microservices need to cache templated realms with the changes already in place. If you need to add read permission to an employee in your customer's organization, it doesn't matter in the context of a large project. And you don't even have to run this migration at the very beginning—you can run it later.
[ Learn four focus areas to maintain momentum on digital transformation. ]
You can create profiles (such as major and minor) and mark them accordingly. If the migration is major, it should run before deployment, and if it is minor, it can run afterward.
- Major migrations include templating changes and adding and removing OAuth 2 clients.
- Minor migrations are all the others that are not cached on the microservice side and are not important at the moment for starting other microservices.
Authorization and authentication at the microservice level
It is very important to think about how microservices will communicate with each other. There can be many of them, and they can access each other's APIs. So you have to set up authorization and authentication routines for these processes. For this, you can use a Client ID and Client Secret authentication.
Create an OAuth 2 client in Keycloak for each service. On each side of the service, a secret is embedded that will receive the token and then access the desired microservice.

First, you can pass it off as an encrypted environment variable. But imagine that 10 to 15 microservices were created in a release, and during deployment, each of them has a secret. Each one needs the secret to start up and communicate with other microservices. To automate this process, you have to teach the machine to do everything itself.
Say you need a microservice to get a secret stored in the client in Keycloak. You can implement an additional user, whose credentials will be in the environment variable in encrypted form. The service will receive these credentials, follow the client to get its ID, and then get the secret. Once it knows this secret, the service will keep it in the future.
Test Keycloak
Testing is an essential part of development. The better a test is written, the faster the development process goes, and the more confident the developer and the customer are in the correctness of the changes and innovations.
I recommend writing a test library that implements the so-called stubs of these calls in Keycloak. When you write a test, you want to go through the complete workflow, and while you can put the right metadata in the base and access an API in your microservice, you can't make these calls in Keycloak directly. With the Keycloak SDK, you can do this using Mockito. However, it is not mocked to another service but to a method call inside the service.
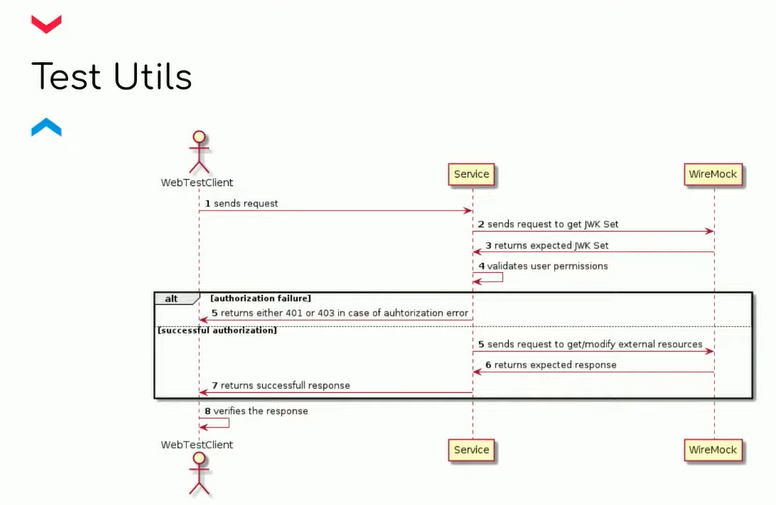
I use WireMock to overcome HTTP calls. In other words, you pass the entire flow from beginning to end, and it's not very important whether or not the HTTP call went to another service. The main thing is to send a call and get a response.
Consequently, in tests, you can put custom permissions on the API to address one or another API. You can also put a response in place when interacting with other microservices and Keycloak in general.
Wrap up
Keycloak is an open source tool that makes the software development process easier and helps make the final product safer, more stable, and more convenient. Give it a try with your next software architecture project.
About the author
Nikita Roate is a Java developer at NIX United working on development and maintenance of microservice architecture. He has been working with Keycloak for several years while helping with the development of a SaaS platform for an enterprise project.
More like this
Strengthening the open source supply chain with Red Hat partners
The new currency of enterprise velocity
Untangling Networks | Compiler
Collaboration In Product Security | Compiler
Browse by channel

Automation
The latest on IT automation for tech, teams, and environments

Artificial intelligence
Updates on the platforms that free customers to run AI workloads anywhere

Open hybrid cloud
Explore how we build a more flexible future with hybrid cloud

Security
The latest on how we reduce risks across environments and technologies

Edge computing
Updates on the platforms that simplify operations at the edge

Infrastructure
The latest on the world’s leading enterprise Linux platform

Applications
Inside our solutions to the toughest application challenges
Virtualization
The future of enterprise virtualization for your workloads on-premise or across clouds