Satellite 6.6 beta was released recently, and contains a number of improvements related to Ansible variables. Ansible variables can be used to customize the behavior of Ansible roles. For example, an Ansible role could be configured to install whatever package is specified in an Ansible variable. From Satellite, we can set the value of the Ansible variable so that the package we want is installed by the role.
Satellite 6.4 introduced the ability to run Ansible roles on Satellite clients, and allowed for parameters to be defined that could be accessed from within the Ansible roles as variables. However, there were a couple limitations to how Ansible variables were supported in Satellite: only string variables were supported, and the Satellite administrator had to review the Ansible role to discover the variable names that should be defined as parameters within Satellite.
The Satellite 6.6 beta release addresses both of these limitations, as it added support for array, hash, boolean, real, and integer Ansible variables types. In addition, variables can be imported from Ansible roles, which helps avoid the need to review the Ansible role to discover variable names to be manually created in Satellite.
For example, we could create an Ansible role that will configure the contents of the message of the day file (motd) on hosts and import this role into Satellite. The role could be created such that the contents of the motd file were set via a variable, which could be imported into Satellite. Once the variable was imported into Satellite, it could be overridden in order to provide a customized message in the motd file.
It would also be possible to add additional “matchers” to this variable in Satellite to allow the motd file contents to be defined based on other criteria within Satellite. For example, we could override the variable to have different contents based on which lifecycle environment the host is in. This means we could configure the variable to have one value for Development servers, and another value for Production servers. The end result of this is the ability to define different motd file contents based on the lifecycle environment or other criteria that is specified within Satellite.
For advanced use cases, it is possible to merge multiple overrides. Going back to our motd example, we could specify a matcher at the domain level that contains the generic part of the login banner for all hosts in the domain. We could add additional matchers for each of the lifecycle environments present in Satellite. We could also add additional matches for individual hosts to provide host-specific information in the motd file. If we merge these overrides, they will all be combined to create a custom login banner for the hosts based on the criteria we defined in the overrides.
This post will cover this functionality using the motd example laid out above. If you haven’t previously worked with Ansible in Satellite, please review my previous post on Getting Started with Ansible in Satellite, which provides foundational knowledge this post will expand on.
Creating the Ansible Role
In this example, we will create a simple Ansible role that creates the message of the day (motd) file, /etc/motd, and can be customized by overriding the motd_array variable within Satellite.
The first step is to create the directory structure on the Satellite server for the role with the following commands:
# mkdir -p /etc/ansible/roles/motd
# mkdir -p /etc/ansible/roles/motd/{defaults,tasks,templates}
We will then create the /etc/ansible/roles/motd/tasks/main.yaml file with the following contents, which specifies that the /etc/motd file should be created from the motd.j2 Jinja2 template with the specified permissions and ownership:
- template:
    src: motd.j2
    dest: /etc/motd
    mode: 644
    owner: root
    group: root
Next, we will create the referenced /etc/ansible/roles/motd/templates/motd.j2 Jinja2 template file. The template below will loop through the items in the motd_array variable. The result will be the creation of the /etc/motd file with the contents of the motd_array variable, with each item in the array resulting in a line in the /etc/motd file.
{% for item in motd_array %}
{{ item }}
{% endfor %}
The last file we need to create for this Ansible role is the /etc/ansible/roles/motd/defaults/main.yaml file. This file will define a default value for the motd_array variable, and is the file Satellite uses to import variables from Ansible roles. We will create this file with the following contents, which defines a default value for motd_array:
motd_array:
  - 'Default MOTD message. Override this variable in Satellite to customize.'
Importing the Ansible role and variables in to Satellite
Now that the Ansible role has been created within the /etc/ansible/roles directory on our Satellite server, the next step is to import the Ansible role and Ansible variables into Satellite. To do so, login to the Satellite web interface, go to the Configure menu, and select Roles (under the Ansible header). You’ll then click the blue button that says Import from <Satellite hostname>.
Ansible will detect which Ansible roles are available to be imported and present a list. Select the motd role, and click Update:

Now that the Ansible role has been imported, we will import the Ansible variable from the role by clicking on the Configure menu, and selecting Variables (under the Ansible header). You’ll then click the blue Import from <Satellite hostname> button.
Satellite will detect the motd_array variable that can be imported from the role. Check the box for this variable, and click Update:

Running the Role with default motd_array variable
At this point, the motd Ansible role and the motd_array variable have been imported into Satellite, and we will run the role on a few hosts to demonstrate the default value of the motd_array variable will be used.
If you are not familiar with creating a Satellite host group and assigning Ansible roles and Satellite hosts to the host group, please refer to my previous post on Getting Started with Ansible in Satellite which covers this.
After the host group has been configured, we will use the Play Roles action on it to run the motd role on the configured hosts.
Once the role has run, we can verify the /etc/motd file was set by logging in to one of the Satellite clients and running:
# cat /etc/motd

Default MOTD message. Override this variable in Satellite to customize.
As you can see, the /etc/motd file was populated based on the default value we specified in the /etc/ansible/roles/defaults/main.yaml file earlier.
Overriding the motd_array variable
We can override the value of the motd_array variable within Satellite to specify a custom message in the /etc/motd file. To do this, we will go to the Configure menu, and select Variables (under the Ansible header). We will then click on the previously imported motd_array variable to edit the variable.
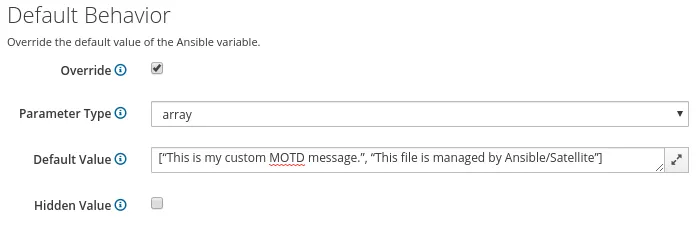
On the edit variable screen, we will check the box for Override, uncheck the box for Hidden Value, verify the Parameter Type is set to array, and change the Default Value to [“This is my custom MOTD message.”, “This file is managed by Ansible/Satellite”] This overrides the array and defines two items within the array.

It is recommended to verify that the Parameter Type was imported as the correct variable type, as in some circumstances it is possible Satellite will not detect the Parameter Type correctly.
If we run the Ansible role on the Satellite clients again and check the /etc/motd file, we should see it has been updated based on the overridden variable, and that each of the 2 values in the array we set are on separate lines within the file.
# cat /etc/motd

“This is my custom MOTD message.”

“This file is managed by Ansible/Satellite”
Specifying Matchers
In the previous example, we defined the motd_array variable for all hosts on the Satellite server using the motd Ansible role. However, there might be instances when the variable needs to be different for some of the hosts. To do this we can specify matchers, which are logic statements that determine what the variable will be set to based on the criteria we define for the variable.
A matcher is set at the Ansible variable level in Satellite, and is similar to an “if” statement in programming. We can specify criteria such as “if the host is in domain example.com”, then set the value of the variable to some value. We could add another matcher for another domain, and in that case set the variable to be a different value. When the Ansible role is run on each host, the first matcher that is true will determine the value that will be set for the variable on that host.
The default attributes you can match on are fqdn, hostgroup, os, and domain. However, you can add additional attributes you would like to match on in the Order section when editing a variable. This is also where you specify the order the matches should be checked in. The order is important, because the first match that is true will determine the value of the variable.
In this example, we added the domain variable to the Order list, which makes it available as a matcher, and add a matcher for it for the example.com domain that will set the motd_array variable to have the value of [“You are accessing {{ ansible_fqdn }}”, “Authorized use only”, “Access may be monitored”] . Since this is an array variable, we can set the value like this to contain multiple array items (in this case, 3 array items, each of which will show up as a line in the motd file).

If none of the matchers are true for a host, the default value will be used.
We’ll go ahead and run the Ansible role again on the Satellite clients, all of which are in the example.com domain. The /etc/motd file is updated to contain what we specified in the domain matcher:
# cat /etc/motd
You are accessing client1.example.com
Authorized use only
Access may be monitored
Also note that the {{ ansible_fqdn }} ansible variable that we specified previously was resolved into the hostname of the client. This demonstrates that it is possible to nest Ansible variables into the values you specify.
If we were to run this Ansible role on a host that was not in the example.com domain, the matcher wouldn’t be a match and the motd_array variable would get the default value that is specified within the variable in Satellite.
Using Host Facts as Matchers
When specifying matchers, it is possible to use host attributes, host parameters, and host facts.
Each host within Satellite has several attributes referred to as facts. These facts are gathered from several sources, including Ansible. The available facts can be browsed by going to the Monitor menu, and selecting Facts.
The screenshot here shows some of the host facts gathered from Ansible related to the OS:

In the next section, we will be working with the ansible_distribution and ansible_distribution_major_version facts.
Logical And Matchers
In the previous section, we identified the ansible_distribution and ansible_distribution_major_version facts. Now we will create a matcher based off of these facts, so we can set the motd_array variable differently across hosts based on these facts.
The ansible_distribution fact is the name of the operating system distribution the client hosts are running. In the case of RHEL servers, it will be RedHat. The ansible_distribution_major_version fact is the major version of the operating system. For example, it will be 6 for RHEL 6 servers, and 7 for RHEL 7 servers.
For the next example, we will setup a matcher that will configure the motd_array variable based on if the Satellite client hosts are RHEL 6 or RHEL 7. The end result will be all RHEL 6 servers will have one motd file, and all RHEL 7 servers will have a different motd file.
If we only matched on the ansible_distribution (which is RedHat for RHEL servers), it would match all RHEL, including RHEL 6 and RHEL7.
If we only matched on the ansible_distribution_major_version (which returns a number, such as 7, in the case of RHEL 7), it is possible we could have unintentional matches in the event there was another distribution that also happened to be at version 6 or 7.
In this situation, we need to specify a logical and matcher. This means instead of matching on a single criteria (like we previously did with the domain matcher), we are matching on two attributes, and both of the attributes must be true for it to be a match. We will be matching for an ansible_distribution that equals RedHat and where ansible_distribution_major_version equals 7 to match for RHEL 7 servers. We will have another rule that is looking for RedHat and 6 to match RHEL 6 servers.
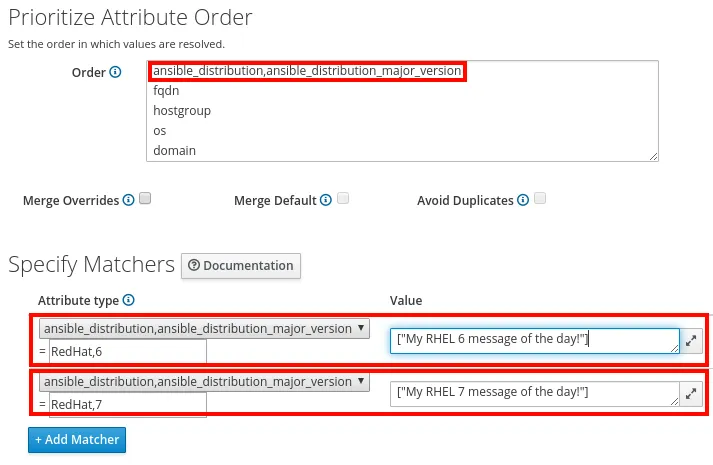
To do this, edit the variable from the Satellite web interface, add a line to the top of the Order section, and specify the two attributes on one line, with a comma between them. When Satellite sees multiple attributes listed on the same line in this manner, it will treat them as a logical and statement. In this case, we will add this line to the Order section: ansible_distribution,ansible_distribution_major_version.
The next step is to locate the Specify Matchers section, under which we’ll add a matcher and click on the drop down for the attribute type, where we’ll select ansible_distribution,ansible_distribution_major_version. After the equals sign, for our RHEL 6 matcher, we will specify RedHat,6 (RedHat will be checked against ansible_distribution, and 6 will be checked against ansible_distribution_major_version). We will also add another matcher and specify RedHat,7 for the RHEL 7 servers, as shown:

Next, we’ll run the role on our hosts, and login to both a RHEL 6 and RHEL 7 server to verify the /etc/motd file is different on each. On the RHEL 7 host, it was set correctly:
root@client1 ~]# cat /etc/redhat-release
Red Hat Enterprise Linux Server release 7.7 (Maipo)
[root@client1 ~]# cat /etc/motd
My RHEL 7 message of the day!
It was set correctly on the RHEL 6 host, as well:
[root@client3 ~]# cat /etc/redhat-release
Red Hat Enterprise Linux Server release 6.9 (Santiago)
[root@client3 ~]# cat /etc/motd
My RHEL 6 message of the day!
Quickly viewing variable values for hosts
When setting up matchers it is helpful to validate that hosts are getting the proper value for the variable you intended. One method to do this is to run the role against the hosts, then check the result was what you intended on the host, as we just did in the previous example.
It is also possible to see the variables for a particular host from the Satellite web interface.
To check this, go to the Hosts menu, and select All Hosts. You’ll then click on a hostname to bring up its details, and finally click the YAML button under the details section for the host. This will show what the motd_array variable was set to for the host.
If we do this for client1.example.com, which is a RHEL 7 server, we see:

And for client3.example.com, which is a RHEL 6 server, we see:

Merging Matchers
By default, the first matcher that is true for a host determines the value for the variable on that host. For example, if we had matchers for the domain name, lifecycle environment, and fully qualified domain name (fqdn), the first one that matched would determine the value for the variable, even if other matchers are true as well.
There is an optional setting for array and hash variables that makes it possible to have Satellite continue checking for additional matchers even if it already found one that is true, then merge all of the matchers that were true into the array or hash variable. This is the Merge Overrides checkbox available above the Specify Matchers section of the edit variable screen.
When using the Merge Override feature with the motd_array variable we have been working with, the result would be a value in the array for each of the matchers that is true, and each of these values in the array would be one line in the motd file when the role was run.
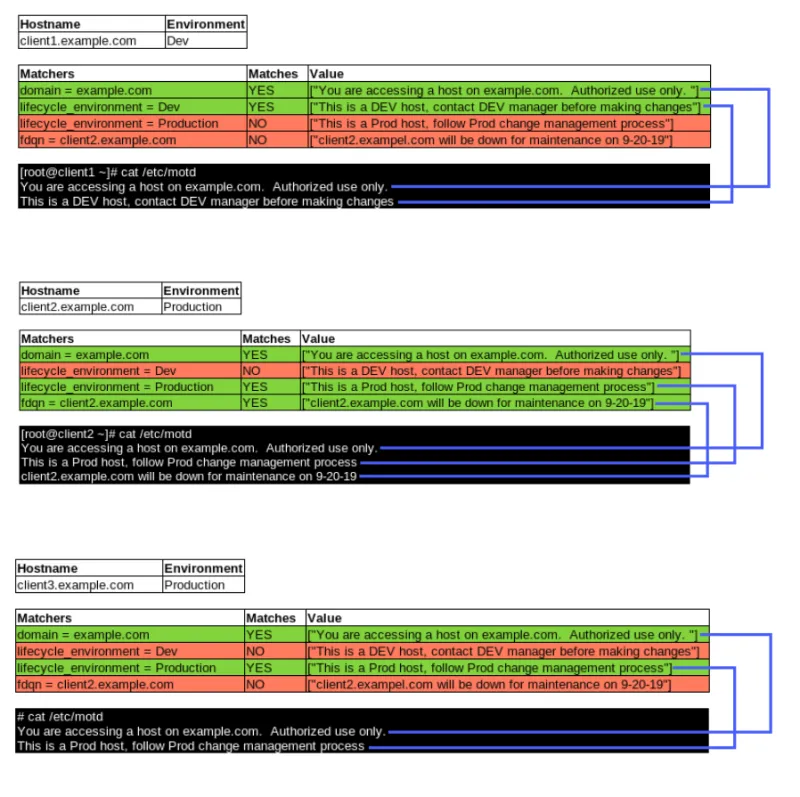
Let’s update the motd_array variable with some different matchers for domain, life_cycle_environment, and fdqn, and also enable the Merge Overrides checkbox:

This will result in each of the three clients having a different /etc/motd file based on the matchers that were true.

Summary and Closing
As evidenced by the material covered, many Ansible variable improvements were introduced in Satellite 6.6 beta, and knowing how to work with Ansible variables in Satellite can be useful.
About the author
Brian Smith is a product manager at Red Hat focused on RHEL automation and management. He has been at Red Hat since 2018, previously working with public sector customers as a technical account manager (TAM).
More like this
How Banco do Brasil uses hyperautomation and platform engineering to drive efficiency
2025 Red Hat Ansible Automation Platform: A year in review
Technically Speaking | Taming AI agents with observability
Building practical self-healing IT | Technically Speaking
Browse by channel
Automation
The latest on IT automation for tech, teams, and environments
Artificial intelligence
Updates on the platforms that free customers to run AI workloads anywhere
Open hybrid cloud
Explore how we build a more flexible future with hybrid cloud
Security
The latest on how we reduce risks across environments and technologies
Edge computing
Updates on the platforms that simplify operations at the edge
Infrastructure
The latest on the world’s leading enterprise Linux platform
Applications
Inside our solutions to the toughest application challenges
Virtualization
The future of enterprise virtualization for your workloads on-premise or across clouds
