Progressive delivery is about the controlled deployment of an application. It is not a new software deployment and delivery concept; it may sound familiar if you did application or system updates before Kubernetes. "Argo Rollouts is a Kubernetes controller and set of [custom resource definitions (CRDs) that] provide advanced deployment capabilities such as blue/green, canary, canary analysis, experimentation, and progressive delivery features to Kubernetes," according to the project's GitHub site. The Rollout resource is a direct replacement for the Kubernetes deployment resource, simplifying the conversion of an existing deployment into a Rollout resource.
[ For more on OpenShift and Argo CD, download the complimentary eBook Getting GitOps. ]
Argo Rollouts use metrics from various providers. (In this tutorial, I'll use the default, Prometheus.) You can use metrics to abort a rollout if there are issues with the application deployment, such as failed health checks or pod restarts. (Using metrics to control the rollout is beyond the scope of this article.)
Note: Red Hat OpenShift and OpenShift GitOps do not officially support Argo Rollouts, but support is expected in 2023.
What are blue, green, and canary deployments?
Blue/green is the concept of having two versions of the same application running simultaneously so that you can verify application updates behave the way they are supposed to. The blue (or production) application doesn't change, and the green (preview or updated application) is deployed beside it.
While this is a tried-and-true approach, it does have some drawbacks. One significant problem with this strategy is that you must have enough capacity to support both applications running simultaneously. This can be a substantial hurdle in resource-constrained environments or with applications that require a license to operate.
Canary is the more modern, advanced approach to blue/green. With a canary deployment, you deploy the new version of the application to a subset of users while the rest continue using the original version. If there's an issue with the new version, only that subset of users is affected. With canary rollouts, you can specify the percentage of traffic allocated to the new application release and a timer for the time between steps. This is ideal when you are trying to test a new feature and you want to gather metrics or data from live traffic.
This article uses OpenShift GitOps to deploy the Argo Rollouts progressive delivery controller. It walks through a blue/green and a canary deployment.
[ Do you know the difference between Red Hat OpenShift and Kubernetes? ]
Deploy the validated pattern
Begin by deploying the argo-rollouts validated pattern. For this demo, I have deployed a 3-node compact cluster using m5.2xlarge machine types in AWS. This demo uses rollouts to deploy onto a single cluster.
$ oc get nodes
NAME                                         STATUS   ROLES           AGE   VERSION
ip-10-0-137-28.us-east-2.compute.internal    Ready    master,worker   13h   v1.24.6+5157800
ip-10-0-165-204.us-east-2.compute.internal   Ready    master,worker   13h   v1.24.6+5157800
ip-10-0-206-142.us-east-2.compute.internal   Ready    master,worker   13h   v1.24.6+5157800

$ oc get machines -n openshift-machine-api
NAME                               PHASE     TYPE        REGION      ZONE         AGE
argo-rollouts-7d9dd-master-0   Running   m5.2xlarge   us-east-2   us-east-2a   13h
argo-rollouts-7d9dd-master-1   Running   m5.2xlarge   us-east-2   us-east-2b   13h
argo-rollouts-7d9dd-master-2   Running   m5.2xlarge   us-east-2   us-east-2c   13h
If you haven't deployed OpenShift before, you could try Red Hat OpenShift Service on AWS (ROSA), the pay-as-you-go OpenShift-managed service.
[ Learning path: Getting started with Red Hat OpenShift Service on AWS (ROSA) ]
Next, create a fork of the argo-rollouts repo. Log in to GitHub in your browser, click the Fork button, and confirm the destination by clicking the big green Create fork button.
Next, install the Validated Patterns Operator from Operator Hub.
Finally, click through to the installed operator, select the Create instance button, and fill out the Create a Pattern form. Most of the defaults are fine, but be sure the GitSpec URL points to your fork of argo-rollouts rather than to the Argo Rollouts repo you forked.
To learn what's going on, click Installed Operators and change the Project to All Projects. After a bit, the following Operators will be installed: Advanced Cluster Manager for Kubernetes multicluster engine for Kubernetes, OpenShift GitOps Package Server, and Validated Patterns Operator.
Once you install everything, clone the repository fork to your local machine. Go to your GitHub account, click the big green code button, and click the copy icon to copy the repository URL.
[ How to explain DevOps in plain English ]
Switch to your command-line interface (CLI) and type:
$ git clone <paste_the_url_just_copied>Next, change directories into the repository.
The Argo Project provides an optional plugin for kubectl, which you can use to manage rollouts in the cluster. This is not required; however, it makes tracking the rollout's progress easy. To install it, follow the official installation procedures.
[ Get the kubectl cheat sheet. ]
Deploy the Argo Rollouts controller
In your repository copy, the manifests that make up Argo Rollouts are in charts/all/argo-rollouts/templates. You could use oc/kubectl create -f, but that defeats the purpose of GitOps. Instead, use openshift-gitops and the validated pattern framework to deploy the Argo Rollouts controller.
If you want to understand the purpose of each manifest, visit the Argo Rollouts architecture page, which details each resource.
I'll review how the framework deploys argo-rollouts. Check the values-hub.yaml file to find out how Argo Rollouts are declared.
First, tell ArgoCD to create the argo-rollouts namespace:
  namespaces:
  - open-cluster-management
  - vault
  - golang-external-secrets
  - argo-rollouts
Next, define a project. A project is an ArgoCD resource that groups application resources:
  projects:
  - hub
  - argo-rollouts
Finally, add a map for argo-rollouts that defines the application:
applications:
<...omitted...>
argo-rollouts:
name: argo-rollouts
namespace: argo-rollouts
project: argo-rollouts
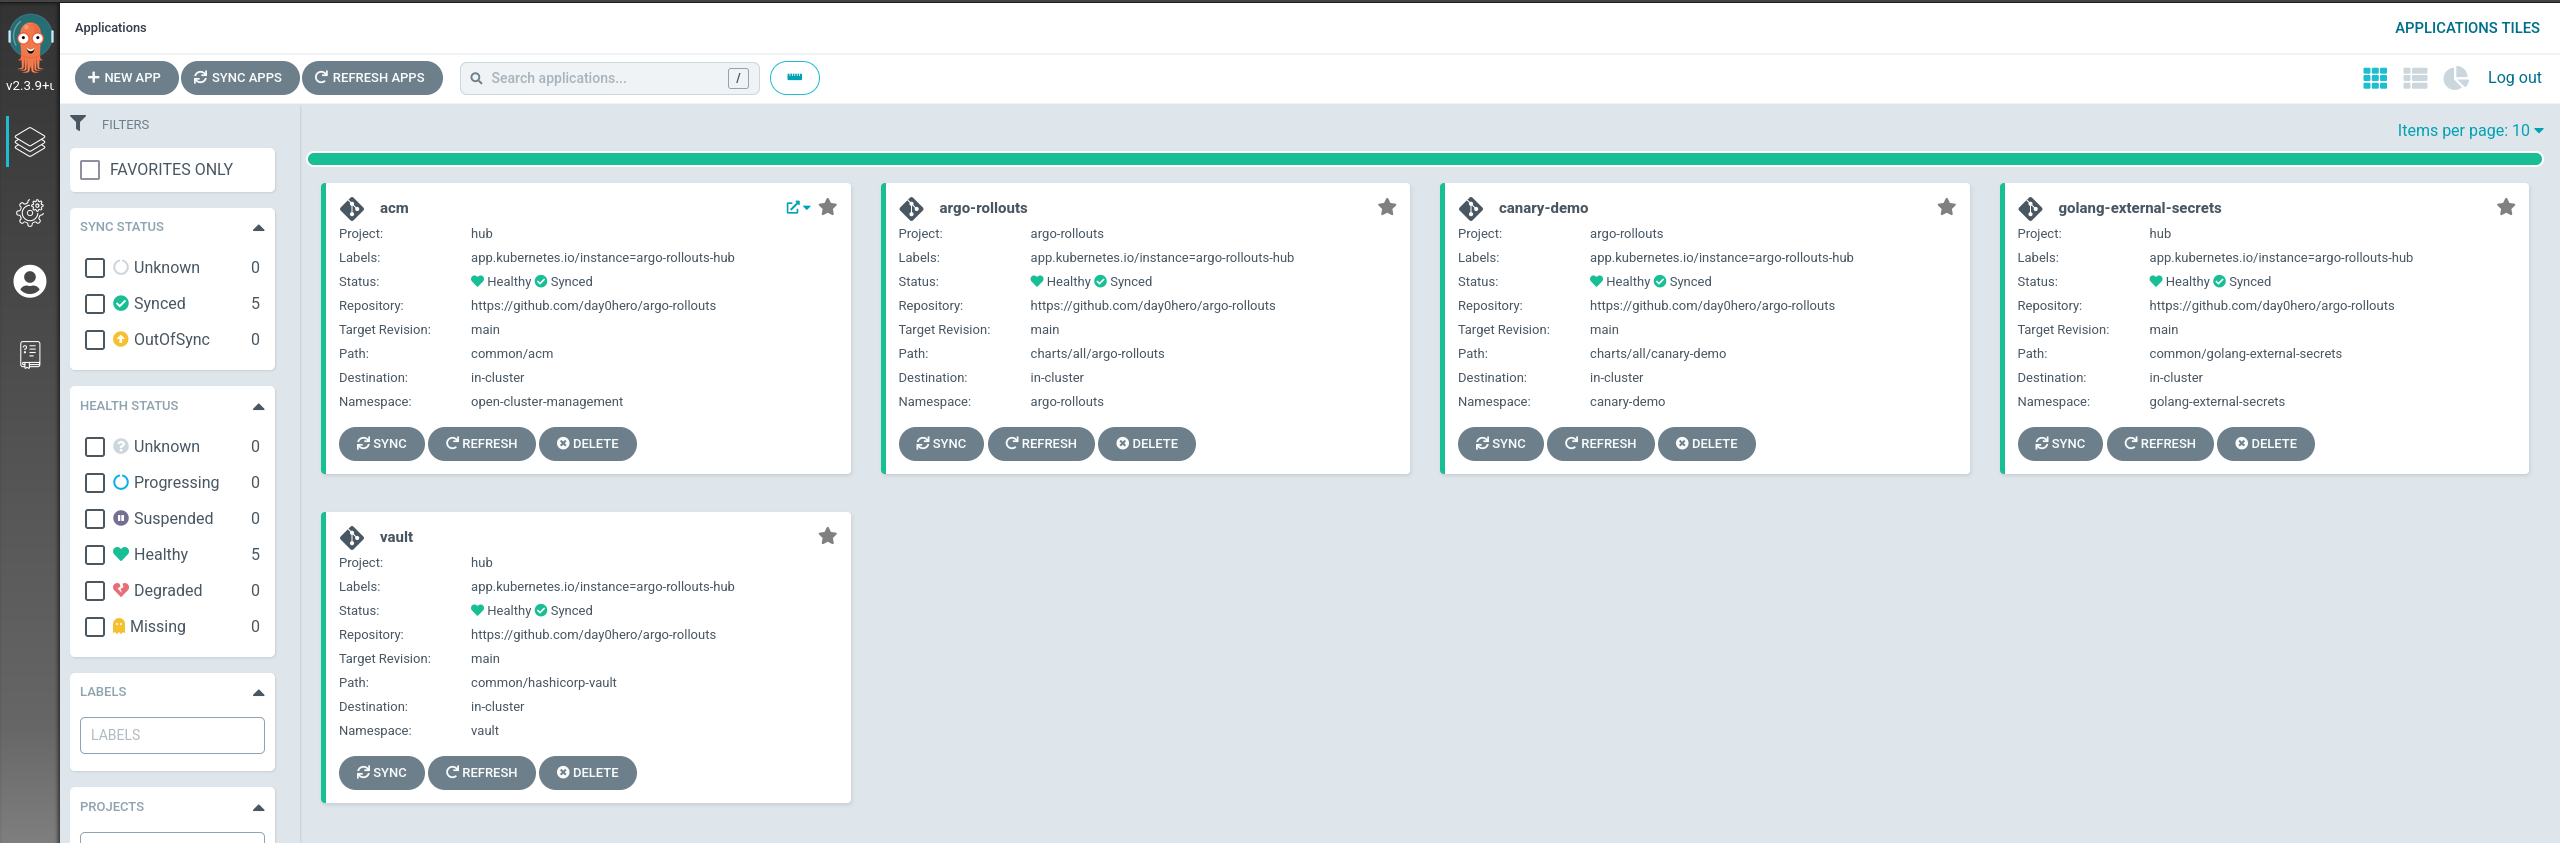
path: charts/all/argo-rolloutsTo watch the deployment in action, log in to your cluster console, select the Squared drop-down box, and choose Hub ArgoCD. After accepting the security warnings for self-signed certificates, click Login with OpenShift on the ArgoCD login screen. When prompted, select Allow user permissions.
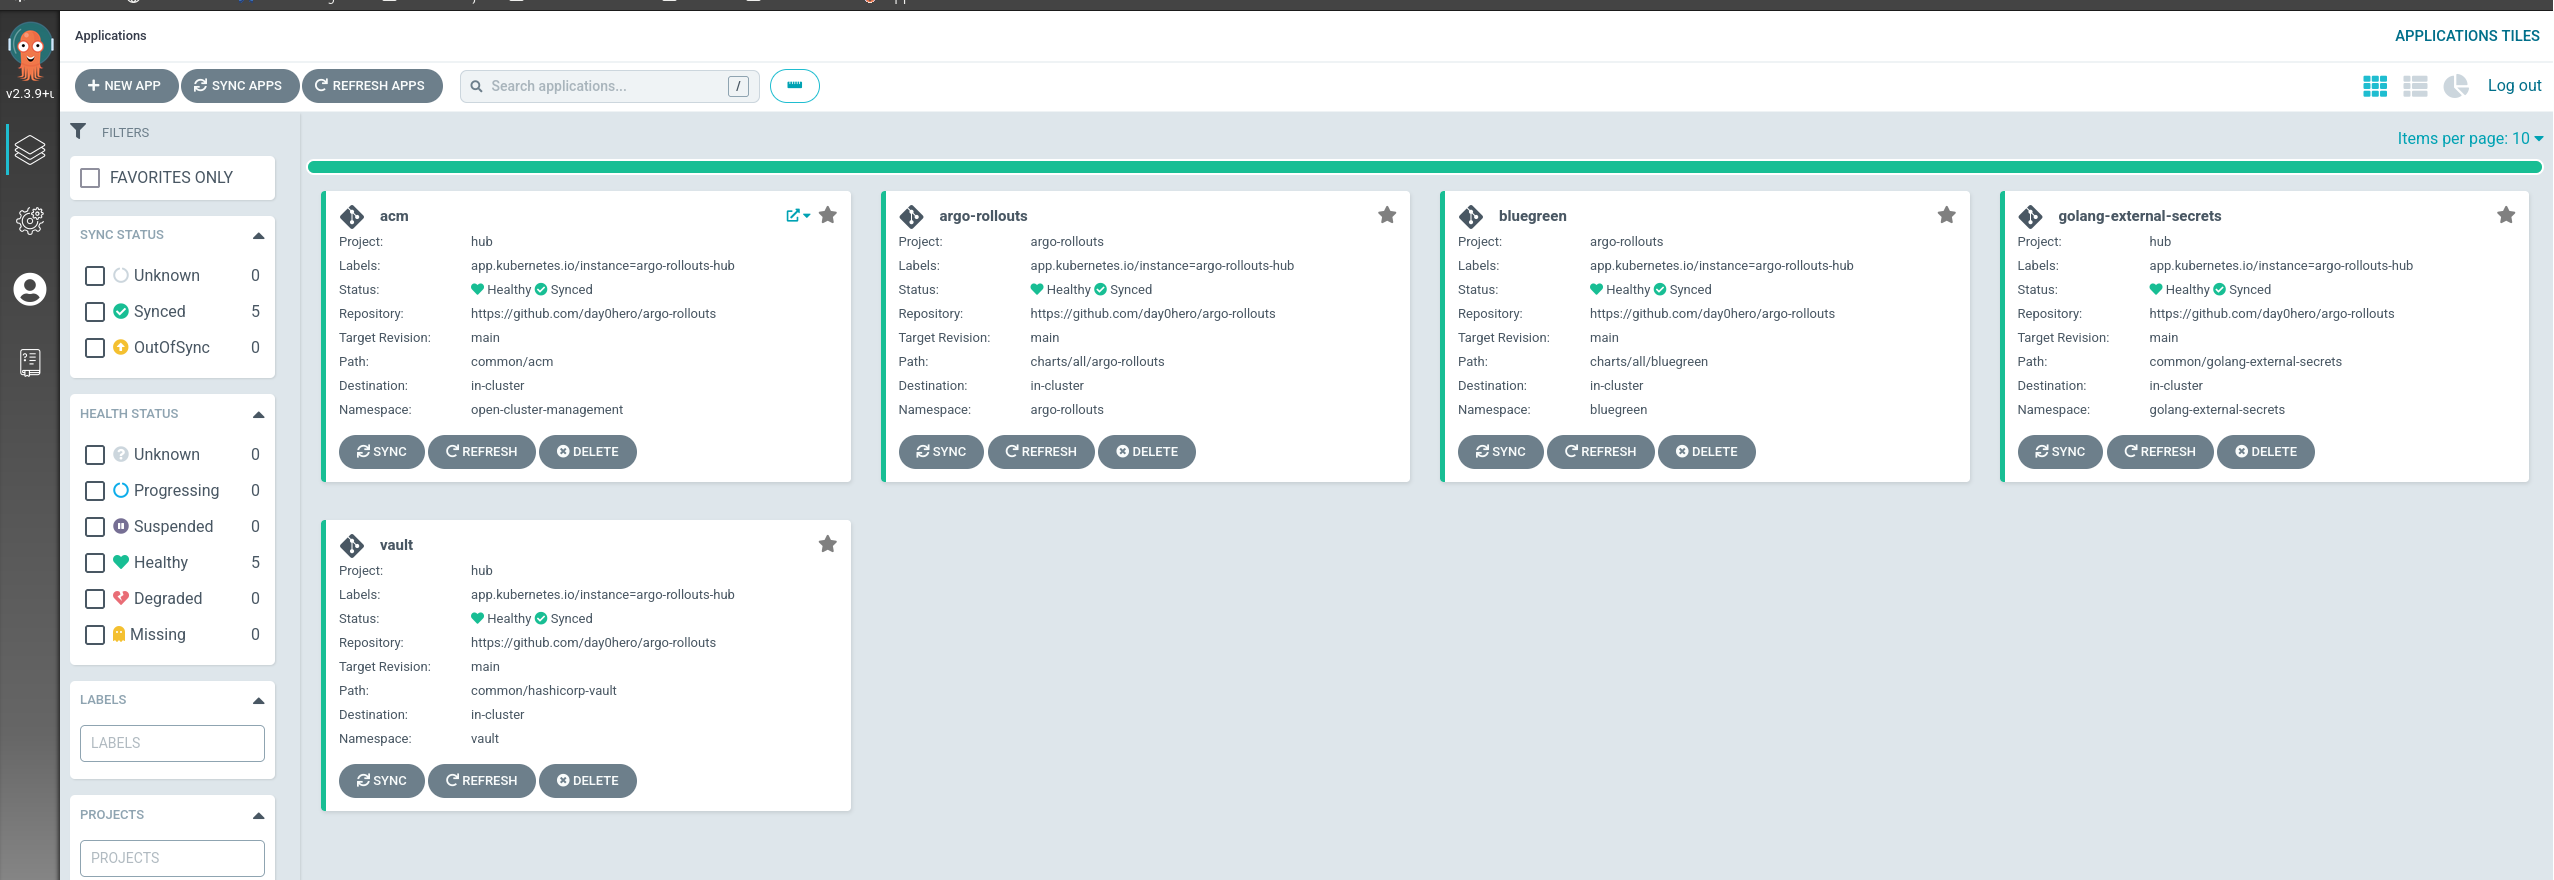
You are now in the ArgoCD console and the applications are deploying. If you don't notice the application rollouts immediately, don't fret; by default, ArgoCD's reconciliation loop runs every three minutes.
After that time, the following should be in your ArgoCD console:

With Argo Rollouts deployed, you can start using progressive delivery. I'll begin with blue/green deployments.
[ Learn about upcoming webinars, in-person events, and more opportunities to increase your knowledge at Red Hat events. ]
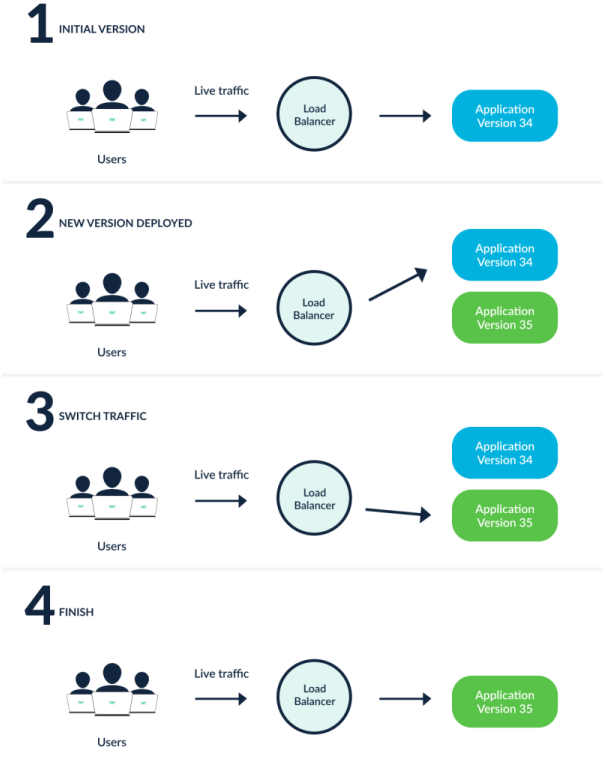
Manage blue/green deployments
When you use a blue/green deployment strategy, you must have two instances of the application running simultaneously. The "blue," or production, instance will continue to receive connections and run without change. The "green," or updated, application will start and be available using a different service. You can create a route (or ingress) if you'd like and then promote the green application to production when you're satisfied.
Once promoted, the rollout will update the blue ReplicaSet, which then scales the blue version of the pods down to zero. After the rollout promotion completes, you can check the rollout status using the Argo Rollouts plugin.
I'll add the blue/green application to the pattern. The first thing to do is update the values-hub.yaml file.
First, add the bluegreen namespace to the list of namespaces OpenShift GitOps will create:
  namespaces:
  - open-cluster-management
  - vault
  - golang-external-secrets
  - argo-rollouts
  - bluegreen
Create this application in the argo-rollouts project. This example is just for simplicity in the demo.
Next, add the bluegreen application stanza under applications:
  applications:
    <... omitted ...>
    bluegreen:
      name: bluegreen
      namespace: bluegreen
      project: argo-rollouts
      path: charts/all/bluegreen
When you finish editing, make sure to commit your changes to Git:
$ git commit -am "Added blue-green application to the pattern"

$ git push -u origin main
The demo application is an example that the Argo Project provides. Declare this image in the values-global.yaml file and modify the tag to trigger the rollout:
  rollout:
    image: argoproj/rollouts-demo:blue
Review the GIF below on adding bluegreen to the pattern.
Check that the application deployed successfully in the ArgoCD user interface. If everything goes well, you should have something like this:
With the demo application deployed, add a rollout by changing the image tag in values-global.yaml to green.
Once you've made the change, commit and push the updates to Git:
$ git add values-global.yaml

$ git commit -m "triggering rollout with image update"

$ git push -u origin main
After ArgoCD recognizes the update, the rollout controller will create a ReplicaSet for the green application and start the desired number of pods. The green application uses its own service, which is exposed through a route. Once the ReplicaSet creates the pods, the rollout will pause and wait for an action to promote or abort it.
You have two ways of viewing the rollout. The first is through the ArgoCD UI. The other is the ArgoCD rollouts plugin. The UI doesn't provide as much detail as the plugin, but I'll show you both for reference.
Here is the plugin before the image tag is detected:
$ oc argo rollouts get rollout bluegreen
Name:            bluegreen
Namespace:       bluegreen
Status:          ✔ Healthy
Strategy:        BlueGreen
Images:          argoproj/rollouts-demo:blue (stable, active)
Replicas:
  Desired:       2
  Current:       2
  Updated:       2
  Ready:         2
  Available:     2

NAME                                   KIND        STATUS     AGE  INFO
⟳ bluegreen                            Rollout     ✔ Healthy  11m
└──# revision:1
   └──⧉ bluegreen-5f5746dc47           ReplicaSet  ✔ Healthy  11m  stable,active
      ├──□ bluegreen-5f5746dc47-5wfnt  Pod         ✔ Running  11m  ready:1/1
      └──□ bluegreen-5f5746dc47-q52cl  Pod         ✔ Running  11m  ready:1/1
Once the image tag is detected and the rollout executes, this is what will happen:
$ oc argo rollouts get rollout bluegreen
Name:            bluegreen
Namespace:       bluegreen
Status:          ॥ Paused
Message:         BlueGreenPause
Strategy:        BlueGreen
Images:          argoproj/rollouts-demo:blue (stable, active)
                 argoproj/rollouts-demo:green (preview)
Replicas:
  Desired:       2
  Current:       4
  Updated:       2
  Ready:         2
  Available:     2

NAME                                   KIND        STATUS     AGE  INFO
⟳ bluegreen                            Rollout     ॥ Paused   13m
├──# revision:2
│  └──⧉ bluegreen-69d5bcb78            ReplicaSet  ✔ Healthy  66s  preview
│     ├──□ bluegreen-69d5bcb78-d5bjp   Pod         ✔ Running  66s  ready:1/1
│     └──□ bluegreen-69d5bcb78-vnw4q   Pod         ✔ Running  66s  ready:1/1
└──# revision:1
   └──⧉ bluegreen-5f5746dc47           ReplicaSet  ✔ Healthy  13m  stable,active
      ├──□ bluegreen-5f5746dc47-5wfnt  Pod         ✔ Running  13m  ready:1/1
      └──□ bluegreen-5f5746dc47-q52cl  Pod         ✔ Running  13m  ready:1/1
This is what the rollout looks like in the ArgoCD interface:
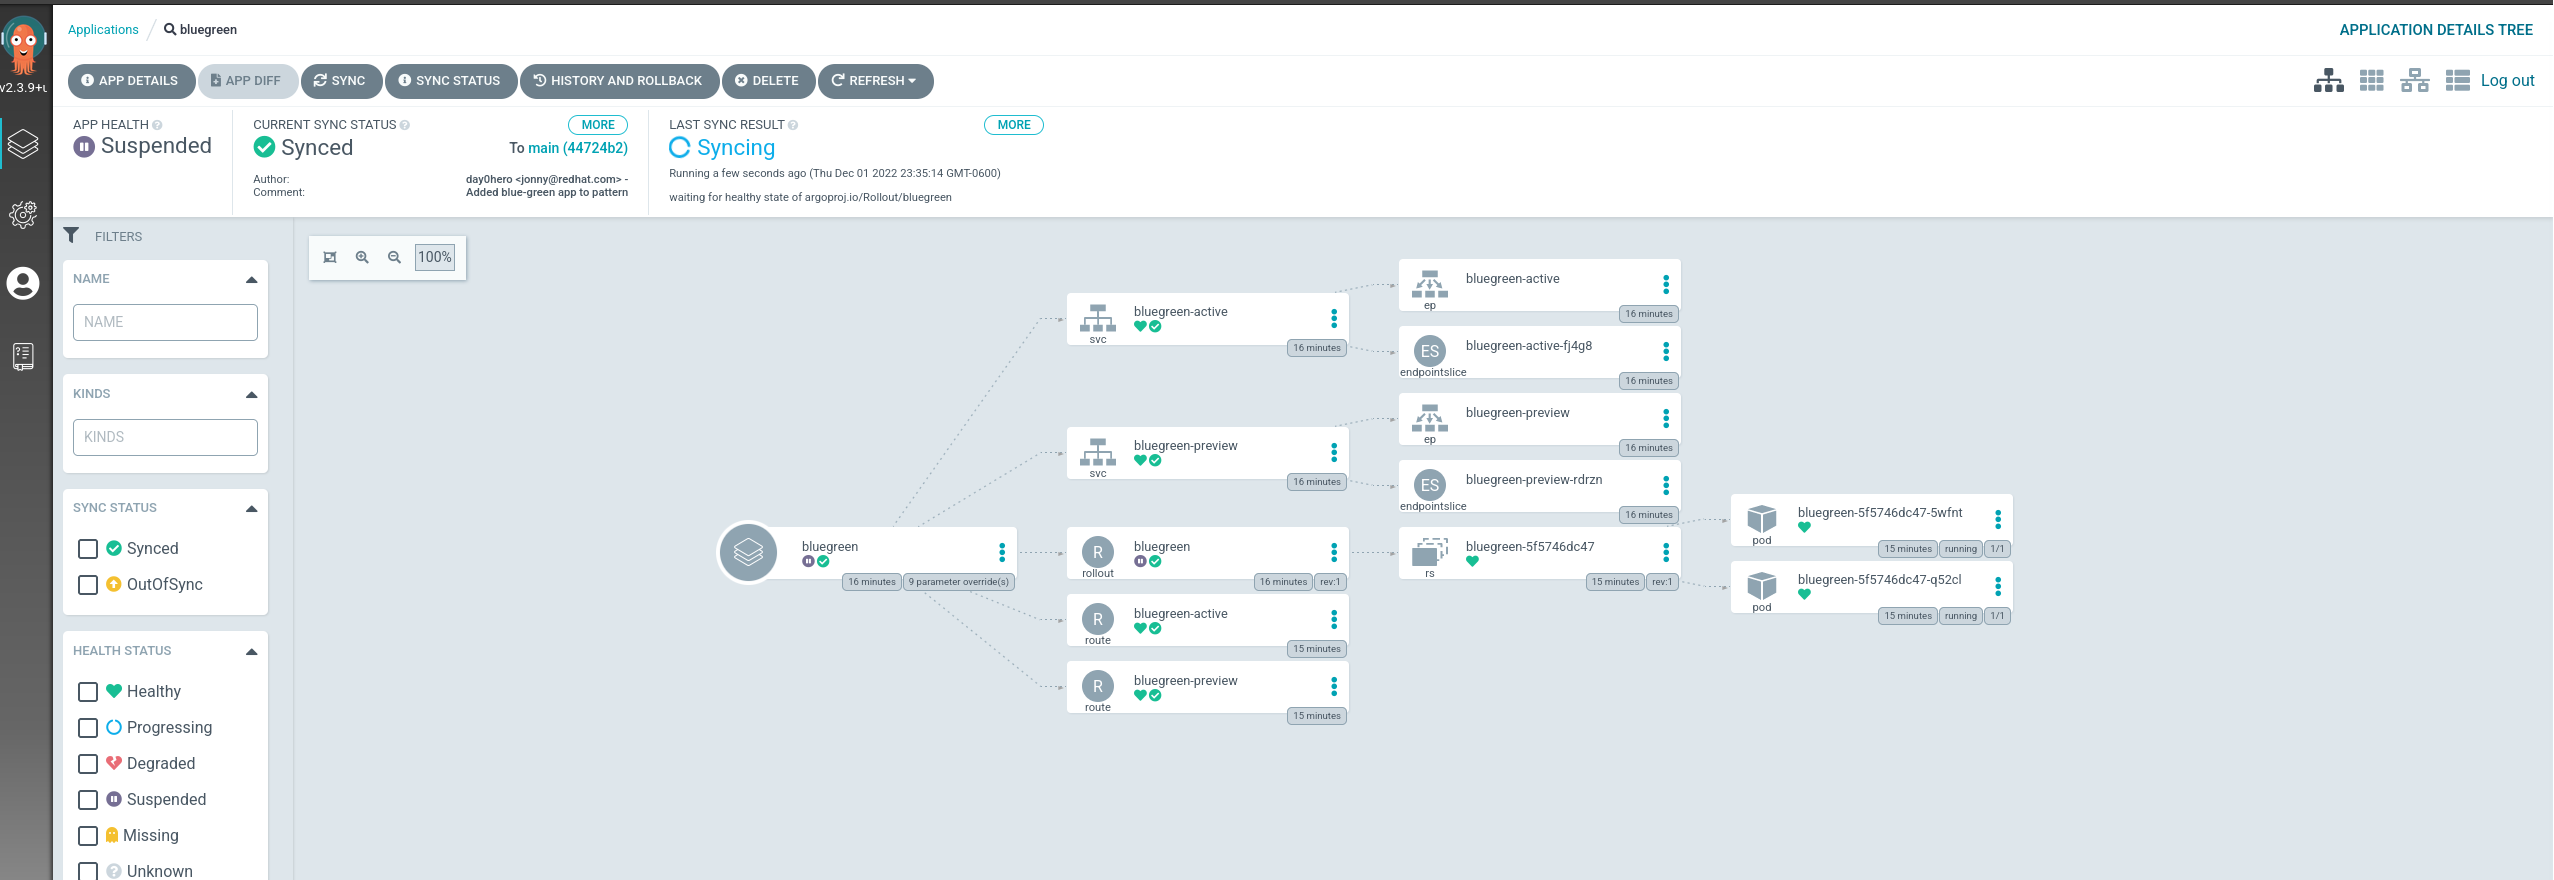
The rollout resource is paused because it's waiting on an administrator to approve or cancel the deployment. Both applications are running side by side. Next, look at the routes.
The active/blue/production route:

The preview/update/new route:
If you promote the application now, the green application will become primary.
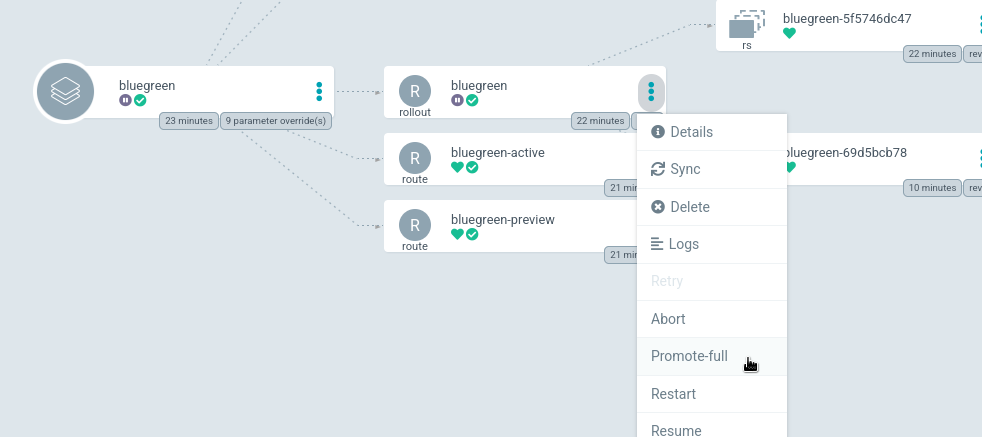
In the ArgoCD interface, click on the bluegreen application. Select the vertical ellipsis next to the bluegreen rollout in the application context. Click Promote-full, or choose Abort to back out.
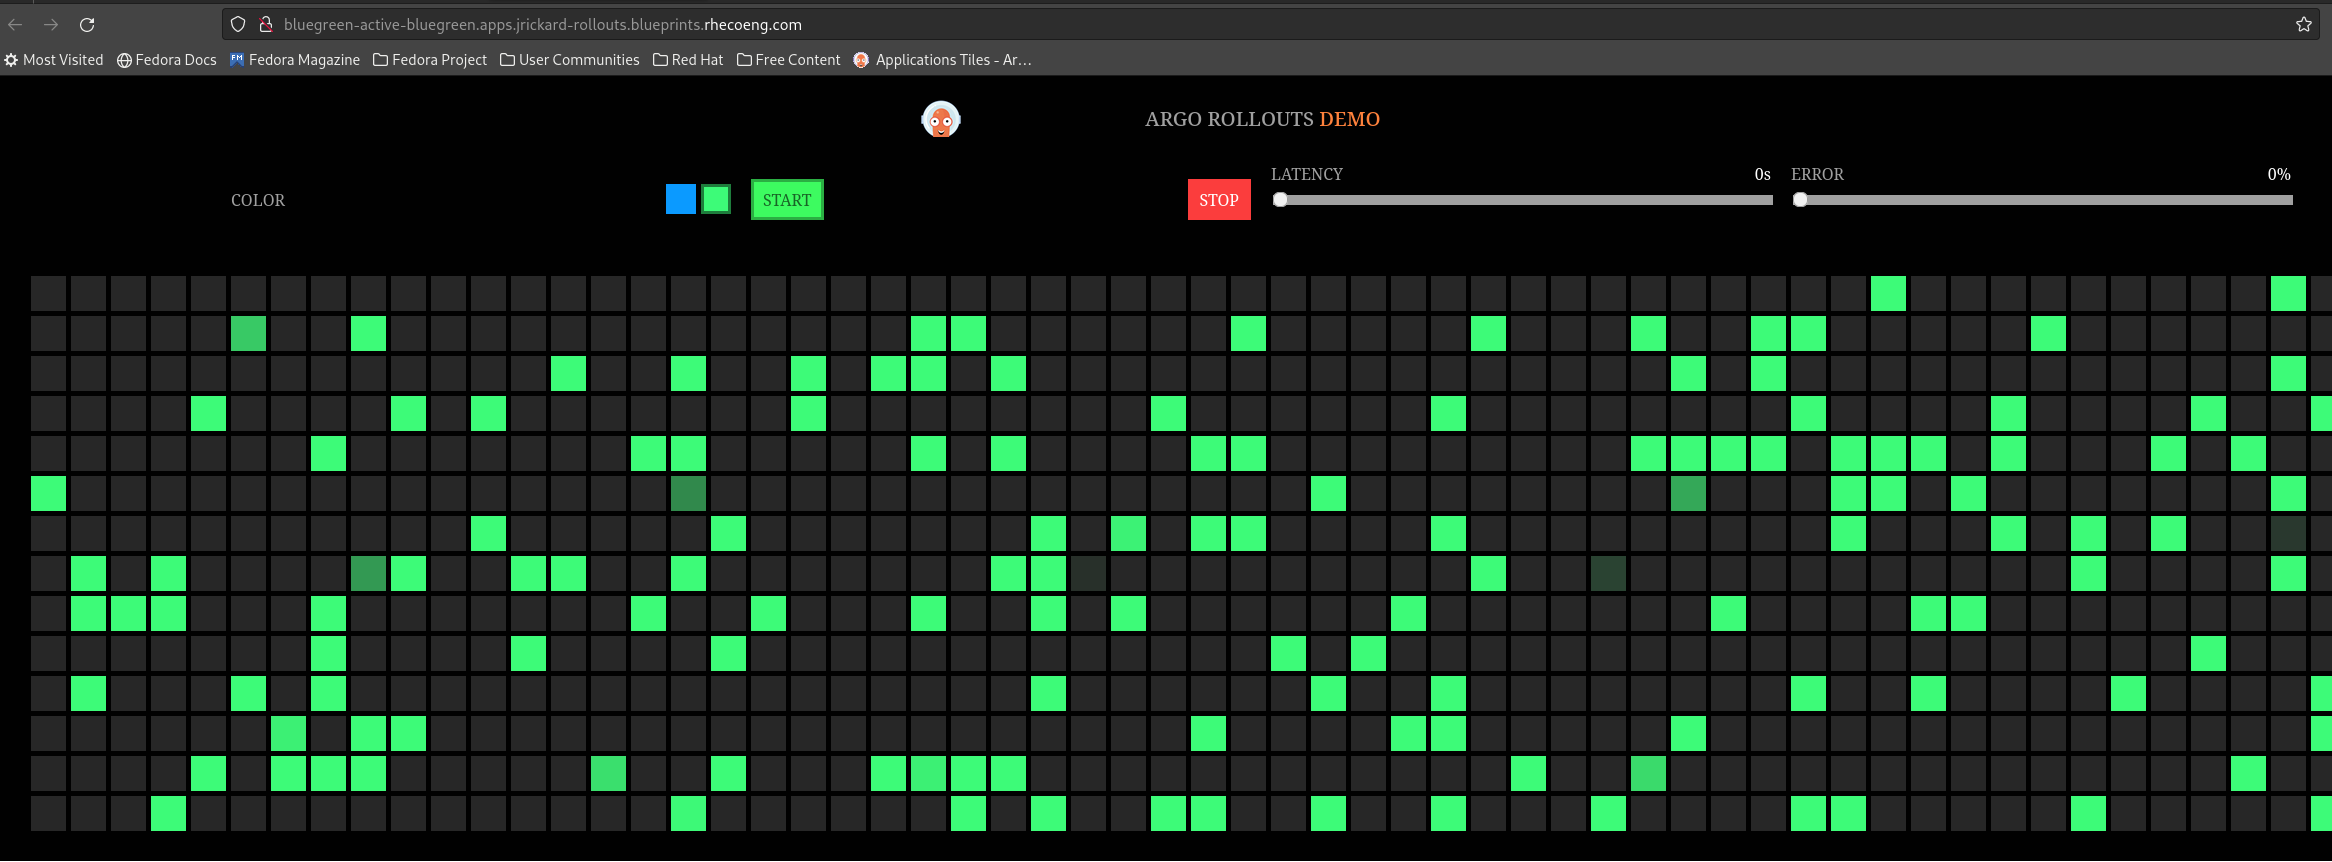
Now the active route's color has changed to green.
You could do the same with the Argo Rollouts plugin to back out of the rollout by using:
kubectl argo rollouts promote bluegreen or kubectl argo rollouts abort bluegreen[ Become a Red Hat Certified Architect and boost your career. ]
You can verify that the application was promoted correctly by using the Argo Rollouts plugin, checking the route, or checking the image tag in the rollout resource:
$ oc argo rollouts get rollout bluegreen
Name:            bluegreen
Namespace:       bluegreen
Status:          ✔ Healthy
Strategy:        BlueGreen
Images:          argoproj/rollouts-demo:green (stable, active)
Replicas:
  Desired:       2
  Current:       2
  Updated:       2
  Ready:         2
  Available:     2

NAME                                  KIND        STATUS        AGE  INFO
⟳ bluegreen                           Rollout     ✔ Healthy     26m
├──# revision:2
│  └──⧉ bluegreen-69d5bcb78           ReplicaSet  ✔ Healthy     13m  stable,active
│     ├──□ bluegreen-69d5bcb78-d5bjp  Pod         ✔ Running     13m  ready:1/1
│     └──□ bluegreen-69d5bcb78-vnw4q  Pod         ✔ Running     13m  ready:1/1
└──# revision:1
   └──⧉ bluegreen-5f5746dc47          ReplicaSet  • ScaledDown  26m
That's it for the blue/green deployment! The next example is a canary deployment.
Manage canary deployments
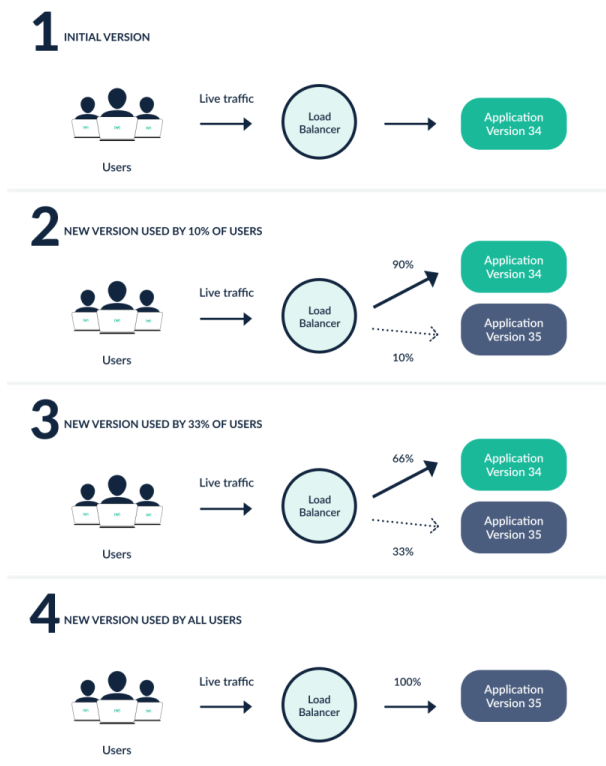
Canary deployments give you significant control over application deployment. You can define what percentage of ingress traffic gets the canary or updated application and for how long. You can use metrics to determine the rollout health and decide whether to continue or abort the rollout.
This feature gives you insight into the application's health as it is deployed. It offers information on whether features are being used and if they're working correctly. It opens all kinds of opportunities to learn more about the applications and how they're used. Canary deployments are powerful and add flexibility to application deployments, either through a full application deployment or just testing a feature.
The canary demo is located in charts/all/canary-demo. As with the bluegreen demo, you must add the canary-demo application to the pattern for ArgoCD to deploy it.
Add the canary-demo namespace to the list of namespaces OpenShift GitOps will create:
  namespaces:
  - open-cluster-management
  - vault
  - golang-external-secrets
  - argo-rollouts
  - canary-demo
Create this application in the argo-rollouts project. This step is just for simplicity in the demo.
Add the canary-demo application stanza under applications:
  applications:
    <... omitted ...>
    bluegreen:
      name: canary-demo
      namespace: canary-demo
      project: argo-rollouts
      path: charts/all/canary-demo
Commit your changes to Git:
$ git commit -am "Added canary application to the pattern"

$ git push -u origin main
You can monitor the ArgoCD interface for the application deployment. When the application has successfully deployed, you should have something similar to the image below in the ArgoCD interface:
Now, look at the rollout resource for the canary-demo application.
$ oc get rollout -o yaml canary-demo -n canary-demo
 strategy:
   canary:
     steps:
       - setWeight: 20
       - pause: {}
       - setWeight: 40
       - pause:
           duration: 10
       - setWeight: 60
       - pause:
           duration: 10
       - setWeight: 80
       - pause:
           duration: 10
In the above snippet, you tell the rollout controller that you want 20% of the traffic (setWeight: 20) to go to the canary for an indefinite amount of time (pause: {}). In the next step, you want 40% of the traffic to go to the canary for 10 seconds, then 60% for 10 seconds, then 80% for 10 seconds until 100% of the traffic is using the canary service. You can modify these values to whatever makes sense for your deployment. Maybe 10 seconds isn't long enough to collect performance data on the feature canary, and you need to run it longer.
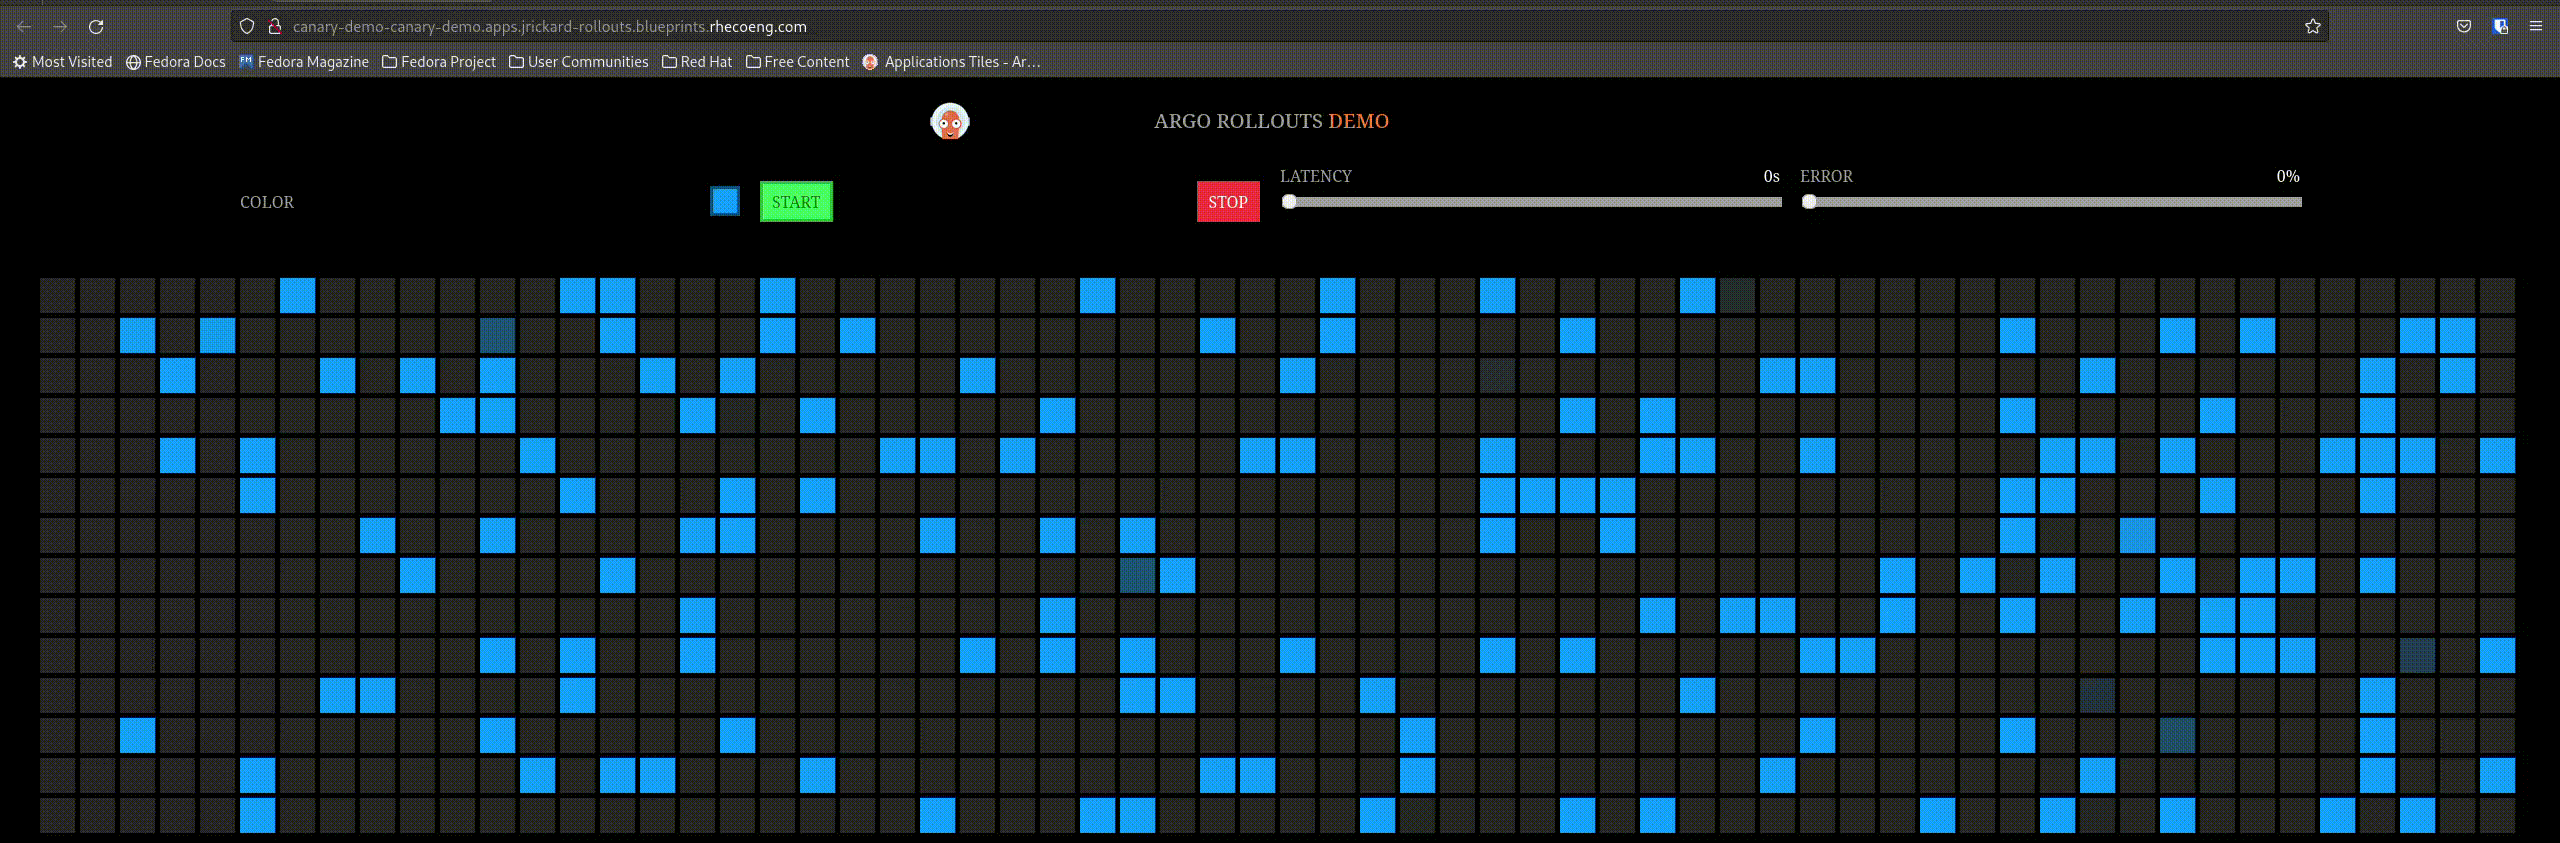
The active service before the rollout looks like this:
Trigger a rollout by changing the image tag. Edit the values-global.yaml and change the tag from blue to red.
Make sure you push your changes to Git:
$ git commit -am "Change canary image tag"

$ git push -u origin main
When the canary rollout occurs, it removes one pod from the existing ReplicaSet to support the canary ReplicaSet. Use the Argo Rollout plugin to learn what this looks like:
$ oc argo rollouts get rollout canary-demo
Name:            canary-demo
Namespace:       canary-demo
Status:          ॥ Paused
Message:         CanaryPauseStep
Strategy:        Canary
  Step:          1/8
  SetWeight:     20
  ActualWeight:  20
Images:          argoproj/rollouts-demo:blue (stable)
                 argoproj/rollouts-demo:red (canary)
Replicas:
  Desired:       5
  Current:       5
  Updated:       1
  Ready:         5
  Available:     5

NAME                                     KIND        STATUS     AGE    INFO
⟳ canary-demo                            Rollout     ॥ Paused   8m45s
├──# revision:2
│  └──⧉ canary-demo-6ffd7b9658           ReplicaSet  ✔ Healthy  39s    canary
│     └──□ canary-demo-6ffd7b9658-dhhph  Pod         ✔ Running  38s    ready:1/1
└──# revision:1
   └──⧉ canary-demo-7d984ffb4c           ReplicaSet  ✔ Healthy  8m45s  stable
      ├──□ canary-demo-7d984ffb4c-5hdsr  Pod         ✔ Running  8m45s  ready:1/1
      ├──□ canary-demo-7d984ffb4c-6wtjq  Pod         ✔ Running  8m45s  ready:1/1
      ├──□ canary-demo-7d984ffb4c-9vnq9  Pod         ✔ Running  8m45s  ready:1/1
      └──□ canary-demo-7d984ffb4c-zh2bj  Pod         ✔ Running  8m45s  ready:1/1


$ oc get replicasets
NAME                     DESIRED   CURRENT   READY   AGE
canary-demo-6ffd7b9658   1         1         1       47s
canary-demo-7d984ffb4c   4         4         4       8m53s
The rollout is paused in the ArgoCD interface, just like with blue/green.

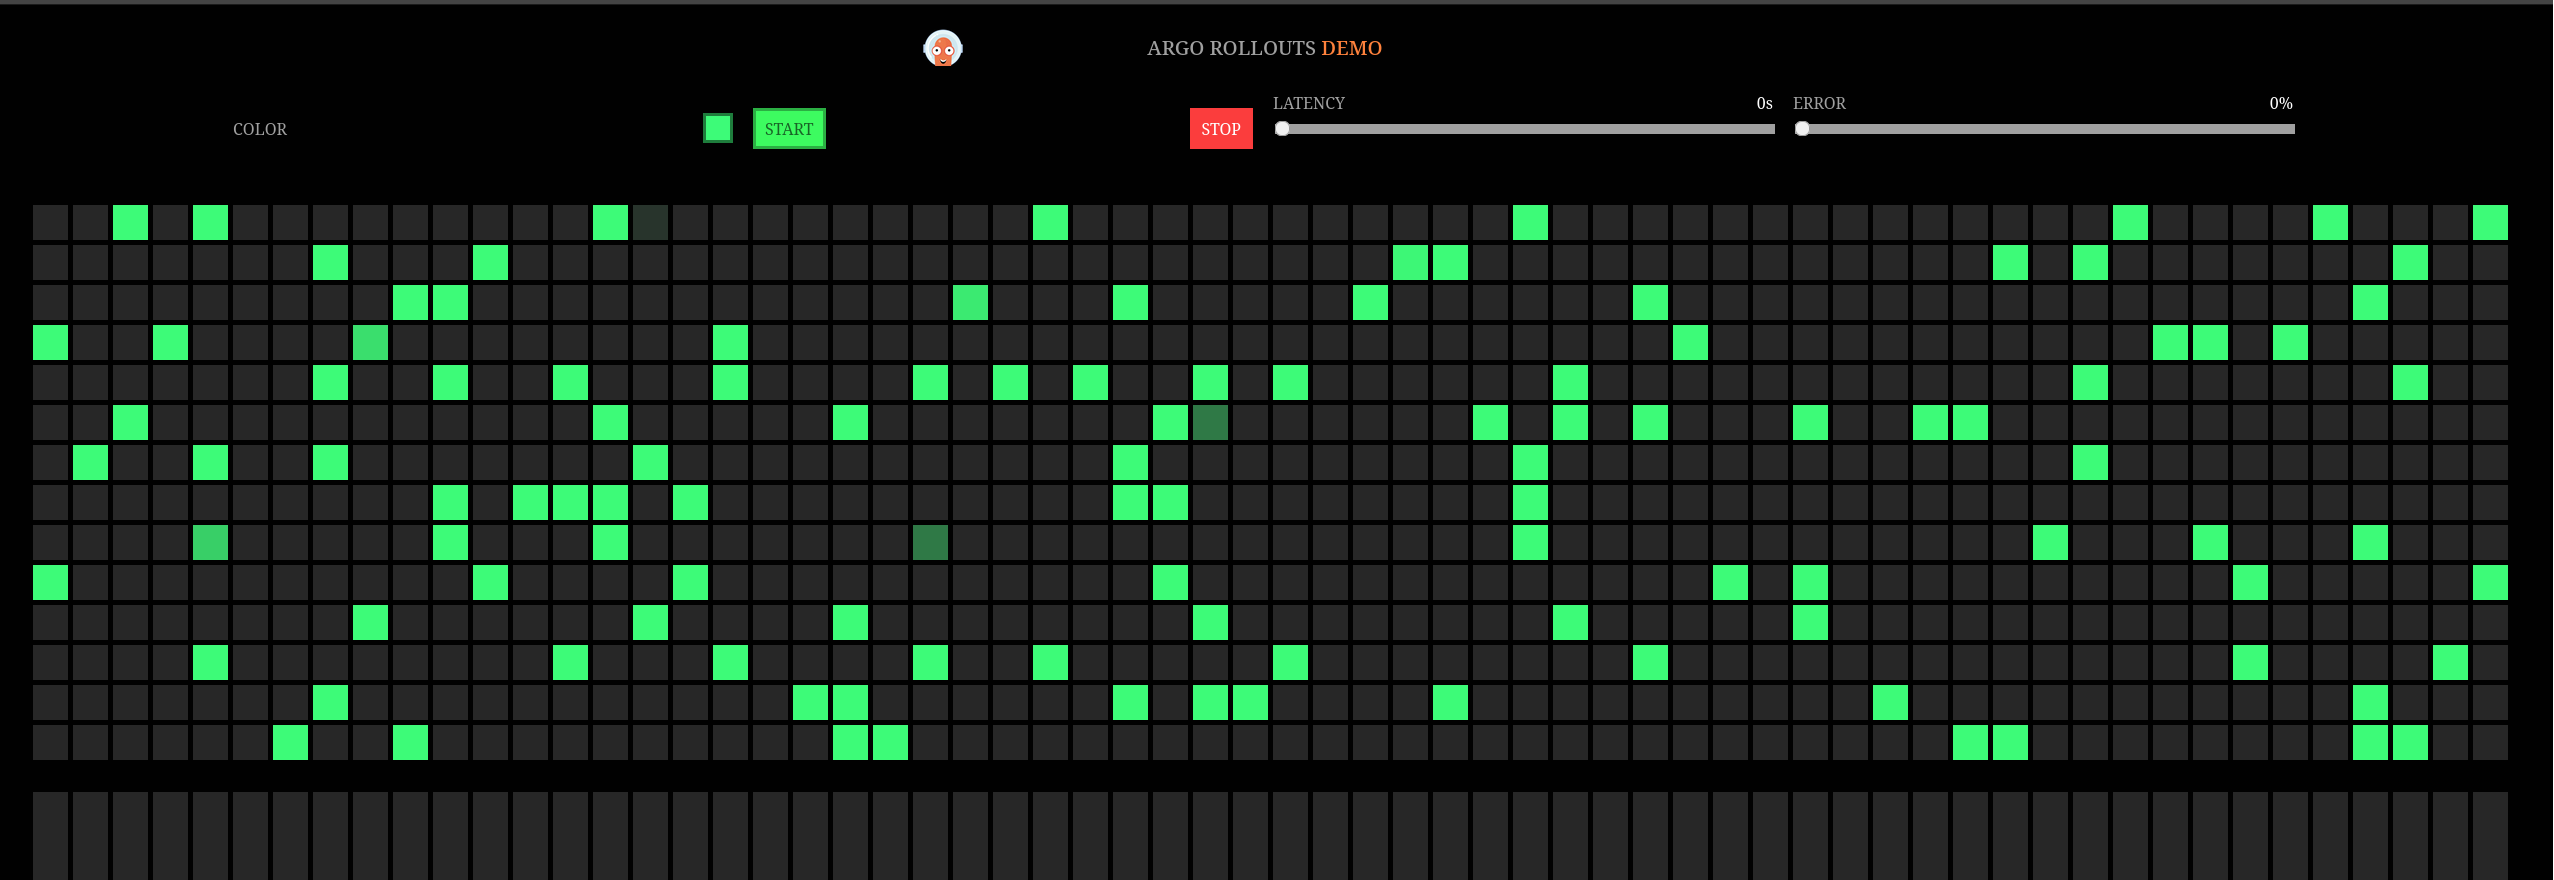
But what about the application? You said you only want 20% of the traffic to go to the new app:
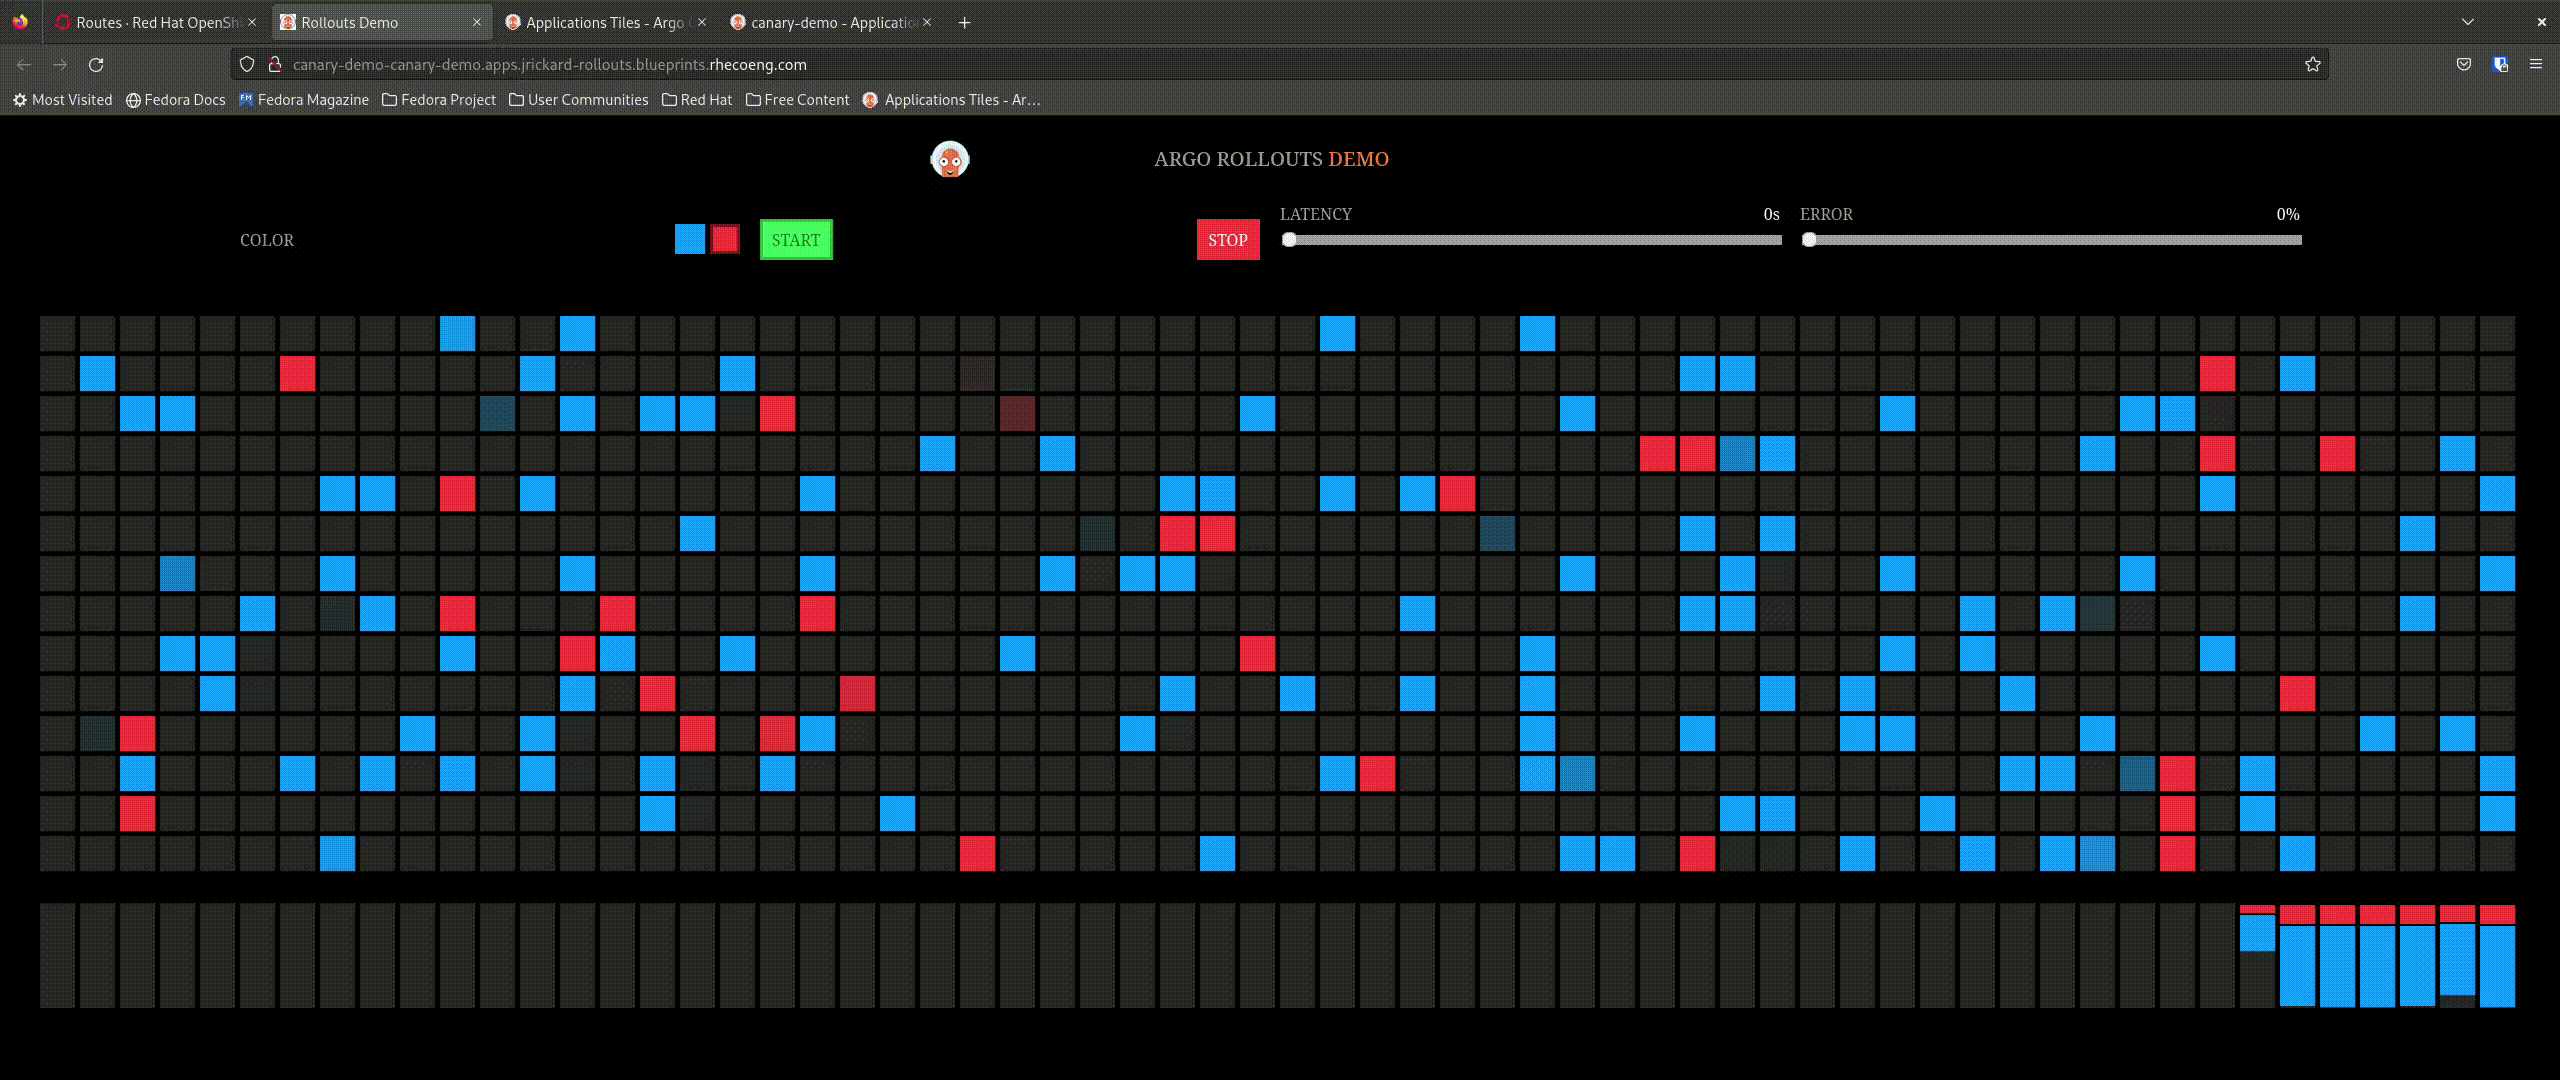
That is awesome! Now promote the application and find out what happens. The expectation is that it will incrementally update the percentage of connections to the new application until it is completely promoted.

Here is what it looks like using the Argo Rollouts plugin:
[ Check out Red Hat Portfolio Architecture Center for a wide variety of reference architectures you can use. ]
Wrap up
Argo Rollouts makes progressive delivery of applications easy. Whether you want to deploy using blue/green or the more advanced canary rollout is up to you. The canary rollout is powerful, offering the ultimate level of control with insights and flexibility to deploy applications. Argo Rollouts can do so much more—this demo barely scratches the surface! Keep an eye out for Argo Rollouts as part of OpenShift GitOps in 2023.
This article is adapted from Hybrid Cloud Patterns and is republished with permission.
About the author

Jonny is a Special Projects Engineer with the Validated Patterns team at Red Hat, he is also the co-host of the "Ask an OpenShift Admin" livestream.
More like this
Turning complexity into confidence with Red Hat Technical Supportability Review with AI
Why developer portals matter more in the age of AI agents
How Are Tech Hubs Changing? | Compiler
Unlocking zero-trust supply chains | Technically Speaking
Browse by channel

Automation
The latest on IT automation for tech, teams, and environments

Artificial intelligence
Updates on the platforms that free customers to run AI workloads anywhere

Open hybrid cloud
Explore how we build a more flexible future with hybrid cloud

Security
The latest on how we reduce risks across environments and technologies

Edge computing
Updates on the platforms that simplify operations at the edge

Infrastructure
The latest on the world’s leading enterprise Linux platform

Applications
Inside our solutions to the toughest application challenges
Virtualization
The future of enterprise virtualization for your workloads on-premise or across clouds