
In a previous article, I described how to implement configuration as code for automation controller (then Red Hat Ansible Tower) using the controller_configuration Ansible Content Collection created by the Red Hat Community of Practice. In this article, I describe how to take that Collection and create an organization-wide solution to deploying configuration as code. The code in this article makes use of the updated redhat_cop.controller_configuration Collection.
Overview
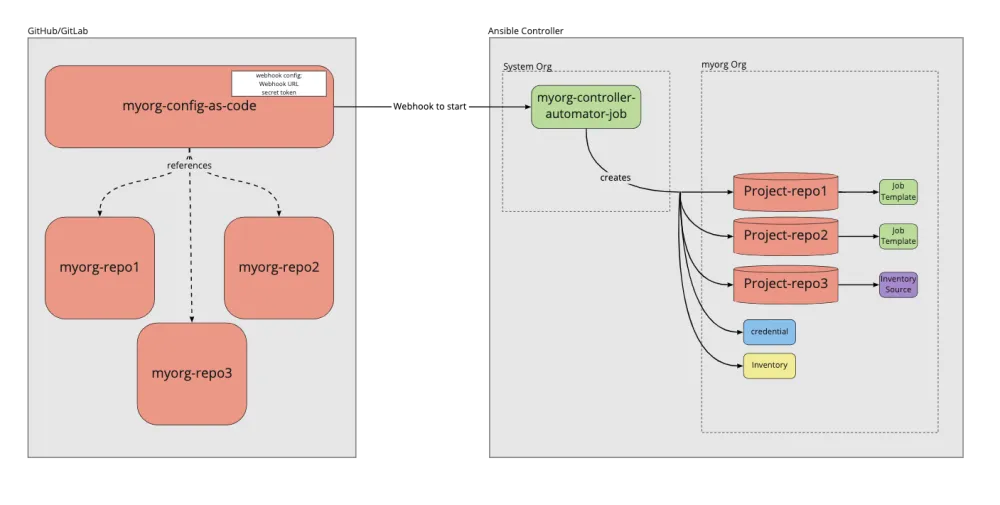
This approach will include a central playbook which will be used to make changes to automation controller, though the actual configuration will be stored in separate repositories to allow for separation of concerns between different organizations. The article describes a solution for putting together these repositories and running them from automation controller itself, including suggestions for how the changes might be put into effect and how the job templates themselves could be triggered.
This is simply a set of suggestions from which all or some of your setup can take inspiration. The article also assumes some familiarity with using automation controller and Ansible Content Collections, and that you know the basics of using the controller_configuration Collection described in the previous article.
This diagram shows the model we will be building out, so come back to this for reference of the big picture.
Creating the central automation
The central automation which "does the magic" is a simple playbook that calls upon the roles within the redhat_cop.controller_configuration Collection. The organizational information (i.e., the variables which will be passed to the roles) will be dealt with elsewhere and imported into this mechanism as an inventory. Therefore, the only thing we need to do here is create a minimal playbook as below:
---
- hosts: controller
  connection: local
  roles:
    - redhat_cop.controller_configuration.dispatch
Note that here we use the dispatch role. This is a new role in the Collection which imports all of the available roles. By nature of how the roles work, if no relevant variables are passed in, the role will simply do nothing and move on.
We will also need to pull in the Collections, making sure that the two required Collections are imported using a collections/requirements.yml file:
---
collections:
  - ansible.controller
  - redhat_cop.controller_configuration
Automation controller will then pull in these Collections at runtime and we will be able to make use of the roles and modules needed. Note that ansible.controller could be replaced with awx.awx for the upstream version.
Setting up a repo for each organization
The hard part of the setup is creating the variables which are used to actually generate the configuration for automation controller. In this instance, we will create one inventory per organization in a standardized way, which the playbook can consume easily and pass to the roles.
In the playbook above we referenced a host: controller. We need to ensure this is the host we reference in our inventory. To do this, we’ll create a file named inventory in our repo that contains a single line with controller as below:
controller
Next, we will create the variables for the controller host. This will be done by using a host_vars directory and further creating the directory host_vars/controller so the content of any files inside will be loaded as variables.
After that, we will create one file per controller object type (e.g., projects.yml, inventories.yml, inventory_sources.yml and so on). In each of these, we’ll describe the objects needed as set out in the previous article. Such a ‘host_vars/controller/projects.yml’ file may look as follows:
---

controller_projects:
  - name: Demo project
    organization: Default
    scm_branch: master
    scm_type: git
    scm_update_on_launch: true
    scm_url: https://github.com/ansible/tower-example.git
It could also be possible to combine multiple related endpoint types into one file if you find that easier. For example, storing inventories and inventory sources may be beneficial.
The end result of this inventory will be a file structure that might look something like this:

Creating the job templates in automation controller
Our next job is to get this mechanism working in automation controller. We will first do this for the single organization we defined the config for above, but this could be easily replicated for other organizations. If the owners of the automation controller cluster want some control over the central configuration, I suggest either using the default organization, or some other system organization to house the configuration job templates.
This way we are able to build in separation of duties where the automation controller owners can set out these mechanisms but allow the other organizations to make use of them. Below I will describe what elements need to be created, but bear in mind that you could just as easily do this as config as code as well. See this example for the objects that need to be created. Note you will need some way to automate this, either running from the command line or creating some kind of system org automator in automation controller.
The first thing we want to do is create a project for the central automation repo, and then a project for each of the inventories owned by each organization. You could have each organization’s inventory project defined by the organization itself, but that could lead to complications with each team needing the inventory and project to exist before running their controller as code.
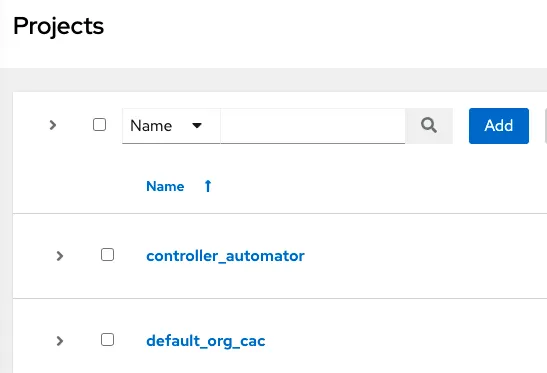
Create a controller_automator project and point it to the central controller automation playbook repo. Then create a project for the organization and point it at the inventory repo. Here, the organization we are using to demo is the Default org. We name the inventory’s project default_org_cac.
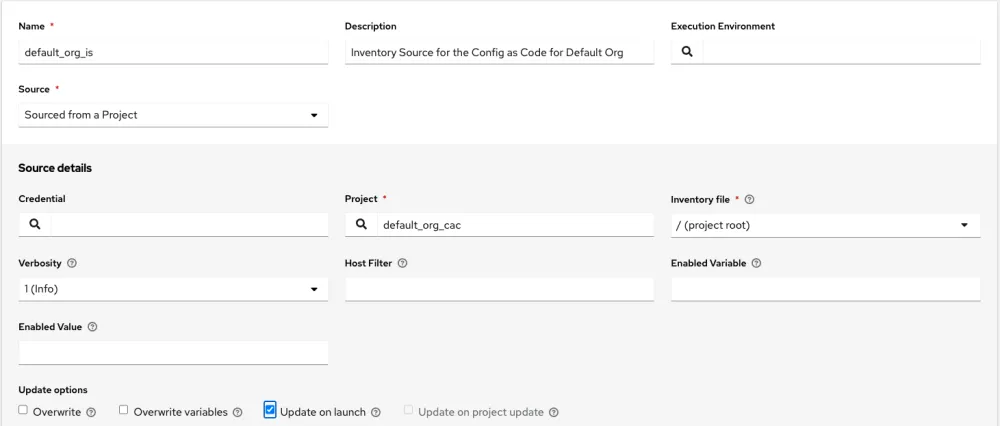
Next, we need to create the inventories and tie them up to the inventory sources. Let’s create a default_org_inv under our system org, and an inventory source that points to the default_org_cac project and sources from the project root.
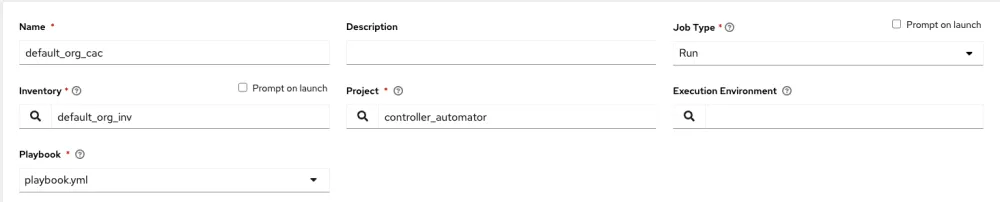
Next we want to create the job template. The only other piece we will need to factor into this is a credential that will allow us to connect back into automation controller, but this will be explained subsequently. We now create the job template by linking up the inventory created earlier with the controller_automator project.
There are still two key things missing from this configuration. First, the credential we will use to connect to automation controller, and second, how we will trigger this playbook automatically. The next two sections will cover these.
Adding service users for each organization
In order to deploy the configuration to each organization, we will create a local service account user, which will be an organizational admin. These users will not be logged into by regular users, as they are only used to enact the configuration. First, as a system admin, we will create these users. Again, this could be done using config as code as the system org, but for now, I will explain the quick creation of users and the general concepts required.
Create the users as “Normal Users” like below. Set the password to something known, as this will be required when we create a credential later. Then give the user permission to be the admin of the organization by going to Roles, then clicking Add and using the wizard to select on each screen: Organization, <org name>, and Admin.


Once this is complete we need to create a credential in automation controller. The type of credential will need to be the Red Hat Ansible Automation Platform type.
This credential type allows you to define a login for Ansible Automation Platform. The fields inputted will then be set as environment variables when you run job templates with the credential attached. The relevant modules will pick up these variables and apply them directly.
Select the organization to be the system org and then fill out the fields relating to the hostname for automation controller, and the username and password of the new user you just created. Also select whether you would like to verify SSL when connecting to automation controller. Finally, go back to the job template and attach the credential to it. We should now be able to run the job template and successfully create the configuration within automation controller.

Creating webhook token
The final piece of the puzzle is automatically triggering the Controller Automator job. For a traditional CI/CD pipeline this would be an essential part, and this is key here too.
Fortunately, if your Git provider is GitHub or GitLab, automation controller gives you a mechanism to enable webhooks easily. If you are using some other Git provider, you will need to do this some other way, for example by creating a user who can launch the job and providing the URL for the launch API endpoint of this job template and the token of the user to a generic webhook in the git provider. For the purpose of this article, though, I will only focus on GitHub or GitLab.
To create a webhook, edit the job template and click “Enable Webhook”, then select the webhook service as GitHub or GitLab. A URL and key will then be provided to you by the UI once you click save. As always, this can also be done through config as code by setting the webhook_service option, though you will still need to go to the UI to capture the webhook URL and key.
 The final step is to set the webhook up on your Git provider inside of the repos, which act as the inventory for each organization. This will include configuring the conditions ito run, and supplying the URL and key provided by automation controller. See the Ansible documentation on webhooks for more information on how to configure each Git provider.
About the author
Red Hat consultant focusing on automation and containers, helping to drive customer success using agile and DevOps practices.
More like this
Achieve high scalability using Red Hat Satellite Capsule Server
Debunking IT automation myths: A strategic blueprint for healthcare payers
Untangling Networks | Compiler
Operating System Management | Compiler
Browse by channel

Automation
The latest on IT automation for tech, teams, and environments

Artificial intelligence
Updates on the platforms that free customers to run AI workloads anywhere

Open hybrid cloud
Explore how we build a more flexible future with hybrid cloud

Security
The latest on how we reduce risks across environments and technologies

Edge computing
Updates on the platforms that simplify operations at the edge

Infrastructure
The latest on the world’s leading enterprise Linux platform

Applications
Inside our solutions to the toughest application challenges
Virtualization
The future of enterprise virtualization for your workloads on-premise or across clouds