When it comes to modernizing IT infrastructure, organizations want to adopt the hybrid cloud, but may find their workloads are stuck in traditional environments that are costly to maintain, complex to manage, and difficult to scale. Are you faced with a similar challenge? In this post we'll show you how you can use Red Hat Enterprise Linux's Image Builder to deploy to the cloud more easily.
Simplicity, consistency and repeatability are key elements of the solution when it comes to effortlessly migrating workloads or scaling a fleet of servers up and down depending on the load. It boils down to having a solid foundational operating system that can offer a standardized way to configure and create custom system images as well as quickly deploy them in a variety of cloud and virtualized environments.
Prior to 8.3, RHEL image builder was using the lorax-composer backend, which is an API server that allows building disk images using blueprints. With the Red Hat Enterprise Linux (RHEL) 8.3 release, the lorax-composer backend was replaced with osbuild-composer to advance the capabilities of image builder to include the ability to generate custom images suitable for pushing to the cloud and other virtualized environments.
This facilitates rapid deployment of images and updates, and accelerates cloud workload migrations, and streamlines the path from development to production.
So now, let’s look at some of the key steps to produce the image using RHEL Image Builder and push it to the cloud using Image Builder’s new "Push-to-cloud" capability.
Getting started with RHEL Image Builder
Before starting, you need to prepare a few things:
First, you’ll need to be running RHEL 8.3. You also need to have the web console installed if you haven’t already installed it. To install and enable the RHEL web console, check out the steps in the documentation here.
Next, in order to obtain the Image Builder plugin for the web console, and the dependent backend components run the following command:
# yum -y install cockpit-composer
# systemctl start cockpit-composer
# systemctl start cockpit
Of course, you will also need to have a cloud provider account. In this post, we are going to show how to build and push images to the Microsoft Azure cloud, but you can also generate images for other commonly used cloud platforms as well such as AMIs for Amazon AWS.
Creating OS image using RHEL Image Builder and pushing it to Azure
Once you have RHEL Image builder and the Web console installed, here is how to go about creating the image:
-
Log in to the web console on your machine, which is available at port 9090.

-
Select Image Builder in the left menu, and click the “Create Blueprint” button to create your image blueprint.
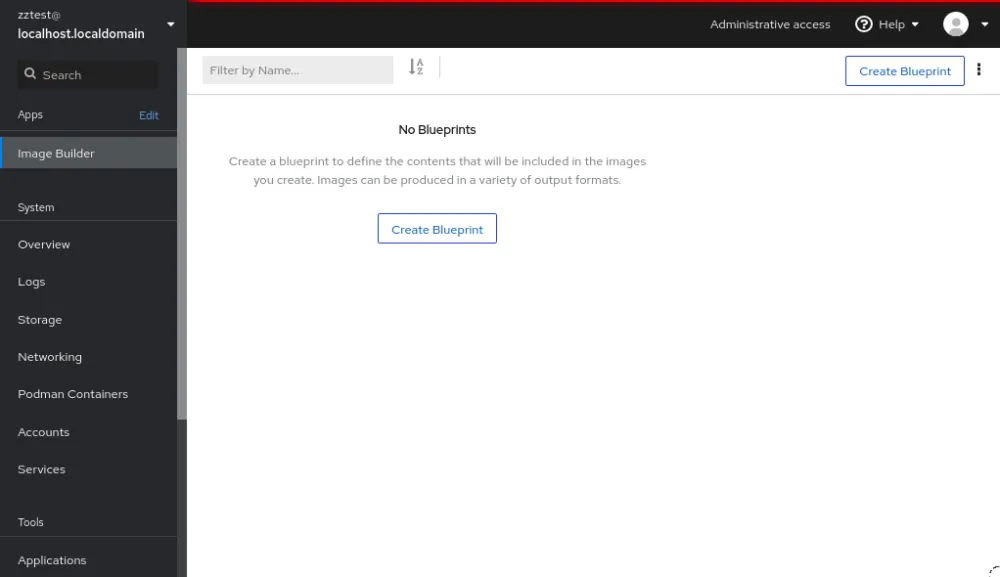
-
Provide a name and optional description for the image blueprint. In this example, it’s called "Demo-Blueprint."

-
Pick from the available list of packages what to include in your blueprint. In this example, we have selected apache server and the Go programming language.

To complete this step, commit the blueprint to save it. -
Next, create an image based on the blueprint from the previous step. For this, click the “Create Image” button and choose from the available blueprint options, and image types. To build an image for the Microsoft Azure cloud, choose the Azure disk image (.vhd) option and mark the image to be uploaded to Azure. You should also provide a size limit for the image that is created.

-
Log into your Microsoft Azure portal to get more details about your Azure storage account to be used to store the image.
a. As shown in the screenshot below, there is an Azure storage account named "rhstorageacnt1" and a resource group called "MyResourceGroup." We will use the resource group later when running the image in Azure.

b. For uploading the image, you will need to provide RHEL image builder with storage access keys for the Azure storage account. You can view and copy the storage access keys from the Azure portal settings "access key" section.

c. You must also create a storage container within the storage account to hold the generated image. As shown in the screenshot below, we have created a storage container to store our disk image called "rhstoragecontainer".
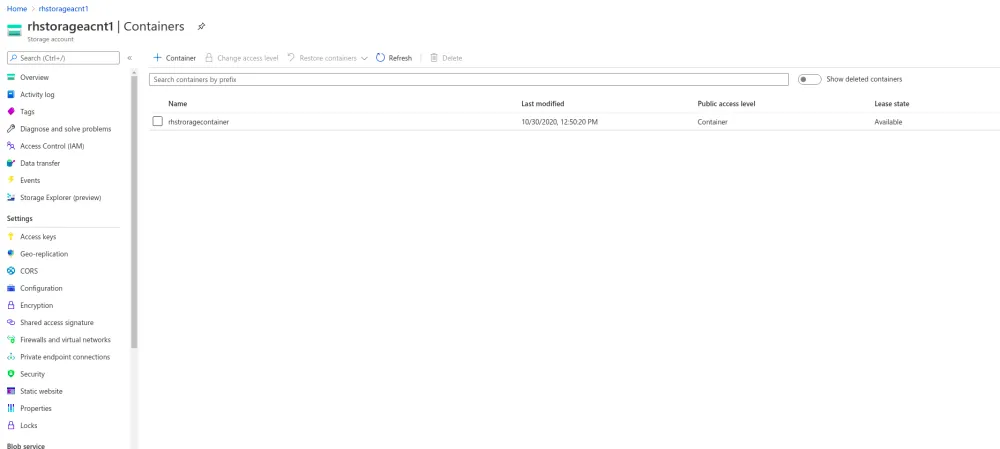
d. Using the information from Azure, complete the authentication and destination steps in RHEL Image Builder. Provide a unique name for the destination image, and the name of the storage container created in the previous step. In this example, we are calling our image "Azure-Apache," and passing in the storage container "rhstoragecontainer."
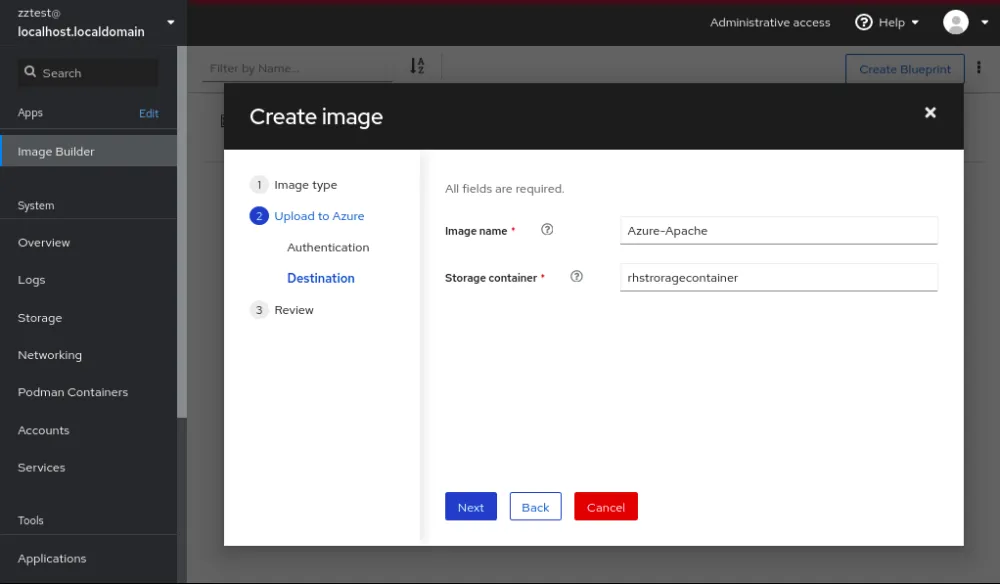
Click the next button, and then hit finish to start creating and uploading the image.
-
After a few minutes, the image should be available and pushed to the Microsoft Azure cloud.

Exploring Azure Storage
-
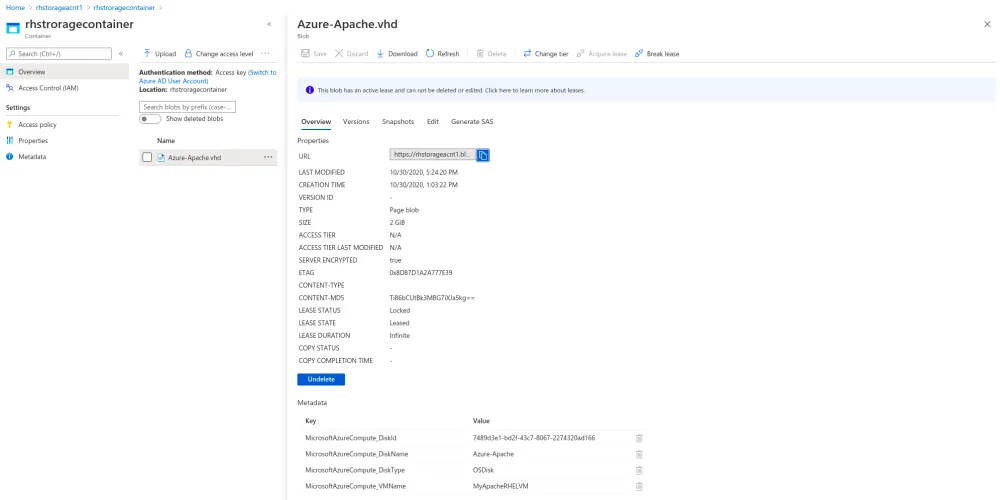
With tools like Azure’s storage explorer tool, you can easily create, delete, view and edit resources in Azure storage. As shown in the screenshot below, we are using Azure’s storage explorer to view whether the image we built has landed in Azure.
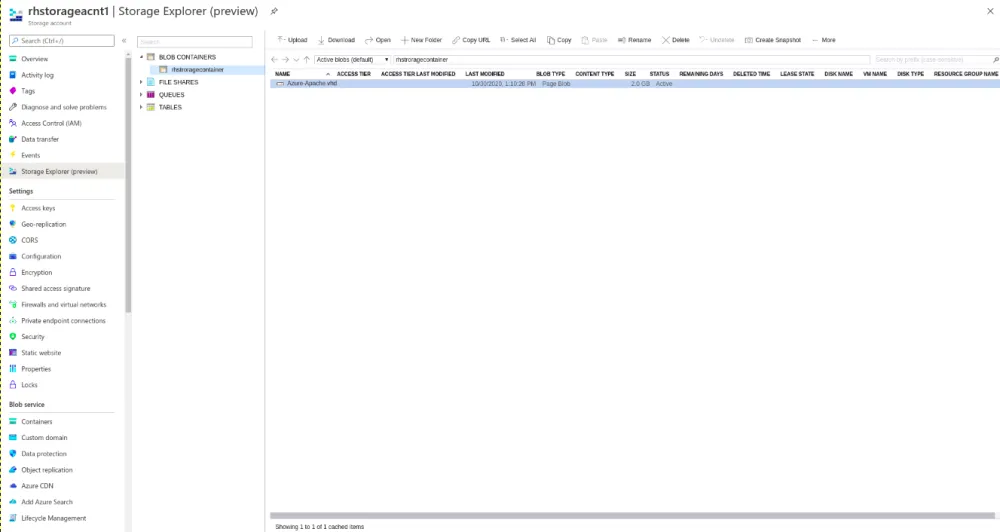
-
Additionally, take a note of the URL of the stored .vhd image file so that you can use it later in the following steps. The URL can be found by navigating to the image in the container section of the Azure portal.
Launching the image using Azure CLI tools on RHEL
After you have uploaded the image, it’s time to spin it up. For this, let’s use the Azure CLI tools for Linux, which are a set of commands used to create and manage Azure resources.
To install the Azure CLI tools, run the following commands at your RHEL command prompt:
# sudo rpm --import https://packages.microsoft.com/keys/microsoft.asc

# sudo sh -c 'echo -e "[azure-cli]\nname=Azure CLI\nbaseurl=https://packages.microsoft.com/yumrepos/azure-cli\nenabled=1\ngpgcheck=1\ngpgkey=https://packages.microsoft.com/keys/microsoft.asc" > /etc/yum.repos.d/azure-cli.repo'

# sudo yum install azure-cli
Log in to the Azure CLI using the az login command with a non-root RHEL user account. It will open a web browser requesting you to authenticate to your Azure portal account.
After you have authenticated to the Azure portal, return to the RHEL command prompt. You will see all the available subscriptions. If you have multiple subscriptions, you’ll need to set your subscription id in Azure CLI so it knows which one to use.
$ az login

$ az account list --output table

$ az account set --subscription <subscription-id>
To create and launch virtual machines using Azure CLI, run the command below by passing in a VM name, the resource group under which to run the VM, and the storage URL of the image file that was obtained from the steps earlier.
$ az vm create -n <vm name> -g <resource group name> --use-unmanaged-disk --os-type linux --attach-os-disk <URL of the vhd image file>
After the command completes successfully, you will be able to see the VM running through the Azure dashboard.

Conclusion
The image builder tool in RHEL is a versatile solution to configure and create custom system images that you can quickly spin up in a variety of cloud and virtualization platforms with just a few clicks. You can also use composer CLI commands if needed to build custom RHEL images programmatically. You can learn more about this here.
With Microsoft’s recent announcement of the general availability of Azure Hybrid Benefit for Linux, moving to the cloud has become even easier. When you’re ready to deploy your workloads into production, you can leverage Azure hybrid cloud benefit to simply convert the pay-as-you-go image you used during your proof of concept testing to bring-you-own-subscription billing.
Get started with Red Hat and Microsoft Azure today.
About the authors
Don Pinto is a Technical Product Marketing Manager at Red Hat focused on helping customers understand why Red Hat Enterprise Linux is an ideal operating system platform for modern application workloads. Pinto is passionate about data management and operating systems, having authored several technical blogs and white papers on various tech topics. Pinto holds a Masters degree in Computer Science and a Bachelor's degree in Computer Engineering from the University of Toronto, Canada.
Terry Bowling has been designing and administering UNIX and GNU/Linux environments since 1999. He brings this experience to the Red Hat Enterprise Linux (RHEL) and Insights Product Management teams to provide help streamline the assembling, deployment, and management of RHEL for our customers. Experience it today at redhat.com/image-builder.
Bronce McClain is a senior product manager focused on making Red Hat Enterprise Linux (RHEL) the default choice in the public cloud. He joined Red Hat in 2012 and has been a part of the RHEL business unit since 2017. Prior to his focus on RHEL, he worked with the Red Hat Virtualization (RHV) team.
More like this
Metrics that matter: How to prove the business value of DevEx
Redefining automation governance: From execution to observability at Bradesco
Technically Speaking | Taming AI agents with observability
The One About DevSecOps | Command Line Heroes
Browse by channel
Automation
The latest on IT automation for tech, teams, and environments
Artificial intelligence
Updates on the platforms that free customers to run AI workloads anywhere
Open hybrid cloud
Explore how we build a more flexible future with hybrid cloud
Security
The latest on how we reduce risks across environments and technologies
Edge computing
Updates on the platforms that simplify operations at the edge
Infrastructure
The latest on the world’s leading enterprise Linux platform
Applications
Inside our solutions to the toughest application challenges
Virtualization
The future of enterprise virtualization for your workloads on-premise or across clouds


