OpenShift API for Data Protection (OADP) enables backup, restore, and disaster recovery of applications on an OpenShift cluster. Data that can be protected with OADP include Kubernetes resource objects, persistent volumes, and internal images. The OpenShift API for Data Protection (OADP) is designed to protect Application Workloads on a single OpenShift cluster.
Red Hat OpenShift® Data Foundation is software-defined storage for containers. Engineered as the data and storage services platform for Red Hat OpenShift, Red Hat OpenShift Data Foundation helps teams develop and deploy applications quickly and efficiently across clouds.
The terms Project and namespace maybe used interchangeably in this guide.
Pre-requisites
- Terminal environment
- Your terminal has the following commands
- oc binary
- git binary
- velero
- Set alias to use command from cluster (preferred)
alias velero='oc -n openshift-adp exec deployment/velero -c velero -it -- ./velero'
- Download velero from Github Release
- Set alias to use command from cluster (preferred)
- Alternatively enter prepared environment in your terminal with
docker run -it ghcr.io/kaovilai/oadp-cli:v1.0.1 bash- source can be found at https://github.com/kaovilai/oadp-cli
- Your terminal has the following commands
- Authenticate as Cluster Admin inside your environment of an OpenShift 4.9 Cluster.
- Your cluster meets the minimum requirement for OpenShift Data Foundation in Internal Mode deployment
- 3 worker nodes, each with at least:
- 8 logical CPU
- 24 GiB memory
- 1+ storage devices
- 3 worker nodes, each with at least:
Installing OpenShift Data Foundation Operator
We will be using OpenShift Data Foundation to simplify application deployment across cloud providers which will be covered in the next section.
-
Open the OpenShift Web Console by navigating to the url below, make sure you are in Administrator view, not Developer.
oc get route console -n openshift-console -ojsonpath="{.spec.host}"
Authenticate with your credentials if necessary.
-
Navigate to OperatorHub, search for and install OpenShift Data Foundation

Creating StorageSystem
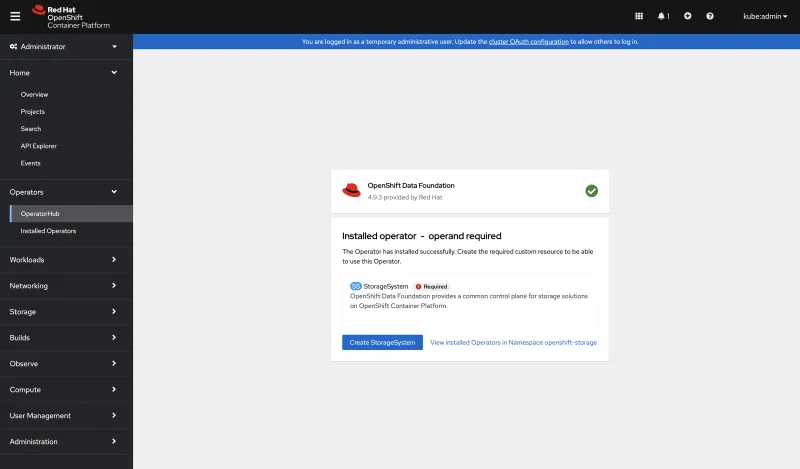
- Click Create StorageSystem button after the install is completed (turns blue).
- Go to Product Documentation for Red Hat OpenShift Data Foundation 4.9
- Filter Category by Deploying
- Open deployment documentation your cloud provider.
- Follow Creating an OpenShift Data Foundation cluster instructions.
Verify OpenShift Data Foundation Operator installation
You can validate the successful deployment of OpenShift Data Foundationn cluster following Verifying OpenShift Data Foundation deployment in the previous deployment documentation or with the following command:
oc get storagecluster -n openshift-storage ocs-storagecluster -o jsonpath='{.status.phase}{"\n"}'
And for the Multi-Cloud Gateway (MCG):
oc get noobaa -n openshift-storage noobaa -o jsonpath='{.status.phase}{"\n"}'
Creating Object Bucket Claim
Object Bucket Claim creates a persistent storage bucket for Velero to store backed up kubernetes manifests.
-
Navigate to Storage > Object Bucket Claim and click Create Object Bucket Claim
 Note the Project you are currently in. You can create a new Project or leave as default
 -
set the following values:
- ObjectBucketClaim Name:
oadp-bucket - StorageClass:
openshift-storage.noobaa.io - BucketClass:
noobaa-default-bucket-class

- ObjectBucketClaim Name:
-
Click Create
 When the Status is Bound, the bucket is ready.
Gathering information from Object Bucket
-
Gathering bucket name and host
-
Using OpenShift CLI:
-
Get bucket name
oc get configmap oadp-bucket -n default -o jsonpath='{.data.BUCKET_NAME}{"\n"}' -
Get bucket host
oc get configmap oadp-bucket -n default -o jsonpath='{.data.BUCKET_HOST}{"\n"}'
-
-
Using OpenShift Web Console:
-
Click on Object Bucket obc-default-oadp-bucket and select YAML view
 Take note of the following information which may differ from the guide:
.spec.endpoint.bucketName. Seen in my screenshot asoadp-bucket-c21e8d02-4d0b-4d19-a295-cecbf247f51f.spec.endpoint.bucketHost: Seen in my screenshot ass3.openshift-storage.svc
-
-
-
Gather oadp-bucket secret
- Using OpenShift CLI:
- Get AWS_ACCESS_KEY
oc get secret oadp-bucket -n default -o jsonpath='{.data.AWS_ACCESS_KEY_ID}{"\n"}' | base64 -d- Get AWS_SECRET_ACCESS_KEY
oc get secret oadp-bucket -n default -o jsonpath='{.data.AWS_SECRET_ACCESS_KEY}{"\n"}' | base64 -d - Using OpenShift Web Console
- Navigate to Storage > Object Bucket Claim > oadp-bucket. Ensure you are in the same Project used to create oadp-bucket.
- Click on oadp-secret in the bottom left to view bucket secrets
- Click Reveal values to see the bucket secret values. Copy data from AWS_ACCESS_KEY_ID and AWS_SECRET_ACCESS_KEY and save it as we'll need it later when installing the OADP Operator.
Note: regardless of the cloud provider, the secret field names seen here may contain AWS_*.
- Using OpenShift CLI:
-
Now you should have the following information:
- bucket name
- bucket host
- AWS_ACCESS_KEY_ID
- AWS_SECRET_ACCESS_KEY
Deploying an application
Since we are using OpenShift Data Foundation, we can use common application definitions across cloud providers regardless of available storage class.
Clone our demo apps repository and enter the cloned repository.
git clone https://github.com/kaovilai/mig-demo-apps --single-branch -b oadp-blog-rocketchat
cd mig-demo-apps
Apply rocket chat manifests.
oc apply -f apps/rocket-chat/manifests/
Navigate to rocket-chat setup wizard url obtained by this command into your browser.
oc get route rocket-chat -n rocket-chat -ojsonpath="{.spec.host}"
Enter your setup information. remember it as we may need it later.
Skip to step 4, select "Keep standalone", and "continue".
Press "Go to your workspace"

"Enter"
Go to Channel #general and type some message

Installing OpenShift API for Data Protection Operator
You can install the OADP Operator from the Openshift's OperatorHub. You can search for the operator using keywords such as oadp or velero.

Now click on Install
Finally, click on Install again. This will create Project openshift-adp if it does not exist, and install the OADP operator in it.
Create credentials secret for OADP Operator to use
We will now create secret cloud-credentials using values obtained from Object Bucket Claim in Project openshift-adp.
From OpenShift Web Console side bar navigate to Workloads > Secrets and click Create > Key/value secret
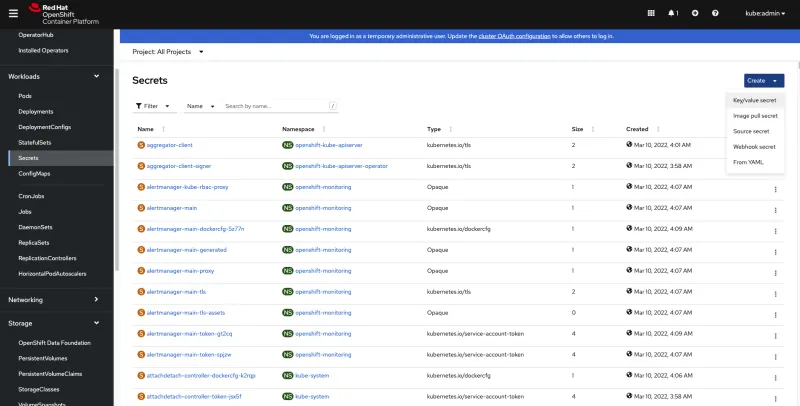
Fill out the following fields:
- Secret name:
cloud-credentials - Key:
cloud - Value:
- Replace the values with your own values from earlier steps and enter it in the value field.
Note: Do not use quotes while putting values in place of INSERT_VALUE Placeholders
[default]
aws_access_key_id=<INSERT_VALUE>
aws_secret_access_key=<INSERT_VALUE>
- Replace the values with your own values from earlier steps and enter it in the value field.

Create the DataProtectionApplication Custom Resource
From side bars navigate to Operators > Installed Operators
Create an instance of the DataProtectionApplication (DPA) CR by clicking on Create Instance as highlighted below:

Select Configure via: YAML view
Finally, copy the values provided below and update fields with comments with information obtained earlier.
- update
.spec.backupLocations[0].objectStorage.bucketwith bucket name from earlier steps. - update
.spec.backupLocations[0].config.s3Urlwith bucket host from earlier steps.
apiVersion: oadp.openshift.io/v1alpha1
kind: DataProtectionApplication
metadata:
  name: example-dpa
  namespace: openshift-adp
spec:
  configuration:
    velero:
      featureFlags:
        - EnableCSI
      defaultPlugins:
      - openshift
      - aws
      - csi
  backupLocations:
    - velero:
        default: true
        provider: aws
        credential:
            name: cloud-credentials
            key: cloud
        objectStorage:
            bucket: "oadp-bucket-c21e8d02-4d0b-4d19-a295-cecbf247f51f" #update this
            prefix: velero
        config:
            profile: default
            region: "localstorage"
            s3ForcePathStyle: "true"
            s3Url: "http://s3.openshift-storage.svc/" #update this if necessary

The object storage we are using is an S3 compatible storage provided by OpenShift Data Foundation. We are using custom s3Url capability of the aws velero plugin to access OpenShift Data Foundation local endpoint in velero.
Click Create
Verify install
To verify all of the correct resources have been created, the following command
oc get all -n openshift-adp
results should look similar to:
NAME                                                     READY   STATUS    RESTARTS   AGE
pod/oadp-operator-controller-manager-67d9494d47-6l8z8    2/2     Running   0          2m8s
pod/oadp-velero-sample-1-aws-registry-5d6968cbdd-d5w9k   1/1     Running   0          95s
pod/velero-588db7f655-n842v                              1/1     Running   0          95s

NAME                                                       TYPE        CLUSTER-IP       EXTERNAL-IP   PORT(S)    AGE
service/oadp-operator-controller-manager-metrics-service   ClusterIP   172.30.70.140    <none>        8443/TCP   2m8s
service/oadp-velero-sample-1-aws-registry-svc              ClusterIP   172.30.130.230   <none>        5000/TCP   95s

NAME                    DESIRED   CURRENT   READY   UP-TO-DATE   AVAILABLE   NODE SELECTOR   AGE
daemonset.apps/restic   3         3         3       3            3           <none>          96s

NAME                                                READY   UP-TO-DATE   AVAILABLE   AGE
deployment.apps/oadp-operator-controller-manager    1/1     1            1           2m9s
deployment.apps/oadp-velero-sample-1-aws-registry   1/1     1            1           96s
deployment.apps/velero                              1/1     1            1           96s

NAME                                                           DESIRED   CURRENT   READY   AGE
replicaset.apps/oadp-operator-controller-manager-67d9494d47    1         1         1       2m9s
replicaset.apps/oadp-velero-sample-1-aws-registry-5d6968cbdd   1         1         1       96s
replicaset.apps/velero-588db7f655                              1         1         1       96s
Modifying VolumeSnapshotClass
Setting a DeletionPolicy of Retain on the VolumeSnapshotClass will preserve the volume snapshot in the storage system for the lifetime of the Velero backup and will prevent the deletion of the volume snapshot, in the storage system, in the event of a disaster where the namespace with the VolumeSnapshot object may be lost.
The Velero CSI plugin, to backup CSI backed PVCs, will choose the VolumeSnapshotClass in the cluster that has the same driver name and also has the velero.io/csi-volumesnapshot-class: "true" label set on it.
-
Using OpenShift CLI
oc patch volumesnapshotclass ocs-storagecluster-rbdplugin-snapclass --type=merge -p '{"deletionPolicy": "Retain"}'
oc label volumesnapshotclass ocs-storagecluster-rbdplugin-snapclass velero.io/csi-volumesnapshot-class="true" -
Using OpenShift Web Console
Navigate to Storage > VolumeSnapshotClasses and click ocs-storagecluster-rbdplugin-snapclass
Click YAML view to modify values
deletionPolicyandlabelsas shown below:apiVersion: snapshot.storage.k8s.io/v1
- deletionPolicy: Delete
+ deletionPolicy: Retain
driver: openshift-storage.rbd.csi.ceph.com
kind: VolumeSnapshotClass
metadata:
name: ocs-storagecluster-rbdplugin-snapclass
+ labels:
+ velero.io/csi-volumesnapshot-class: "true"
Backup application
From side menu, navigate to Operators > Installed Operators Under Project openshift-adp, click on OADP Operator. Under Provided APIs > Backup, click on Create instance

In IncludedNamespaces, add rocket-chat

Click Create.
The status of backup should eventually show Phase: Completed
Uhh what? Disasters?
Someone forgot their breakfast and their brain is deprived of minerals. They proceeded to delete the rocket-chat namespace.
Navigate to Home > Projects > rocket-chat
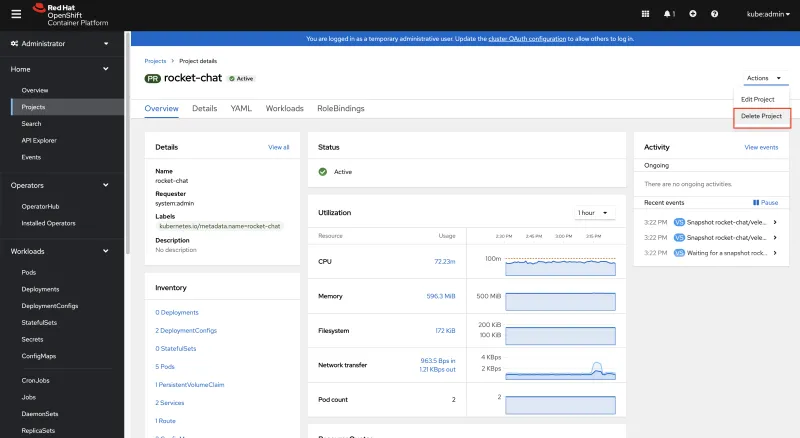
Confirm deletion by typing rocket-chat and click Delete.
Wait until Project rocket-chat is deleted.
Rocket Chat application URL should no longer work.
Restore application
An eternity of time has passed.
You finally had breakfast and your brain is working again. Realizing the chat application is down, you decided to restore it.
From side menu, navigate to Operators > Installed Operators Under Project openshift-adp, click on OADP Operator. Under Provided APIs > Restore, click on Create instance
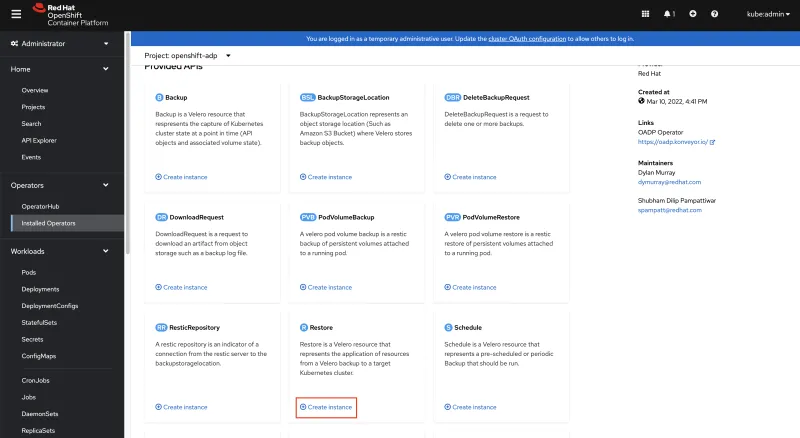
Under Backup Name, type backup
In IncludedNamespaces, add rocket-chat check restorePVs
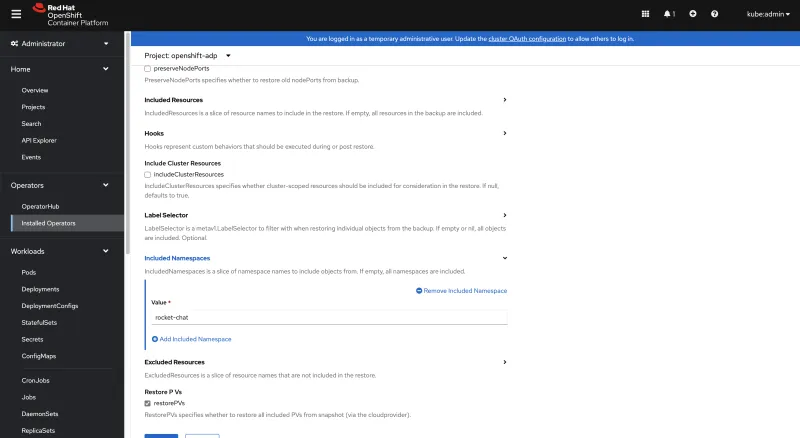
Click Create.
The status of restore should eventually show Phase: Completed.
After a few minutes, you should see the chat application up and running. You can check via Workloads > Pods > Project: rocket-chat and see the following
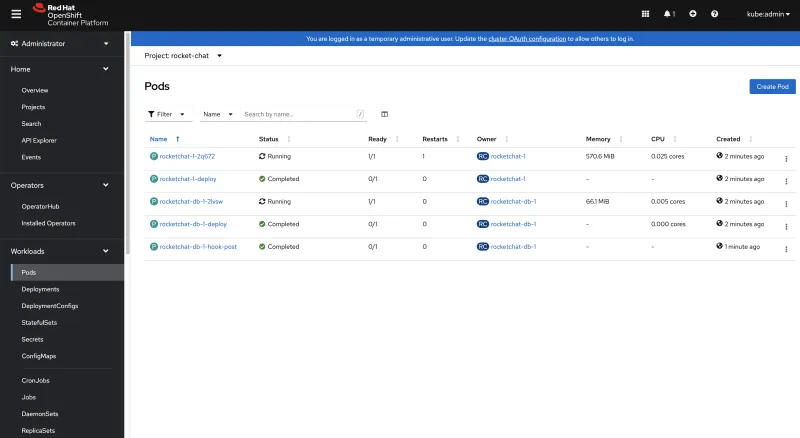
Try to access the chat application via URL:
oc get route rocket-chat -n rocket-chat -ojsonpath="{.spec.host}"
Check previous message exists.

Conclusion
Phew.. what a ride. We have covered the basic usage of OpenShift API for Data Protection (OADP) Operator, Velero, and OpenShift Data Foundation.
Protect your data with OADP, so you can rest easy restoration is possible whenever your team forgets their breakfast.
Remove workloads from this guide
oc delete ns openshift-adp rocket-chat openshift-storage
If openshift-storage Project is stuck, follow troubleshooting guide.
If you have set velero alias per this guide, you can remove it by running the following command:
unalias velero
About the author
More like this
Introducing OpenShift Service Mesh 3.2 with Istio’s ambient mode
Looking ahead to 2026: Red Hat’s view across the hybrid cloud
Crack the Cloud_Open | Command Line Heroes
Edge computing covered and diced | Technically Speaking
Browse by channel
Automation
The latest on IT automation for tech, teams, and environments
Artificial intelligence
Updates on the platforms that free customers to run AI workloads anywhere
Open hybrid cloud
Explore how we build a more flexible future with hybrid cloud
Security
The latest on how we reduce risks across environments and technologies
Edge computing
Updates on the platforms that simplify operations at the edge
Infrastructure
The latest on the world’s leading enterprise Linux platform
Applications
Inside our solutions to the toughest application challenges
Virtualization
The future of enterprise virtualization for your workloads on-premise or across clouds
