
In this blog post, originally posted on Ales Nosek - The Software Practitioner, I am going to talk about how I installed OpenShift 4.1 on a Fedora laptop with 16 GB of RAM. If you are interested in deploying your own OpenShift instance whether for evaluation or testing please follow along with me.

Red Hat named a Leader in the 2024 Gartner® Magic Quadrant™ for second consecutive year
Red Hat was named a Leader in the Gartner 2024 Magic Quadrant for Container Management. This year, Red Hat was positioned furthest on the Completeness of Vision axis.
OpenShift 4.1 is the first GA release in the OpenShift 4 series. It is a significant leap forward in the evolution of OpenShift mainly due to the incorporation of features developed by the folks at CoreOS. In order to take a closer look at the latest and greatest version of OpenShift, I installed OpenShift 4.1 on my laptop using Libvirt and KVM. How did I accomplish this?
I essentially followed the guide for installing the OpenShift cluster on bare metal and I recommend that you read this guide first. After you make yourself familiar with the bare metal installation process, read on to learn the details on how I made this process work on Libvirt and KVM.
Deployment overview
First, let’s take a look at the diagram showing the deployment of the OpenShift cluster on Libvirt/KVM. In addition to the OpenShift cluster nodes, the diagram also depicts supplementary pieces of the user-provisioned infrastructure that you will need to deploy:
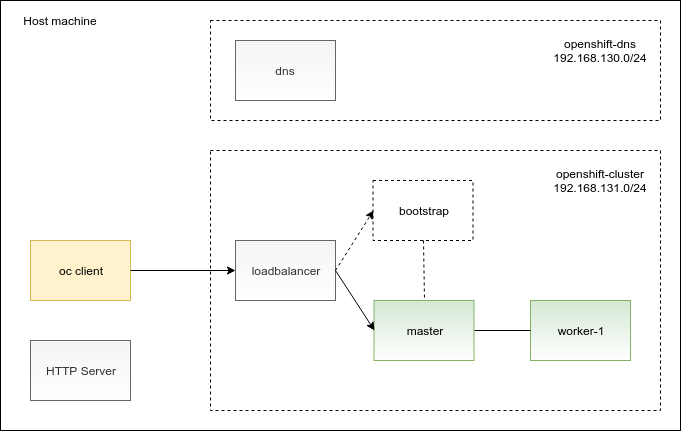
In the diagram, you can see that there is an HTTP server and an oc client installed directly on the host machine. The remaining boxes in the diagram are virtual machines. I outlined the purpose of the virtual machines for you in the following table:
| VM Name | Operating System | Purpose |
|---|---|---|
| dns | RHEL7 | Custom Dnsmasq DNS server used by the load balancer, bootstrap node and OpenShift nodes. |
| loadbalancer | RHEL 7 | HAProxy load balancer. Facilitates bootstrapping, balances the load between the master nodes and also between the ingress router pods. |
| bootstrap | RHCOS | The bootstrap machine. Used one-time to initialize the OpenShift cluster. |
| master | RHCOS | OpenShift master node. |
| worker-1 | RHCOS | OpenShift worker node. |
Note that the virtual machines are deployed across two Libvirt networks: openshift-dns and openshift-cluster. Using two Libvirt networks allowed me to meet the OpenShift DNS requirements and I will elaborate on this design later on in this post.
After reviewing the big picture, let’s roll up our sleeves and get to work. We are going to deal with the HTTP server first.
Setting up HTTP server
The OpenShift installation process assumes installation on empty virtual machines with no operating system pre-installed. There are two provisioning methods available to choose from. You can either provision OpenShift nodes by booting from an ISO image or you can leverage the PXE boot. I find the PXE boot option to take a bit more effort to configure and hence went with the ISO image method.
Using the ISO image method, you are supposed to boot the virtual machines using the rhcos-4.1.0-x86_64-installer.iso CD-ROM image. During the boot from this image, the Red Hat CoreOS installer starts up and provisions an empty virtual machine in two steps:
- It downloads a disk image
rhcos-4.1.0-x86_64-metal-bios.raw.gzfrom a URL you specify and writes it to the virtual machine’s disk. - It downloads one of the ignition files (e.g.
bootstrap.ign,master.ign, orworker.ign) and installs it on the virtual machine’s file system. This ignition file contains configuration required for the bootstrap of the OpenShift cluster that is triggered on the next reboot.
You are expected to host the aforementioned files on an HTTP server that is reachable from the OpenShift nodes during the provisioning process. To meet this requirement, I installed an Apache HTTP server on my Fedora host machine and copied the disk image and ignition files to the /var/www/html directory which is the default DocumentRoot directory on a Fedora host.
Addressing OpenShift DNS requirements
OpenShift requires a set of records to be configured in your DNS. In addition to simple A records, you must also configure a wildcard DNS record that points to the load balancer and an SRV DNS record for each of the etcd nodes.
Libvirt allows you to insert custom A and SRV records into DNS. You can specify them using the network descriptor. However, Libvirt doesn’t support creating wildcard DNS records. The respective feature request can be found here. It would be great if it would be possible to meet the OpenShift DNS requirements by just configuring the DNS records in the Libvirt’s network descriptor. However, as the wildcard DNS records were not supported at the time of this writing, I had to look for an alternative solution. After giving it some thought, I decided to spin up my own DNS server and instructed Libvirt to forward the DNS queries sent by the OpenShift nodes to this server. In order to achieve this, I had to define two networks in Libvirt: openshift-dnsand openshift-cluster.
Let’s tackle the openshift-dns network first. A single virtual machine is connected to this network. This virtual machine hosts the custom DNS server. Here is the respective network XML descriptor:
1 2 3 4 5 6 7 8 9 10 11 12 13 14 15 16 17 |
|
As you can see in the descriptor, I prefer to manage virtual machine’s MAC addresses and the associated IP addresses and host names by hand. The virtual machine
dns that hosts my DNS server is connected to the openshift-dns network by including these settings in its domain configuration:
1 2 3 4 5 6 7 8 9 10 11 |
|
I installed Dnsmasq on this
dns virtual machine and replaced the content of /etc/dnsmasq.conf with my own configuration:
1 2 3 4 5 6 |
|
The listing of the
/etc/dnsmasq.openshift.addnhosts file referred to in the above configuration looks as follows:
1 2 3 4 5 |
|
This configuration addresses the user-provisioned DNS requirements as specified in the installation guide.
In the next step, we want to make the load balancer machine and OpenShift nodes resolve their DNS queries using our custom DNS server. In order to achieve that, we define a second Libvirt network called openshift-cluster and place the load balancer and OpenShift nodes onto this network. The definition of the openshift-cluster network looks like this:
1 2 3 4 5 6 7 8 9 10 11 12 13 14 15 16 17 18 19 20 21 22 23 |
|
Note the
<forwarder addr='192.168.130.10'/> setting which allows all DNS requests from the load balancer and OpenShift nodes deployed on this network to be forwarded to our custom DNS server. Remember that the IP address 192.168.130.10 is the address of our custom DNS server that we configured previously.
With the DNS configuration out of the way, let’s continue with deploying a load balancer in the next section.
Setting up a load balancer
Installing OpenShift on a user-provisioned infrastructure requires you to provision a load balancer. The details on how the load balancer should be configured can be found in the networking requirements section of the OpenShift installation guide.
The load balancer is used during the bootstrapping process to route the requests to the bootstrap and the master nodes. After the OpenShift installation is complete, the load balancer remains part of the deployment and balances load between the master nodes and also between the ingress router pods.
I created a dedicated virtual machine called loadbalancer and installed HAProxy on top of it. The HAProxy configuration is pretty straight forward. Here is the listing of the /etc/haproxy/haproxy.cfg file:
1 2 3 4 5 6 7 8 9 10 11 12 13 14 15 16 17 18 19 20 21 22 23 24 25 26 27 28 29 30 31 32 33 34 35 36 37 38 39 40 41 42 43 44 45 46 47 48 49 50 51 52 53 54 |
|
With the load balancer in place, we will move on to creating OpenShift virtual machines in the next section.
Creating OpenShift virtual machines
The official installation guide defines minimum machine requirements for installing an OpenShift cluster as follows:
- One bootstrap machine
- Three control plane, or master, machines
- At least two compute, or worker, machines
If you can meet these requirements, you will achieve the smallest highly available OpenShift cluster. However, do we really need high availability for our test installation?
Internally, OpenShift uses etcd to store its state. Since etcd is a quorum-based cluster, it requires at least three nodes to achieve high availability. These etcd nodes are installed on OpenShift master machines which is the reason for the minimum requirement of three OpenShift master machines. In our limited environment, we are going to give up on high availability and instead save up two master machines. OpenShift can install with a single master machine just fine if you can accept the fact that the OpenShift control plane won’t be highly available.
And what about the requirement of two worker machines? The minimum requirement of two worker machines ensures that there will be at least two OpenShift routers running on the cluster. OpenShift router is an ingress point for external traffic to reach application pods running on OpenShift. Production installations require that at least two routers are installed to avoid a single point of failure. Furthermore, a highly available load balancer is deployed in front of the two routers. In a data center, a hardware load balancer is typically used, in cloud environments like AWS an Elastic Load Balancer can be utilized. As we don’t pursue a highly available deployment, we are going to install an OpenShift cluster with a single worker machine. There will be a single router running on top of this cluster which we hereby accept.
This discussion leads us to the minimum requirements for a not highly available OpenShift cluster:
- One bootstrap machine
- One control plane, or master, machine
- One compute, or worker, machine
In regards to the minimum memory requirements for each of the machines, I was able to install OpenShift on virtual machines with the following memory configuration:
| Machine | RAM |
|---|---|
| Bootstrap | 4 GB |
| Control plane | 6 GB |
| Compute | 6 GB |
Note that the above memory requirements allow you to properly deploy the OpenShift cluster including the monitoring and log collection components. Furthermore, there will be enough capacity left on the worker node for you to run several hello world applications.
This concludes the user-provisioned infrastructure setup. At this point, we have HTTP server, DNS server, load balancer and a set of empty virtual machines in place. Let’s dive into the OpenShift installation in the next section.
Installing OpenShift 4.1
The installation of OpenShift 4 starts with crafting an installation configuration file. You can use the install-config.yaml configuration file that I created, just remember to replace the placeholders with your own pull secret and public SSH key:
1 2 3 4 5 6 7 8 9 10 11 12 13 14 15 16 17 18 19 20 21 22 23 24 25 26 |
|
The OpenShift installation is actually driven by the ignition configuration files. You can issue this command to generate ignition configuration files out of your
install-config.yaml file:
1
|
|
Beware that the above command will remove your handcrafted
install-config.yaml from the disk. I found this behavior of the openshift-install tool rather annoying. In order to not lose my configuration settings, I protect the install-config.yaml file from deletion by creating a hard link like this:
1
|
|
And after the
install-config.yaml file is deleted, I can simply recreate it with:
1
|
|
Finally, we can use our ignition files to kick off the OpenShift installation process which deploys OpenShift cluster on our fleet of virtual machines. The whole process takes about 30 minutes and consists of several steps:
- Provision and reboot the bootstrap machine
- Provision and reboot the master machine
- Bootstrap the master machine
- Shut down the bootstrap machine
- Provision and reboot the worker machine
- Worker machine joins the OpenShift cluster
Note that after you bootstrap the master machine, you should shut down the bootstrap machine. Only after that, you should boot up the worker machine. On startup, the worker node registers with the master node and forms an OpenShift cluster.
Conclusion
In this blog post, we discussed how to deploy OpenShift 4.1 into the Libvirt/KVM-based virtualized environment. We created and configured a bunch of user-provisioned infrastructure which was a prerequisite for the OpenShift installation. With the user-provisioned infrastructure in place, we followed the OpenShift bare metal deployment guide to create an OpenShift cluster.
I hope that you found this article useful and you have your OpenShift 4.1 cluster running by now. If you have any questions or comments please feel free to add them to the comment section below.
Connect with Red Hat Services
Learn more about Red Hat Consulting
Learn more about Red Hat Training
Join the Red Hat Learning Community
Learn more about Red Hat Certification
Subscribe to the Training Newsletter
Follow Red Hat Services on Twitter
Follow Red Hat Open Innovation Labs on Twitter
Like Red Hat Services on Facebook
Watch Red Hat Training videos on YouTube
Follow Red Hat Certified Professionals on LinkedIn
About the author
More like this
Friday Five — July 24, 2026 | Red Hat
Why single AI agents fail at scale: Building governed multi-agent networks
Container Roundup | Compiler
Untangling Networks | Compiler
Browse by channel

Automation
The latest on IT automation for tech, teams, and environments

Artificial intelligence
Updates on the platforms that free customers to run AI workloads anywhere

Open hybrid cloud
Explore how we build a more flexible future with hybrid cloud

Security
The latest on how we reduce risks across environments and technologies

Edge computing
Updates on the platforms that simplify operations at the edge

Infrastructure
The latest on the world’s leading enterprise Linux platform

Applications
Inside our solutions to the toughest application challenges
Virtualization
The future of enterprise virtualization for your workloads on-premise or across clouds