In this tutorial, we will finish setting up both Red Hat Satellite and VMWare for provisioning virtual machines (VMs) from Satellite. Throughout the tutorial, we will use the Satellite console GUI and the command line for configuring our Satellite environment so that you get familiar with using both.
When we installed and configured Satellite, the domain example.com was added to the default organization and location. We need to add the domain to the Operations Department organization and the moline location.
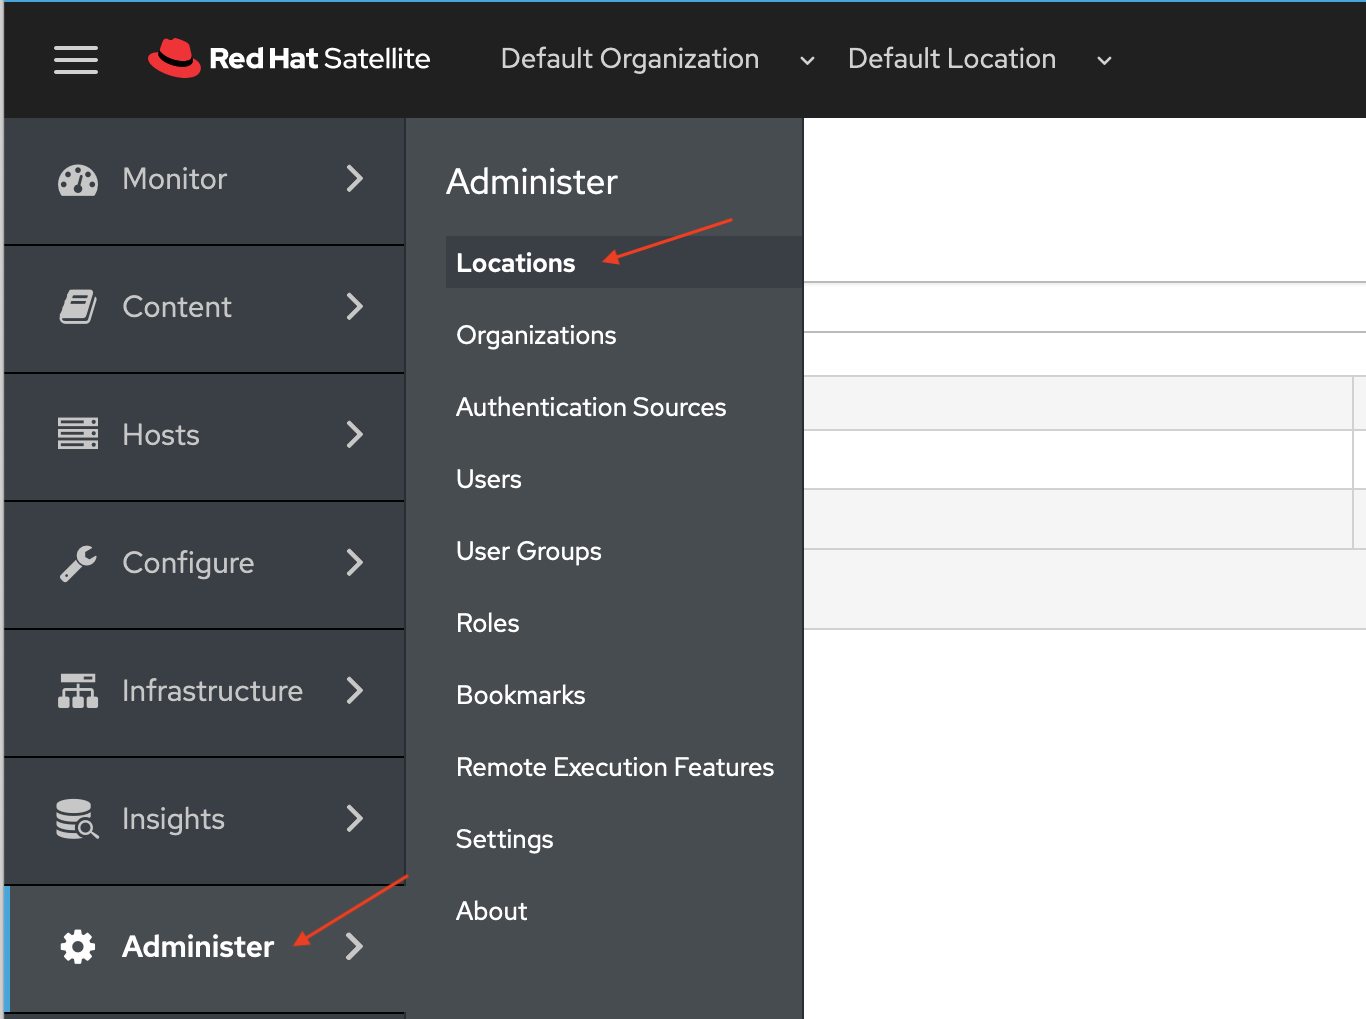
On the Satellite Console choose Administer -> Locations from the left side navigation bar.
 On the Locations page, click the moline link.

On the Locations > Edit moline page, choose Domains and then click example.com in the Select domains list.
The example.com domain will move from the All items to the Selected items list. Click the blue Submit button.

We need to add the example.com domain to the Operations Department organization. We will do this via the command line. First we need ID for the Operations Department.
# hammer organization list
---|-----------------------|-----------------------|-------------|--------
ID | TITLE                 | NAME                  | DESCRIPTION | LABEL
---|-----------------------|-----------------------|-------------|--------
1  | Default Organization  | Default Organization  |             | Default_Organization
3  | Operations Department | Operations Department |             | operations
---|-----------------------|-----------------------|-------------|--------
Now let's add the example.com domain to the Operations Department Organization
# hammer organization add-domain --domain example.com --id 3
The domain has been associated.
You will now see the update in the Red Hat Satellite console. Do you remember how to navigate to the Organization page for the Operations Department organization? Follow the same steps above that we used to navigate to the moline locations page.
Here's a reminder for you how to navigate in the Satellite console Domains selection for the Operations Department organization.
-
Choose Administer -> Organizations from the left side navigation bar.
-
On the Organizations page, click the Operations Department link.
-
Click the Domains option on the Organizations > Edit Operations Department page.
-
You will see that the example.com domain is now in the Selected items list.
Satellite will be updating our DNS records when we provision a VM from Satellite. The reverse DNS zone record update is defined when we create a provisioning subnet. And the forward DNS zone record update is defined with the domain. Let's create the provisioning subnet first.
Before we create a provisioning subnet, we need the id of our satellite server's embedded capsule server. The id is likely to be '1', but we will check anyway.
# hammer capsule list
---|-------------------|--------------------------------|--------------------------
ID | NAME              | URL                            | FEATURES
---|-------------------|--------------------------------|--------------------------
1  | sat01.example.com | https://sat01.example.com:9090 | Discovery, Dynflow, An...
---|-------------------|--------------------------------|--------------------------
We will use the id from the hammer capsule list command to enable our satellite instance for remote execution.
Next we will create a provisioning subnet for Operations Department organziation and the moline location. Remember that for this lab and lab environment we are using Satellite installed DHCP and DNS services on the same server where Satellite is running.
# hammer subnet create --name sn-operations-department \
--locations moline \
--organizations "Operations Department" \
--domains example.com \
--network 10.1.10.0 \
--mask 255.255.255.0 \
--gateway 10.1.10.1 \
--dns-primary 10.1.10.254 \
--from 10.1.10.149 \
--to 10.1.10.199 \
--dns sat01.example.com \
--dhcp sat01.example.com \
--boot-mode DHCP \
--ipam DHCP \
--remote-execution-proxy-ids 1
Subnet created.
We can view the newly created subnet by going to the side menu and then choose Infrastructure -> Subnets. If you don't see the newly created subnet, it's probably because you have not chosen the Operations Department for the organization and moline for the location. Check the top of the Satellite console.

If you want to view the details of the subnet we just created, you can click on the sn-operations-department link on the Subnets page.

Let's update the domain configuration so Satellite can update the forward DNS zone records when we provision a VM from Satellite.
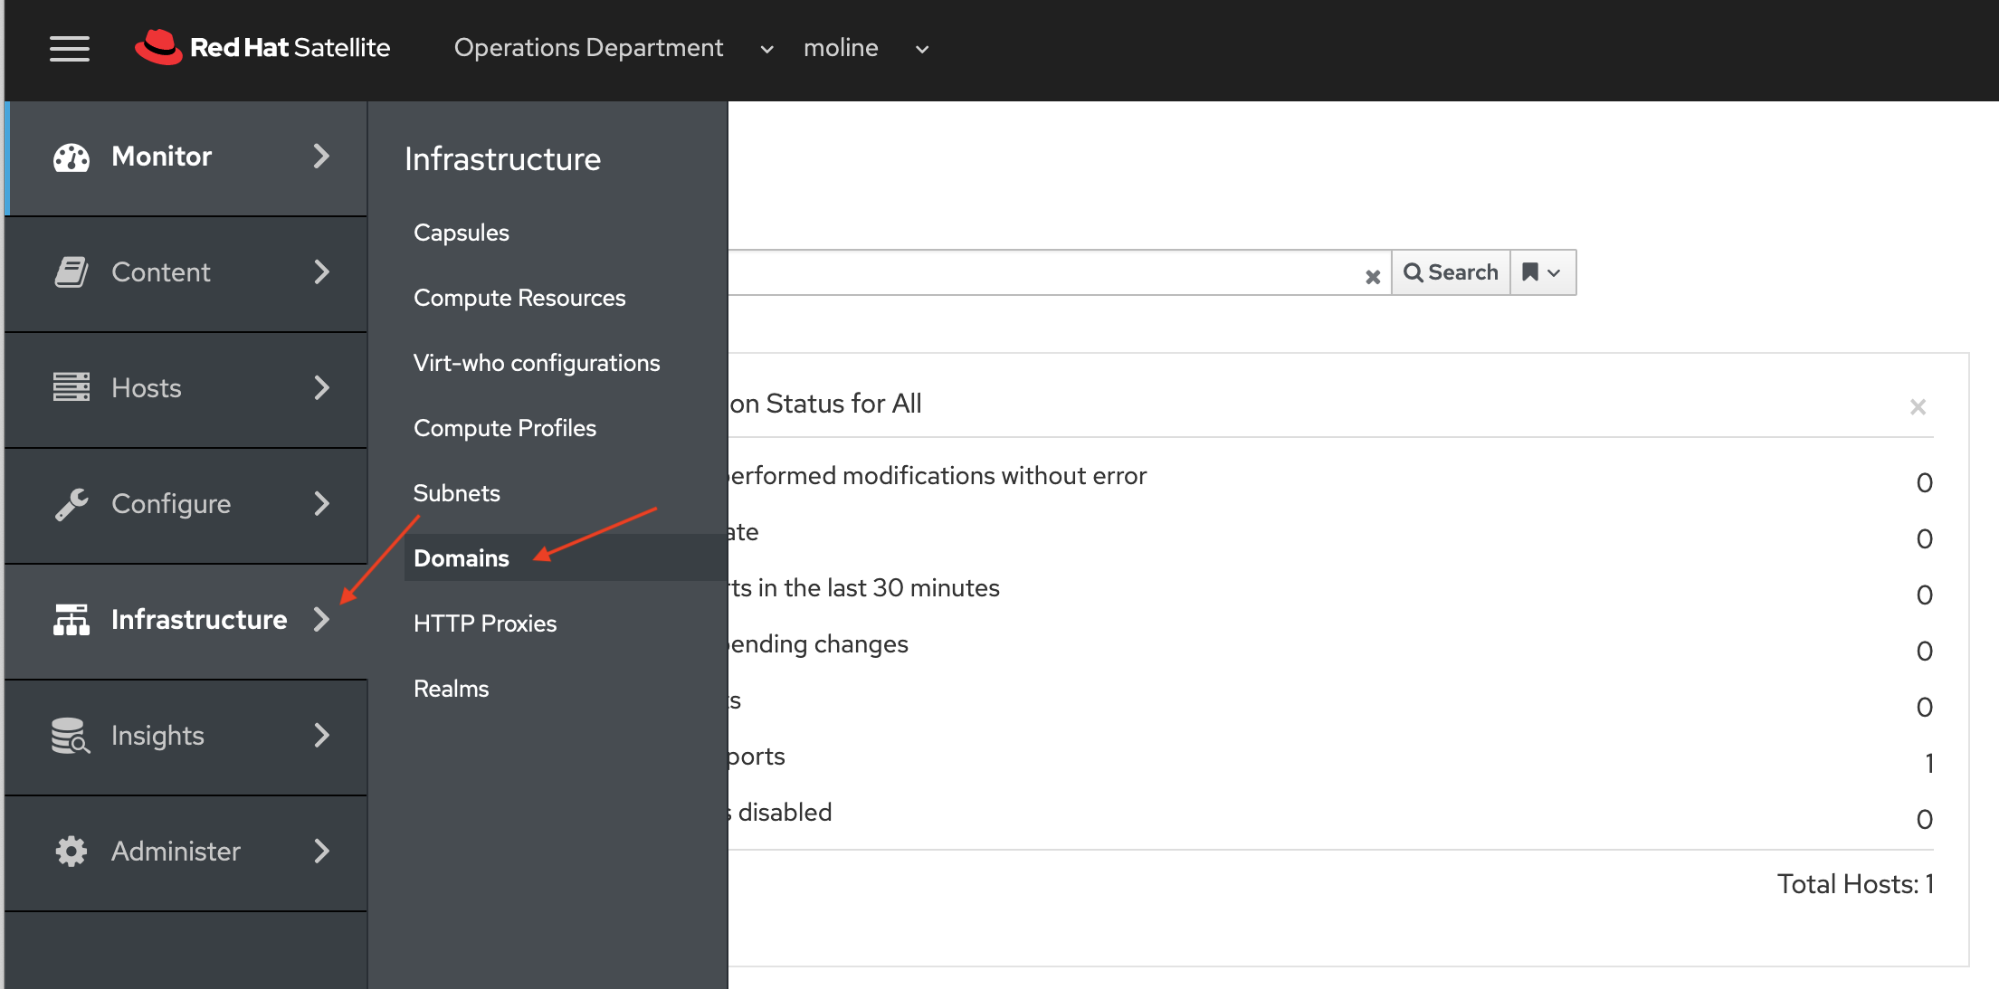
On the side menu choose Infrastructure -> Domains
On the Domains page click on the example.com link.

On the Domains > Edit example.com make sure you are on the Domain tab and click the DNS Capsule drop down list. Choose sat01.example.com and click the blue Submit button.

Next we will create a compute resource which allows Satellite to communicate with your vMware EXSi environment's vCenter. Before creating the compute resource, you will need to create a vCenter user with permissions. Read this article for details regarding the user permissions needed for Satellite to communicate to vCenter - What user permissions/roles are required for the VMware vCenter user account to provision from Satellite 6.x?.
After you've completed creating your vCenter user id and password, we will create the compute resource from the Satellite console. Using the navigation bar on the left of the Satellite console, click Infrastructure -> Compute Resources.
 On the Compute Resources page, click the blue Create Compute Resources button. Make sure that you have selected the Operations Department for the organization and moline for the location.

We will enter the following data when we create a Compute Resource. Click on the Compute Resource tab in the Compute Resources | Create Compute Resource Screen. On the Create Compute Screen fill in the following values.
Note: After you enter the username and password, you will click the Load Datacenters button next to the Datacenter field. If your permissions, username and password are correct, you will be able to choose the target datacenter for your RHEL VM deployments. The Load Datacenters button will not turn into a green Test Connection button. Continue filling out the values in the Compute Resource Screen.
|
Field Name |
Value |
|
Name |
cr-vcenter |
|
Provider |
VMWare |
|
VCenter/Server |
vsca01.example.com |
|
Username |
VSPHERE.LOCAL\satadmin |
|
Password |
Passw0rd! |
|
Datacenter |
LabDatacenter |
|
Distplay Typer |
VMRC |
|
VNC Console Passwords |
uncheck |
|
Enable Caching |
check |
The correct Organization and location should be set since we chose the choices earlier in the Satellite console, If you want to review the settings, click on the Locations tab to make sure moline has been selected. And then click on the Operations tab to make sure the Operations Department has been selected.
Click the blue Submit button to create our Compute Resource.

Note: you can also use the following `hammer` command to set up the Compute Resource in Satellite.
# hammer compute-resource create \
--caching-enabled 1 \
--datacenter LabDatacenter \
--name "cr-vcenter" \
--password Passw0rd\! \
--provider Vmware \
--server vsca01.example.com \
--user "VSPHERE.LOCAL\satadmin" \
--locations moline \
--organizations "Operations Department"
Compute resource created.
This completes our preparation work for using vCenter with Satellite to provision VMs.
References
- Installing Satellite Server from a Connected Network
- Simple Content Access
- Provisioning VMWare using userdata via Satellite 6.3-6.6
- Understanding Red Hat Content Delivery Network Repositories and their usage with Satellite 6
- CHAPTER 11. PROVISIONING VIRTUAL MACHINES IN VMWARE VSPHERE
- What user permissions/roles are required for the VMware vCenter user account to provision from Satellite 6.x?
Provisioning RHEL virtual machines to vSphere from Red Hat Satellite
 In this multi-part tutorial, we cover how to provision Red Hat Enterprise Linux (RHEL) virtual machines (VMs) to a vSphere environment from Red Hat Satellite. Missed any steps in the series? Check them out:
執筆者紹介
Paul Lucas is a Chicagoland-based Red Hat Solutions Architect working with a variety of enterprise businesses. A 21 year technical sales veteran, Paul was previously a customer working at a benefits consulting firm, where he advised development teams on the use of Java and the then-emerging Java EE.
チャンネル別に見る
自動化
テクノロジー、チームおよび環境に関する IT 自動化の最新情報
AI (人工知能)
お客様が AI ワークロードをどこでも自由に実行することを可能にするプラットフォームについてのアップデート
オープン・ハイブリッドクラウド
ハイブリッドクラウドで柔軟に未来を築く方法をご確認ください。
セキュリティ
環境やテクノロジー全体に及ぶリスクを軽減する方法に関する最新情報
エッジコンピューティング
エッジでの運用を単純化するプラットフォームのアップデート
インフラストラクチャ
世界有数のエンタープライズ向け Linux プラットフォームの最新情報
アプリケーション
アプリケーションの最も困難な課題に対する Red Hat ソリューションの詳細
仮想化
オンプレミスまたは複数クラウドでのワークロードに対応するエンタープライズ仮想化の将来についてご覧ください


