
Not too long ago, I wrote an article covering an overview of the most common namespaces. The information is great to have, and to some extent, I am sure that you can extrapolate how you might put this knowledge to good use. It's not normally my style to leave things so open-ended. So for the next couple of articles, I spend some time demonstrating a few of the more important namespaces through the lens of creating a primitive Linux container. In some sense, I am writing down my experiences with the techniques I use while troubleshooting a Linux container on a client site. With that in mind, I start with the foundation of any container, especially when security is a concern.
A little about Linux capabilities
Security on a Linux system can take many forms. For this article's purposes, I am mainly concerned with security when it comes to file permissions. As a reminder, everything on a Linux system is some sort of file, and therefore file permissions are the first line of defense against an application that may misbehave.
The primary way Linux handles file permissions is through the implementation of users. There are normal users, for which Linux applies privilege checking, and there is the superuser that bypasses most (if not all) checks. In short, the original Linux model was all-or-nothing.
To get around this, some program binaries have the set uid bit set on them. This setting allows the program to run as the user who owns the binary. The passwd utility is a good example of this. Any user can run this utility on the system. It needs to have elevated privileges on the system to interact with the shadow file, which stores the hashes for user passwords on a Linux system. While the passwd binary has built-in checks to ensure that one normal user cannot change another user's password, many applications do not have the same level of scrutiny, especially if the system administrator turned on the set uid bit.
Linux capabilities were created to provide a more granular application of the security model. Instead of running the binary as root, you can apply only the specific capabilities an application requires to be effective. As of Linux Kernel 5.1, there are 38 capabilities. The man pages for the capabilities are actually quite well written and describe each capability.
A capability set is the manner in which capabilities can be assigned to threads. In brief, there are five total capability sets, but for this discussion, only two of them are relevant: Effective and Permitted.
Effective: The kernel verifies each privileged action and decides whether to allow or disallow a system call. If a thread or file has the effective capability, you are allowed to perform the action related to the effective capability.
Permitted: Permitted capabilities are not active yet. However, if a process has permitted capabilities, it means the process itself can choose to escalate its privilege into an effective privilege.
In order to see what capabilities a given process may have you can run the getpcaps ${PID} command. The output of this command will look different depending on the distribution of Linux. On RHEL/CentOS you will get an entire list of capabilities:
[root@CentOS8 ~]# getpcaps $$
Capabilities for `1304': = cap_chown,cap_dac_override,cap_dac_read_search,cap_fowner,cap_fsetid,cap_kill,cap_setgid,cap_setuid,cap_setpcap,cap_linux_immutable,cap_net_bind_service,cap_net_broadcast,cap_net_admin,cap_net_raw,cap_ipc_lock,cap_ipc_owner,cap_sys_module,cap_sys_rawio,cap_sys_chroot,cap_sys_ptrace,cap_sys_pacct,cap_sys_admin,cap_sys_boot,cap_sys_nice,cap_sys_resource,cap_sys_time,cap_sys_tty_config,cap_mknod,cap_lease,cap_audit_write,cap_audit_control,cap_setfcap,cap_mac_override,cap_mac_admin,cap_syslog,cap_wake_alarm,cap_block_suspend,cap_audit_read,38,39+ep
If you run the command man 7 capabilities, you will find a listing of all of these capabilities along with a description for each. In some distributions, such as Ubuntu or Arch, running the same command simply results in this:
[root@Arch ~]# getpcaps $$
414429: =ep
There is a whitespace preceding the = sign. This whitespace is interchangeable with the keyword all. As you may have guessed, this means that all the capabilities available on the system are granted in both the Effective and Permitted capability sets.
Why is this important? First off, capability sets are tied to a user namespace (which I discuss below). For now, what this means is that each namespace will have its own set of capabilities that only apply to its own namespace. Suppose you have a namespace called constrained. It is possible that constrained looks like it has all the proper capabilities as seen with the getpcaps command. However, if constrained was created by a process and a namespace that did not have a full capability set (such as a normal user), constrained cannot be given more permissions on a system than the creating process.
To sum up, then, capabilities, while not a namespace technology, work hand in hand in determining what and how processes inside a namespace can perform.
[ You might also enjoy: Running rootless Podman as a non-root user ]
The user namespace
Before you dive into creating a user namespace, here's a brief recap the purpose of this namespace. As I discussed in an earlier article, usernames, and ultimately the user identification number (UID), are one of the layers of security that a system will use to ensure that people and processes are not accessing things they are not allowed to.
Theory behind user namespace
The user namespace is a way for a container (a set of isolated processes) to have a different set of permissions than the system itself. Every container inherits its permissions from the user who created the new user namespace. For example, in most Linux systems, regular user IDs start at or above 1000. Throughout the rest of this series, I use a user named container-user, which has the following IDs (SELinux contexts are omitted for these demos):
uid=1000(container-user) gid=1000(container-user) groups=1000(container-user)
It is important to note that unless intentionally restricted by the system administrator, any user can, in theory, create a new user namespace. This, however, does not provide any obfuscation from administrators on the system itself. User namespaces are a hierarchy. Consider the diagram below:
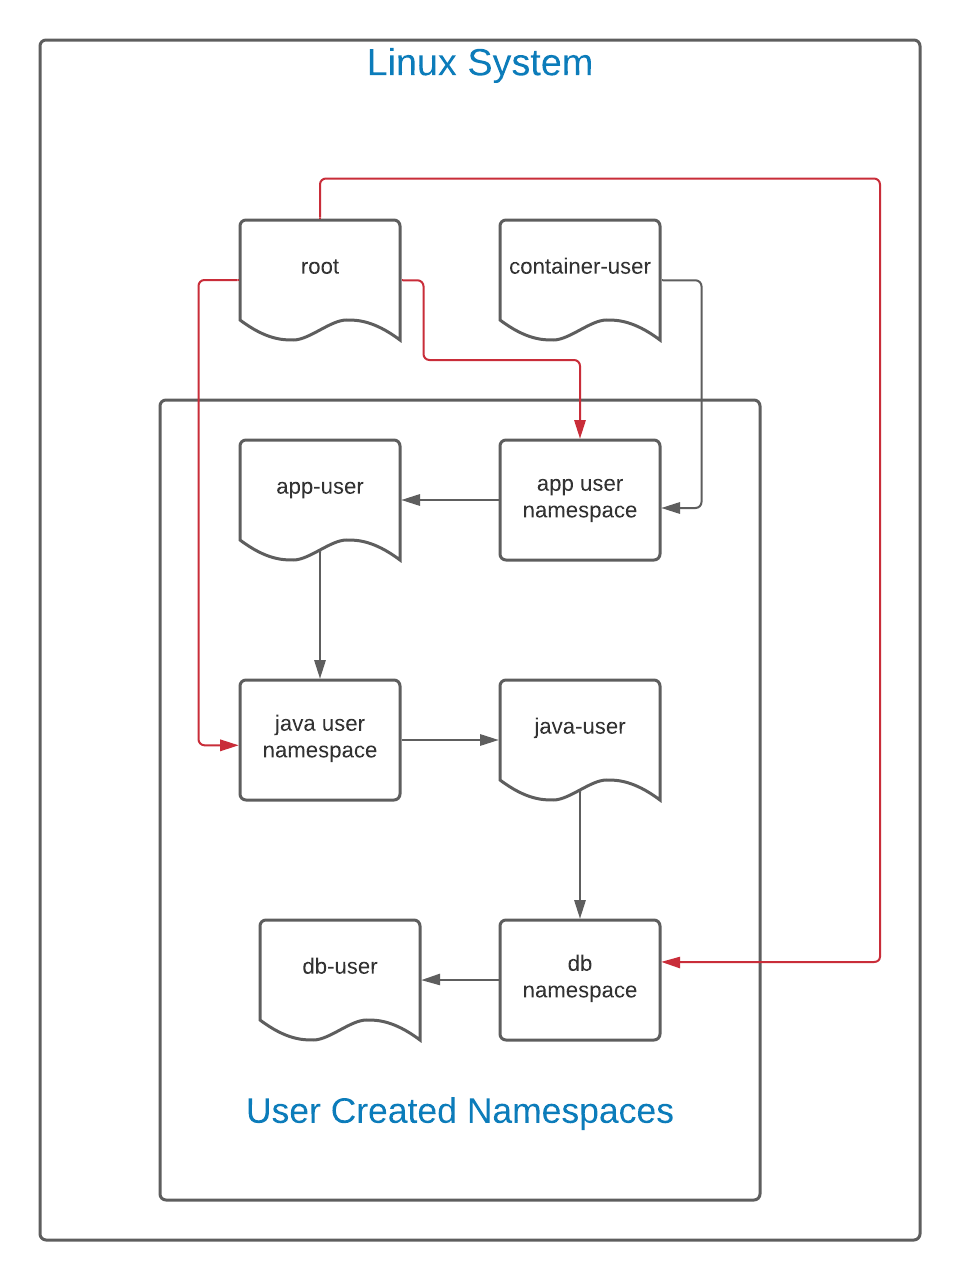
In this diagram, the black lines indicate the flow of creation. The user container-user creates a namespace for a user called app-user. In theory, this would be a web front end or other application. Next, app-user creates a user namespace for java-user. In this namespace, java-user creates a namespace for db-user.
As this is a hierarchy, container-user can see and access all files created by any of the namespaces spawned from its UID. Similarly, because the root user on the Linux system can see and interact with all files on a system, including those created by container-user, the root user (represented by the red line) can have total authority over all namespaces.
However, the reverse is not true. The db-user user, in this case, cannot see or interact with anything above it. If the ID mapping is kept the same (the default policy), app-user, java-user, and db-user all have the same UID. However, although they share the same UID, db-user cannot interact with java-user, which cannot interact with app-user, and so on.
Any permissions granted in a user namespace only apply in its own namespace and possibly namespaces below it.
Hands-on with user namespaces
To create a new user namespace, simply use the unshare -U command:
[container-user@localhost ~]$ PS1='\u@app-user$ ' unshare -U
nobody@app-user$
The above command includes a PS1 variable which simply changes the shell so that it is easier to determine in which namespace the shell is active. Interestingly, you'll note that the user is nobody:
nobody@app-user$ whoami
nobody
nobody@app-user$ id
uid=65534(nobody) gid=65534(nobody) groups=65534(nobody)
This is because, by default, there is no user ID mapping taking place. When no mapping is defined, the namespace simply uses your system's rules to determine how to handle an undefined user.
However, if you create the namespace like this:
PS1='\u@app-user$ ' unshare -Ur
The mapping will be automatically created for you:
root@app-user$ cat /proc/$$/uid_map
         0       1000       1
This file represents the following:
ID-inside-ns ID-outside-ns range
The range value represents the number of users to map. For example, if this were 0 1000 4, the mapping would be like so
0    1000
1    1001
2    1002
3    1003
And so on. Most of the time, you only really care about the root user mapping, but the option is available if desired. What happens when you create the java-user namespace?
root@app-user$ PS1='\u@java-user$ ' unshare -Ur
root@java-user$
As expected, the shell prompt changes, and you are the root user, but what does the UID mapping look like?
root@java-user$ cat /proc/$$/uid_map
         0          0          1
You see that now, you have a 0 to 0 mapping. That is because the user instantiating the new namespace is used for the ID mapping process. Since you were root in the previous namespace, the new namespace has a mapping of root to root. However, since root in the app-user namespace does not have root on the system, neither does the new namespace root user.
Aside from simply checking the uid_map, you can also verify from outside the namespace whether two processes are in the same namespace. Of course, you need to find the PID of the process first, but with that in hand, you can run the following command:
readlink /proc/$PID/ns/user
To make this easier, I ran the following:
[container-user@localhost ~]$ PS1='\u@app-user$ ' unshare -Ur
root@app-user$ sleep 100000
In another terminal, I dug up the PID and used the readlink command on that PID as well as the current shell:
[root@localhost ~]# readlink /proc/1307/ns/user
user:[4026532275]

[root@localhost ~]# readlink /proc/$$/ns/user
user:[4026531837]
As you can see, the user link is different. If they were operating in the same namespace, it would look like this:
[root@localhost ~]# readlink /proc/1424/ns/user
user:[4026532275]

[root@localhost ~]# readlink /proc/1307/ns/user
user:[4026532275]
The biggest advantage to the user namespace is the ability to run containers without root privileges. Additionally, depending on how you set up the UID mapping, you can completely avoid having a superuser inside a given user namespace. This means it is not possible to run any privileged processes inside of this type of namespace.
Note: The user namespace governs every namespace. This means that a namespace's capabilities are directly related to the capabilities of its parent user namespace.
The original, full root user namespace owns all of the namespaces on a system in the diagram below. This relationship has the potential to be bi-directional. If a process running in the net namespace runs as root, it can impact all other processes owned by the root user namespace. However, while creating an unprivileged user namespace allows that new user namespace to access resources in other namespaces, it may not alter them as it does not own them. Thus, while a process in the unprivileged namespace can ping an IP (which relies on the net namespace), it may not change the host's network configuration.

Many things outside of what you think of as Linux containers make use of namespaces. The Linux packaging format Flatpak uses user namespaces as well as some other technologies in order to provide an application sandbox. Flatpaks bundle all of an application's libraries in the same package distribution file. This allows a Linux machine to receive the most up-to-date applications without having to worry whether you have the correct version of glibc installed, for example. The ability to have these in their own user namespace means that (in theory) a misbehaving process inside of the flatpak cannot change (or possibly even access) any files or processes outside the namespace.
[ Getting started with containers? Check out this free course. Deploying containerized applications: A technical overview. ]
Wrapping up
The use of user namespaces alone does not solve the problem that Flatpak and others are trying to handle. While user namespaces are integral to the security story and capabilities of other namespaces, they do not provide much on their own. There is a lot to consider when creating new isolated namespaces. In the next article, I'll look at using the mount namespace in conjunction with the user namespace to create a chroot-like environment with namespaces.
If you are looking for some challenges to help cement your understanding, try mapping a range of users into the new namespace. What happens if you map the entire range into a namespace? Is it possible to become the apache user in an unprivileged namespace? What are the security implications for writing a bad uid_map file? (Hint: You will need two shells open; one to create and live inside the new namespace and the other to write the uid_map and gid_map files. If you are struggling with this, drop me a line on Twitter @linuxovens).
About the author
Steve is a dedicated IT professional and Linux advocate. Prior to joining Red Hat, he spent several years in financial, automotive, and movie industries. Steve currently works for Red Hat as an OpenShift consultant and has certifications ranging from the RHCA (in DevOps), to Ansible, to Containerized Applications and more. He spends a lot of time discussing technology and writing tutorials on various technical subjects with friends, family, and anyone who is interested in listening.
More like this
No time to lose: Why post-quantum security for financial services must start now
Gain stronger pod isolation on Microsoft Azure Red Hat OpenShift with OpenShift sandboxed containers
Container Roundup | Compiler
Infrastructure At The Edge | Compiler
Browse by channel

Automation
The latest on IT automation for tech, teams, and environments

Artificial intelligence
Updates on the platforms that free customers to run AI workloads anywhere

Open hybrid cloud
Explore how we build a more flexible future with hybrid cloud

Security
The latest on how we reduce risks across environments and technologies

Edge computing
Updates on the platforms that simplify operations at the edge

Infrastructure
The latest on the world’s leading enterprise Linux platform

Applications
Inside our solutions to the toughest application challenges
Virtualization
The future of enterprise virtualization for your workloads on-premise or across clouds