
We have all accepted a certificate that is not recognized by our browser. Maybe it's from a developer or a test deployment internal to the company and running with a default self-signed certificate. Maybe it is another internal reference but the corporate CA certificate has not been loaded into this client.
Of course, I should inspect a certificate when warned that it is not from a trusted site, but I
might also want to review the certificate even for a site that my browser automatically trusts. What if there is an expired certificate or a malicious phishing effort? There have also been cases of fraudulently obtained certificates sold on the black market and used for impersonation and identity fraud, as well as for digitally signing malware, according to a snippet in the SAN Institute news bites September 17, 2019.
Tip: Look for the section with the title, "Someone is Fraudulently Buying Certificates and Reselling Them." Other related articles include Threatpost: New Threat Actor Fraudulently Buys Digital Certificates to Spread Malware and Reversing Labs: Digital Certificates - Models for Trust and Targets for Misuse.
Keep in mind that a certificate only provides information for trusting content's source. It does not guarantee the content's quality or safety. You can learn more about what a certificate is and why they are important from Mike Bursell.
Server certificates
There are two kinds of certificates: server and Certificate Authority (CA). You use server certificates to show those browsing to your servers that your servers are trustworthy. CA certificates come from the authorities that are vouching for you.
Let’s start with server certificates. Many people are familiar with HTTPS sites, so the simplest way to get started with viewing server certificates can be in the web browser. The steps and screenshots below are taken on a Fedora 30 system running Firefox 7.0.0 (64-bit). These steps will be similar, but maybe not identical, for other versions and in other browsers.
You can also download these certificates and inspect the resulting file with openssl commands. The commands below will also show a standardized text output that can be used to describe additional interesting fields contained in the certificate.
There are a number of ways to view a server certificate using your browser:
- If you accepted an exception, you can find the certificate through the browser's settings or preferences, usually in a security section.
- If you’re using most browsers, you can click on the lock or verified icon next to the URL and find an option to view the certificate or to view more information.
- If you check the right-click page context menu, you might find a "view page information" choice with a security section.
Once you reach the security information for a particular certificate, there is an option to view the certificate. In the image below, Firefox is opened to https://www.redhat.com/sysadmin. The box on the left is the result of a right-click and then View Page Info. The box on the right is the result of the View Certificate button from the box on the left:
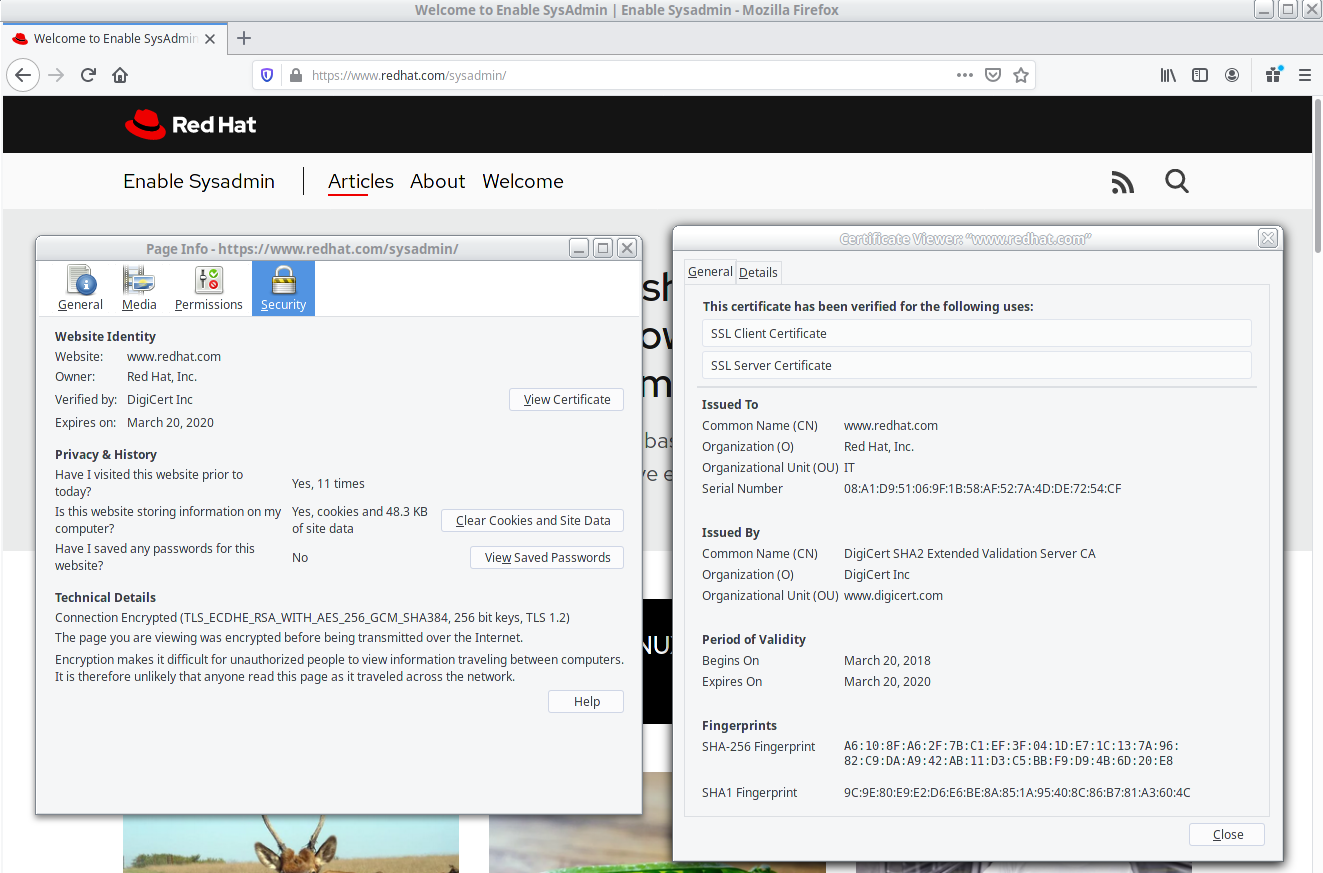
The General tab (shown here, on the right) shows Issued To information, which is also known as the subject, along with Issued By information, also known as the issuer. The issuer is the certificate’s signer. A certificate is self-signed if the subject and issuer match. A certificate is signed by a Certificate Authority (CA) if they are different. To validate a CA-signed certificate, you also need a CA certificate.
The Details tab (not shown here) sections can be expanded to show each field in a certificate. You can also view these fields with an openssl command if you downloaded the certificate. Here, I downloaded the certificate to a file named www.redhat.com.crt:
$ openssl x509 -noout -text -in www.redhat.com.crt
Certificate:
    Data:
        Version: 3 (0x2)
        Serial Number:
            08:a1:d9:51:06:9f:1b:58:af:52:7a:4d:de:72:54:cf
        Signature Algorithm: sha256WithRSAEncryption
        Issuer: C = US, O = DigiCert Inc, OU = www.digicert.com, CN = DigiCert SHA2 Extended Validation Server CA
        Validity
            Not Before: Mar 21 00:00:00 2018 GMT
            Not After : Mar 20 12:00:00 2020 GMT
        Subject: businessCategory = Private Organization, jurisdictionC = US, jurisdictionST = Delaware, serialNumber = 2945436, C = US, ST = North Carolina, L = Raleigh, O = "Red Hat, Inc.", OU = IT, CN = www.redhat.com
        Subject Public Key Info:

...output truncated...
All certificates include the period of validity (see the Validity section above), but this information is what was set when the certificate was created. It does not indicate if a certificate has been revoked for any reason.
Browsers and other applications verify a certificate by verifying the signature via the CA certificate. Fingerprints can also be used to manually verify the certificate just as fingerprints for SSH or GPG keys can be used for verification and trust. To view the fingerprint of a downloaded certificate use the -fingerprint option:
$ openssl x509 -noout -in www.redhat.com.crt  -fingerprint
SHA1 Fingerprint=9C:9E:80:E9:E2:D6:E6:BE:8A:85:1A:95:40:8C:86:B7:81:A3:60:4C
CA certificates
Web browsers ship with a number of CA certificates that are used to automatically verify server certificates (which are signed by those certificates). Most browsers provide a way to view these CA certificates through a settings or preferences option. Look for a security or "privacy and security" section. You may then need to scroll down to find the certificates sections and an option to view certificates.
The image below shows the Firefox Preferences tab opened to its Privacy & Security option (or the URL about:preferences#privacy):
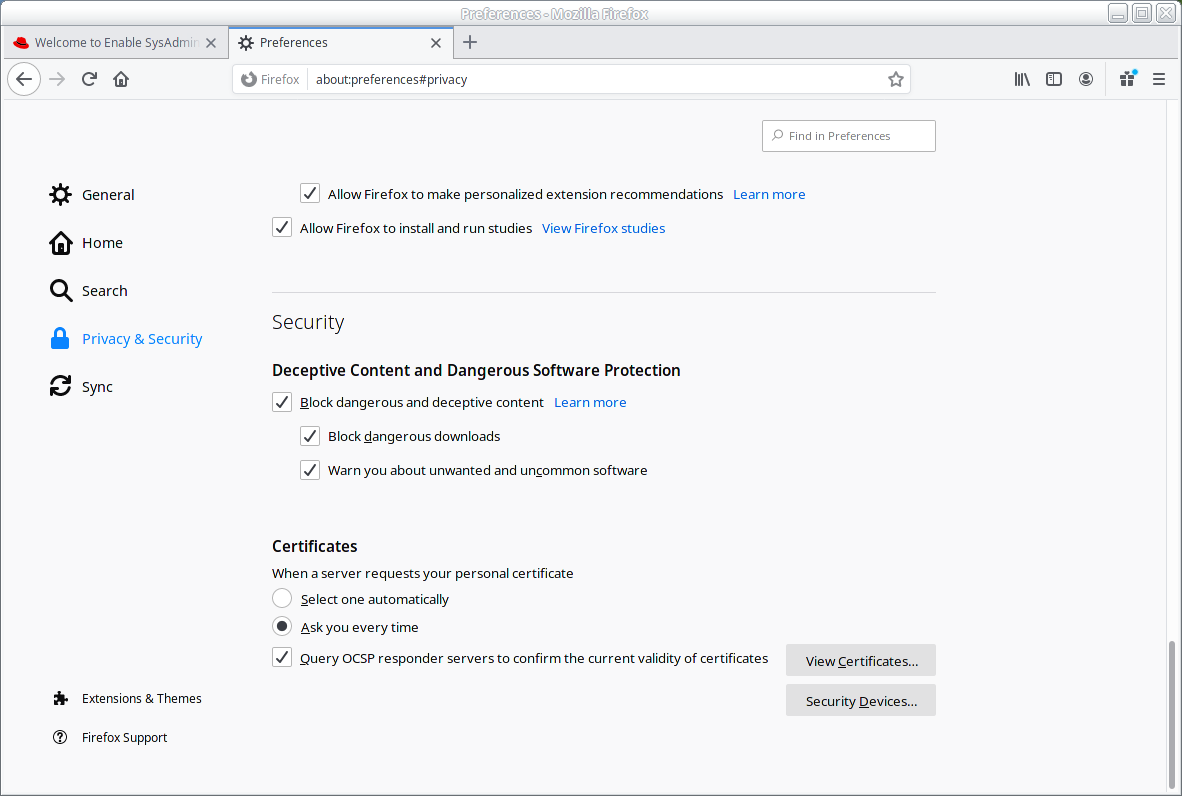
From here, click View Certificates to open the Certificate Manager window, and then click the Authorities tab. Here you’ll find the CA Certificates. From this tab, you can also import your corporate CA certificate to eliminate prompts asking if you want to trust internal sites.
You can view or export any of the certificates shown. Let’s look at the certificate that was used to sign our server certificate DigiCert SHA2 Extended Validation Server CA. Select the certificate and click View to open the Certificate Viewer "DigiCert SHA2 Extended Validation Server CA" window shown here:

A CA certificate generally has a longer period of validity than a server certificate. Top-level CA certificates are self-signed, but there may be a chain of authorities. Note that the CA certificate above is signed by another CA certificate: DigiCert High Assurance EV Root CA. With the name of "Root CA" you can expect—but still view to verify—that this will be a self-signed certificate.
There may be a signing chain of several certificate authorities, but at the root of the trust chain will be a self-signed certificate, usually with a subject indicating that it is a signing certificate.
Like the server certificates, a downloaded CA certificate can be examined by dumping the text with an openssl command. Many of the details of a CA certificate are found in the extensions section:
$ openssl x509 -noout -text -in DigiCertSHA2ExtendedValidationServerCA.crt
...output truncated...
X509v3 extensions:
            X509v3 Basic Constraints: critical
                CA:TRUE, pathlen:0
            X509v3 Key Usage: critical
                Digital Signature, Certificate Sign, CRL Sign
            X509v3 Extended Key Usage:
                TLS Web Server Authentication, TLS Web Client Authentication
            Authority Information Access:
                OCSP - URI:http://ocsp.digicert.com
...output truncated...
Both server and CA certificates include the CA value in the Constraints field. The value will show either TRUE or FALSE. This CA certificate also shows max intermediate CAs (pathlen) as zero, which means it cannot be used to sign another CA certificate. The Root CA does not have the same constraint.
The extensions section also contains Key Usage fields that identify which types of signing the certificate may be used for, as well as whether it can be used for web server or client authentication. The CA certificate can be used for both certificate signing and certificate revocation list (CRL) signing.
Both the CA and the server certificate are used for digital signatures:
$ openssl x509 -noout -text -in www.redhat.com.crt
...output truncated...
            X509v3 Subject Alternative Name:
                DNS:www.redhat.com, DNS:redhat.com
            X509v3 Key Usage: critical
                Digital Signature, Key Encipherment
            X509v3 Extended Key Usage:
                TLS Web Server Authentication, TLS Web Client Authentication
...output truncated...
The Subject Alternative Name (SAN) field shows the hostnames that are valid for this certificate. Your browser and other software checks that the destination hostname and the name in the offered server certificate match. Modern browsers no longer use the subject field and instead must find a match in the SAN field. In our server certificate, we see that you can browse to either https://www.redhat.com or https://redhat.com and the certificate will match the destination.
Certification revocation
If a private key is lost or compromised, a certificate should be revoked. Unfortunately, there is no automatic method for notifying clients that they have a revoked certificate. A browser can be configured to check a Certificate Revocation List (CRL), but it’s up to the user to refresh this list. The URL for both CRL distribution points and Online Certificate Status Protocol (OCSP) sites can be found in the certificate:
$ openssl x509 -noout -text -in www.redhat.com.crt
...output truncated...
            X509v3 CRL Distribution Points:

                Full Name:
                  URI:http://crl3.digicert.com/sha2-ev-server-g2.crl

                Full Name:
                  URI:http://crl4.digicert.com/sha2-ev-server-g2.crl

            X509v3 Certificate Policies:
                Policy: 2.16.840.1.114412.2.1
                  CPS: https://www.digicert.com/CPS
                Policy: 2.23.140.1.1

            Authority Information Access:
                OCSP - URI:http://ocsp.digicert.com
                CA Issuers - URI:http://cacerts.digicert.com/DigiCertSHA2ExtendedValidationServerCA.crt
...output truncated...
Wrapping up
By checking the subject and issuer information as well as the validity dates, fingerprints, and revocation status, you can begin the process of verifying the certificates that your browser warns you about, or simply trusts.
[Want to learn more about security? Check out the IT security and compliance checklist.]
About the author
Susan Lauber is a Consultant and Technical Trainer with her own company, Lauber System Solutions, Inc. She has over 25 years of experience working with Information Systems and specializes in Open Source technologies, specifically platform and data center installation, interoperability, automation, and security.
Susan is always an open source advocate and ambassador of projects she follows. She contributes to projects mostly by way of documentation and QA processes. She has contributed to Fedora Magazine and Opensource.com and is the author of "Linux Command Line Complete Video Course" (2016, Prentice Hall).
Susan is an independent instructor for several companies and holds an alphabet of certifications in those products. She is also a Certified Information Systems Security Professional (CISSP) and a Certified Technical Trainer (CTT). She has been a Red Hat Certified Instructor since 1999 and a co-author and contributor to several Red Hat Training student guides.
Follow her on twitter @laubersm to see what she is reading. Posts include a variety of technology topics as well as some travel, animals, sports, and other randomness.
More like this
Agentic AI, Red Hat OpenShift, and NVIDIA: Shifting to precision security
Why Operational Resilience and Digital Sovereignty Top the CIO Agenda
Collaboration In Product Security | Compiler
Keeping Track Of Vulnerabilities With CVEs | Compiler
Browse by channel

Automation
The latest on IT automation for tech, teams, and environments

Artificial intelligence
Updates on the platforms that free customers to run AI workloads anywhere

Open hybrid cloud
Explore how we build a more flexible future with hybrid cloud

Security
The latest on how we reduce risks across environments and technologies

Edge computing
Updates on the platforms that simplify operations at the edge

Infrastructure
The latest on the world’s leading enterprise Linux platform

Applications
Inside our solutions to the toughest application challenges
Virtualization
The future of enterprise virtualization for your workloads on-premise or across clouds