
When deploying Red Hat Virtualization with as much automation as possible, building a custom boot ISO can be a useful tool. While the default installer for the Red Hat Virtualization Host (RHVH) is easy enough, sometimes, it pays to trim down the process. Augmenting the default install process for RHVH is pretty straight forward. In the following article I will walk you through the steps and describe the details of the RHVH installer.
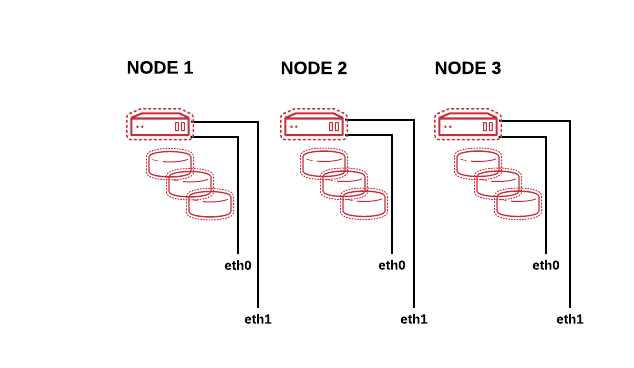
In this example, we have three hosts, that we will be installing RHVH. We want to create a unique and automated install process for each of the three nodes. Each node has a unique networking configuration we need to account for, so this will require us to capture the MAC addresses ahead of time for this automation to work.
Below is a diagram of our three node setup.
To begin our custom boot ISO build, we need to first download the latest RHVH ISO from RHN. You can download the latest version from this link:
https://access.redhat.com/downloads/content/150/ver=4.1/rhel---7/4.1/x86_64/product-software
Preparing a Build Area
You will need to prepare a build system on RHEL or Fedora.
Need following 3 packages installed on your system:
- syslinux: Simple kernel loader which boots from a FAT filesystem
- isomd5sum: Utilities for working with md5sum implanted in ISO images
- genisoimage: Creates an image of an ISO9660 file-system
1.Create a BUILD folder to work in. This will be where you edit files and will be a staging location for your content.
mkdir /home/mskinner/BUILD
2. Now we need to source our content and copy the content of the Red Hat provided ISO into our staging location.
sudo mount RHVH-4.1-20171002.1-RHVH-x86_64-dvd1.iso /mnt
This will mount up the Red Hat provided ISO for us to access and see the contents inside of the ISO file.
3. Now copy the contents into your staging location.
cp -v -r /mnt/. /home/mskinner/BUILD/
4. You can then unmount the Red Hat iso, as we will no longer need it.
sudo umount /mnt
5. Jump into your build folder, as we need to focus on changing three areas.
cd /home/mskinner/BUILD
The first two areas we need to update are related to the boot process. You’ll need to select “MBR” boot or “EFI” boot, depending on your hardware.
Legacy or MBR Booting
Modify the isolinux/grub.conf file by adding three stanzas to add three additional boot menu options.
I have added the following three stanzas:
title Install RHVH 4.1 NODE1
findiso
kernel @KERNELPATH@ @ROOT@ quiet
initrd @INITRDPATH@
title Install RHVH 4.1 NODE2
findiso
kernel @KERNELPATH@ @ROOT@ quiet
initrd @INITRDPATH@
title Install RHVH 4.1 NODE3
findiso
kernel @KERNELPATH@ @ROOT@ quiet
initrd @INITRDPATH@
Modify the isolinux/isolinux.cfg file by adding three stanzas to tell the boot process to use a custom kickstart file for each boot option.
label RHVH1
menu label ^Install RHVH 4.1 :: NODE1
kernel vmlinuz
append initrd=initrd.img inst.stage2=hd:LABEL=RHVH-4.1\x20RHVH.x86_64 ks=hd:LABEL=RHVH-4.1\x20RHVH.x86_64:/ks1.cfg quiet
label RHVH2
menu label ^Install RHVH 4.1 :: NODE2
kernel vmlinuz
append initrd=initrd.img inst.stage2=hd:LABEL=RHVH-4.1\x20RHVH.x86_64 ks=hd:LABEL=RHVH-4.1\x20RHVH.x86_64:/ks2.cfg quiet
label RHVH3
menu label ^Install RHVH 4.1 :: NODE3
kernel vmlinuz
append initrd=initrd.img inst.stage2=hd:LABEL=RHVH-4.1\x20RHVH.x86_64 ks=hd:LABEL=RHVH-4.1\x20RHVH.x86_64:/ks3.cfg quiet
Add them above the default “labels”, so your options will show up first.
EFI Booting
You would think that by editing the EFI/BOOT/grub.cfg things would work - but NO! You must edit the grub.cfg embedded in the efiboot.img. First mount the efiboot.img with the following command:
mount images/efiboot.img /mnt
Next edit the /mnt/EFI/BOOT/grub.cfg file by adding three stanzas to add three additional boot menu options. Once you are finished editing, save and unmount /mnt.
menuentry 'Install RHVH :: NODE1' --class fedora --class gnu-linux --class gnu --class os {
linuxefi /images/pxeboot/vmlinuz inst.stage2=hd:LABEL=RHVH-4.1\x20RHVH.x86_64 ks=hd:LABEL=RHVH-4.1\x20RHVH.x86_64:/ks1.cfg quiet
initrdefi /images/pxeboot/initrd.img
}
menuentry 'Install RHVH :: NODE2' --class fedora --class gnu-linux --class gnu --class os {
linuxefi /images/pxeboot/vmlinuz inst.stage2=hd:LABEL=RHVH-4.1\x20RHVH.x86_64 ks=hd:LABEL=RHVH-4.1\x20RHVH.x86_64:/ks2.cfg quiet
initrdefi /images/pxeboot/initrd.img
}
menuentry 'Install RHVH :: NODE3' --class fedora --class gnu-linux --class gnu --class os {
linuxefi /images/pxeboot/vmlinuz inst.stage2=hd:LABEL=RHVH-4.1\x20RHVH.x86_64 ks=hd:LABEL=RHVH-4.1\x20RHVH.x86_64:/ks3.cfg quiet
initrdefi /images/pxeboot/initrd.img
}
Add them above the default “menuentrys”, so your options will show up first.
Customizing the Install Process
Now that we have the boot process customized, we need to add our custom kickstart files. There is a default ks.cfg file present that you can copy and use as a template.
cp ks.cfg ks1.cfg
Now edit each one appropriately.
When you are booting from a USB drive, make sure you know what block device Linux assigns it and adjust your kickstart process appropriately. My USB drive showed up as /dev/sdf. If yours shows up first, you can make the installer ignore it with the “--ignordisk=/dev/sda” option. This option tells the installer to ignore that disk, and will not see it during the install process.
I made the following changes to mine:
# Clean Disks
clearpart --all --drives=sda
zerombr
I wanted to specify the disk layout for /dev/sda - this can easily be adapted to your needs and hardware.
# Partition Disks
part /boot --fstype xfs --size=1024 --ondisk=sda
part pv.01 --size=43008 --grow --ondisk=sda
volgroup HostVG pv.01 --reserved-percent=20
logvol swap --vgname=HostVG --name=swap --fstype=swap --recommended
logvol none --vgname=HostVG --name=HostPool --thinpool --size=40960 --grow
logvol / --vgname=HostVG --name=root --thin --fstype=ext4 --poolname=HostPool --fsoptions="defaults,discard" --size=6144 --grow
logvol /var --vgname=HostVG --name=var --thin --fstype=ext4 --poolname=HostPool --fsoptions="defaults,discard" --size=15375
logvol /var/log --vgname=HostVG --name=var_log --thin --fstype=ext4 --poolname=HostPool --fsoptions="defaults,discard" --size=8192
logvol /var/log/audit --vgname=HostVG --name=var_audit --thin --fstype=ext4 --poolname=HostPool --fsoptions="defaults,discard" --size=2048
logvol /home --vgname=HostVG --name=home --thin --fstype=ext4 --poolname=HostPool --fsoptions="defaults,discard" --size=1024
logvol /tmp --vgname=HostVG --name=tmp --thin --fstype=ext4 --poolname=HostPool --fsoptions="defaults,discard" --size=1024
I wanted to configure the following settings and configure a base password for root.
# Configure Settings
rootpw --plaintext redhat
timezone --utc America/Chicago
lang en_US.UTF-8
keyboard us
NOTE: Part of an automated installation means everything gets installed correctly the first time. This does require us to know the MAC address of each NODE so we can guarantee each NIC in each NODE gets the appropriate IP address and relative information. Each NODE has two network cards. I don't want to leave it up to chance as to which interface gets which IP address, thus using the --device option and hard coding the MAC address guarantees the NIC is assigned as desired.
# Configure boot network
#MAC FOR NODE1
network --bootproto static --ip=10.15.108.55 netmask=255.255.255.0 --gateway=10.15.108.254 --nameserver=10.15.108.22 --hostname rhhi1.lab.msp.redhat.com --device=a4:ba:db:52:67:8f
network --bootproto static --ip=192.168.99.1 netmask=255.255.255.0 --device=a4:ba:db:52:67:90
I then only had to change the MAC/Network sections for ks2.cfg and ks3.cfg, since NODE2 and NODE3 would have different MAC addresses and need different IP address information.
cp ks1.cfg ks2.cfg
cp ks1.cfg ks3.cfg
# Configure boot network
#MAC FOR NODE2
network --bootproto static --ip=10.15.108.56 netmask=255.255.255.0 --gateway=10.15.108.254 --nameserver=10.15.108.22 --hostname rhhi2.lab.msp.redhat.com --device=a4:ba:db:52:6b:57
network --bootproto static --ip=192.168.99.2 netmask=255.255.255.0 --device=a4:ba:db:52:6b:58
# Configure boot network
#MAC FOR NODE3
network --bootproto static --ip=10.15.108.57 netmask=255.255.255.0 --gateway=10.15.108.254 --nameserver=10.15.108.22 --hostname rhhi3.lab.msp.redhat.com --device=a4:ba:db:15:f3:7c
network --bootproto static --ip=192.168.99.3 netmask=255.255.255.0 --device=a4:ba:db:15:f3:7d
Once our customization is done, we need to build a new ISO file.
That process requires three steps.
Generate the ISO Image
We run the following command with a myriad of options. The main thing to remember is that the volume name we use "RHVH" must match the name we use for our LABEL= in both the isolinux/grub.conf and the EFI/BOOT/grub.cfg files. I'm keeping things simple, and using "RHVH" everywhere.
Step 1
genisoimage \
-V "RHVH-4.1 RHVH.x86_64" \
-A "RHVH-4.1 RHVH.x86_64" \
-o ../MLS-RHVH-4.1-RHVH.x86_64.iso \
-joliet-long \
-b isolinux/isolinux.bin \
-c isolinux/boot.cat \
-no-emul-boot \
-boot-load-size 4 \
-boot-info-table \
-eltorito-alt-boot -e images/efiboot.img \
-no-emul-boot \
-R -J -v -T \
.
This will generate a RHVH.iso file!
Step 2
To enable EFI booting, you need to run the next command.
isohybrid --uefi ../MLS-RHVH-4.1-RHVH.x86_64.iso
Step 3
And finally, for good measure and proper security, you will want to implant a md5 checksum into the ISO file with this command.
implantisomd5 ../MLS-RHVH-4.1-RHVH.x86_64.iso
Now that we are done, burn the ISO to a CD-ROM, dd it to a USB or simply mount it via a virtual interface.
Below is a dd example where my USB device is block device /dev/sdc:
dd if=MLS-RHVH-4.1-RHVH.x86_64.iso of=/dev/sdc bs=1M
More details on how to make installation media can be found here:
Final Thoughts
As you can see below, the installer now has three specific install options, NODE1, NODE2 and NODE3. With a little customization, you can make a very specific install experience for your environment.

執筆者紹介
類似検索
vi エディター入門
自動化を超えて:AI 駆動型のセキュリティ脆弱性の急増に対して、人間による技術的な支援が必要な理由
Untangling Networks | Compiler
Technically Speaking | Defining sovereign AI with open source
チャンネル別に見る

自動化
テクノロジー、チームおよび環境に関する IT 自動化の最新情報

AI (人工知能)
お客様が AI ワークロードをどこでも自由に実行することを可能にするプラットフォームについてのアップデート

オープン・ハイブリッドクラウド
ハイブリッドクラウドで柔軟に未来を築く方法をご確認ください。

セキュリティ
環境やテクノロジー全体に及ぶリスクを軽減する方法に関する最新情報

エッジコンピューティング
エッジでの運用を単純化するプラットフォームのアップデート

インフラストラクチャ
世界有数のエンタープライズ向け Linux プラットフォームの最新情報

アプリケーション
アプリケーションの最も困難な課題に対する Red Hat ソリューションの詳細
仮想化
オンプレミスまたは複数クラウドでのワークロードに対応するエンタープライズ仮想化の将来についてご覧ください